

Xsede®
1
Proper product installation, in accordance with these instructions, is the responsibility of the installing agent. If you have
any questions concerning these instructions, please call Kimball Customer Care.
Part 3144829, Revision
-
Assembly Instructions
X Beam/Power Panel Post
Tools Required
•
Box Cutter/Utility Knife
•
Cordless Drill w/#2 Phillips head bit drive
•
M4 Allen hex key
•
M5 Allen hex key
Installation
1.
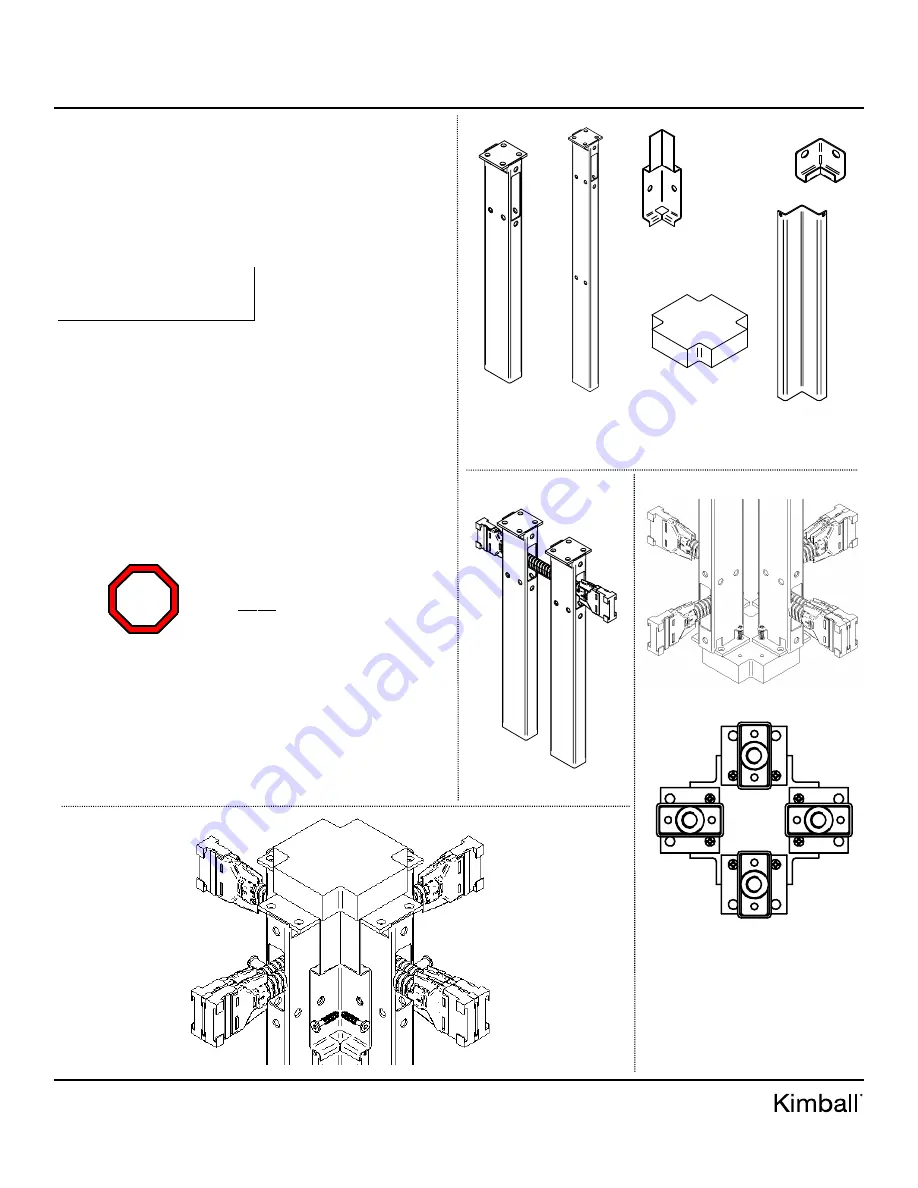
Using a knife open boxes removing all components/
hardware carefully and place aside. See components in
Fig-
ure A.
2.
See Figure B
, run jumper through shared leg cutouts.
3.
Attach wood top cap using (4) #12 wood and cordless drill.
See Figure C.
4.
Locate trim covers front and back (left/right). Attach as
shown lining up holes on trim pieces with holes on shared
legs.
See Figure D.
Use M4 Allen key to tighten bolts/nuts.
Skip to step 7 if data beam X connector was ordered.
Figure A
Figure B
Figure C
Figure D
Electrical jumpers must be installed in the
connector PRIOR to leg attachment.
STOP
Shared leg
Data Beam
(short/tall)
Front Trim
Cover
Shared leg
Power Panel
Front
Lower Rail
Wood Top Cap
Front Filler
Panel
Orientation
HARDWARE (included)
Data Beam
Short
Data Beam
Tall
Power
Panel
Legs
4
4
4
Jumpers
3
3
3
Wood Top Cap
1
1
1
Front Trim Cover
4
4
4
Front Lower Rail
N/A
N/A
4
Front Filler Panel
N/A
N/A
4
Attachment Plate
8
8
8
Pan Head Wood Screw #12 X
3/4”
8
8
8
Button Screw M8
-
1.25 X 12mm
16
16
16
Connector Bolts 1/4
-
20 X 17mm
4
4
8
Connector Nuts 1/4
-
20 X 30mm
4
4
8
Spacers
N/A
N/A
8