


76
PFX2512_CE
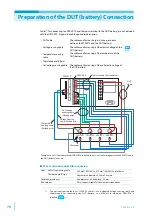
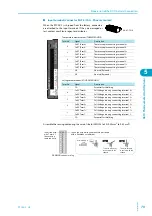
Attaching of the Volt / Thermometer Unit
When you want to expand the number of voltage and temperature measurement points, you can
install Volt / Thermometer Unit OP02-PFXs in the rear-panel option slots.
After you remove a Volt / Thermometer Unit, attach a slot cover over the empty slot using screws.
The number of channels that you can connect to the charge and discharge unit is equal to
regardless of whether OP02-PFX units are installed in the PFX2512.
1
Confirm that the POWER switch of all connected equipments are turned off.
2
Touch the grounded metal to discharge your physical static electricity.
3
Unfasten the screws that are holding the slot cover in place, and remove the
cover from the panel.
4
Hold the panel section of the OP02-PFX so that the connector section of the
printed circuit board is facing right.
5
Insert the OP02-PFX into the leftmost slot (slot 1) so that the printed circuit
board's connector is inserted into the connector at the back of the slot.
If you are installing multiple OP02-PFX units, install them from the leftmost slot (from
slot 1 as they are displayed on the rear panel).
6
Push the OP02-PFX all the way in.
7
Use the attached screws that the OP02-PFX in place to fix the board to the
panel.
Be sure to use the screws that come with the OP02-PFX units to fix the units in place.
8
Set the channel number.
Io Config,
Test Condition Editor
9
The first time that you install OP02-PFX units after purchase, use the
application software BPChecker3000 to set the system configuration and the
number of OP02-PFX units.
Volt / thermometer units not installed/ installed
1 to 7
Number of units that can be installed
Up to 3 OP02-PFXs
WARNING
Possible electric shock. Be sure to turn the POWER switch off before you install an OP02-PFX
or connect the DUT (battery).
Install Volt / Thermometer Unit OP02-PFX in adjacent option slots starting from the leftmost slot.
See
?
Help
Содержание PFX2515
Страница 10: ...10 PFX2512_CE This page is intentionally blank ...
Страница 11: ...General Description This chapter describes the outline of product the connectable equipments and the options ...
Страница 58: ...58 PFX2512_CE This page is intentionally blank ...
Страница 59: ...Specification This chapter contains the PFX2512 specifications and outline drawings ...
Страница 86: ...86 PFX2512_CE This page is intentionally blank ...
Страница 100: ...100 PFX2512_CE This page is intentionally blank ...
Страница 103: ......