


PFX2512_CE
27
2
Installa
tion and P
repar
a
tion
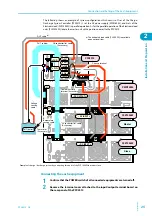
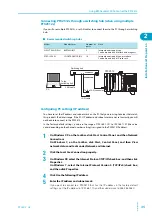
Connecting with the DC Power Supply
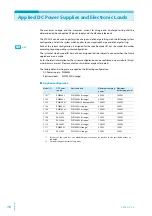
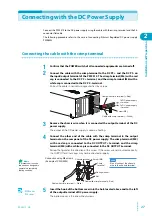
Connect the PFX2512 to the DC power supply using the cable with the crimp terminal and the 26-
conductor flat cable.
The following procedure refers to the case of connecting Kikusui's Regulated DC power supply
PWR800L.
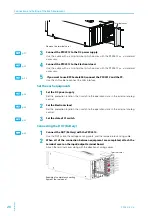
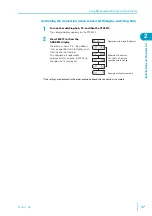
Connecting the cable with the crimp terminal
1
Confirm that the POWER switch of all connected equipments are turned off.
2
Connect the cable with the crimp terminal to the DC PS + and the DC PS- on
the input/output terminal of the PFX2512. The crimp terminal (M6) with a red
cap is connected to the DC PS + terminal, and the crimp terminal (M6) with a
white cap is connected to the DC PS - terminal.
Pull out the cable in horizontal angle and fix it by screws.
3
Remove the chassis wire when it is connected the output terminal of the DC
power supply.
The output of the DC power supply is used as floating.
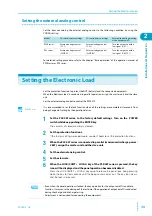
4
Connect the other end of the cable with the crimp terminal to the output
terminal on the rear panel of the DC power supply. The crimp terminal (M8)
with a red cap is connected to the DC terminal, and the crimp
terminal (M8) with a white cap is connected to the DC OUTPUT -terminal.
Follow the figure for the direction of the screw. If the screw are not mounted correctly,
the OUTPUT terminal cover may not be attached properly.
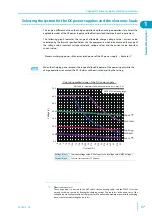
PWR series
PAS series
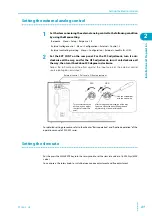
5
Insert the hook of the bottom cover into the hole located above and to the left
of the output terminal of DC power supply.
The bottom cover is the one without screws.
Screw (M6)
To DC power supply
– terminal
To DC power supply
+ terminal
Cable with crimp terminal (+: Red)
Cable with crimp terminal (–: White)
Memo
To prevent short circuits,
this has been designed to
operate in a completely
floating condition.
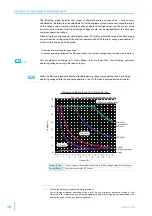
Connection using M8 screws
(Example of PWR800L)
Screw (M8)
Spring washer
Nut
Crimp
terminal
Cable with crimp terminal (+: Red)
Cable with crimp terminal (–: White)
Chassis terminal
Do not connect the chassis
wire to the chassis terminal.
Ope
Содержание PFX2515
Страница 10: ...10 PFX2512_CE This page is intentionally blank ...
Страница 11: ...General Description This chapter describes the outline of product the connectable equipments and the options ...
Страница 58: ...58 PFX2512_CE This page is intentionally blank ...
Страница 59: ...Specification This chapter contains the PFX2512 specifications and outline drawings ...
Страница 86: ...86 PFX2512_CE This page is intentionally blank ...
Страница 100: ...100 PFX2512_CE This page is intentionally blank ...
Страница 103: ......