KG-SH130
User’s Manual
Default account & Passowrd for KG-SH130:
.
User account :
「
aa
」
Password
:
11
(Version 1.0)
Страница 1: ...KG SH130 User s Manual Default account Passowrd for KG SH130 User account aa Password 11 Version 1 0 ...
Страница 2: ...5 5 Backup Device 16 5 5 1 Backup Setting 17 5 6 Setup 18 5 6 1 Pre Camera 18 5 6 2 Camera 19 5 6 2 2 Motion Setting 21 5 6 3 Alarm 22 5 6 4 SEQ Display Setup 23 5 6 5 Scheduled Record 23 5 6 6 HDD 24 5 6 7 Password 25 5 6 8 System Setup 26 5 6 9 RS 232 422 485 27 5 6 10 Network 28 5 6 10 1 Email Setting 29 5 6 10 2 FTP setting 29 5 6 10 3 Advanced Network Setting 30 6 Software Upgrade 31 7 Search...
Страница 3: ...odify Server 45 8 1 4 3 Delete Server 45 8 1 4 4 Configure Server Property 46 8 1 5 POS Search 61 8 1 6 GPS Configuration 62 8 1 7 POS Configuration 63 8 2 Remote Access via PDA 64 9 CMS2000 65 Appendix A POS Connection Setup 66 Appendix B POS 66 Appendix C GPS POS Display Setting 67 Appendix D Detection Setting 68 Appendix E Time Zone 69 Appendix F Recording Table Reference NTSC 71 Appendix G Rec...
Страница 4: ... x1 Optional Available for purchase 1 4 Terminal Block x2 1 5 Bolt x9 1 6 Power Cable x1 1 7 Power Adapter x1 1 8 CD x1 Electronic User Manual 1 9 User Manual x1 1 10 AAA Battery x2 1 11 External IR Sensor x1 KG SH130 Remote Controller Y Cable Terminal Block Power Adapter Power Cable Bolt AAA Battery CD User Manual External IR Sensor ...
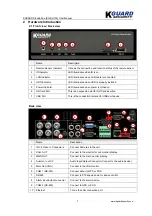
Страница 5: ...on slot for SD Card insertion 7 USB Port This is the connection terminal for USB port device Back view Name Description 1 IN 1 4 Video In Connectors Connect Cameras to the unit 2 CALL OUT Connect to the monitor for call monitor display 3 MAIN OUT Connect to the main monitor display 4 Audio In out X 2 Audio Input Output Connector Connect to the audio device 5 Main Out VGA Connect to the VGA monitor...
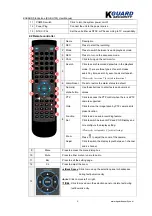
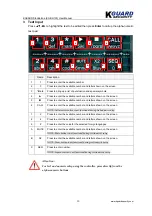
Страница 6: ... status to default 7 Numeric alpha button Use these buttons to enter texts and numerical values 8 PTZ Click to access the PTZ control when there is a PTZ camera supported Goto Click to view the image taken by PTZ camera at its preset location Function Click to add an audio recording feature Set Click to switch between GPS and POS Display and to reconfigure the display setting Please refer to Appen...
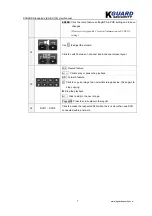
Страница 7: ...olume Click to switch between 1 channel and 4 channel screen layout 15 ee Rewind feature f ii Click to play or pause the playback ff Forward feature Click to copy an image to an external storage device Click again to stop copying Stop the playback fI Click to skip to the next image PageÏÐ Press to scroll up down the log list 16 DVR1 DVR8 Click to access the respected DVR when there is more than on...
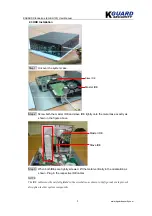
Страница 8: ... onto the metal case exactly as shown in the figure above Step 3 When both IDEs are tightly screwed lift the metal vertically in the orientation as shown Plug in the respective IDE cables NOTE The IDE cables must be carefully folded in the orientation as shown in the figure above to prevent disruption to other system components Slave IDE Master IDE Master IDE Slave IDE ...
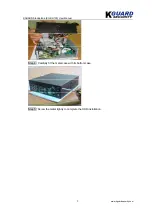
Страница 9: ...KGUARD Standalone KG SH130 User Manual www kguardsecurity com 9 Step 4 Carefully fit the metal case with its bottom case Step 5 Screw the metal tightly to complete the HDD installation ...
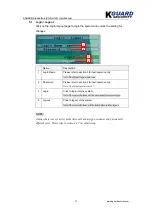
Страница 10: ... the screen NOTE Call monitor button is not functional during text numeric entry 7 2 Press to enter the available number and letters shown on the screen 8 4 Press to enter the available number and letters shown on the screen 9 Press to enter the code for the selected foreign languages A MUTE Press to enter the available number and letters shown on the screen NOTE Mute button is not functional duri...
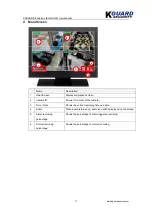
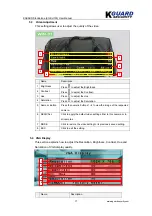
Страница 11: ...deo 2 Camera ID Shows ID number of the camera 3 Time Date Shows the current recording time and date 4 Audio When audio is turned on audio icon will be displayed on the screen 5 Alarm recording percentage Shows the percentage of alarm triggered recording 6 Normal recording percentage Shows the percentage of normal recording 2 3 4 5 6 1 ...
Страница 12: ... 4 VGA Display User can adjust the image output quality in terms of resolution brightness contrast hue and saturation 5 Backup Device This window allows user to view the connection status of the backup device and to initiate data backup 6 Setup System features settings Please refer to section 5 6 for detail information 7 Software Upgrade This feature allows user to upgrade the software directly fr...
Страница 13: ...ogin name is aa 2 Password Please refer to section 3 for text numeric entry Note The default password is 11 3 Login Click to login into the system Note The control buttons will be unlocked after system login 4 Logout Click to logout of the system Note The control buttons will be locked after system logout NOTE Administrator can set access authorities edit and assign usernames and passwords to diff...
Страница 14: ... normal recording mode It shows the size of data for normal recording mode 3 Cameras Motion A white box for a specific camera appears upon motion trigger Camera video loss A white box for a specific camera appears when the video connection is lost 4 Alarm input A white box appears when an alarm triggered event occurs 5 Serial Number Use serial number to log into the system when both login name and...
Страница 15: ... Press to adjust the Saturation 5 Numeric Button Press the numeric buttons 1 4 to view the image of the respected camera 6 SEQ CALL Click to apply the default video setting either to this camera or to all cameras 7 MODE Click to restore the video setting to its previously saved setting 8 ESC Click to exit the setting 5 4 VGA Display This section explains how to adjust the Resolution Brightness Con...
Страница 16: ...dalone DVR system 2 Status Display the connection status of external storage device 3 Configuration Click Backup to store the data files to an external storage device Click Restore to restore the data files from the external device to the local system 1 Resolution Press to adjust the Resolution 2 Brightness Press to adjust the Brightness 3 Contrast Press to adjust the Contrast 4 Hue Press to adjus...
Страница 17: ... that are selected for data backup will have a white colored box 5 GPS File Format Click to set the GPS file format to be saved 6 End Time Click to set the backup end time in terms of year month date hour and minute Note Please go to search by Time setting to set the start time 7 COPY Click to apply the backup setting to the other cameras 8 STOP Click to stop the backup process 9 ESC Click to exit...
Страница 18: ...cording Resolution Setup the number of camera installed and assigning PTZ Speed Dome ID Name Description 1 REC Resolution Press to adjust the recording resolution to 360x240 720x480 or 720x240 2 Camera This shows the number of supported camera of the system 3 Camera Installed Press Enter to check uncheck camera installed 4 PTZ ID Press to assign each PTZ an ID 1 2 3 4 ...
Страница 19: ...motion detection setting Please refer to section 5 6 2 2 on motion setting for detail information 6 Covert Click check to enable covert feature NOTE When covert is activated only administrator supervisor level users can view the live video of the respected camera 7 Call By Event Call Monitor This feature will cause a specified channel to display upon a specific event trigger 8 Dwell Time User may ...
Страница 20: ...Click to select the video loss triggered alarm output 4 Buzzer Click Enter to activate the buzzer warning that will be triggered upon video loss 5 Log When enabled the system will record all video loss history 6 Screen Message Click to enable disable event message being displayed on the screen 7 Email Enable this feature will trigger video files be sent to email when video loss is detected 8 FTP E...
Страница 21: ...er motion detection 5 Alarm Out Click to select the motion triggered alarm output 6 Detection Setting This setting allows user to define the area for motion to be detected Please refer to Appendix D for detail configuration 7 Buzzer Click Enter to activate the buzzer warning that will be triggered upon motion detection 8 Log When enabled the system will record all video loss history 9 Email Enable...
Страница 22: ...ger 5 Pre record Press to adjust the transition period before initiating the recording prior to event trigger 6 Post record Press to adjust the transition period before initiating the recording after an event trigger 7 Alarm out Click to select the alarm output triggered by a specific event 8 Buzzer Click Enter to activate the buzzer warning due to an alarm trigger 9 Log When enabled the system wi...
Страница 23: ...set to the page according to the sequence order 5 6 5 Scheduled Record This setting is for user to define and adjust the recording schedule The system supports up to 16 different schedules with each T represents each schedule The recording schedules automatically apply to all cameras instead of individual camera Name Description 1 Start Time Press to set the recording start time NOTE User can set ...
Страница 24: ...te is enabled new data will automatically replace old data under HDD space shortage condition 5 HDD Full Action Click Enter to check uncheck this feature This feature enables the system to take appropriate actions when the HDD capacity is short 6 Duration Press to adjust the length of warning period due to HDD capacity shortage 7 Alarm Click to select the alarm output triggered due to HDD capacity...
Страница 25: ...r the HDD 6 CALL Click to initiate HDD formatting 5 6 7 Password Name Description 1 Login Name Administrator can assign a login name for other users Please refer to section 3 for text numeric entry Note The default login name for administrator is aa 2 Password Administrator can assign a password for other users Please refer to section 3 for text numeric entry Note The default password for administ...
Страница 26: ... the appropriate daylight saving time according to the time zone selected 2 System Time Synchronization Time Click to synchronize the system time with the TSP server time TSP Server Type in the TSP server address Date Press to adjust the date Time Press to adjust the time Display Format Press to modify the date time display format 3 Language Press to apply the appropriate language setting The syst...
Страница 27: ...iate device 2 Model Press to select the appropriate model for the device 3 Baud Rate Press to set the baud rate 4 Data Bit Press to set the data bit 5 Stop Bit Press to set the stop bit 6 Parity Press to set the parity 7 DVR Camera ID Press to assign the DVR Camera an ID 8 MODE Click Mode to enter the optional RS 232 setting NOTE POS Models supported by SH 130 Epson TM200 Epson TMU295 Epson TMU300...
Страница 28: ...Type in the username assigned Please refer to section 3 for text numeric entry NOTE Username entry is only applicable to PPPoE 6 Password Type in the password assigned Please refer to section 3 for text numeric entry NOTE Password entry is only applicable to PPPoE 7 PPPoE DDNS Type Click to select the DDNS type URL Type in the URL address Please refer to section 3 for text numeric entry NOTE Passw...
Страница 29: ...ssword Please refer to section 3 for text numeric entry 5 Mail From Type in the sender s email address Please refer to section 3 for text numeric entry 6 Mail to Type in the recipients email addresses Please refer to section 3 for text numeric entry 7 Attachment This allows user to be alerted with an image attached email 5 6 10 2 FTP setting Name Description 1 FTP Server Type in the FTP server add...
Страница 30: ...ntrol Port Type in the control port number 2 Data Port Type in the data port number 3 WAP Picture Quality Press to adjust the picture quality Please refer to section 3 to text numeric entry 4 Prefix of Filename Assign a prefix for each file for easier identification Please refer to section 3 for text numeric entry 1 2 3 ...
Страница 31: ... DVD USB SD card or USB flash drive Name Description 1 Backup Device Click Enter on Backup Device to connect the device for upgrading Please refer to section 5 5 for detail information on device connection 2 SD Card Press to select the appropriate device that has the upgrading software and then press Enter to start upgrading 3 File list Displays all the files stored in the device 1 2 3 ...
Страница 32: ...ar month date hour and minute as the start search criteria Note Please press to access the backup setting to set the end time 2 Video Audio Alarm Click to set the alarm triggered record as the search criteria Motion Click to set the motion triggered record as the search criteria Video Loss Click to set the video loss triggered record as the search criteria Normal Click to set the normal record as ...
Страница 33: ...ion 1 Log history This section displays the search result with all the event log information 2 Event Type Set the search criteria by selecting the types of event such as alarm trigger motion trigger video loss trigger and system event 3 Source ID Click to select the data source camera as the search criteria 4 MODE Click to refresh the page 5 SEQ X2 Click to scroll the log list 1 2 3 4 5 ...
Страница 34: ...e motion trigger area criteria The system allows the creation of multiple point motion detection zones Note For multiple search zones all restricted zones must be triggered to enable motion detection recording 3 Time Date Criteria Click to set the date and time period as the search criteria 4 Search result It displays the number of files that match the criteria set 5 Log page It displays the searc...
Страница 35: ...e to connect the device for upgrading Please refer to section 5 5 for detail information on device connection 2 SD Card Press to select the appropriate device that has the upgrading software and then press Enter to start upgrading 3 Used Space Shows the used space of the device 4 Available Space Shows the free space of the device 5 File list Displays all the files stored in the device 6 MODE Click...
Страница 36: ...mera Use to select the camera that recorded the data from POS 2 Key Word Type in the key word of the POS that need to be searched 3 Time Range Use to set the search time range in terms of start and end time 4 Result List The window will display all the searched files that match the criteria set 5 MODE Press to start the search process 6 SEQ X2 Press to scroll the search list 1 2 3 4 5 6 ...
Страница 37: ...y com 37 8 Remote Access 8 1 Remote Access via Internet Explorer IE Step1 Type in the IP address of the S 130 standalone DVR in the IE address bar to access the system remotely Step2 When the IE prompts to install ActiveX control click to allow installation ...
Страница 38: ...ep3 When an installation dialog box pops up click to install IE Plugin cab NOTE Step2 Step3 only apply to first time user Step4 Type in the login name password control port and data port information to access the system The default login name aa The default password 11 ...
Страница 39: ...ntering the camera lens 5 Camera These buttons correspond to the respective cameras connected to DVR 6 Alarm In These buttons correspond to the respective alarms connected to DVR 7 Alarm Out These buttons correspond to the cameras that are set tot respond to the alarm trigger 8 Sequence Mode Press to switch to sequence mode Audio Click to listen to the audio being recorded by the selected DVR serv...
Страница 40: ...e playback Click to play the selected record file Search by Event This feature enables user to search for video data according to the event criteria PTZ Click to open the PTZ control panel POS Search This feature enables user to search for POS recorded data according to the specified date and time Software Upgrade Click to upgrade the system GPS Configuration GPS Configuration enables user to cust...
Страница 41: ...to search for a video data playback according to specific date time and event type search criteria Name Description 1 Event Type Check the type of video as the search criteria 2 Date Time Select the date and time and set it as the search criteria 3 Play Click to play the searched video 4 Search Click to start the search process 1 2 3 4 ...
Страница 42: ...rding to the criteria set 2 Device Select the device for the data to be retrieved 3 Event Type Set the search criteria according to the event type set 4 Source ID Set the search criteria according to the cameras set 5 Backup Status The window displays the status of each server 6 Refresh Click to refresh the search process 7 Up down Click to scroll along the event list 8 Backup Press to backup the ...
Страница 43: ...k to adjust the camera iris 4 Auto Pan Run Click to start the auto pan feature Stop Click to stop the auto pan feature Set Start End Click to set the start and end time for automated pan feature 5 SEQ Run Click to turn on sequence surveillance Stop Click to turn off sequence surveillance 6 Preset SET Click to set the camera at a specific location Goto Click to access the image taken by the camera ...
Страница 44: ...ll as configure the property of each DVR Setup configuration of the specific DVR can be modified and uploaded to the respective DVR remotely 8 1 4 1 Add New Server Press to add a new server STEP1 Enter device name address control port data port username and password and then click OK Optional User may also select Auto Connection to enable auto connection to the DVS ...
Страница 45: ...Press to modify the server information STEP1 Delete all the information that is to be modified STEP2 Then enter new information into their respective columns STEP3 Then click OK to save changes 8 1 4 3 Delete Server STEP1 Select the Server to be discarded STEP2 Click to delete the server ...
Страница 46: ... This shows the camera of a specific DVR 5 Installed Click to activate the camera 6 PTZ ID Assign an ID to the PTZ camera for identification purpose 7 Group Allow the assignment of each camera into different groups 8 Download This function enables user to download the original configuration from the host system should any accidental modification occur It also allows user to reconfirm whether the m...
Страница 47: ...KGUARD Standalone KG SH130 User Manual www kguardsecurity com 47 A Open Click to apply the previously saved setting to the current configuration B Save Press to save the setting to a specified location ...
Страница 48: ...inistrator supervisor level users can view the live video of the respected camera 4 Call By Event Click to select the purpose of the camera whether it is for motion detection alarm or both 5 Dwell Time Select the interval period of each camera display 6 Audio Click to select the audio input 7 Record Quality Allow the adjustment of recording quality 8 Event Record IPS Allow the adjustment of event ...
Страница 49: ...t the post recording time 6 Alarm Output Select the alarm output notification during motion detection 7 Buzzer Click this to enable the activation of buzzer warning during motion detection 8 Log Click this to enable the creation of a log during motion detection 9 Email Click this to enable a text notification display on the screen during motion detection A FTP Click this to have an email notificat...
Страница 50: ...t Select the alarm output notification during video loss 5 Buzzer Click this to enable the activation of buzzer warning during video loss 6 Log Click this to enable the creation of a log during video loss 7 Email Click this to enable a text notification display on the screen during video loss 8 FTP Click this to have an email notification during video loss A Screen Message Click this to have the n...
Страница 51: ...d Set the pre recording time 6 Post record Set the post recording time 7 Alarm Output Assign an alarm output when the alarm is triggered 8 Buzzer Click this to enable the activation of buzzer warning during an alarm trigger 9 Log Click this to enable the creation of a log when the alarm is triggered A Screen Message Click this to enable a text notification display on the screen during an alarm tri...
Страница 52: ...nitor for the surveillance sequence Window Type Select the number of display channel for each surveillance page Dwell Time Select the interval period of each surveillance page Total Page Select the total number of page that will be displayed in the surveillance order Page No User can set the camera to be displayed on the selected surveillance page 2 Display Page Layout Set the camera to be display...
Страница 53: ... schedule segment Thus a warning dialog box will appear when two time schedule segments overlap 2 Start Allows user to set the start recording time 3 Alarm User may choose to only record video or audio or both video and audio during alarm recording period 4 Motion User may choose to only record video or audio or both video and audio during motion detection recording period 5 Normal User may choose...
Страница 54: ...evice Buzzer Click to enable buzzer warning Email Check to enable warning notification being sent to email Log Click to enable the creation of log 2 Normal Record Auto Overwrite Select this will enable the overwritten of old data when the disk capacity is achieved HDD Full Action Select this will enable full usage of HDD capacity Duration User may set the duration of warning period Alarm Out User ...
Страница 55: ...word to other users Name Description 1 User Information Administrator can create user accounts for other users by assigning login name password and user level 2 Add Click to add a new user account 3 Modify Click to change the user account information 4 Delete Click to delete a user account 5 User List The window displays all the user accounts 1 2 3 4 5 ...
Страница 56: ...lect the suitable time zone from the drop down menu 2 System time User can manually set the time of the system or set the system to synchronize its time with a specific standard time server 3 Language Choose a language setting from the drop down menu 4 Protection Key This function is currently inapplicable 1 2 3 4 ...
Страница 57: ...aud rate data bit stop bit and parity from the drop down menus 2 RS 422 485 Select the appropriate device that uses the RS 422 485 signal device model camera ID baud rate data bit stop bit and parity from the drop down menus 3 Optional RS 232 Select the appropriate device that uses the RS 232 signal device model camera ID baud rate data bit stop bit and parity from the drop down menus 2 1 3 3 1 2 ...
Страница 58: ... IP address net mask gateway and DNS Note This section is only available when Static IP net is selected 3 PPPoE Type in all the information in their respective columns Note This section is only available for information entry when PPPoE net is selected 4 Control Port Data Port HTTP Port Warp Picture Quality Fill in the correct port number in their respective columns Note This section is available ...
Страница 59: ... 1 4 4 13 Email Name Description 1 SMTP Type in the server URL username and password 2 Mail From Enter the email address of the sender 3 Mail To Enter the email address of the recipient 4 Attachment User can select the type of image to be attached to the mail 1 2 3 4 ...
Страница 60: ...his function enables user to download the original configuration from the host system should any accidental modification occur It also allows user to reconfirm whether the modified configuration has been properly updated to the host system 3 Upload Click to upload the modified configuration to the host system through internet 4 Open Click to apply the previously saved setting to the current config...
Страница 61: ...ra source of the POS data 3 Keyword Type in the keyword of the data file as part of the search criteria 4 Start Time End Time Specify the time period for the retrieval of the POS record 5 Result list This section shows the number of files found and a list of file that matches the criteria will be shown in the Date Time window 6 Backup status This window will show the status of the backup process 7...
Страница 62: ...adjust the coordinates of the window through the X Y values Pop up window Check to display GPS in a separate window Text color User can select the font color for the GPS text Background Color User can select the background color of the GPS window Output Live Playback User can choose to configure live or playback GPS output configuration Live Data Exchange File This is to allow user to save the liv...
Страница 63: ... the signal that applies 5 Live Playback User can choose to configure live or playback POS output configuration 6 Video Window Click to display POS in the video channel of the selected camera User may adjust the size of the display window through the Rows Character value and the coordinates of the window through the X Y values 7 Text Color User can select the font color for the POS text 8 Backgrou...
Страница 64: ...using Nokia N73 Step 1 Connect to internet by clicking on Web Step 2 Type in the IP address of the S 130 system to access the connection page Step 3 Press yes to confirm connection Step 4 Type in the login ID and password to log into the system The default login name aa The default password 11 Step 5 Click on the camera number to view image of the camera NOTE User has to press OK in order to view ...
Страница 65: ... and DVS to enhance its security integrity Therefore administrator and authorized clients can easily monitor and control the activities and security of their respected settings and playback recorded data just with a click on the CMS2000 network Benefits 1 Multi Level Authority Control 2 E map graphic control menu 3 Multiple camera real time monitoring 4 Historical video data playback 5 Control up ...
Страница 66: ...n of POS system This picture illustrates the connection diagram of the POS system with the standalone DVR system SH 130 NOTE When printer is not connected the printer terminal of the Y cable must be connected to a terminator Appendix B POS This image shows the display of 4 video channels with 1 POS channel overlay at the center of the screen ...
Страница 67: ...k to set the height of the POS display window NOTE This feature is only available for POS display 5 Characters Click to set the width of the POS display window NOTE This feature is only available for POS display 6 Enter Click to save and exit the setting 7 ESC Click to exit without saving the configuration NOTE User needs to configure RS 232 422 485 setting for GPS and POS to function properly Ple...
Страница 68: ...1 Click to resize the motion detection area 2 Enter Press to set reset the changes made 3 ESC Press to exit the setting 4 MODE Press to set reset the whole area as the motion detection zone 5 SEARCH Press to test the motion detection feature 6 SEQ CALL Press to adjust the sensitivity of motion being detected 7 Sensitivity This shows the sensitivity value 1 2 3 4 5 6 7 ...
Страница 69: ...Mar 2nd Sun 0 00 Newfoundland GMT 03 30 ˇ Apr 1st Sun 2 00 Oct last Sun 2 00 Brasilia GMT 03 00 ˇ Oct 3rd Sun 2 00 Feb 3rd Sun 2 00 Buenos Aires Georgetown GMT 03 00 ˇ Oct 3rd Sun 2 00 Feb 2nd Sun 2 00 Greenland GMT 03 00 ˇ Mar last Sun 1 00 Oct last Sun 1 00 Mid Atlantic GMT 02 00 ˇ Mar last Sun 2 00 Sep last Sun 2 00 Azores GMT 01 00 ˇ Mar last Sun 2 00 Oct last Sun 3 00 Cape Verde GMT 01 00 Cas...
Страница 70: ... 08 00 ˇ Mar last Sun 2 00 Oct last Sun 3 00 Beijing Chingqing H K Urumqi GMT 08 00 Kuala Lumpur Perth Singapore GMT 08 00 Taipei GMT 08 00 Osaka Seoul Tokyo GMT 09 00 Yakutsk GMT 09 00 ˇ Mar last Sun 2 00 Oct last Sun 3 00 Adelaide GMT 09 30 ˇ Oct last Sun 2 00 Mar last Sun 3 00 Darwin GMT 09 30 Brisbane Guam Port Moresby GMT 10 00 Canberra Melbourne Sydney GMT 10 00 ˇ Oct last Sun 2 00 Mar last ...
Страница 71: ...3 3086 720x240 9 13 9 67 133 266 400 799 Half D1 8 12 3 75 151 301 452 903 7 10 5 88 176 353 529 1058 6 9 2 101 201 403 604 1208 5 7 0 132 265 529 794 1587 4 5 7 162 325 650 975 1949 3 3 9 237 475 950 1425 2849 2 2 8 331 661 1323 1984 3968 1 1 8 514 1029 2058 3086 6173 360x240 9 7 0 67 133 266 529 794 1587 CIF 8 6 2 75 149 299 597 896 1792 7 5 2 88 176 353 712 1068 2137 6 4 6 101 201 403 805 1208 ...
Страница 72: ...78 2955 720x288 9 18 0 62 123 247 386 772 Half D1 8 16 0 69 139 278 434 868 7 13 6 82 163 327 511 1021 6 10 7 104 208 415 649 1298 5 9 2 121 242 483 755 1510 4 7 4 150 300 601 938 1877 3 5 0 222 444 889 1389 2778 2 3 7 300 601 1201 1877 3754 1 2 4 463 926 1852 2894 5787 360x288 9 9 0 62 123 247 494 772 1543 CIF 8 8 0 69 139 278 556 868 1736 7 7 2 82 163 327 654 1021 2042 6 5 7 103 206 412 823 1286...