Performance Tests and Calibration
5
Keysight U1241AN User’s and Service Guide
73
Calibration Adjustments
1
Turn the rotary switch to the respective test function position, as shown in
.
2
After unsecuring the multimeter, the multimeter will go into the adjustment
mode, see
“Unsecuring the Multimeter for Calibration”
3
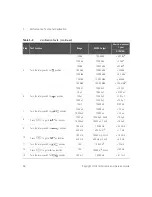
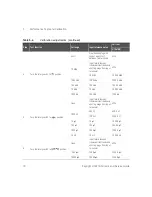
The primary display will show the reference value of the calibration items
(Cal Item). Configure each Cal Item shown in the input reference values in
.
4
Use the
and
arrow keys to select the calibration range (Cal Range).
5
Apply the input signal as shown in the
Input Reference Value
column of the
. The bar graph will display the input reading. There is no bar graph
display for temperature adjustment.
T1
0 °C
Ensure that 0 °C with ambient compensation is
provided
DCmV
(T1)
100 mV
0.9 to 1.1 x full scale
Table 5-3
Valid adjustment input values (continued)
Function
Range
Valid Input Reference Values
CAUTION
The minimum AC current output of the Fluke 5520A calibrator is 29
µ
A.
Ensure that at least 50
µ
A is set at the calibrator source of AC
µ
A.
NOTE
Review the Test Considerations and Adjustment Considerations before
beginning the adjustment procedures.
Содержание U1241AN
Страница 1: ...Keysight U1241AN Handheld Digital Multimeter User s and Service Guide ...
Страница 14: ...14 Keysight U1241AN User s and Service Guide THIS PAGE HAS BEEN INTENTIONALLY LEFT BLANK ...
Страница 16: ...16 Keysight U1241AN User s and Service Guide THIS PAGE HAS BEEN INTENTIONALLY LEFT BLANK ...
Страница 18: ...18 Keysight U1241AN User s and Service Guide THIS PAGE HAS BEEN INTENTIONALLY LEFT BLANK ...
Страница 28: ...1 Getting Started 28 Keysight U1241AN User s and Service Guide THIS PAGE HAS BEEN INTENTIONALLY LEFT BLANK ...


