background image


17  


EMS-BA-f-1112 

Comptage de 
pièces 


Lors du comptage de pièces, il vous est possible, soit 
d’additionner la quantité de pièces placées dans un récipient, 
soit de soustraire la quantité de pièces retirées d’un récipient. 
Afin de pouvoir compter une quantité importante de pièces, le 
poids moyen par pièce doit être déterminé à l’aide d’une petite 
quantité (quantité de pièces de référence).  
Plus la quantité de pièces de référence est importante, plus la 
précision de comptage est élevée. Dans le cas de petites 
pièces ou de pièces fortement différentes, veillez à ce que la 
référence soit particulièrement élevée. 
plus le nombre de pièces de référence est important, plus la 
précision de comptage est élevée. 


Le déroulement du travail se compose de quatre étapes : 


Tarer le récipient de pesée 
Déterminer le nombre de pièces de référence 
Peser le poids de référence 
Compter les pièces 


Ö

  Appuyer brièvement sur la touche 

MODE

 en mode de 

pesée. La quantité de référence „

5

PCS

 est affichée en 

clignotant. 

Ö

  En appuyant à plusieurs reprises sur la touche 

MODE

, il est 

possible d’appeler d’autres nombres de pièces de référence 

5, 10, 20, 25

 et 

50

. Posez sur la balance autant de nombre 

de pièces à compter que l’exige le nombre de pièces de 
référence demandé par le réglage. 

Ö

  Confirmez sur la touche 

SET

. La balance se trouve 

maintenant en mode de comptage des pièces et compte 
toutes les pièces, qui sont déposées sur le plateau de la 
balance. 


Содержание EMS 12K0.1

Страница 1: ...433 9933 0 Fax 49 0 7433 9933 149 Internet www kern sohn com Betriebsanleitung Operating instruction Mode d emploi D CZ E F GB I NL P PL RUS DK EST H N RO S SF SK SLO TR KERN EMS Version 1 2 07 2011 Artikel Nr KK gae 112 404 130 704 112 405 130 705 112 406 130 706 112 407 130 707 ...

Страница 2: ...gerung 7 4 1 Kontrolle bei Übernahme 7 4 2 Verpackung Rücktransport 7 5 Auspacken Aufstellung und Inbetriebnahme 8 5 1 Aufstellort Einsatzort 8 5 2 Auspacken Aufstellen 8 5 3 Netzanschluss 9 5 4 Batteriebetrieb Akkubetrieb optional 9 5 5 Erstinbetriebnahme 10 5 6 Justierung 10 5 7 Justieren 11 6 Bedienungselemente 12 6 1 Anzeigenübersicht 12 6 2 Tastaturübersicht 12 7 Basisbetrieb 13 Einschalten 1...

Страница 3: ... Übersicht 22 8 3 Beschreibung einzelner Menüpunkte 22 Auto Off Funktion 22 Auto Zero Funktion 23 Rücksetzen auf Werkseinstellung 23 9 Wartung Instandhaltung Entsorgung 24 9 1 Reinigung 24 9 2 Wartung Instandhaltung 24 9 3 Entsorgung 24 10 Kleine Pannenhilfe 25 ...

Страница 4: ... 0 02 g Anwärmzeit 120 min 120 min Referenzstückzahlen bei Stückzählung 5 10 20 25 50 Wägeeinheiten g kg Empf Justiergewicht nicht bei gegeben Klasse 300 g F1 3000 g F2 Einschwingzeit typisch 3 sec Betriebstemperatur 5 C 35 C Luftfeuchtigkeit max 80 nicht kondensierend Gehäuse B x T x H mm 200 x 280 x 63 Wägeplatte mm Ø 105 160 x 160 Gewicht kg netto 1 4 Eingangsspannung 110V 230V AC Batteriebetri...

Страница 5: ... 2 g 0 2 g 2 g Anwärmzeit 120 min 30 min 120 min 30 min Referenzstückzahlen bei Stückzählung 5 10 20 25 50 Wägeeinheiten g kg Empf Justiergewicht nicht bei gegeben Klasse 6 kg F2 6 kg M1 12 kg F2 12 kg M1 Einschwingzeit typisch 3 sec Betriebstemperatur 5 C 35 C Luftfeuchtigkeit max 80 nicht kondensierend Gehäuse B x T x H mm 200 x 280 x 63 Wägeplatte mm 160 x 160 Gewicht kg netto 1 4 Eingangsspann...

Страница 6: ...ktiv verändert werden Dies kann zu falschen Wägeer gebnissen sicherheitstechnischen Mängeln sowie der Zerstörung der Waage führen Die Waage darf nur gemäß den beschriebenen Vorgaben eingesetzt werden Abwei chende Einsatzbereiche Anwendungsgebiete sind von KERN schriftlich freizugeben 2 3 Gewährleistung Gewährleistung erlischt bei Nichtbeachten unserer Vorgaben in der Betriebsanleitung Verwendung a...

Страница 7: ...i Übernahme Überprüfen Sie bitte die Verpackung sofort beim Eingang sowie das Gerät beim Aus packen auf eventuell sichtbare äußere Beschädigungen 4 2 Verpackung Rücktransport Ö Alle Teile der Originalverpackung für einen eventuell not wendigen Rücktransport aufbewahren Ö Für den Rücktransport ist nur die Originalverpackung zu verwenden Ö Vor dem Versand alle angeschlossenen Kabel und lo sen bewegl...

Страница 8: ...en Sie das Gerät nicht über längere Zeit starker Feuchtigkeit aus Eine nicht erlaubte Betauung Kondensation von Luftfeuchtigkeit am Gerät kann auftreten wenn ein kaltes Gerät in eine wesentlich wärmere Umgebung gebracht wird Ak klimatisieren Sie in diesem Fall das vom Netz getrennte Gerät ca 2 Stunden bei Raumtemperatur statische Aufladung von Wägegut und Wägebehälter vermeiden Beim Auftreten von ...

Страница 9: ...Waagenunterseite abnehmen 9 V Blockbatterie anschließen Batteriefachdeckel wieder einsetzen Für den Batteriebetrieb verfügt die Waage über eine automatische Abschaltfunktion die im Menü s Kap 9 3 aktiviert oder deaktiviert werden kann Ö Im Wägemodus UNIT Taste gedrückt halten bis AF angezeigt wird Ö Mit SET Taste bestätigen Ö Mit MODE Taste kann nun zwischen folgenden zwei Einstellungen ausgewählt...

Страница 10: ...rreicht haben Die Waa ge muss für diese Anwärmzeit an die Stromversorgung Netzanschluss Akku oder Batterie angeschlossen sein Die Genauigkeit der Waage ist abhängig von der örtlichen Fallbeschleunigung Unbedingt die Hinweise im Kapitel Justierung beachten 5 6 Justierung Da der Wert der Erdbeschleunigung nicht an jedem Ort der Erde gleich ist muss je de Waage gemäss dem zugrundeliegenden physikalis...

Страница 11: ...e drücken und gedrückt halten im Display wird kurz CAL ange zeigt Anschließend wird im Display blinkend die genaue Größe des ausge wählten Justiergewichtes angezeigt Ö Nun das Justiergewicht in die Mitte der Wägeplatte stellen Ö SET Taste betätigen Kurze Zeit später erscheint CAL F danach erfolgt au tomatisch der Rücksprung in den Wägemodus In der Anzeige erscheint der Wert des Justiergewichtes Be...

Страница 12: ...NIT Taste Wägeeinheiten umschalten Menü aufrufen Taste gedrückt halten bis AF erscheint SET Taste Einstellungen im Menü bestätigen Speichern und Menü verlassen MODE Taste Menüpunkte anwählen Einstellungen im Menü ändern Justieren TARE Taste Tarieren ON OFF Taste Ein Ausschalten EMS BA d 1112 12 ...

Страница 13: ...die Anzeige erlischt 0g Wägen Ö Wägegut auflegen Ö im Display das Wägeresultat ablesen Ist das Wägegut schwerer als der Wägebereich erscheint im Display Error Überlast Tarieren Ö Leeren Wägebehälter auflegen das Gewicht des Wäge behälters wird angezeigt 134g Beispiel Ö TARE Taste drücken die Nullanzeige erscheint Das Ta ragewicht bleibt so lange gespeichert bis es gelöscht wird 0g 13 EMS BA d 1112...

Страница 14: ...en und TARE Taste drücken die Nullanzeige erscheint 0g PRE TARE Funktion Mit dieser Funktion wird das Gewicht eines Taragefäßes ge speichert Auch nach dem Aus Einschalten arbeitet die Waage mit dem gespeicherten Tarawert weiter Ö Im Wägemodus Taragefäß auf die Wägeplatte stellen Ö MODE Taste wiederholt drücken bis PtArE blinkend an gezeigt wird Ö Mit SET Taste das aktuelle Gewicht auf der Wägeplat...

Страница 15: ... usw Ö Sollgewicht auf die Wägeplatte stellen und mit TARE Taste tarieren Ö Sollgewicht abnehmen Ö Prüflinge nacheinander auf die Wägeplatte stellen jeweilige Abweichung zum Sollgewicht wird vorzeichenrichtig nach und angezeigt Nach dem gleichen Verfahren können auch gewichtsglei che Packungen bezogen auf ein Sollgewicht hergestellt werden Ö Zurück in den Wägemodus durch Drücken der TARE Taste 15 ...

Страница 16: ...den Je größer die Referenzstückzahl desto genauer die Stückzäh lung Der Arbeitsablauf gliedert sich in vier Schritte Wägebehälter tarieren Referenzstückzahl festlegen Referenzgewicht einwägen Stücke zählen Ö Im Wägemodus MODE Taste kurz drücken Referenz stückzahl 5PCS wird blinkend angezeigt Ö Durch Mehrfachbetätigung der MODE Taste können weite re Referenzstückzahlen 5 10 20 25 und 50 aufgerufen ...

Страница 17: ...Netto Total d h ohne das Gewicht des Tarabehälters Beispiel 1 Tarabehälter auf die Wägeplatte stellen TARE Taste drü cken die Nullanzeige erscheint 2 Komponente n einwiegen SET Taste drücken die Nullan zeige erscheint c wird am linken Rand des Displays an gezeigt 3 Komponente o einwiegen SET Taste drücken Netto Total Summengewicht von Komponenten n und o wird ange zeigt 4 SET Taste erneut drücken ...

Страница 18: ...emodus MODE Taste wiederholt drücken bis 100 blinkend angezeigt wird Ö Referenzgewicht das 100 entspricht auflegen Ö Mit SET Taste Referenz speichern Referenzgewicht ab nehmen Ö Wägegut auflegen Das Gewicht der Probe wird in Prozent bezogen auf das Referenzgewicht angezeigt Zurück in den Wägemodus durch Drücken der MODE Taste EMS BA d 1112 18 ...

Страница 19: ...n Einstellungen ändern AF QFF Beispiel AF Qn Angewählten Menüpunkt mit SET Taste bestätigen die aktuelle Einstellung wird angezeigt Mit der MODE Taste lässt sich die Ein stellung ändern Bei jedem Drücken der MODE Taste wird die nächste Einstel lung angezeigt siehe Kap 8 2 Menü Übersicht 1 Änderung eines Menüpunktes speichern und Menü verlassen 0g Ö SET Taste drücken die Waage kehrt in den Wägemodu...

Страница 20: ...nstellung wird angezeigt Mit der MODE Taste Einstellung ändern TARE Taste drücken Exit wird ange zeigt Entweder Mit SET Taste Ja bestätigen StorE wird angezeigt Speichern SET Taste bzw Verwerfen PRINT Taste und Me nü verlassen oder UNIT Taste Nein drücken und Ände rungen an weiteren Menüpunkten wie oben beschrieben vornehmen EMS BA d 1112 20 ...

Страница 21: ...Verwerfen 0 0g Entweder Durch Drücken der SET Taste Ja die vorgenommenen Änderungen abspei chern Die Waage kehrt automatisch in den Wägemodus zurück oder Zum Verwerfen der Änderungen UNIT Taste Nein drücken Die Waage kehrt automatisch in den Wägemodus zurück 21 EMS BA d 1112 ...

Страница 22: ...he Kap 8 3 rSt yes ja Werkseinstellung 8 3 Beschreibung einzelner Menüpunkte Auto Off Funktion 0 0g AF AF Qn Mit dieser Funktion wird die automatische Abschaltung ein bzw ausgeschaltet Ö Im Wägemodus UNIT Taste gedrückt halten bis AF angezeigt wird Ö Mit SET Taste bestätigen die aktuelle Einstellung wird ange zeigt Ö Mit MODE Taste gewünschte Einstellungen auswählen 0 0g Ö Auswahl mit SET Taste be...

Страница 23: ...n 0 0g Ö Auswahl mit SET Taste bestätigen Die Waage kehrt zurück in den Wägemodus Rücksetzen auf Werkseinstellung 0 0g AF RST RST Qn Mit dieser Funktion werden alle Menü Punkte auf Werkseinstellung zurückgesetzt Ö Im Wägemodus UNIT Taste gedrückt halten bis AF angezeigt wird Ö MODE Taste 2x drücken rSt wird angezeigt Ö Mit SET Taste bestätigen die aktuelle Einstellung wird ange zeigt Ö Mit MODE Ta...

Страница 24: ... eindringt und mit einem trockenen weichen Tuch nachreiben Lose Probenreste Pulver können vorsichtig mit einem Pinsel oder Handstaubsauger entfernt werden Verschüttetes Wägegut sofort entfernen 9 2 Wartung Instandhaltung Das Gerät darf nur von geschulten und von KERN autorisierten Servicetechnikern geöffnet werden Vor dem Öffnen vom Netz trennen 9 3 Entsorgung Die Entsorgung von Verpackung und Ger...

Страница 25: ...gelegt Luftzug Luftbewegungen Vibrationen des Tisches Bodens Die Gewichtsanzeige ändert sich fortwährend Die Wägeplatte hat Berührung mit Fremd körpern Elektromagnetische Felder Statische Auf ladung anderen Aufstellungsort wählen falls möglich störendes Gerät ausschalten Die Waagenanzeige steht nicht auf Null Die Justierung stimmt nicht mehr Das Wägeergebnis ist offensichtlich falsch Es herrschen ...

Страница 26: ...bliche Gebrauchsende der Batterien Akkus erreicht sein ansons ten muss Vorsorge gegen Kurzschluss getroffen werden Ö Schadstoffhaltige Batterien sind mit einem Zeichen bestehend aus einer durch gestrichenen Mülltonne und dem chemischen Symbol Cd Cadmium Hg Quecksilber oder Pb Blei des für die Einstufung als schadstoffhaltig aus schlaggebenden Schwermetalls versehen Ö Schadstoffarme Batterien nur m...

Страница 27: ...ohn GmbH Ziegelei 1 D 72336 Balingen E mail info kern sohn com Tel 49 0 7433 9933 0 Fax 49 0 7433 9933 149 Internet www kern sohn com Instrukce obsluhy Školní váha KERN EMS Verze 1 2 07 2011 CZ EMS BA cz 1112 ...

Страница 28: ...hled nad kontrolními prostředky 6 4 Základní bezpečnostní instrukce 7 4 1 Dodržování návodu dle instrukce obsluhy 7 4 2 Zaškolení obsluhy 7 5 Transport a uskladnění 7 5 1 Kontrola při přejímce 7 5 2 Balení zpětný transport 7 6 Rozbalení umístění a zprovoznění 8 6 1 Místo pro provoz 8 6 2 Rozbalení a umístění 8 6 3 Síťový adaptér 9 6 4 Provoz na baterie na akumulátor opčně 9 6 5 První zprovoznění 1...

Страница 29: ... 120 min Počet referenčních kusů při počítání kusů 5 10 20 25 50 Jednotky váhy g kg Doporučovaná kalibrační hmotnost není součástí dodávky třída 300 g F1 3000 g F2 Doba narůstání signálu typická 3 s Provizní teploty 5 C 35 C Vlhkost vzduchu max 80 bez kondenzace Kryt š x t x v mm 200 x 280 x 63 Deska váhy mm Ø 105 160 x 160 Celková hmotnost kg netto 1 4 Vstupní napětí 110V 230V AC Provoz na bateri...

Страница 30: ...20 min 30 min 120 min 30 min Počet referenčních kusů při počítání kusů 5 10 20 25 50 Jednotky váhy g kg Doporučovaná kalibrační hmotnost není součástí dodávky třída 6 kg F2 6 kg M1 12 kg F2 12 kg M1 Doba narůstání signálu typická 3 s Provizní teploty 5 C 35 C Vlhkost vzduchu max 80 bez kondenzace Kryt š x t x v mm 200 x 280 x 63 Deska váhy mm 160 x 160 Celková hmotnost kg netto 1 4 Vstupní napětí ...

Страница 31: ...epojování jednotek váhy Vyvolávání menu podržet zmáčknuté tlačítko až se zobrazí oznámení AF Tlačítko SET Potvrzení nastavení v menu Opuštění paměti a menu Tlačítko MODE Volby bodů menu Změna nastavení v menu Kalibrace Tlačítko TARE Tárování Tlačítko ON OFF Zapnutí vypnutí 5 EMS BA cz 1112 ...

Страница 32: ...nému měření a rovněž ke zničení váhy Váha musí být provozována pouze v souladu s popsanými směrnicemi Jiné použití vyžaduje písemný souhlas firmy KERN 3 3 Záruka Na váhu se nevztahuje záruka v případech když je zjištěno nedodržování předepsané instrukce obsluhy použití v rozporu s předurčením provádění konstrukčních změn nebo otevírání mechanické poškození nebo poškození v důsledku působení médií ...

Страница 33: ...žení zásilky je nutné ověřit zda nedošlo k případnému viditelnému poškození totéž je třeba provést po rozbalení zásilky 5 2 Balení zpětný transport Ö Všechny části originálního balení je třeba ponechat pro případný zpětný transport Ö Pro zpětný transport je nutno používat pouze originální balení Ö Před odesláním zásilky je nutno odpojit všechny přípojné kabely a pohyblivé prvky Ö Pokud se používaj...

Страница 34: ...ouhodobým působením extrémní vlhkosti V případě přenesení váhy do teplejšího prostředí může dojít v důsledku kondenzace k jejímu orosení V tomto případě je třeba váhu odpojenou od napájení 2 hodiny aklimatizovat zabezpečit váhu před působením statických nábojů majících zdroj ve váženém materiálu a v nádobě váhy V případě působení elektromagnetických polí vlivem mobilů nebo rádiových zařízení stati...

Страница 35: ...ryt V průběhu provozu na baterie může být v menu aktivována nebo vypnuta funkce automatického vypínání viz kapitola 9 3 Ö V režimu vážení zmáčknout a podržet zmáčknuté tlačítko UNIT až se zobrazí oznámení AF Ö Potvrdit zmáčknutím tlačítka SET Ö Tlačítko MODE umožňuje volbu jednoho ze dvou níže uvedených nastavení AF on Za účelem šetření baterií se váha automaticky vypne 3 minuty po ukončení vážení...

Страница 36: ...ěž v případě výkyvů teploty okolí Abychom obdrželi přesné hodnoty měření doporučuje se dodatečné cyklické kalibrování váhy v rámci běžného provozu 6 7 Postup kalibrace Kalibraci nutno provést pomocí doporučené kalibrační hmotnosti viz kapitola 1 Technické údaje Kalibraci je možno rovněž provést pomocí jiných nominálních hodnot kalibrační hmotnosti viz tabulka 1 avšak takový postup není z hlediska ...

Страница 37: ...bH Ziegelei 1 D 72336 Balingen E mail info kern sohn com Tlfn 49 0 7433 9933 0 Fax 49 0 7433 9933 149 Web www kern sohn com Manual de instrucciones Balanza para colegios KERN EMS Versión 1 2 07 2011 E EMS BA s 1112 ...

Страница 38: ...s medios de control 7 4 Recomendaciones básicas de seguridad 8 4 1 Observar las recomendaciones del manual de instrucciones 8 4 2 Formación del personal 8 5 Transporte y almacenaje 8 5 1 Control a la recepción 8 5 2 Embalaje devolución 8 6 Desembalaje emplazamiento y puesta en marcha 9 6 1 Lugar de emplazamiento y lugar de explotación 9 6 2 Desembalaje emplazamiento 9 6 3 Enchufe a la red 10 6 4 U...

Страница 39: ...mero de elementos de referencia durante el conteo de unidades 5 10 20 25 50 Unidades de pesaje g kg Pesa de calibrado recomendada no incluida clase 300 g F1 3000 g F2 Tiempo de crecimiento de la señal típico 3 sec Temperatura de servicio 5 C 35 C Humedad del aire max 80 sin condensación Carcasa A x P x A mm 200 x 280 x 63 Plato de pesaje mm Ø 105 160 x 160 Peso total neto kg 1 4 Tensión de entrada...

Страница 40: ...20 min 30 min Número de elementos de referencia durante el conteo de unidades 5 10 20 25 50 Unidades de pesaje g kg Pesa de calibrado recomendada no incluida clase 6kg F2 6kg M1 12kg F2 12kg M1 Tiempo de crecimiento de la señal típico 3 s Temperatura de servicio 5 C 35 C Humedad del aire un máximo de 80 sin condensación Carcasa A x P x A mm 200 x 280 x 63 Plato de pesaje mm 160 x 160 Peso total ne...

Страница 41: ...T Cambio de unidad de pesaje Entrar en el menú presionar la tecla hasta que aparezca el mensaje AF Tecla SET Confirmación de los ajustes en el menú Salir de la memoria y del menú Tecla MODE Selección de los puntos del menú Cambio de ajustes en el menú Ajuste Tecla TARE Tarar Tecla ON OFF Encender apagar 5 EMS BA s 1112 ...

Страница 42: ...y sobrecarga del platillo por encima de la carga máxima máx incluyendo la carga que implica la tara Si no la balanza puede sufrir daños No usar nunca la balanza en locales con riesgo de explosión La versión de serie no tiene protección contra deflagraciones No se debe proceder a modificaciones estructurales de la balanza Una modificación puede conllevar errores en las indicaciones de peso signific...

Страница 43: ...idad adecuada así como el estándar y los limites de estos controles Las informaciones sobre la supervisión de las medidas de control las balanzas así como las pesas de muestra se encuentran accesibles en la página Web de KERN www kern sohn com Las pesas de muestra así como las balanzas se pueden calibrar rápidamente y a un módico precio en el laboratorio acreditado por DKD Deutsche Kalibrierdienst...

Страница 44: ...dañado el embalaje El mismo procedimiento se aplica al aparato después de haberlo extraído de su embalaje 5 2 Embalaje devolución Ö Todos los componentes del embalaje original deben guardarse para el caso de una posible devolución Ö El transporte de la devolución siempre se ha de efectuar en el embalaje original Ö Antes de enviar el aparato hay que desconectar todos los cables conectados así como ...

Страница 45: ...arato a una fuerte humedad durante un largo periodo de tiempo El aparato puede cubrirse de rocío condensación de humedad ambiental si pasa de un ambiente frío a un ambiente más caliente Si este caso se produjera el aparato ha de permanecer apagado aproximadamente 2 horas para aclimatarse a la temperatura ambiental Evitar cargas estáticas que se puedan originar entre el material a pesar y el recipi...

Страница 46: ... la balanza Colocar la pila petaca de 9V Volver a colocar la tapa del compartimento de la pila En el modo de trabajo con batería la balanza dispone de la función de apagado automático que se activa y desactiva desde el menú ver el capítulo 9 3 Ö En el modo de pesaje mantener presionada la tecla UNIT hasta la aparición del mensaje AF Ö Validar mediante la tecla SET Ö La tecla MODE permite la elecci...

Страница 47: ... balanza tiene que estar enchufada a la alimentación eléctrica enchufe de red batería o pila La precisión de la balanza depende de la aceleración terrestre Es obligatorio observar las indicaciones del capítulo Ajustes 6 6 Ajuste Dado que el valor de la aceleración terrestre no es igual en todos los puntos de la Tierra cada balanza tiene que ser ajustada conforme al principio del pesaje resultante ...

Страница 48: ...onada la tecla MODE hasta que en la pantalla aparezca el mensaje CAL En la pantalla aparecerá parpadeando el valor exacto de la masa de calibración elegida Ö Colocar la pesa de calibración en el centro del plato Ö Presionar la tecla SET Transcurrido un momento aparecerá el mensaje CAL F y la balanza volverá automáticamente al modo de pesaje En la pantalla aparece el valor de la masa de calibración...

Страница 49: ...n GmbH Ziegelei 1 D 72336 Balingen E mail info kern sohn com T 49 0 7433 9933 0 Télécopie 49 0 7433 9933 149 Internet www kern sohn com Mode d emploi Balance d école KERN EMS Version 1 2 07 2011 F EMS BA f 1112 ...

Страница 50: ...l appareil 8 4 2 Emballage réexpédition 8 5 Déballage installation et mise en service 9 5 1 Lieu d installation lieu d utilisation 9 5 2 Déballage implantation 9 5 3 Branchement secteur 10 5 4 Fonctionnement sur piles sur accu en option 10 5 5 Première mise en service 11 5 6 Ajustage 11 5 7 Ajuster 12 6 Éléments de commande 13 6 1 Vue d ensemble des affichages 13 6 2 Vue d ensemble du clavier 13 7...

Страница 51: ...s menus 23 8 3 Description de quelques points de menu 23 Fonction Auto Off 23 Fonction auto zéro 24 Remise au réglage d usine 24 9 Maintenance entretien élimination 25 9 1 Nettoyage 25 9 2 Maintenance entretien 25 9 3 Mise au rebut 25 10 Aide succincte en cas de panne 26 ...

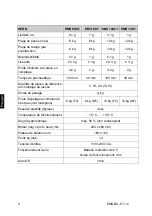
Страница 52: ...20 min 120 min Quantité de pièces de référence en comptage de pièces 5 10 20 25 50 Unités de pesage g kg Poids d ajustage recommandé n est pas joint catégorie 300 g F1 3000 g F2 Essai de stabilité typique 3 sec Température de fonctionnement 5 C 35 C Degré hygrométrique max 80 non condensant Boîtier larg x prof x haut mm 200 x 280 x 63 Plateau de balance mm Ø 105 160 x 160 Poids kg net 1 4 Tension ...

Страница 53: ...120 min 30 min 120 min 30 min Quantité de pièces de référence en comptage de pièces 5 10 20 25 50 Unités de pesage g kg Poids d ajustage recommandé n est pas joint catégorie 6 kg F2 6 kg M1 12 kg F2 12 kg M1 Essai de stabilité typique 3 sec Température de fonctionnement 5 C 35 C Degré hygrométrique max 80 non condensant Boîtier larg x prof x haut mm 200 x 280 x 63 Plateau de balance mm 160 x 160 P...

Страница 54: ...lance ou de charger cette dernière au delà de la charge maximale indiquée Max après déduction éventuelle d une charge de tare déjà existante Sinon la balance pourrait être endommagée Ne jamais utiliser la balance dans des endroits où des explosions sont susceptibles de se produire Le modèle série n est pas équipé d une protection contre les explosions Toute modification constructive de la balance ...

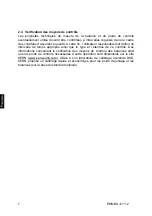
Страница 55: ...ur responsable doit définir un intervalle de temps approprié ainsi que le type et l étendue de ce contrôle Des informations concernant la vérification des moyens de contrôle des balances ainsi que les poids de contrôle nécessaires à cette opération sont disponibles sur le site KERN www kern sohn com Grâce à son laboratoire de calibrage accrédité DKD KERN propose un calibrage rapide et économique p...

Страница 56: ...s vous prions de contrôler l emballage dès son arrivée et de vérifier lors du déballage que l appareil ne présente pas de dommages extérieurs visibles 4 2 Emballage réexpédition Ö Conservez tous les éléments de l emballage d origine en vue d un éventuel transport en retour Ö L appareil ne peut être renvoyé que dans l emballage d origine Ö Avant expédition démontez tous les câbles branchés ainsi qu...

Страница 57: ...s vapeurs et de la poussière N exposez pas trop longtemps l appareil à une humidité élevée L installation d un appareil froid dans un endroit nettement plus chaud peut provoquer l apparition d une couche d humidité condensation de l humidité atmosphérique sur l appareil non autorisée Dans ce cas laissez l appareil coupé du secteur s acclimater à la température ambiante pendant env 2 heures Evitez ...

Страница 58: ...ouvercle du compartiment à piles de la face inférieure de la balance Branchez la batterie monobloc de 9 V Remettre en place le couvercle En mode piles la balance dispose d une fonction de coupure automatique qui peut être activée ou désactivée dans le menu voir chap 9 3 Ö En mode pesée maintenir la touche UNIT enclenchée jusqu à ce que AF soit affiché Ö Confirmez sur la touche SET Ö Alors vous pou...

Страница 59: ...chap 1 Pour ce temps de chauffe la balance doit être branché à l alimentation de courant secteur pile rechargeable ou pile La précision de la balance dépend de l accélération due à la pesanteur Il est impératif de tenir compte des indications du chapitre Ajustage 5 6 Ajustage Etant donné que la valeur d accélération de la pesanteur varie d un lieu à l autre sur la terre il est nécessaire d adapter...

Страница 60: ... ON OFF Ö Appuyer sur la touche MODE et la garder enclenchée sur le visuel apparaît brièvement CAL Ensuite est affiché en clignotant le poids exact du poids d ajustage Ö Poser le poids d ajustage au milieu du plateau de la balance Ö Actionner la touche SET Peu de temps après apparaît CAL F ensuite le mode repasse automatiquement en mode de pesée normal Sur l affichage apparaît la valeur du poids d...

Страница 61: ...ouche UNIT Commutation des unités de pesée Appeler le menu garder la touche enclenchée jusqu à ce qu apparaisse AF Touche SET Confirmer les réglages dans le menu Enregistrer et quitter le menu Touche MODE Sélectionner les points de menu Modifier les réglages dans le menu Ajustage Touche TARE Tarage Touche ON OFF Mise en marche arrêt ...

Страница 62: ...hage s éteint 0g Pesage Ö Mettre en place le produit pesé Ö Dans l affichage relever le résultat de la pesée Si le produit pesé est plus lourd que la valeur seuil l écran affiche Error surcharge Tarage Ö Poser le récipient à peser vide sur la balance le poids du récipient à peser est affiché 134g exemple Ö Appuyer sur la touche TARE l affichage du zéro apparaît La tare demeure mémorisée jusqu à ce...

Страница 63: ...ît 0g Fonction PRE TARE Cette fonction permet de mettre en mémoire le poids de la cuve à tare Même après la mise à l arrêt en marche la balance continue à travailler avec la valeur tare mémorisée Ö En mode de pesage mettre un récipient à tare sur le plateau de pesée Ö Appeler de façon répétée la touche MODE jusqu à ce que PtArE apparaisse en clignotant Ö Mémoriser sur la touche SET le poids actuel...

Страница 64: ... le poids de gouverne sur le plateau de pesée et tarez le au moyen de la touche TARE Ö Enlevez le poids de gouverne Ö Posez successivement les pièces d essai sur le plateau de pesée chaque écart par rapport au poids de consigne est affiché avec le signe et qui s y rapporte Le même procédé permet de confectionner des lots de même poids rapporté à un poids de consigne Ö Retour en mode de pesage par ...

Страница 65: ...s le nombre de pièces de référence est important plus la précision de comptage est élevée Le déroulement du travail se compose de quatre étapes Tarer le récipient de pesée Déterminer le nombre de pièces de référence Peser le poids de référence Compter les pièces Ö Appuyer brièvement sur la touche MODE en mode de pesée La quantité de référence 5PCS est affichée en clignotant Ö En appuyant à plusieu...

Страница 66: ...t c est à dire sans le poids de le récipient à tare Exemple 1 Poser le récipient à tarer vide sur le plateau de pesée Appuyer sur la touche TARE l affichage du zéro apparaît 2 Peser les composants n Appuyer sur la touche SET l affichage du zéro apparaît c est affiché au bord gauche du visuel 3 Peser les composants o appuyer sur la touche SET Net total le poids total des composants n et o est affic...

Страница 67: ...er sur la touche MODE plusieurs fois jusqu à ce que soit affiché 100 en clignotant Ö Poser des poids de référence qui correspondent à 100 Ö Mémoriser la référence sur la touche SET Oter le poids de référence Ö Mettre en place le produit pesé Le poids de l échantillon est indiqué en pourcent en relation au poids de référence Retour en mode de pesage par appel de la touche MODE ...

Страница 68: ...uns après les autres Changer les réglages AF QFF exemple AF Qn Valider sur la touche SET le point de menu appelé le réglage actuel est affiché Sur la touche MODE peut être modifié le réglage A chaque pression sur la touche MODE est affiché le réglage suivant voir au chap 8 2 Vue d ensemble du menu 1 Mémoriser la modification du point du menu et quitter le menu 0g Ö Appeler la touche SET une nouvel...

Страница 69: ...pelé le réglage actuel est affiché Modifier le réglage sur la touche MODE Appuyer sur la touche TARE Exit est affiché soit Valider sur la touche SET par oui StorE est affiché Mémoriser touche SET ou rejeter touche PRINT et quitter le menu ou Appuyer sur la touche UNIT non et apporter les modifications à d autres points du menu comme décrit ci dessus ...

Страница 70: ...jet 0 0g soit Les modifications apportées sont mémorisées par l appel de la touche SET oui La balance revient automatiquement en mode de pesée ou Appuyez sur la touche UNIT non pour rejeter les modifications La balance revient automatiquement en mode de pesée EMS BA f 1112 22 ...

Страница 71: ...ablir les réglages en usine voir au chap 8 3 rSt yes oui réglé en usine 8 3 Description de quelques points de menu Fonction Auto Off 0 0g AF AF Qn Cette fonction permet d activer ou désactiver la coupure automatique Ö En mode pesée maintenir la touche UNIT enclenchée jusqu à ce que AF soit affiché Ö Valider sur la touche SET le point de menu appelé le réglage actuel est affiché Ö Sélectionner sur ...

Страница 72: ...firmez choix sur la touche SET La balance revient en mode de pesée Remise au réglage d usine 0 0g AF RST RST Qn Cette fonction permet de rétrograder tous les points de menu en état de réglage à l usine Ö En mode pesée maintenir la touche UNIT enclenchée jusqu à ce que AF soit affiché Ö Appuyer deux fois sur la touche MODE rSt est affiché Ö Valider sur la touche SET le point de menu appelé le régla...

Страница 73: ... chiffon doux sec pour l essuyer Les poudres restes d échantillon épars peuvent être retirés avec précaution à l aide d un pinceau ou d un aspirateur balai Retirer immédiatement les matières à peser renversées sur la balance 9 2 Maintenance entretien L appareil ne doit être ouvert que par des dépanneurs formés à cette fin et ayant reçu l autorisation de KERN Avant d ouvrir l appareil couper ce der...

Страница 74: ...rant d air circulation d air Vibrations de la table du sol L affichage de poids change continuellement Le plateau de pesée est en contact avec des corps étrangers Champs électromagnétiques charge électrostatique changer de lieu d installation si possible arrêter l appareil provoquant l anomalie L affichage de la balance n est pas sur zéro L ajustage n est plus bon Il est évident que le résultat de...

Страница 75: ... GmbH Ziegelei 1 D 72336 Balingen E mail info kern sohn com Tel 49 0 7433 9933 0 Fax 49 0 7433 9933 149 Internet www kern sohn com Instruction Manual School balance KERN EMS Version 1 2 07 2011 GB EMS BA e 1112 ...

Страница 76: ...4 2 Packaging return transport 7 5 Unpacking Setup and Commissioning 8 5 1 Installation Site Location of Use 8 5 2 Unpacking installation 8 5 3 Mains connection 9 5 4 Operation using a rechargeable battery optional 9 5 5 Initial Commissioning 10 5 6 Adjustment 10 5 7 Adjustment 11 6 Operating elements 12 6 1 Overview of display 12 6 2 Keyboard overview 12 7 Basic Operation 13 Start up 13 Switching...

Страница 77: ...u 19 8 2 Menu overview 22 8 3 Description of individual menu items 22 Auto Off function 22 Auto Zero function 23 Reset to factory setting 23 9 Service maintenance disposal 24 9 1 Cleaning 24 9 2 Service maintenance 24 9 3 Disposal 24 10 Instant help 25 ...

Страница 78: ...Warm up time 120 min 120 min Reference quantities at piece counting 5 10 20 25 50 Weighing Units g kg Recommended adjustment weight not added class 300 g F1 3000 g F2 Stabilization time typical 3 sec Operating temperature 5 C 35 C Humidity of air max 80 not condensing Housing B x D x H mm 200 x 280 x 63 Weighing plate mm Ø 105 160 x 160 Weight kg net 1 4 Input Voltage 110V 230V AC Battery operatio...

Страница 79: ...2 g 2 g Warm up time 120 min 30 min 120 min 30 min Reference quantities at piece counting 5 10 20 25 50 Weighing Units g kg Recommended adjustment weight not added class 6 kg F2 6 kg M1 12 kg F2 12 kg M1 Stabilization time typical 3 sec Operating temperature 5 C 35 C Humidity of air max 80 not condensing Housing B x D x H mm 200 x 280 x 63 Weighing plate mm 160 x 160 Weight kg net 1 4 Input Voltag...

Страница 80: ...ected The structure of the balance may not be modified This may lead to incorrect weighing results safety related faults and destruction of the balance The balance may only be used according to the described conditions Other areas of use must be released by KERN in writing 2 3 Warranty Warranty claims shall be voided in case Our conditions in the operation manual are ignored The appliance is used ...

Страница 81: ...cceptance When receiving the appliance please check packaging immediately and the appliance itself when unpacking for possible visible damage 4 2 Packaging return transport Ö Keep all parts of the original packaging for a possibly required return Ö Only use original packaging for returning Ö Prior to dispatch disconnect all cables and remove loose mobile parts Ö Reattach possibly supplied transpor...

Страница 82: ...ot expose the device to extreme dampness for longer periods of time Non permitted condensation condensation of air humidity on the appliance may occur if a cold appliance is taken to a considerably warmer environment In this case acclimatize the disconnected appliance for ca 2 hours at room temperature Avoid static charge of goods to be weighed and weighing container Major display deviations incor...

Страница 83: ... the lower side of the balance Connect 9 V compound battery Replace the battery compartment cover For battery operation the balance has an automatic switch off function which can be activated or deactivated in the menu see chapter 9 3 Ö In weighing mode keep the UNIT key pressed until AF appears Ö Use the SET key to confirm Ö Use the MODE key to choose between the two following settings AF on In o...

Страница 84: ... 1 During this warming up time the balance must be connected to the power supply mains accumulator or battery The accuracy of the balance depends on the local acceleration of gravity Strictly observe hints in chapter Adjustment 5 6 Adjustment As the acceleration value due to gravity is not the same at every location on earth each balance must be coordinated in compliance with the underlying physic...

Страница 85: ...key and keep it pressed in the display appears shortly CAL After that the exact size appears flashing in the display of the selected adjustment weight Ö Now set the adjusting weight in the centre of the weighing plate Ö Press the SET key Short time later there appears CAL F then the automatic return to the weighing mode In the display there appears the value of the adjustment weight An error durin...

Страница 86: ...Function UNIT key How to change weighing units Call up menu keep key pressed until AF appears SET key Confirm settings in the menu Save and exit menu MODE key How to select menu items Change settings in the menu Adjustment TARE button Taring ON OFF switch Turn on off EMS BA e 1112 12 ...

Страница 87: ...ppears 0g Weighing Ö Position item to be weighed Ö Read the weighing result in the display If the material to be weighed is heavier than the weighing range the display will show Error Overload Taring Ö Place an empty weighing container the weight of the weighing container will be displayed 134g Example Ö Press the TARE button the zero display disappears The tare weight is saved until it is deleted...

Страница 88: ...E button the zero display appears 0g PRE TARE function Using this function the weight of a tare vessel is stored Even after turning off on the weighing balance will continue working with the saved tare value Ö In weighing mode put tare vessel on the weighing plate Ö Press repeatedly the MODE key until PtArE flashing appears Ö Use SET key to store the current weight on the weighing plate as a PRE T...

Страница 89: ...ight on the weighing plate and tare using the TARE button Ö Remove the nominal weight Ö Put the test objects subsequently on the weighing plate the respective deviation from the nominal weight is displayed with the respective sign to and According to the same procedure also packages with the same weight can be produced referring to a nominal weight Ö Back to weighing mode by pressing the TARE butt...

Страница 90: ...eference quantity the more accurate the parts counting The process has four steps Tare the weighing container Determine the reference unit Original weighing of reference weight Count the items Ö In weighing mode press MODE key shortly Reference piece number 5PCS appears flashing Ö By pressing the MODE button several times other reference quantities 5 10 20 25 and 50 can be called up Place as many ...

Страница 91: ...ses net total i e the weight of the tare vessel Example 1 Place tare container on the weighing plate Press the TARE button the zero display disappears 2 Weigh in component n Press the SET button the zero display disappears c is displayed on the right border of the display 3 Weigh in component o and press SET key Net total sum weight of the components n and o is displayed 4 Press the SET button the...

Страница 92: ...ress MODE key repeatedly until 100 is displayed flashing Ö Put a reference weight which corresponds to 100 Ö Store by pressing the SET key Remove reference weight Ö Place goods to be weighed on balance The weight of the sample is displayed in percentage in terms of the reference weight Back to weighing mode by pressing the MODE button EMS BA e 1112 18 ...

Страница 93: ... selected one after the other Change settings AF QFF Example AF Qn Acknowledge selected menu item using SET key the current setting is displayed Change the settings using the MODE key At any pressing of the MODE key the next setting is displayed see chapter 8 2 Menu Overview 1 Save change of a menu item and exit the menu 0g Ö Press the SET key balance will return to weighing mode 19 EMS BA e 1112 ...

Страница 94: ...T key the current setting is displayed Use the MODE key to change settings Press the TARE key Exit is displayed either Acknowledge with SET key yes StorE is displayed Save SET key or reject PRINT key and exit the menu or Press UNIT key no and make the changes on the other menu items as described above EMS BA e 1112 20 ...

Страница 95: ...0 0g Ö Reject 0 0g either Any changes carried out are stored by pressing the SET key yes The balance returns automatically into weighing mode or To cancel changes press the UNIT key no The balance returns automatically into weighing mode 21 EMS BA e 1112 ...

Страница 96: ...ing see chap 8 3 rSt yes yes default setting 8 3 Description of individual menu items Auto Off function 0 0g AF AF Qn Use this function to enable or to disable the automatic switch off Ö In weighing mode keep the UNIT key pressed until AF appears Ö Acknowledge using SET key the current setting is displayed Ö Select the desired settings by pressing the MODE key 0 0g Ö Use the SET key to confirm sel...

Страница 97: ...he MODE key 0 0g Ö Use the SET key to confirm selection The balance returns to weighing mode Reset to factory setting 0 0g AF RST RST Qn This function resets all menu items to factory setting Ö In weighing mode keep the UNIT key pressed until AF appears Ö Press the MODE key twice rSt is displayed Ö Acknowledge using SET key the current setting is displayed Ö Select the desired settings by pressing...

Страница 98: ...polish it with a dry soft cloth Loose residue sample powder can be removed carefully with a brush or manual vacuum cleaner Spilled weighing goods must be removed immediately 9 2 Service maintenance The appliance may only be opened by trained service technicians who are authorized by KERN Before opening disconnect from power supply 9 3 Disposal Disposal of packaging and appliance must be carried ou...

Страница 99: ...w No batteries inserted Draught air movement Table floor vibrations The displayed weight is permanently changing The weighing plate is in contact with foreign matter Electromagnetic fields static charging choose different location switch off interfering device if possible The display of the balance is not at zero Adjustment is no longer correct The weighing value is obviously wrong Great fluctuati...

Страница 100: ...egelei 1 D 72336 Balingen E mail info kern sohn com Tel 49 0 7433 9933 0 Fax 49 0 7433 9933 149 Internet www kern sohn com Manuale d istruzioni per l uso Bilancia da scuola KERN EMS Versione 1 2 07 2011 I EMS BA i 1112 ...

Страница 101: ...ri per la sicurezza 8 4 1 Osservanza delle indicazioni contenute nel manuale d istruzioni per l uso 8 4 2 Istruzione del personale 8 5 Trasporto e stoccaggio 8 5 1 Controllo in accettazione 8 5 2 Imballaggio trasporto di resa 8 6 Disimballaggio collocamento e messa in funzione 9 6 1 Posto di collocamento posto di utilizzo 9 6 2 Disimballaggio e collocamento 9 6 3 Presa di rete 10 6 4 Funzionamento...

Страница 102: ...i di riferimento nel conteggio pezzi 5 10 20 25 50 Unità di misurazione g kg Peso di calibrazione consigliato non incluso classe 300 g F1 3000 g F2 Tempo di crescita segnale tipi co 3 sec Temperatura di lavoro 5 C 35 C Umidità dell aria max 80 senza formazione di condensa Cassa L x P x A mm 200 x 280 x 63 Piatto bilancia in mm Ø 105 160 x 160 Peso totale kg netto 1 4 Tensione d ingresso 110V 230V ...

Страница 103: ...n Numero pezzi di riferimento nel conteggio pezzi 5 10 20 25 50 Unità di misurazione g kg Peso di calibrazione consigliato non incluso classe 6 kg F2 6 kg M1 12 kg F2 12 kg M1 Tempo di crescita segnale tipi co 3 sec Temperatura di lavoro 5 C 35 C Umidità dell aria al mass l 80 senza formazione di condensa Cassa L x P x A mm 200 x 280 x 63 Piatto bilancia in mm 160 x 160 Peso totale kg netto 1 4 Te...

Страница 104: ...isurazione Richiamo menu tenere il tasto premuto finché il display visualizzerà il messaggio AF Tasto SET Conferma impostazioni nel menu Uscita dalla memoria e menu Tasto MODE Selezione punti nel menu Modifica impostazioni nel menu Calibrazione Tasto TARE Taratura Tasto ON OFF Accensione spegnimento bilancia 5 EMS BA i 1112 ...

Страница 105: ...rti nonché sovraccarichi del piatto di bilancia sopra i carichi massimi indicati max togliendo il carico di tara già presente ciò potrebbe causare denneggiamento della bilancia Non usare mai la bilancia in locali minacciati da esplosione L esecuzione di serie non è esecuzione antideflagrante Non è permesso apportare modifiche alla struttura della bilancia il che potrebbe cau sare risultati errati ...

Страница 106: ...onché il genere e la portata di tale verifica Le informazioni ri guardanti la vigilanza degli strumenti di controllo quali sono le bilance nonché l indicazione di pesi campione indispensabili sono disponibili sul sito internet della ditta KERN www kern sohn com I pesi campione nonché le bilance si possono far calibrare in breve tempo e a buon mercato presso il laboratorio di calibrazione della dit...

Страница 107: ... Subito dopo aver ricevuto il pacco bisogna controllare se esso non presenti eventuali danneggiamenti visibili Lo stesso riguarda lo strumento dopo che è stato sballato 5 2 Imballaggio trasporto di resa Ö Tutte le parti dell imballaggio originale si devono conservare per il caso d eventuale trasporto di resa Ö Per il trasporto di resa si deve usare esclusivamente l imballaggio originale Ö Prima de...

Страница 108: ... esporre la bilancia all azione prolungata di umidità intensa rugiada indeside rata condensazione dell umidità presente nell aria d ambiente può formarsi sullo strumento quando esso è freddo e viene collocato in un locale a temperatura no tevolmente più alta in tal caso è necessario scollegarlo dalla rete di alimentazio ne e sottoporre ad acclimatazione di circa due ore alla temperatura ambiente e...

Страница 109: ...vano batteria situato in basso della bilancia Inserire ina bat teria piatta da 9 V quindi rimettere il coperchio del vano bateria In modalità di alimentazione da batteria la bilancia dispone della funzione di spegni mento automatico che può essere attivato e disattivato nel menu vedi il cap 9 3 Ö In modalità di pesatura premere e tenere premuto il tasto UNIT finché il display visualizzerà il messa...

Страница 110: ...riscaldamento la bilancia dev essere alimentata elettricamente da presa di rete accumulatore o batteria La precisione della bilancia dipende dall accelerazione terrestre locale Rispettare assolutamente le indicazioni contenute nel successivo capitolo Calibra zione 6 6 Calibrazione Siccome il valore dell accelerazione terrestre non è uguale in ogni posto della Terra ogni bilancia dev essere adattat...

Страница 111: ...E il display visualizzerà per un mo mento il messaggio CAL Successivamente il display visualizzerò a intermit tenza il valore preciso del peso di calibrazione selezionato Ö Collocare il peso di calibrazione al centro del piatto della bilancia Ö Premere il tasto SET Dopo un momento il display visualizzerà il messaggio CAL F quindi la bilancia si rimette automaticamente in modalità di pesatura L ind...

Страница 112: ...GmbH Ziegelei 1 D 72336 Balingen E mail info kern sohn com Tel 49 0 7433 9933 0 Fax 49 0 7433 9933 149 Internet www kern sohn com Gebruiksaanwijzing Schoolweegschaal KERN EMS Versie 1 2 07 2011 NL EMS BA nl 1112 ...

Страница 113: ...6 3 4 Toezicht over controlemiddelen 7 4 Veiligheid grondrichtlijnen 8 4 1 Richtlijnen van de gebruiksaanwijzing nakomen 8 4 2 Personeelscholing 8 5 Vervoer en opslag 8 5 1 Controle bij ontvangst 8 5 2 Verpakking retourvervoer 8 6 Uitpakken installeren en aanzetten 9 6 1 Plaats van installatie gebruikslocatie 9 6 2 Uitpakken instellen 9 6 3 Contactdoos 10 6 4 Bedrijf met batterijvoeding bedrijf me...

Страница 114: ... referentiestuks bij optellen 5 10 20 25 50 Weegeenheden g kg Aanbevolen kalibratiegewicht niet toegevoegd klasse 300 g F1 3000 g F2 Duur van signaaltoename typisch 3 sec Bedrijfstemperatuur 5 C 35 C Luchtvochtigheid max 80 nicht kondensierend Behuizing Breedte x Dikte x Hoogte mm 200 x 280 x 63 Wägeplatte mm Ø 105 160 x 160 Totaal gewicht kg netto 1 4 Ingangsspanning 110V 230V AC Bedrijf met batt...

Страница 115: ...min 30 min Aantal referentiestuks bij optellen 5 10 20 25 50 Weegeenheden g kg Aanbevolen kalibratiegewicht niet toegevoegd klasse 6 kg F2 6 kg M1 12 kg F2 12 kg M1 Duur van signaaltoename typisch 3 s Bedrijfstemperatuur 5 C 35 C Luchtvochtigheid Max 80 geen condensatie Behuizing Breedte x Dikte x Hoogte mm 200 x 280 x 63 Weegschaalplateau mm 160 x 160 Totaal gewicht kg netto 1 4 Ingangsspanning 1...

Страница 116: ...n weegeenheden Het menu opvragen de toets gedrukt houden totdat de melding AF verschijnt De toets SET De instellingen in het menu bevestigen Het geheugen en het menu verlaten De toets MODE Keuze van de menupunten De instellingen in het menu wijzigen Justeren De toets TARE Tarreren De toets ON OFF Aan uitzetten 5 EMS BA nl 1112 ...

Страница 117: ...n beschadiging van het meetmechanisme veroorzaken Stoten en overbelasting van de weegschaal boven aangegeven maximale last max met bestaande tarravooraftrek absoluut mijden Het kan beschadiging van de weegschaal veroorzaken De weegschaal nooit in ruimtes met explosiegevaar gebruiken Serie uitvoering is geen explosiebestendige uitvoering Geen wijzigingen in de constructie van de weegschaal aanbreng...

Страница 118: ...l als ook aard en omvang van dergelijke controle te bepalen Informatie betreffende toezicht over controlemiddelen zoals weegschalen als ook over noodzakelijke controlegewichten zijn toegankelijk op de website van de firma KERN www kern sohn com De controlegewichten en weegschalen kan men snel en goedkoop ijken in een kalibratielaboratorium van de firma KERN geaccrediteerd door DKD Deutsche Kalibri...

Страница 119: ...ket controleren of er geen zichtbare beschadigingen aanwezig zijn hetzelfde betreft het apparaat na uitpakken 5 2 Verpakking retourvervoer Ö Alle delen van de originele verpakking dienen te worden behouden voor het geval van eventueel retourvervoer Ö Alleen originele verpakking bij retourvervoer gebruiken Ö Vóór versturen dienen alle aangesloten kabels en losse bewegende onderdelen te worden afgek...

Страница 120: ...en De weegschaal niet aan langdurige werking van grote vochtigheid blootleggen Ongewenst dauwen condensatie van luchtvocht op het apparaat kan voorkomen indien een koud apparaat in een veel warmere ruimte wordt geplaatst In dergelijk geval dient het van netwerk gescheiden apparaat ca 2 godzinnej uur acclimatisering aan de omgevingstemperatuur te ondergaan statische ladingen mijden die van het gewo...

Страница 121: ... batterij 9 V aansluiten Het deksel van de batterijcontainer opnieuw opleggen In de modus batterijvoeding beschikt de weegschaal over de functie automatisch uitschakelen die in het menu geactiveerd en gedeactiveerd kan worden zie hoofdstuk 9 3 Ö In de weegmodus de toets UNIT drukken en zo lang gedrukt houden totdat de melding AF verschijnt Ö Met de toets SET bevestigen Ö Door de toets MODE is het ...

Страница 122: ...ens opwarming moet de weegschaal elektrisch gevoed worden contact accu of batterij De nauwkeurigheid van de weegschaal is van lokale valversnelling afhankelijk Men dient de voorschriften van het hoofdstuk Justeren absoluut te volgen 6 6 Justeren Omdat de waarde van de valversnelling niet op elke plek op aarde gelijk is dient elke weegschaal aangepast te worden conform de weegregel voortvloeiende u...

Страница 123: ...lang gedrukt houden totdat op display het symbool CAL kort verschijnt Vervolgens verschijnt op display de blinkende nauwkeurige waarde van het gekozen kalibratiegewicht Ö Het kalibratiegewicht in het midden van het weegplateau plaatsen Ö De toets SET drukken Kort daarna verschijnt de melding CAL F en vervolgens keert de weegschaal automatisch naar de weegmodus Op de display verschijnt de waarde va...

Страница 124: ...hn GmbH Ziegelei 1 D 72336 Balingen E mail info kern sohn com Tel 49 0 7433 9933 0 Fax 49 0 7433 9933 149 Internet www kern sohn com Instrução de uso Balança escolar KERN EMS Versão 1 2 07 2011 P EMS BA p 1112 ...

Страница 125: ...eios de controle 7 4 Indicações básicas de segurança 8 4 1 Seguimento das indicações contidas na instrução de uso 8 4 2 Treinamento do pessoal 8 5 Transporte e armazenagem 8 5 1 Controle à recepção 8 5 2 Embalagem transporte de retorno 8 6 Desembalagem montagem e colocação em uso 9 6 1 Locais de montagem e exploração 9 6 2 Desembalagem montagem 9 6 3 Tomada de rede 10 6 4 Funcionamento a pilhas op...

Страница 126: ... 120 min Número de peças de referência para a contagem de peças 5 10 20 25 50 Unidades de pesagem g kg Peso de calibração recomendado não acrescentado classe 300 g F1 3000 g F2 Tempo de aumento do sinal típico 3 s Temperatura de trabalho 5 C 35 C Humidade do ar max 80 sem condensação Caixa L x P x A mm 200 x 280 x 63 Prato de pesagem mm Ø 105 160 x 160 Peso kg líquido 1 4 Tensão de entrada 110V 23...

Страница 127: ...20 min 30 min 120 min 30 min Número de peças de referência para a contagem de peças 5 10 20 25 50 Unidades de pesagem g kg Peso de calibração recomendado não acrescentado classe 6 kg F2 6 kg M1 12 kg F2 12 kg M1 Tempo de aumento do sinal típico 3 s Temperatura de trabalho 5 C 35 C Humidade do ar máx 80 sem condensação Caixa L x P x A mm 200 x 280 x 63 Prato de pesagem mm 160 x 160 Peso kg líquido ...

Страница 128: ...taçăo de unidades de pesagem Abertura do menu manter a tecla pressionada até ser projetado o comunicado AF Tecla SET Confirmação dos ajustes no menu Saída da memória e do menu Tecla MODE Escolha dos pontos de menu Alteraçăo dos ajustes no menu Ajustar Tecla TARE Tarar Tecla ON OFF Ligar desligar 5 EMS BA p 1112 ...

Страница 129: ...smo de medição Evitar completamente golpes e sobrecargas acima do valor máximo máx dado diminuindo o valor de tara já existente Isto poderia danificar a balança Jamais fazer uso da balança em locais onde haja risco de explosão A produção em série não possui proteção anti explosão Jamais realizar modificações na construção da balança Isto pode causar resultados de pesagem errôneos violação das cond...

Страница 130: ...spondentes bem como a espécie e âmbito de tais controles As informações relativas à inspeção sobre os meios de controle tais como balanças como também os pesos de controlo metrológico indispensáveis estão a disposição no sítio da empresa KERN www kern sohn com Os pesos de controlo metrológico e as balanças podem ser calibradas de forma rápida e barata num laboratório de calibração com crédito DKD ...

Страница 131: ... recebimento do pacote conferir se existem danos visíveis sendo o mesmo feito após a desembalagem do dispositivo 5 2 Embalagem transporte de retorno Ö Todas as peças da embalagem original deverão ser guardadas para a eventualidade de um envio de retorno Ö Para o transporte de retorno deve se utilizar só a embalagem original Ö Antes do envio deverão ser desligadas todas as peças soltas móveis e os ...

Страница 132: ...car o equipamento sob a ação por tempo prolongado de forte humidade Uma humidificação imprópria condensação da humidade do ar no dispositivo poderá surgir se o equipamento em estado frio for colocado num local significativamente mais quente Neste caso o equipamento deverá permanecer por aproximadamente 2 horas desligado da rede para que haja uma devida aclimatização ao meio evitar cargas estáticas...

Страница 133: ...inferior da balança Ligar a pilha plana 9 V Novamente colocar a tampa do compartimento das pilhas No modo de funcionamento a pilhas a balança dispõe de função de autodesconectante que pode ser ativada e desativada no menu ver cap 9 3 Ö No modo de pesagem pressionar e segurar a tecla UNIT até ser projetado o comunicado AF Ö Confirmar pressionando a tecla SET Ö A tecla MODE permite selecionar um dos...

Страница 134: ...imento cap 1 Durante o aquecimento a balança deve ser alimentada eletricamente tomada de rede pilhas A precisão da balança depende da aceleração gravitacional local Seguir rigorosamente as instruções contidas no capítulo Ajustar 6 6 Ajustar Pelo fato da aceleração gravitacional não ser igual em cada lugar da Terra cada balança deve ser adaptada de acordo com o princípio de pesagem resultante das b...

Страница 135: ... a tecla MODE o comunicado CAL será projetado por um momento no visor da balança Em seguida no visor da balança surgirá piscando o valor exato do peso de calibração escolhido Ö Colocar o peso de calibração no centro do prato de pesagem Ö Apertar o botão SET Um momento depois aparece o comunicado CAL F e em seguida a balança retorna automaticamente ao modo de pesagem O valor do peso de calibração é...

Страница 136: ...n GmbH Ziegelei 1 D 72336 Balingen E mail info kern sohn com Tel 49 0 7433 9933 0 Faks 49 0 7433 9933 149 Internet www kern sohn com Instrukcja obsługi Waga szkolna KERN EMS Wersja 1 2 07 2011 PL EMS BA pl 1112 ...

Страница 137: ...ontrolnymi 6 4 Podstawowe wskazówki bezpieczeństwa 7 4 1 Przestrzeganie wskazówek zawartych w instrukcji obsługi 7 4 2 Przeszkolenie personelu 7 5 Transport i składowanie 7 5 1 Kontrola przy odbiorze 7 5 2 Opakowanie transport zwrotny 7 6 Rozpakowanie ustawienie i uruchomienie 8 6 1 Miejsce ustawienia miejsce eksploatacji 8 6 2 Rozpakowanie ustawienie 8 6 3 Gniazdo sieciowe 9 6 4 Praca z zasilanie...

Страница 138: ...czba sztuk referencyjnych przy zliczaniu sztuk 5 10 20 25 50 Jednostki wagowe g kg Zalec masa kalibracyjna niedodana klasa 300 g F1 3000 g F2 Czas narastania sygnału typowy 3 s Temperatura pracy 5 C 35 C Wilgotność powietrza max 80 brak kondensacji Obudowa S x G x W mm 200 x 280 x 63 Płytka wagi mm Ø 105 160 x 160 Masa całkowita kg netto 1 4 Napięcie wejściowe 110V 230V AC Praca z zasilaniem bater...

Страница 139: ...in 120 min 30 min Liczba sztuk referencyjnych przy zliczaniu sztuk 5 10 20 25 50 Jednostki wagowe g kg Zalec masa kalibracyjna niedodana klasa 6 kg F2 6 kg M1 12 kg F2 12 kg M1 Czas narastania sygnału typowy 3 s Temperatura pracy 5 C 35 C Wilgotność powietrza maks 80 brak kondensacji Obudowa S x G x W mm 200 x 280 x 63 Płytka wagi mm 160 x 160 Masa całkowita kg netto 1 4 Napięcie wejściowe 110 V 2...

Страница 140: ...nie jednostek wagowych Wywołanie menu przytrzymać przycisk wciśnięty aż zostanie wyświetlony komunikat AF Przycisk SET Potwierdzanie ustawień w menu Opuszczanie pamięci i menu Przycisk MODE Wybór punktów menu Zmiana ustawień w menu Justowanie Przycisk TARE Tarowanie Przycisk ON OFF Włączenie wyłączenie 5 EMS BA pl 1112 ...

Страница 141: ...że to spowodować błędne wyniki ważenia naruszenie technicznych warunków bezpieczeństwa jak również zniszczenie wagi Waga może być eksploatowana tylko zgodnie z opisanymi wytycznymi Inne zakresy użytkowania obszary zastosowania wymagają pisemnej zgody firmy KERN 3 3 Gwarancja Gwarancja wygasa w przypadku nieprzestrzegania naszych wytycznych zawartych w instrukcji obsługi użycia niezgodnego z opisan...

Страница 142: ...ymaniu paczki należy sprawdzić czy nie posiada ona ewentualnych widocznych uszkodzeń to samo dotyczy urządzenia po jego rozpakowaniu 5 2 Opakowanie transport zwrotny Ö Wszystkie części oryginalnego opakowania należy zachować na wypadek ewentualnego transportu zwrotnego Ö Do transportu zwrotnego należy używać tylko oryginalnego opakowania Ö Przed wysyłką należy odłączyć wszystkie podłączone kable i...

Страница 143: ...owietrza oparami i pyłem nie wystawiać urządzenia na długotrwałe działanie silnej wilgoci Niepożądane obroszenie kondensacja na urządzeniu wilgoci zawartej w powietrzu może wystąpić gdy zimne urządzenie zostanie umieszczone w znacznie cieplejszym pomieszczeniu W takim przypadku odłączone od sieci urządzenie należy poddać ok 2 godzinnej aklimatyzacji do temperatury otoczenia unikać ładunków statycz...

Страница 144: ...ęści wagi Podłączyć baterię płaską 9 V Ponownie założyć pokrywę zasobnika baterii W trybie zasilania bateryjnego waga dysponuje funkcją automatycznego wyłączania którą można aktywować i dezaktywować w menu patrz rozdz 9 3 Ö W trybie ważenia nacisnąć i przytrzymać wciśnięty przycisk UNIT aż zostanie wyświetlony komunikat AF Ö Zatwierdzić naciskając przycisk SET Ö Przycisk MODE umożliwia wybór jedne...

Страница 145: ...acy patrz Czas nagrzewania rozdz 1 W czasie nagrzewania waga musi być zasilana elektrycznie gniazdo sieciowe akumulator lub bateria Dokładność wagi zależy od lokalnego przyspieszenia ziemskiego Bezwzględnie należy przestrzegać wskazówek zawartych w rozdziale Justowanie 6 6 Justowanie Ponieważ wartość przyspieszenia ziemskiego nie jest równa w każdym miejscu Ziemi każdą wagę należy dopasować zgodni...

Страница 146: ...rzycisk MODE na wyświetlaczu zostanie wyświetlony na chwilę komunikat CAL Następnie na wyświetlaczu zostanie wyświetlona migająca dokładna wielkość wybranej masy kalibracyjnej Ö Ustawić masę kalibracyjną na środku płyty wagi Ö Nacisnąć przycisk SET Chwilę później zostanie wyświetlony komunikat CAL F a potem następuje automatyczny powrót do trybu ważenia Na wskaźniku wyświetlana jest wartość masy k...

Страница 147: ... Ziegelei 1 D 72336 Balingen E mail info kern sohn com Тел 49 0 7433 9933 0 Факс 49 0 7433 9933 149 Интернет www kern sohn com Руководство по эксплуатации Школьные весы KERN EMS Версия 1 2 07 2011 RUS EMS BA rus 1112 ...

Страница 148: ...и средствами 7 4 Основные указания по безопасности 8 4 1 Соблюдение указаний содержащихся в инструкции по обслуживанию 8 4 2 Обучение персонала 8 5 Транспортировка и складирование 8 5 1 Контрольный осмотр при приемке 8 5 2 Упаковка возврат 8 6 Распаковка установка и приведение в действие 9 6 1 Место установки место эксплуатации 9 6 2 Распаковка установка 9 6 3 Сетевой разъем 10 6 4 Работа с питани...

Страница 149: ...20 мин Количество контрольных штук при подсчете штук 5 10 20 25 50 Единицы измерения веса г кг Рекомендуемый калибровочный вес неприбавленный класс 300 г F1 3000 г F2 Время нарастания сигнала типичное 3 с Рабочая температура 5 C 35 C Влажность воздуха макс 80 отсутствие конденсации Корпус ШxГxВ мм 200 x 280 x 63 Платформа весов мм Ø 105 160 x 160 Общий вес нетто кг 1 4 Входное напряжение 110V 230V...

Страница 150: ...30 мин 120 мин 30 мин Количество контрольных штук при подсчете штук 5 10 20 25 50 Единицы измерения веса г кг Рекомендуемый калибровочный вес неприбавленный класс 6 кг F2 6 кг M1 12 кг F2 12 кг M1 Время нарастания сигнала типичное 3 с Рабочая температура 5 C 35 C Влажность воздуха макс 80 отсутствие конденсации Корпус ШxГxВ мм 200 x 280 x 63 Платформа весов мм 160 x 160 Общий вес нетто кг 1 4 Вход...

Страница 151: ...еключение единиц измерения веса Вызов меню придержать кнопку нажатой пока не появится сообщение AF Кнопка SET Подтверждение настроек в меню Выход из памяти и меню Кнопка MODE Выбор пунктов меню Изменение настроек меню Юстировкa Кнопка TARE Тарирование Кнопка ON OFF Включение выключение 5 EMS BA rus 1112 ...

Страница 152: ... Следует категорически избегать ударов и взвешивания продуктов весом превышающим максимально макс допустимый предел взвешивания с учётом веса тары Это может быть причиной повреждения весов Никогда не эксплуатируйте весы во взрывоопасном помещении Серийное выполнение не имеет противовзрывной защиты Запрещается производить изменение конструкции весов Это может быть причиной ошибочных результатов взв...

Страница 153: ...делить соответствующий предел времени а также вид и периодичность проведения контрольного осмотра Информация относительно надзора над контрольными средствами которыми являются весы как и необходимые образцы гирь доступны на сайте фирмы KERN www kern sohn com Образцы гирь и весы можно быстро и недорого калибровать в аккредитованной DKD Deutsche Kalibrierdienst калибрационной лаборатории фирмы KERN ...

Страница 154: ...ке Сразу же после получения посылки следует проверить нет ли на ней заметных повреждений это же касается самого оборудования после снятия упаковки 5 2 Упаковка возврат Ö Все части оригинальной упаковки следует сохранять на случай возможного возврата Ö В случае возврата следует использовать только оригинальную упаковку Ö Перед тем как выслать следует отключить все подключенные кабеля и свободные по...

Страница 155: ...ройство не следует подвергать длительному влиянию высокой влажности Нежелательное оседание влаги конденсация на устройстве содержащейся в воздухе влажности может появиться когда холодное оборудование будет помещено в помещении со значительно высшей температурой В таком случае отключенное от сети питания устройство следует приблизительно 2 часа акклиматизировать до температуры окружающей среды избе...

Страница 156: ...жней части весов Подключить плоскую батарейку 9 В Снова установить крышку отсека для батареек В режиме питания от батареек весы обладают функцией автоматического выключения которую можно активировать и дезактивировать в меню см раздел 9 3 Ö В режиме взвешивания нажать и придержать нажатой кнопку UNIT пока не появится сообщение AF Ö Подтвердить нажимая кнопку SET Ö Кнопка MODE позволяет выбрать одн...

Страница 157: ...аздел 1 Во время нагревания весы должны быть подключены к электропитанию сетевой разъем аккумуляторы или батарейки Точность весов зависит от локального ускорения силы тяжести Обязательно следует придерживаться указаний содержащихся в разделе Юстировка 6 6 Юстировкa Поскольку показатель земного ускорения отличается в разных местах земного шара каждые весы следует приспособить в соответствии с принц...

Страница 158: ...ржать нажатой кнопку MODE на дисплее на секунду появится сообщение CAL Затем на дисплее появится мигающее точное значение выбранной калибровочной массы Ö Разместить калибровочный груз на середине платформы весов Ö Нажать кнопку SET Секунду позднее появится сообщение CAL F а затем произойдет автоматический возврат в режим взвешивания На индикаторе высвечивается значение калибровочной массы В случае...

Страница 159: ...er beregnet til brug som ikke automatisk vægt Belast ikke vejepladen permanent Må ikke bruges til dynamisk vejning Stød og overbelastning skal ubetinget undgås Må aldrig bruges i eksplosionsfarlige rum Vægtens konstruktion må ikke ændres Kontroller inden tilslutning af forsyningsadapteren om den påtrykte spændingsværdi stemmer overens med den lokale forsyningsspænding Vær opmærksom på en fast vibr...

Страница 160: ...KERN KA dk 0810 2 Tarering 0 00 g 21 01 g 0 00 g 17 37 g 0 00 g 77 03 g 38 38 g 0 00 g Tilkobling 8 8 8 8 8 0 00 g Frakobling OFF Vejning 0 00 g 17 37 g Side 2 af 2 ...

Страница 161: ...Kaal on ettenähtud kasutamiseks mehaanilise kaaluna Mitte jätta püsikoormat kaaluplaadile Mitte kasutada dünaamilisteks kaalumisteks Kindlasti vältida kuhjasid ja ülekoormust Vältida kasutamist plahvatusohtlikes ruumides Kaalu konstruktsiooni ei tohi muuta Enne võrguadapterisse ühendamist kontrollida kas peale trükitud pingeväärtus sobib kohaliku võrgupingega Jälgida et last oleks kindel ei kõiguk...

Страница 162: ...KERN KA est 0810 2 Lehekülg 2 2 Lülitage sisse 8 8 8 8 8 0 00 g Lülitage välja OFF Kaaluma 0 00 g 17 37 g Määratlema 0 00 g 21 01 g 0 00 g 17 37 g 0 00 g 77 03 g 38 38 g 0 00 g ...

Страница 163: ...ó A mérleg serpenyőjén nem szabad sokáig rajta hagyni a súlyt Nem használható dinamikus súlymérésekre A mérleget mindenképpen óvni kell az ütésektől és a túlterhelésektől Tilos robbanásveszélyes helyiségben használni Tilos megváltoztatni a mérleg szerkezetét A hálózati adapter csatlakoztatása előtt ellenőrizni kell hogy az feltüntetett feszültségérték megfelel e a helyi hálózati feszültségnek Szil...

Страница 164: ...KERN KA h 0810 2 2 2 oldal Bekapcsolás 8 8 8 8 8 0 00 g Kikapcsolás OFF Mérés 0 00 g 17 37 g Tárázás 0 00 g 21 01 g 0 00 g 17 37 g 0 00 g 77 03 g 38 38 g 0 00 g ...

Страница 165: ...als Vekten skal brukes som ikke selvstendig vekt Ikke la det være varig last på vektplaten Må ikke brukes for dynamisk veiing Støt og overbelastninger må absolutt unngås Må aldri brukes i eksplosjonsfarlige rom Vekten må ikke endres konstruktiv Før nettadapteren forbindes så må du kontrollere om påskrevet spenningsverdi stemmer overens med den lokale nettspenningen Pass på å ha en fast vibrasjonsf...

Страница 166: ...KERN KA n 0810 2 Side 2 av 2 Innkopling 8 8 8 8 8 0 00 g Utkobling OFF Vekt 0 00 g 17 37 g Tarere 0 00 g 21 01 g 0 00 g 17 37 g 0 00 g 77 03 g 38 38 g 0 00 g ...

Страница 167: ... de timp Nu folosiţi cântarul pentru cântărirea dinamică Feriţi cântarul de lovituri şi supraîncărcare Nu folosiţi niciodată cântarul în încăperile în care există pericol de explozie Nu realizaţi modificări în construcţia cântarului Înainte de conectarea alimentatorului la reţeaua de alimentare cu curent electric verificaşi dacă valoarea tensiunii care este trecută pe eticheta cântarului este în c...

Страница 168: ...KERN KA ro 1110 Tara 0 00 g 21 01 g 0 00 g 17 37 g 0 00 g 77 03 g 38 38 g 0 00 g Pornire 8 8 8 8 8 0 00 g Oprire OFF Cântărire 0 00 g 17 37 g Pagina 2 din 2 ...

Страница 169: ...anuals Vågen är avsedd som icke självständig våg Lämna ingen permanentlast på vågplattan Får inte användas för dynamiska vägningar Stöttar och överlast måste undvikas Får inte användas i explosionsfarliga utrymmen Vågens konstruktion får inte ändras Innan nätadaptern ansluts skall kontrolleras att det utmärkta spänningsvärdet stämmer överens med den lokala nätspänningen Skall placeras på fast vibr...

Страница 170: ...KERN KA swe 0810 2 Sida 2 av 2 Påslagning 8 8 8 8 8 0 00 g Avstängning OFF Vägning 0 00 g 17 37 g Tarering 0 00 g 21 01 g 0 00 g 17 37 g 0 00 g 77 03 g 38 38 g 0 00 g ...

Страница 171: ...s Vaa an tarkoitus on toimia mekaanisena vaa ana Älä jätä jatkuvaa kuormaa vaa an levylle Älä käytä dynaamisia painamisia varten Vältä kukkuroita ja ylikuormitusta Älä käytä räjähdysvaarallisissa tiloissa Vaa an rakennetta ei saa muuttaa Ennen verkkosovittimeen kytkemistä tarkista onko päälle painettu jännitearvo paikallisen verkkojännitteen kanssa yhteen sopiva Tarkista että lasti ei heiluisi ja ...

Страница 172: ...KERN KA fin 0810 Sivu 2 2 Laitteen käynnistys 8 8 8 8 8 0 00 g Virran katkaiseminen OFF Painaa 0 00 g 17 37 g Määritellä 0 00 g 21 01 g 0 00 g 17 37 g 0 00 g 77 03 g 38 38 g 0 00 g ...

Страница 173: ... Váha naprojektovaná ako neautomatická váha Váhu dlhodobo nezaťažujte Nepoužívajte na dynamické váženie Zabraňujte nárazom a preťaženiu Nikdy nepoužívajte v miestnostiach s nebezpečenstvom výbuchu Nevykonávajte žiadne konštrukčné zmeny na váhe Pred pripojením sieťového napájania skontrolujte či je uvedená hodnota napätia zhodná s lokálnym napätím siete umiestnite na pevný povrch podľa možnosti hor...

Страница 174: ...KERN KA sk 1110 Tarovanie 0 00 g 21 01 g 0 00 g 17 37 g 0 00 g 77 03 g 38 38 g 0 00 g Zapínanie 8 8 8 8 8 0 00 g Vypínanie OFF Váženie 0 00 g 17 37 g Strana 2 z 2 ...

Страница 175: ...e predvidena za uporabo kot neavtomatična tehtnica Na tehtalni plošči ne puščajte trajne obremenitve Ne uporabljajte za dinamična tehtanja Obvezno preprečite udarce in preobremenitve Nikoli ne uporabljajte v eksplozivno nevarnih področjih Tehtnice se konstruktivno ne sme spreminjati Pred priključitvijo omrežnega adapterja preverite ali se natisnjena vrednost napetosti ujema z lokalno omrežno napet...

Страница 176: ...KERN KA slo 0810 2 Stran 2 od 2 Vklop 8 8 8 8 8 0 00 g Izklop OFF Tehtanje 0 00 g 17 37 g Tariranje 0 00 g 21 01 g 0 00 g 17 37 g 0 00 g 77 03 g 38 38 g 0 00 g ...

Страница 177: ...rülmüştür Tartım tablası üzerinde daimi yük bırakılmamalıdır Dinamik tartım işlemleri için kullanılmamalıdır Darbelerden ve aşırı yüklemeden mutlaka kaçınılmalıdır Patlama tehlikesi olan mekanlarda asla çalıştırılmamalıdır Tartının yapısal olarak değiştirilmesi yasaktır Güç adaptörünün bağlamadan önce adaptör üzerinde yazılı olan voltaj değerinin yerel şebeke voltajı ile örtüşüp örtüşmediği kontro...

Страница 178: ...KERN KA tr 0810 2 Sayfa 2 2 Açma 8 8 8 8 8 0 00 g Kapatma OFF Tartma 0 00 g 17 37 g Dara alma 0 00 g 21 01 g 0 00 g 17 37 g 0 00 g 77 03 g 38 38 g 0 00 g ...

Отзывы: