background image

English

1

Notes on Disposal

Recycling the Built-in Battery

The Transmitter uses a lithium ion rechargeable battery cell as the built-in battery. The 
lithium ion rechargeable battery is a recyclable resource. When disposing of the Transmitter, 
take out the built-in battery and bring it to your local recycling business.

WARNING

•  Do not heat excessively the built-in battery, open it, modify it or throw it in fire or 

water.

Excessive heat generation, explosion or fire ignition may cause a fire.

•  Do not leave the built-in battery near fire or under direct sunlight.

A fire, explosion or excessive heat generation may result.

•  Attach insulating tape on the connectors of the built-in battery.

A fire or explosion may result if the battery electrodes are short-circuited.

•  Do not leave the built-in battery within the reach of children.

Injury or other accidents may result.

•  If the built-in battery fluid leaks and enters your eyes, immediately rinse your eyes 

with fresh water and call a doctor.

If the fluid is left in your eyes, an eye injury may result.

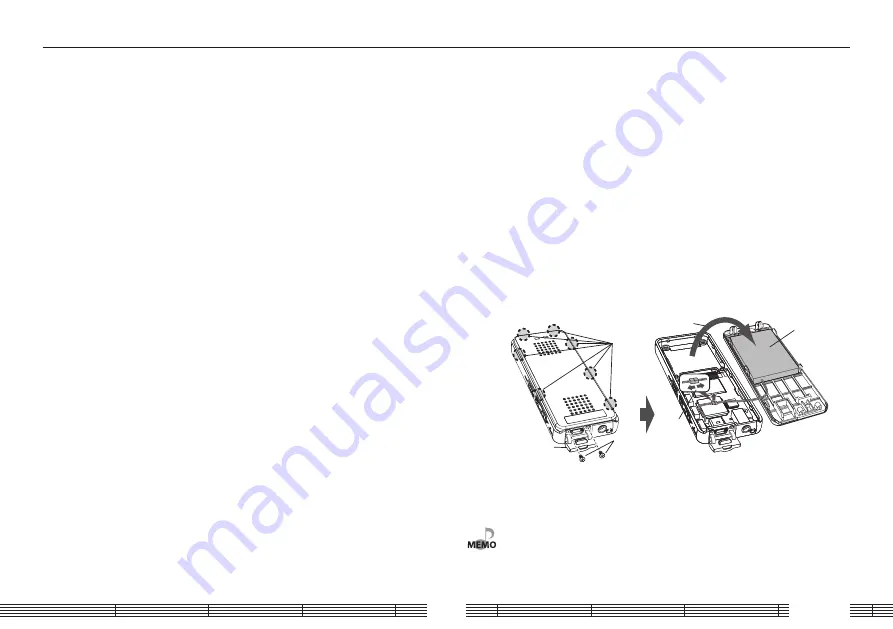
Removing  the  Rechargeable  Battery  (Built-in  Battery)  Before  Disposal: 
M2GD55

IMPORTANT:

  Never attempt to open the Player besides when disposing of it. 
  For replacement of the built-in battery, contact your nearest Kenwood service agent.

  • Remove the built-in battery after having confirmed that it is completely discharged.


• Once the built-in battery is disconnected, do not attempt to reconnect it to the connector on 

the circuit board.


• Bring the removed built-in battery to a rechargeable battery recycling business as early as 

possible.

1

 Open the USB cover.

2

 Remove the 2 screws from the panel 

using a precision Phillips screwdriver 
(+).

3

 Remove the back panel (by releasing 

7 latches).

4

 Disconnect the built-in battery from the 

connector. Be careful not to apply an 
excessive force on the connector.

5

 Take out the built-in battery. Be careful 

not to injure your nail or finger during 
removal.

6

 Attach a piece of insulating tape on 

the connector at the end of the cable 
from the built-in battery, and put it in a 
plastic bag, etc.

Appendix

Содержание M1GD50

Страница 1: ...M2GD55 M1GD50 B60 5704 08 01 E INSTRUCTION MANUAL DIGITAL AUDIO PLAYER ENGLISH FRANÇAIS DEUTSCH NEDERLANDS ITALIANO ESPAÑOL ...

Страница 2: ...ows Media Player 11 10 9 15 Formatting 16 When the connection mode is MTP mode 16 When the connection mode is MSC mode 16 Playing music tracks Selecting music for playback 17 Display during playback 18 Number of tag information display characters 18 Operations available during playback 18 Various play modes 19 Adjusting the audio Adjusting the audio 21 Adjusting the volume 21 Selecting the sound e...

Страница 3: ...he car particularly above the dashboard for this may lead to malfunction or damage due to solar heat If the unit is connected to a car stereo using an audio cord noise may sometimes interfere IMPORTANT SAFETY INSTRUCTIONS Caution Read this page carefully to ensure safe operation Read Instructions All the safety and operating instructions should be read before the product is operated Retain Instruc...

Страница 4: ...ty wipe with a soft dry cloth Do not use thinner benzine alcohol etc for these agents may cause discoloration In regard to contact cleaner Do not use contact cleaners because it could cause a malfunction Be specially careful not to use contact cleaners containing oil for they may deform the plastic component Note on the built in battery For the replacement of the built in battery contact your deal...

Страница 5: ...ion page 8 Switching Power ON page 8 Recharging Battery Connecting a PC page 9 Capturing Music in PC page 11 Transferring Music from PC page 13 Playing music tracks Selecting music for playback page 17 Operations available during playback page 18 19 Preparation Preparation of music files Playback of music Adjusting the audio Adjusting the volume page 21 Selecting the sound effects page 21 Volume a...

Страница 6: ...ress and hold for more than 1 second to set the A B Repeat points Press while the menu is displayed to enter a selected item VOLUME button Press to increase or decrease the volume Pressing and holding a button segment varies the volume gradually HOLD switch Press to defeat all other buttons This helps prevent erroneous operation of the Player when it is carried in a bag etc Phones jack Connect the...

Страница 7: ...lecting by artist name Artist name Album title Track title Selecting by album title Album title Track title Selecting by genre name Genre name Track title Selecting by track title Track title Library screen This is the music selection display page with 4 types of selecting method page 17 Selecting Play all during playback starts playback of all the music tracks belonging to the last selected item ...

Страница 8: ...HOLD function is switched on and the display is in the screen saver mode the Power Menu button blinks twice every 3 seconds is displayed when the display is turned on Switching Power ON OFF Connect the provided stereo headphones to the Player Entanglement prevention slider Hold the headphone body and insert into each ear The optimum condition is when the ear hole is stopped completely by the ear t...

Страница 9: ...e battery is not inserted or not rechargeable Power Menu button s indicator during USB connection ON The indicator lights during recharging OFF The indicator is extinguished when recharging completes Blink Data is being transferred between the player and the PC Connecting a PC Connect the Player to a PC to transfer music from the PC to the Player and to recharge its battery The connection mode var...

Страница 10: ...not blinking before unplugging the USB cable When the connection mode is MSC mode When KENWOOD_DAP is displayed on Windows 1 Click the Safe To Remove Hardware icon Display the indicator on the task tray if it is not displayed WindowsVista Windows XP Windows 2000 2 Click Safely remove USB Mass Storage Device Vista XP 2000 When the message showing that the Player can be disconnected safely disconnec...

Страница 11: ...he checkboxes of the CD tracks to be ripped Checking the checkbox at the top of the list checks or unchecks all the track names listed below it For the operating procedures of software including the Windows Media Player refer to the manuals and help information for the software If copy protection is set when capturing tracks of a music CD into the PC using the Windows Media Player transferring the...

Страница 12: ... Media Player 2 Click the Rip button on the top 3 Place a music CD in the CD ROM driver of the PC 4 Check the checkboxes of the CD tracks to be ripped 5 Click the Rip Music button For first use For selecting a destination folder or a file format go to Tools menu Options Rip music tab ...

Страница 13: ... dialog box is displayed Search for the music files to be added to the library 3 Click the Sync button on the top 4 Select the MTP player Kenwood M_D5 or the removable disk KENWOOD_DAP corresponding to this Player For first use Transferring Music from PC 5 Add the music files to be transferred in the Sync List Drag drop the music file selected from the library into the sync list on the right Alter...

Страница 14: ...plorer and drag drop the desired file from the PC s hard disk drive to this Player expressed as MTP Kenwood M_D5 M_D5 or MSC KENWOOD_DAP on Windows Copy paste can also be used for data transfer 1 Open the MTP player or the removable disk corresponding to this Player Click Start Computer MTP Kenwood M_D5 M_D5 or MSC KENWOOD_DAP 2 Open the folder storing the desired music file 3 Drag drop the music ...

Страница 15: ...Launch the Windows Media Player 3 Click the Sync button on the top 4 Select the MTP player Kenwood M_D5 or the removable disk KENWOOD_DAP corresponding to this Player 5 Select the music file to be deleted right click to open a pop up menu and select Delete from it Using Windows Media Player 10 1 Connect the Player to a PC 2 Launch the Windows Media Player 3 Click the Sync button on the top 4 Selec...

Страница 16: ...indows Media Player 3 Click the Sync button on the top 4 Select the MTP player Kenwood M_D5 corresponding to this Player 5 Click the arrow below the Sync tab to open a menu and select Kenwood M_D5 Format Using Windows Media Player 10 1 Connect the Player to a PC 2 Launch the Windows Media Player 3 Click the Sync button on the top 4 Select the MTP player M_D5 corresponding to this Player 5 Click th...

Страница 17: ...t a major item Artist for example Artist Album Genre Track The list for the major item intermediate items is displayed 4 Select an intermediate item Artist name for example Artist Play all Artist name Artist name The list for the intermediate item is displayed 5 Select an intermediate item Album title for example Artist Play all Album title Album title The list for the intermediate item is display...

Страница 18: ...utton Displays the menu Press in screen saver mode to turn the display on Down button Each press plays the next track Skip up Press and hold to fast forward the track Up button Each press skips to the beginning of the current track or of the previous track Skip down Press and hold to fast reverse the track Play Pause button Play mode Lets playback pause temporarily Pause mode Resumes playback Pres...

Страница 19: ...d mode Play mode Sleep timer Playing music tracks 4 Select the desired play mode Play mode Normal Repeat all Repeat one The display during playback resumes in about 30 seconds Press the Menu button to return to the previous display page To select A B repeat 1 Advance music until the point you want to set as the A B Repeat start point Artist name Track title MP3 Press and hold the Up or Down button...

Страница 20: ...ng the button for more than 1 second release the button A B is displayed Even during pause the end point can be set by pressing and holding the button for more than 1 second 5 To cancel A B Repeat Artist name Track title MP3 1sec Artist name Track title MP3 Playing music tracks Various play modes ...

Страница 21: ...default condition set at the factory Sound mode is set to Normal Press the Menu button to return to the previous display page Adjusting the audio Adjusting the volume Adjust the listening volume as follows 1 Select the volume level Artist name Track title MP3 Artist name Track title 10 side Pressing and holding a button segment varies the volume gradually Selecting the sound effects Select one of ...

Страница 22: ...itch the Player OFF after the set period of time 1 Open the home screen Artist Album Genre Track The home screen opens 2 Select Settings Settings 3 Select Sleep timer Settings Sound mode Play mode Sleep timer 4 Select the timer to be set Sleep timer Off 10Min 20Min The sleep timer period can be set in 10 minute steps between 10 and 60 minutes The display during playback resumes in about 30 seconds ...

Страница 23: ...us etc ENGLISH 日本語 DEUTSCH FRANCAIS ESPAÑOL ITALIANO NEDERLANDS indicates the factory setting Initialize Initialization resets the settings made using the Settings menu etc to the default settings made at the factory Refer to Initialization page 25 System information System The system information of the Player total memory capacity available memory capacity and version No is displayed Press the Pl...

Страница 24: ...ens 2 Select Settings Settings 3 Select Language Settings Language Initialize System 4 Select the desired language Language ENGLISH 日本語 DEUTSCH The display during playback resumes in about 30 seconds Setting the menu language Setting and adjusting the Player Press the Menu button to return to the previous display page ...

Страница 25: ...n to the previous display page Setting and adjusting the Player Initialization Initialization resets the settings made using the Settings menu etc to the default settings made at the factory Caution Initialization resets the Settings menu to the default settings It does not delete music files etc 1 Open the home screen Artist Album Genre Track The home screen opens 2 Select Settings Settings 3 Sel...

Страница 26: ... of the connected external component Noise may be interfered depending the installation environment including the vehicle model devices in the surroundings and the antenna positioning Do not use or leave the Player or connected component in an automobile compartment with high temperatures Otherwise equipment failure may result For the operating procedure and the playable files read the instruction...

Страница 27: ...s and operating method of the Digital Audio Player Link refer to the instruction manual for a Digital Audio Player Link compatible audio component This Player is not compatible with the folder skip function Digital Audio Player Link compatible stereo Digital audio input Special cable 1 Switch the Player ON 2 Set the input selector of the connected stereo set to Digital Audio The Player operations ...

Страница 28: ...tion technology of Microsoft Corp that was incorporated since Windows Media Player 10 It is compatible with fixed rate distribution as well as traditional copy protection MP3 An international data compression standard of MPEG which is a working group in ISO International Standardization Organization It offers compression rates between about 1 10 and 1 12 MSC Mass Storage Class USB device type that...

Страница 29: ...ry power drops soon after recharging The rechargeable battery is degraded Replace it with a brand new rechargeable battery For the battery replacement contact your nearest Kenwood service agent Audio is not heard Headphones are connected improperly Connect headphones correctly to the Player Battery cannot be recharged USB cable is connected improperly Check the connections on both the Player and P...

Страница 30: ...ements 6 OS Microsoft Windows Vista XP 2000 Not supported by 64 bit version OS USB connector Compliant to USB 1 1 2 0 standard Kenwood follows a policy of continuous advancements in development For this reason specifications may be changed without notice 1 The actual available space may be smaller than specified due to the presence of the system file area 2 The organic EL display is fabricated wit...

Страница 31: ...inse your eyes with fresh water and call a doctor If the fluid is left in your eyes an eye injury may result Removing the Rechargeable Battery Built in Battery Before Disposal M2GD55 IMPORTANT Never attempt to open the Player besides when disposing of it For replacement of the built in battery contact your nearest Kenwood service agent Remove the built in battery after having confirmed that it is ...

Страница 32: ...le battery recycling business as early as possible 1 Remove the rubber of back panel 2 Remove the 1 screw from the panel using a precision Phillips screwdriver 3 Remove the front panel by releasing 8 latches 4 Remove the 4 screws from the circuit board using a precision Phillips screwdriver 5 Take out the circuit board 6 Disconnect the built in battery from the connector Be careful not to apply an...

Страница 33: ...i shi Tokyo 192 8525 Japan EU Representative s Kenwood Electronics Europe BV Amsterdamseweg 37 1422 AC UITHOORN The Netherlands Information on Disposal of Old Electrical and Electronic Equipment applicable for EU countries that have adopted separate waste collection systems Products with the symbol crossed out wheeled bin cannot be disposed as household waste Old electrical and electronic equipmen...

Страница 34: ......

Отзывы: