background image

Connection/Installation

84

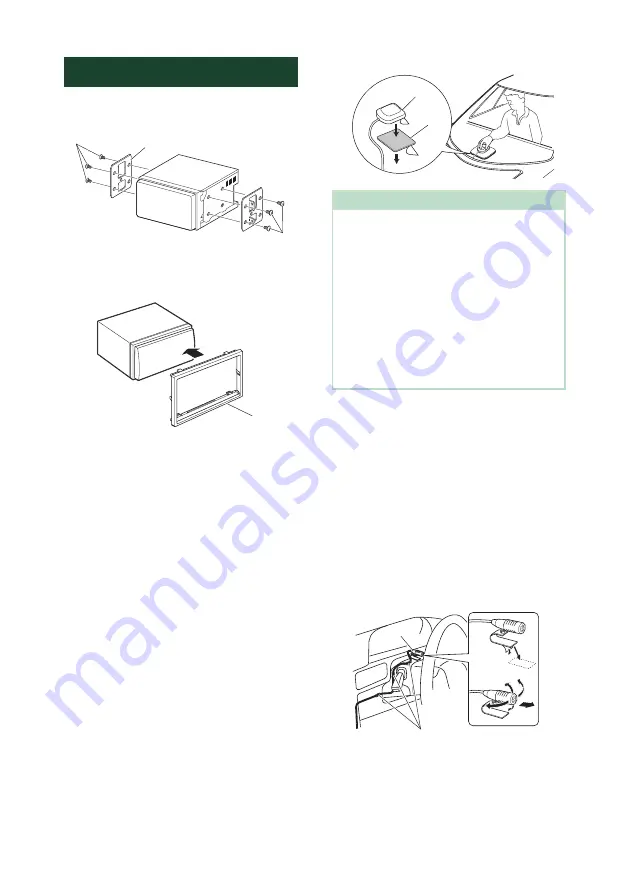
Installing the unit


Ñ

Japanese cars

6

 or 

7

6

 or 

7

Car Bracket


Ñ

Trim plate 

1) Attach accessory 

5

 to the unit.

5


Ñ

GPS antenna

GPS antenna is installed inside of the car. It 

should be installed as horizontally as possible 

to allow easy reception of the GPS satellite 

signals.
To mount the GPS antenna inside your vehicle:

1) Clean your dashboard or other surface.
2) Remove the separator of the metal plate 

(accessory 

9

).

3) Press the metal plate (accessory 

9

) down 

firmly on your dashboard or other mounting 
surface. You can bend the metal plate 
(accessory 

9

) to conform to a curved surface, 

if necessary.

4) Remove the separator of the GPS antenna 

(accessory 

8

), and stick the antenna to the 

metal plate (accessory 

9

).

9

8

NOTE

•  Depending on the type of car, reception of the 

GPS satellite signals might not be possible with 
an inside installation.

•  Please install this GPS antenna in an area away 

from any antennas that are used with CB radios or 
satellite televisions.

•  The GPS antenna should be installed at a position 

that is spaced at least 12 inch (30 cm) from 
cellular phone or other transmitting antennas. 
Signals from the GPS satellite may be interfered 
with by these types of communication.

•  Painting the GPS antenna with (metallic) paint 

may cause a drop in performance.


Ñ

Microphone unit

1) Check the installation position of the 

microphone (accessory 

4

).

2) Clean the installation surface.
3) Remove the separator of the microphone 

(accessory 

4

), and stick the microphone to 

the place shown below.

4) Wire the microphone cable up to the unit 

with it secured at several positions using tape 
or other desired method.

5) Adjust the direction of the microphone 

(accessory 

4

) to the driver.

4

Fix a cable with a commercial item of tape.

Содержание DNX5170S

Страница 1: ...AL Updated information the latest Instruction Manual system updates new functions etc is available from http www kenwood com cs ce The Instruction manual is subject to change for modification of specifications and so forth Be sure to download the latest edition of the Instruction manual for reference http manual kenwood com edition im392 ...

Страница 2: ...n 22 Music CD Disc media Basic Operation 24 Search Operation 25 DVD Disc Menu Operation 26 DVD Setup 27 USB 28 Connecting a USB device 28 USB Basic Operation 28 Search Operation 30 iPod iPhone 31 Preparation 31 iPod iPhone Basic Operation 32 Search Operation 33 APPS Android Auto Apple CarPlay Mirroring 34 Mirroring Operation 34 Apple CarPlay Operation 35 Android Auto Operation 36 Spotify Operation...

Страница 3: ...r Interface Setup 65 Special Setup 67 Display Setup 67 AV Setup 69 Controlling Audio 70 Speaker X over setup 70 Controlling General Audio 72 Equalizer Control 73 Volume Offset 74 Zone Control 74 Sound Effect 75 Listening Position DTA 76 Remote control 78 Battery Installation 78 Functions of the Remote control Buttons 79 Connection Installation 82 Before Installation 82 Installing the unit 84 Troub...

Страница 4: ... unit is stained wipe it with a dry soft cloth such as a silicon cloth If the faceplate is stained badly wipe the stain off with a cloth moistened with neutral cleaner then wipe it again with a clean soft dry cloth NOTE Applying spray cleaner directly to the unit may affect its mechanical parts Wiping the faceplate with a hard cloth or using a volatile liquid such as thinner or alcohol may scratch...

Страница 5: ...ing potentially hazardous situations could result in an accident or collision resulting in death or serious injury When navigating carefully compare information displayed on the navigation system to all available navigation sources including information from street signs visual sightings and maps For safety always resolve any discrepancies or questions before continuing navigation Always operate t...

Страница 6: ...eserve the battery however it should be used with the engine running whenever possible Using the navigation system for a long time with the engine switched off can cause the battery to run down Map Data Information One of the goals of Garmin is to provide customers with the most complete and accurate cartography that is available to us at a reasonable cost We use a combination of governmental and ...

Страница 7: ...en 4 HOME Displays the HOME screen P 13 Pressing for 1 second turns the power off When the power off turns the power on The function of the button when held varies depending on the Manual Power OFF setting P 67 5 MENU Displays the popup menu screen Pressing for 1 second switches view camera display on off P 61 The camera whose view is displayed first changes according to the Camera Setup setting a...

Страница 8: ... If above icon is showed read the article applicable to the unit you use Number Name Motion 1 Disc insert slot A slot to insert a disc media 2 G Ejects the disc To forcibly eject the disc press it for 2 seconds and touch Yes after the message is displayed 3 SI This indicator flashes when the vehicle ignition is off P 11 4 Remote Sensor Receives the remote control signal 5 HOME Displays the HOME sc...

Страница 9: ...how to upgrade the map refer to the instruction manual of the navigation system Turning on the Unit The method of turning on is different depending on the model 1 Press the HOME button h h The unit is turned on To turn off the unit 1 Press the HOME button for 1 second NOTE If it is your first time turning the unit on after installation it will be necessary to perform Initial setup P 10 The functio...

Страница 10: ...ee User Interface Setup P 65 Display Set the button illumination color If it is hard to see the image on the screen even after adjusting the front panel angle adjust the viewing angle 1 Touch Display 2 Touch Key Color 3 Select the desired color 4 Touch 5 Touch Viewing Angle 6 Select a viewing angle 7 Touch For detailed operation see Display Setup P 67 Camera Set the parameters for the camera 1 Tou...

Страница 11: ... touch Enter 6 Enter the same code again and touch Enter Now your security code is registered NOTE Touch BS to delete the last entry If you enter a different security code the screen returns to step 5 for the first code entry if you have disconnected the Receiver from battery enter the correct security code as that you have entered in step 5 and touch Enter You can use your receiver To change the ...

Страница 12: ...ock Adjust If you select Manual for Clock adjust the date and time manually P 65 Adjusting the volume To adjust the volume 0 to 40 Press R to increase and press S to decrease Holding R increases the volume continuously to level 15 Turn to the right to increase and turn to the left to decrease Monitor Angle Control You can adjust the position of the monitor 1 Press the G button h h Angle Adjust scr...

Страница 13: ...creen up down Swipe Slide your finger up or down on the screen to scroll the screen HOME screen descriptions Most functions can be performed from the HOME screen 5 4 6 7 1 2 3 1 Displays the control screen of current source 2 Widget You can change the widget by touching or flicking left or right on the widget area Touch the widget to display the detailed screen 3 Page indication for widgets 4 Curr...

Страница 14: ...hes to the Android Auto 2 Apple CarPlay Air Mirroring screen from the connected iPod touch iPhone Android device 1 P 34 Switches to the Radio broadcast P 42 Switches to the Digital Radio broadcast 3 P 45 Plays a Bluetooth audio player P 50 Plays a disc P 22 Plays an iPod iPhone P 31 Plays files on a USB device P 28 Switches to the Spotify P 38 Switches to the Pandora 4 P 40 Switches to an external...

Страница 15: ...playback source on the source control screen Display source selection buttons by touching or flicking left or right on the source control screen then select a playback source Put the unit in standby 1 Touch on the HOME screen 2 Touch STANDBY Customize Short cut buttons on HOME screen You can arrange the position of the source icons as you like 1 Touch on the HOME screen 2 Touch and hold the icon w...

Страница 16: ...or right on the screen Indicators Displays the current source condition and so on ATT The attenuator is active DUAL The dual zone function is on MUTE The mute function is active LOUD The loudness control function is on Navigation information Displays the current location and the direction The screen changes to the navigation screen when you touch here Short cut buttons The source changes to the on...

Страница 17: ...iptions P 13 Turn off the screen 1 Select Display OFF on the pop up menu List screen There are some common function keys in the list screens of most sources 6 1 2 3 4 5 1 Displays list type selection window 2 Displays music movie file list 3 Text scroll Scrolls the displayed text 4 etc Keys with various functions are displayed here Plays all tracks in the folder containing the current track Jump t...

Страница 18: ...e guidance Finding points of interest 1 Touch Where To 2 Select a category and a subcategory 3 Select a destination 4 Touch Go NOTE To enter letters contained in the name touch the Search bar and enter the letters 3 Follow your route to the destination NOTE The speed limit icon feature is for information only and does not replace the driver s responsibility to abide by all posted speed limit signs...

Страница 19: ...he traffic map 1 The traffic map shows color coded traffic flow and delays on nearby About traffic DNX9170S DNX9170SM DNX5170SM Traffic service is not available in some areas or countries Garmin and JVC KENWOOD are not responsible for the accuracy or timeliness of the traffic information With an FM traffic receiver the navigation system can receive and use traffic information When a traffic messag...

Страница 20: ...ation Setup 1 Press the MENU button h h Popup menu appears 2 Touch SETUP h h SETUP Menu screen appears 3 Touch Navigation h h Navigation SETUP screen appears 4 Set each item as follows NAV Mute Mutes the volume of rear speakers during voice guidance of the navigation system Default is ON NAV Interrupt Speaker Selects speakers used for voice guidance of the navigation system Front L Uses the front ...

Страница 21: ...erted as the slot cover Remove it before using and keep it in an appropriate place Ñ Ñ Remove the SD card 1 Press the G button 2 Touch OPEN to the panel fully opens 3 Push the SD card until it clicks and then remove your finger from the card The card pops up so that you can pull it out with your fingers 4 Press the G button 1 Push the microSD card until it clicks and then remove your finger from t...

Страница 22: ...ntally 3 Press the G button 1 Press the G button DVD VCD Basic Operation Most functions can be controlled from the source control screen and playback screen NOTE Set the remote control mode switch to DVD mode before starting operation for DVD and VCD see Switch the operation mode P 79 The screen shot below is for DVD It may be different from the one for VCD 1 When the operation buttons are not dis...

Страница 23: ...io output of channel 1 or 2 1chLR 2chLR Identifies the monaural audio output of channel 1 or 2 1chRR 2chRR Identifies the right audio output of channel 1 or 2 1chST 2chST Identifies the stereo audio output of channel 1 or 2 LL Identifies the left audio output LR Identifies the monaural audio output RR Identifies the right audio output ST Identifies the stereo audio output PBC The PBC function is o...

Страница 24: ...de switches in the following sequence Track random Music CD only Folder random Disc media only Random off 2 Track information Displays the information of the current track file Only a file name and a folder name are displayed if there is no tag information Disc media only 3 Function bar 1 Disc media only Searches file For details on search operation see File search P 25 E F Searches the previous n...

Страница 25: ...a only You can search music or video files by the following operations NOTE If you use a remote control you can jump directly to the desired track with entering the track number For details see Direct search mode P 79 Ñ Ñ File search You can search a file according to hierarchy 1 Touch 1 h h Folder List screen appears 2 Touch the desired folder h h When you touch a folder its contents are displaye...

Страница 26: ...uch R S C D Switches the subtitle language Touch Subtitle Each time you touch this key language is switched Switches the audio language Touch Audio Each time you touch this key language is switched Switches the picture angle Touch Angle Each time you touch this key picture angle is switched These keys may not function depending on the disc Ñ Ñ Highlight control Highlight control lets you control t...

Страница 27: ...Dolby Digital software Screen Ratio Sets the screen display mode 16 9 Default Displays wide pictures 4 3 LB Displays wide pictures in the Letter Box format having black stripes at the top and bottom of screen 4 3 PS Displays wide pictures in the Pan Scan format showing pictures cut at the right and left ends Ñ Ñ Language setup This setting is for the language used in the menu subtitle and voice 1 ...

Страница 28: ...d depending on the operating conditions of the USB device We shall have no compensation for any damage arising from any erased data USB Basic Operation Most functions can be controlled from the source control screen and playback screen NOTE Set the remote controller mode switch to AUD mode before starting operation see Switch the operation mode P 79 Control screen 4 3 5 2 6 1 7 Content list panel ...

Страница 29: ...devices are connected 5 Content list Touch on the right side of the screen to display the Content list Touch again to close the list 6 Indicator Items VIDEO Identifies the video file MUSIC Identifies the music file 7 Artwork Play mode indicator Playing time The jacket of the currently playing file is displayed D B etc Current play mode indicator The meanings of each icon are as follows D play B fa...

Страница 30: ...4 Touch to select desired item in the list Repeat this step until you find the desired file Ñ Ñ Link search You can search a file of same artist album genre as the current track 1 Touch Link Search 2 Touch the desired tag type You can select from artist album and genre h h The list corresponding to your selection appears 3 Touch desired item from the content list Ñ Ñ Folder search You can search a...

Страница 31: ...nnect an iPod iPhone with the KCA iP103 optional accessory while CarPlay is not connected With a CarPlay capable iPhone turn off CarPlay by operating the iPhone at functional setup before connecting iPhone For details of the setup method contact the manufacturer of the terminal Plug the iPod iPhone into the gray USB terminal with the KCA iP103 optional accessory Only one iPod iPhone can be connect...

Страница 32: ...See Category search P 33 3 Function bar 1 Searches track file For details on search operation see Search Operation P 33 E F Searches the previous next track file Touch and hold to fast forward or fast backward It will be cancelled automatically after about 50 seconds DH Plays or pauses Touch to mute or not to mute 4 Content list Touch on the right side of the screen to display the Content list Tou...

Страница 33: ...gory List 2 Touch the desired category h h The list corresponding to your selection appears 3 Touch to select desired item in the list Repeat this step until you find the desired file Ñ Ñ Link search You can search a file of same artist album genre composer as the current track 1 Touch Link Search 2 Touch the desired tag type You can select from artist album genre and composer h h The list corresp...

Страница 34: ...operation 1 Press the HOME button 2 Touch 3 Touch Air Mirroring P 14 h h The App screen is displayed 4 Operate your Android device to activate Miracast then connect to this unit 5 Select Car Multimedia as the network to use h h When the connection is established then the same screen displayed on the Android device is displayed NOTE Air mirroring is discontinued when the power is turned ON OFF or y...

Страница 35: ...one 6 Plus iPhone 6 iPhone 5s iPhone 5c iPhone 5 Ñ Ñ Preparation 1 Connect iPhone using KCA iP103 via USB Black terminal P 91 When iPhone compatible with CarPlay is connected to the USB Black terminal the Bluetooth smartphone currently connected is disconnected 2 Unlock your iPhone Ñ Ñ Operation buttons and available Apps on the home screen of CarPlay You can use the Apps of the connected iPhone T...

Страница 36: ...o music and access convenient functions on the Android device while driving For details about Android Auto visit https www android com auto and https support google com androidauto Compatible Android devices You can use Android Auto with Android devices of Android version 5 0 Lollipop or later NOTE Android Auto may not be available on all devices and is not available in all countries or regions Ñ ...

Страница 37: ...o icon in the source selection screen P 14 1 1 Application information buttons Starts the application or displays information To exit the Android Auto screen 1 Press the HOME button Ñ Ñ Using voice control 1 Press the button for 1 second Press for 1 second To cancel 1 Press the button Ñ Ñ Switch to the Android Auto screen while listening to another source 1 Press the button Press for 1 second NOTE...

Страница 38: ...unit P 51 and Connect the Bluetooth unit P 53 1 2 3 4 1 Artwork Playing time The picture data is displayed if available from current content For confirmation of play time 2 Function bar Displays the Menu screen New radio station that relates to the artist of the currently playing song is selected and playback starts Skips the current song Plays or pauses the content of the current station Saves cu...

Страница 39: ...Ensure you are logged in to your smartphone application If you do not have an Spotify account you can create one for free from your smartphone or at www spotify com Because Spotify is a third party service the specifications are subject to change without prior notice Accordingly compatibility may be impaired or some or all of the services may become unavailable Some functions of Spotify cannot be ...

Страница 40: ... available from current content For confirmation of play time 2 Function bar Searches for a station For details on searching see Station list screen P 40 Thumbs down Thumbs down to the current song and skip to the next song Thumbs up Registers the current contents as favorite content D H Plays or pauses the content of the current station F Skips the current song Note this function is disabled when...

Страница 41: ...l BlackBerry Visit www pandora com from the built in browser to download the Pandora application Bluetooth must be built in and the following profiles must be supported SPP Serial Port Profile A2DP Advanced Audio Distribution Profile NOTE In the application on your device log in and create an account with Pandora If you are not already a registered user an account can also be created at www pandor...

Страница 42: ...s in a station The method of frequency switching can be changed see 2 in table AME Presets stations automatically For details see Auto memory P 43 Displays the TUNER SETUP screen For details see Tuner Setup P 44 Touch to mute or not to mute 6 PTY FM only Searches a program by setting program type For details see Search by program type P 43 7 MONO FM only Select the Monaural reception 8 TI FM only ...

Страница 43: ... a station you wish to store in memory 3 Touch 1 6 in which you want to store the station for 2 seconds until a beep sounds Selecting Operation Ñ Ñ Preset select You can list and select memorized station 1 Select a station from the list Ñ Ñ Search by program type FM only You can tune to a station with a specific program type when listening to FM 1 Touch PTY h h PTY Search screen appears 2 Select a...

Страница 44: ...setting automatically Tuner Setup You can set tuner related parameters 1 Touch h h Radio SETUP screen appears 2 Set each item as follows NEWS Sets a news bulletin interrupt time Default is OFF AF When station reception is poor automatically switches to the station that is broadcasting the same program over the same Radio Data System network Default is OFF Regional Sets whether to switch to the sta...

Страница 45: ...after another MANUAL Switches to the next ensemble manually 4 Function bar 1 Displays the Service List screen For details on search operation see Service search P 47 E F Tunes in a ensemble service and component The seek mode switching can be changed see 3 in table Touch to mute or not to mute 5 Preset key Recalls the memorized service Touching on the screen or flicking the screen to left will dis...

Страница 46: ...es a program by setting program type For details see Search by program type P 47 DLS Display the Dynamic Label Segment screen Ñ Ñ Information screen 1 Touch to switch between the Control and Information screen Storing Service in Preset Memory You can store the current receiving service in memory 1 Select a service you wish to store in memory 2 Touch on the right side of the screen 3 Touch P 1 15 i...

Страница 47: ...PTY Search screen appears 2 Select a program type from the list 3 Touch Search You can search a station of the selected program type Ñ Ñ Service search You can select a service from a list of all services received 1 Touch 1 2 Select the desired content from the list Touch and hold to find the latest service list 1A Z Displays the keyboard screen Jump to the letter you entered alphabet search ...

Страница 48: ...on of traffic information is automatically stored The next time the traffic information is received this unit recalls the volume setting automatically Replay You can replay last 30 minutes of current station 1 Touch on the left side of the screen Touch Instant Replay E F Forward backward 15 seconds when touch it A B Fast forward fast backward when keep on touching It will be cancelled automaticall...

Страница 49: ...ntenna Power Sets power supply to the Digital Radio antenna Set to ON when the Digital Radio antenna in use is equipped with a booster Default is ON L Band Tuning Sets L band reception When set to ON also receives L band ensembles When the setting is changed the preset services are initialized Related Service When you select ON the unit switches to a related service if exists when a Digital Radio ...

Страница 50: ...work for some Bluetooth devices Connecting conditions may vary depending on your environment For some Bluetooth devices the device is disconnected when the unit is turned off Ñ Ñ About the cell phone and Bluetooth audio player This unit conforms to the following Bluetooth specifications Version Bluetooth Ver 3 0 Profile Cell phone HFP V1 6 Hands Free Profile SPP Serial Port Profile PBAP Phonebook ...

Страница 51: ...ration from the Bluetooth device 1 Search the unit DNX from your smartphone cell phone 2 Input the PIN code in your smartphone cell phone PIN code is set to 0000 as the default SSP Secure Simple Pairing of Bluetooth 2 1 or later 1 Search the unit DNX from your smartphone cell phone 2 Confirm the request both on the smartphone cell phone and the unit Step 2 Connection settings When the HFP profile ...

Страница 52: ...he data transmission will start with your permission When the data transmission and connection have completed the Bluetooth connection icon appears on the screen Bluetooth Setup 1 Press the MENU button h h Popup menu appears 2 Touch SETUP h h SETUP Menu screen appears 3 Touch Bluetooth h h Bluetooth SETUP screen appears See the following section for each setting Connect the Bluetooth unit P 53 Cha...

Страница 53: ... TEL HFP 2 The device is connected with the unit as hands free phone 1 or 2 Audio A2DP App SPP Set to interwork with an application installed in a smartphone or to use as an audio player 4 Touch Close NOTE If a device has been paired the Bluetooth unit cannot be connected from the paired device To delete the registered Bluetooth unit 1 Touch Delete 2 Touch the device name to check þ All Select all...

Страница 54: ... basic operation Control screen 3 4 5 2 1 1 Device name Connected device name Repeats the current track folder Each time you touch the key repeat mode switches in the following sequence File repeat Folder repeat All songs repeat Repeat off Randomly plays all tracks in current folder Each time you touch the key random mode switches in the following sequence Folder random All random Random off 2 Inf...

Страница 55: ...nected NOTE If the operation keys do not appear operate from the player Depending on your cell phone or audio player audio may be heard and controlled but text information may not appear If the volume is too low raise it on your cell phone or audio player Ñ Ñ Connect the Bluetooth audio Selects the device to connect via Bluetooth audio A2DP or APP SPP 1 Touch on the left side of the screen Touch B...

Страница 56: ...o 1000 entries Up to 50 entries including dialed calls received calls and missed calls 2 Select a dialing method Call using call records Call using the phonebook Call using the preset number Call by entering a phone number Voice Recognition P 57 Select the cell phone to use When you connect two cell phones 1 Touch to select the phone you want to use Bluetooth SETUP 1 Touch Bluetooth SETUP screen a...

Страница 57: ... from the list 5 Select the phone number from the list NOTE You can set the list to arrange in the order of last name or first name For details see Hands Free Setup P 60 Ñ Ñ Voice Recognition You can access the voice recognition function of the cell phone connected to this unit You can search the cell phone phonebook by voice The functionality depends on the cell phone 1 Press the button for 1 sec...

Страница 58: ...ton Turn to the right to increase and turn to the left to decrease Mute your voice Touch to mute or not to mute your voice Output the dial tone Touch DTMF to display the tone input screen You can send tones by touching desired keys on the screen Switching the speaking voice output Touching each time switches the speaking voice output between cell phone and speaker Call waiting When you receive a c...

Страница 59: ...dd number direct Enter the telephone number directly and touch SET See Call by entering a phone number P 56 NOTE To delete the preset number touch Delete and then touch Yes on the confirmation screen Ñ Ñ Phonebook transfer You can transfer the phonebook in your Bluetooth smartphone via PBAP 1 Touch 2 Touch h h The phonebook data transmission starts Phonebook deletion 1 Touch 2 Touch the name to ch...

Страница 60: ...t available 1 5 10 15 20 25 30 Set calling ring time second Auto Pairing When set to ON the Apple Auto Pairing function is turned on to automatically register the iPod touch or iPhone connected to this unit ON Default Uses Apple Auto Pairing function OFF Not uses Apple Auto Pairing function Sort Order Sets how to arrange the cell phone phonebook First Arranges in the order of first name Last Defau...

Страница 61: ...ble when Rear Camera is set to CMOS 3 Series Camera 4 Switching the Angle Touching each time changes camera angles Available when Dashboard Camera Front Camera is set to CMOS 3 Series Camera 1 Only for Ñ Ñ Camera Setup 1 Press the MENU button h h Popup menu appears 2 Touch SETUP h h SETUP Menu screen appears 3 Touch Camera h h Camera screen appears 4 Set each item as follows Rear Camera CMOS 3 Ser...

Страница 62: ...ys the picture from the front view camera horizontally reversed OFF Default Displays the picture from the front view camera as it is Dashboard Camera ON Select this when the dashboard camera is connected OFF Default Select this when no camera is connected To adjust the parking guidelines NOTE Install the rear view camera in the appropriate position according to the instructions supplied with the r...

Страница 63: ...ch to exit the camera screen 3 Key display Touch to display the dashboard camera control buttons External audio video players AV IN 1 Connect an external component to the AV IN input terminal P 89 2 Select AV IN as the source P 14 3 Turn on the connected component and start playing the source TV tuner You can connect the TV tuner commercially available with this unit and watch TV Preparation When ...

Страница 64: ...o Auto DVD VCD and disc media Video of 16 9 ratio is displayed in Full and video of 4 3 ratio is displayed in Regular USB device Displays video fully on vertical or horizontal with no ratio change NOTE Adjusting items are different depending on the current source System Setup NOTE Each operation in this section can be started from the multi function menu 1 Press the MENU button h h Popup menu appe...

Страница 65: ...k time with navigation Manual Sets the clock manually Time Zone If you have selected Manual for Clock select the time zone Clock Adjust If you select Manual for Clock adjust the date and time manually P 65 Travel Prayer for Safe Drive DNX9170SM DNX5170SM When this function is set the prayer for driving safety is displayed when the unit is turned on then Quran is played Turns the Safe drive pray fu...

Страница 66: ...screen appears 2 Press and hold the steering remote controller button NOTE You can have the unit learned all buttons at a time In that case press the all buttons one at a time and after pressing all of them touch Learning completed in Steering Remote Controller Setting screen However new functions cannot be learned after this operation 3 Touch the function you want to set 4 Repeat steps 2 and 3 as...

Страница 67: ...Recall Recalls the memorized audio setting Audio SETUP Clear Clears the AUDIO SETUP Memory and the currently memorized audio setting Software Information Check the software version of this unit P 67 Open Source Licenses Displays the open source licenses Initialize Touch Initialize and then touch Yes to set all the settings to the initial default settings Audio SETUP Memory is not initialized Ñ Ñ S...

Страница 68: ...color 1 Touch Key Color in the Display screen 2 Touch the desired color User The color you have set in the process of Adjust is registered Scan You can set the key color to continuously scan through the color spectrum 3 Touch To register original color You can register your original color 1 Touch User in the Key Color screen 2 Touch Adjust 3 Use and to adjust each color value 4 Touch Ñ Ñ Change ba...

Страница 69: ... h AV screen appears 4 Set each item as follows TV Tuner Control Sets when connecting the TV tuner to AV INPUT ON Set to ON when connecting the 3rd party TV tuner AV IN1 Name is set to TV If you connect the TV tuner made by DOS and watch TV you can perform some simple operations by touching the screen of this unit OFF Default Set to OFF when not connecting the 3rd party TV tuner AV OUT You can sel...

Страница 70: ...ffect P 75 Speaker X over setup 1 Press the MENU button h h Popup menu appears 2 Touch Audio h h Audio screen appears 3 Touch Speaker Xʼover 4 Select a car type You can setup the car type and speaker network etc If your car type is selected the Delay Time Alignment is set automatically for timing adjustment of sound output for each channel to have the highest surround effects 5 Touch the speaker 1...

Страница 71: ...Touch Xʼover 2 Touch the speaker to set 3 Set each item as follows HPF FREQ High Pass Filter adjustment When front or rear speaker is selected on Speaker Select screen LPF FREQ Low Pass Filter adjustment When subwoofer is selected on Speaker Select screen Slope 1 Sets a crossover slope Gain Adjusts the front speaker rear speaker or subwoofer level TW Tweeter Gain 2 Adjusts the tweeter level When f...

Страница 72: ...riate crossover network mode according to the speaker system 2 way speaker system or 3 way speaker system 1 Press the HOME button h h HOME screen appears 2 Touch h h Source selection screen appears 3 Touch STANDBY 4 Press the G button and the NAV button for 1 second at the same time h h Speaker system select screen appears 5 Select the crossover network mode h h A confirmation screen appears 6 Tou...

Страница 73: ...ect frequency bar and adjust its level by R S Preset Select Displays the screen to recall the preset equalizer curve Memory Saves the adjusted equalizer curve from User1 to User4 Initialize The current EQ curve returns to flat ALL SRC Apply the adjusted equalizer to all sources Touch ALL SRC and then touch OK on the confirmation screen Bass EXT Bass Extend Settings When turned on the frequency low...

Страница 74: ...the volume using the Volume Offset the sound generated if you suddenly switch to another source may be extremely loud Zone Control You can select different sources for both front and rear positions in the vehicle 1 Press the MENU button h h Popup menu appears 2 Touch Audio h h Audio screen appears 3 Touch Zone Control h h Zone Control screen appears 4 Touch Zone Select 5 Touch Dual Zone 6 Set each...

Страница 75: ... sound effects 1 Press the MENU button h h Popup menu appears 2 Touch Audio h h Audio screen appears 3 Touch Sound Effect 4 Set each item as follows Bass Boost Sets the amount of bass boost among OFF 1 2 3 Loudness Sets the amounts of boost of low and high tones OFF Low High Drive Equalizer The sound quality is automatically optimized to meet the current car speed by GPS OFF ON Space Enhancer Sele...

Страница 76: ... DTA Set up Listening Position P 76 Set up Front Focus P 77 Ñ Ñ Listening Position Adjust the sound delay time as nearer speakers to the selected seat have more delay time so that the sound from each speaker arrive a listener at the same time 1 Touch Listening Position in the Position DTA screen 2 Select listening position from Front R Right front Front L Left front Front All All front and All Pos...

Страница 77: ...y sound image Ñ Ñ Front Focus fine adjustment 1 Touch Adjust 2 Touch Delay 3 Set each item as follows Sound Image LR Front Adjust the sound image to focus on in front of front seats Sound Image LR Rear Adjust the sound image to focus on in front of rear seats Size of the Virtual Sound Field Adjust the size of sound image to meet your taste If the sound image is shifted from the front adjust it by ...

Страница 78: ...battery or place it in an open fire Such actions may cause the battery to leak fluid If spilled fluid comes in contact with your eyes or on clothing immediately rinse with water and consult a physician Place the battery out of reach of children In the unlikely event that a child swallows the battery immediately consult a physician Battery Installation If the remote control operates only over short...

Страница 79: ... select AUD mode Ñ Ñ Direct search mode Using the remote control you can jump directly to the desired file track chapter etc with entering the number corresponding to the content NOTE This operation cannot be performed for USB device and iPod 1 Press the BS button several times until the desired content appears The available contents are different depending on the source DVD Title number Chapter n...

Страница 80: ...Displays Main menu 4 OUT IN NAV Zooms in or out the navigation map 5 POSITION AUD DVD Pauses the track or file and resumes playing by pressing twice During radio source in AUD mode switches the seek mode NAV Displays the current position 6 Cursor Key DVD Moves the cursor in the DVD menu NAV Moves the cursor or scrolls the map 7 ENTER AUD DVD Performs the selected function NAV Registers the selecte...

Страница 81: ...n direct search For details on the direct search mode see Direct search mode P 79 DVD Press 1 2 to fast forward backward Press 4 5 to slow forward backward Switches the slow playback speed each time you press this key DVD only 15 DVD Clears the number 16 BS AUD DVD Switches to the direct search mode For details on the direct search mode see Direct search mode P 79 17 AUDIO DVD Switches the voice l...

Страница 82: ...be checked If your car s ignition does not have an ACC position connect the ignition wires to a power source that can be turned on and off with the ignition key If you connect the ignition wire to a power source with a constant voltage supply such as with battery wires the battery may be drained If the console has a lid make sure to install the unit so that the front panel will not hit the lid whe...

Страница 83: ...mm x6 8 3 5 m x1 9 x1 0 x1 x1 1 x3 1 x1 1 x1 1 x1 1 DNX9170DABS only Ñ Ñ Installation procedure 1 To prevent a short circuit remove the key from the ignition and disconnect the terminal of the battery 2 Make the proper input and output wire connections for each unit 3 Connect the speaker wires of the wiring harness 4 Connect the wiring harness wires in the following order ground battery ignition 5...

Страница 84: ... car reception of the GPS satellite signals might not be possible with an inside installation Please install this GPS antenna in an area away from any antennas that are used with CB radios or satellite televisions The GPS antenna should be installed at a position that is spaced at least 12 inch 30 cm from cellular phone or other transmitting antennas Signals from the GPS satellite may be interfere...

Страница 85: ...Thoroughly wipe oil and dirt from the pasting surface with the included cleaner accessory Do not bend or damage the film antenna accessory It may not be possible to install on some type of vehicle Check the cable routing of the film antenna accessory and amplifier accessory before pasting Installation overview The antenna should be installed on the passenger side for safety Antenna cable 3 5 m Det...

Страница 86: ... air bag Air bag Front pillar Determining the antenna installation location 1 Remove the front pillar cover of your car Front pillar cover 2 Clean the windscreen with the supplied cleaner accessory Wait until the glass surface is completely dry before pasting If the glass surface is cold such as during winter warm it with defroster or dryer 3 Remove the first sheet tag 1 of film antenna accessory ...

Страница 87: ...he left side Earth sheet 7 Remove the film covering the earth sheet and attach the earth sheet to the metal part of the vehicle Provide sufficient space for the earth sheet so that it does not obstruct the interior parts front pillar cover Also take care that the interior parts do not obstruct the amplifier unit accessory Earth sheet Font pillar cover Front pillar Front glass 8 Wire the antenna ca...

Страница 88: ... Purple White Reverse sensor wire 2 m Light Blue Yellow Steering remote control wire Connect to vehicle s reverse lamp harness when using the optional rear view camera To steering remote To use the steering wheel remote control feature you need an exclusive remote adapter not supplied matched to your car If no connections are made do not let the cable come out from the tab Purple Black To rear rig...

Страница 89: ...o P 70 For how to connect speaker wires to terminals other than speaker terminals and Preout terminals see Connecting the system and external components P 89 and Connecting wires to terminals P 88 Ñ Ñ Connecting the system and external components 3 2 1 4 5 6 7 8 11 12 13 9 10 1 DAB antenna DNX9170DABS only 2 AV Audio output ø3 5 mini jack 3 FM AM antenna input 4 When connecting to an external ampl...

Страница 90: ...nput Yellow only 13 Visual Output Yellow Ñ Ñ Connecting a USB device USB device 2 USB Gray terminal 1 USB Black terminal 1 Accessory 2 Black 1 m 3 Accessory 3 Gray 1 m 3 1 USB maximum power supply current DC 5 V 1 5 A 2 Sold separately Use CA U1EX to extend the cable if necessary Max 500 mA 5V 3 See Securing the USB extension cable P 90 Ñ Ñ Securing the USB extension cable Secure the USB extension...

Страница 91: ...uring the USB extension cable P 90 Ñ Ñ Connecting an Android smartphone Micro USB to USB cable 2 Android smartphone 2 USB Gray terminal 1 USB Black terminal 1 Accessory 2 Black 1 m 3 Accessory 3 Gray 1 m 3 1 USB maximum power supply current DC 5 V 1 5 A 2 Sold separately 3 See Securing the USB extension cable P 90 Ñ Ñ Connecting a Dashboard camera DRV N520 1 Accessory 0 Visual Yellow Front view ca...

Страница 92: ...he random function Cannot perform repeat play during VCD playback The PBC function is enabled Turn off the PBC function The specified disc does not play but another one plays instead The disc is quite dirty Clean the disc See Precautions on handling discs P 4 The disc is severely scratched Try another disc instead The sound skips when an audio file is being played The disc is scratched or dirty Cl...

Страница 93: ...ed iPod Bluetooth audio player The iPod Bluetooth audio player is selected as a source although no iPod Bluetooth audio player is connected Change the source to any source other than iPod Bluetooth Connect an iPod Bluetooth audio player and change the source to iPod Bluetooth again No Media file The connected USB device contains no playable audio file Media was played that doesn t have data record...

Страница 94: ... DTS CD Video CD VCD v Super video CD Photo CD CD EXTRA r Only music CD session can be played HDCD r Normal music CD sound quality CCCD Others Dualdisc Super audio CD r Only CD layer can be played v Playback is possible r Playback is partly possible Playback is impossible 1 Incompatible with 8 cm 3 inch discs Use of DualDisc When playing a DualDisc on this unit the surface of the disc that is not ...

Страница 95: ...s tag of DSDIFF is not supported Although the audio files are complied with the standards listed above the play may be impossible depending on the types or conditions of media or device Acceptable Video files Profile Max Picture size Max bit rate Audio format MPEG 1 mpg mpeg 352 240 352 288 1 5 Mbps MPEG Audio Layer 2 MPEG 2 mpg mpeg MP ML 720 480 720 576 8 Mbps MPEG Audio Layer 2 H 264 MPEG 4 AVC...

Страница 96: ... from multiple angles you can select a favorite angle 16 9 LB Indicates the type of screen for the image The left mark indicates that a wide image picture 16 9 is displayed on a standard TV set screen 4 3 with a black band at both the top and bottom of the screen letter box Operation regulatory marks With this DVD some functions of this unit such as the play function may be restricted depending on...

Страница 97: ...n kn Kannada ko Korean ks Kashmiri ku Kurdish ky Kirghiz la Latin lb Luxembourgish ln Lingala lo Laotian lt Lithuanian lv Latvian Lettish mg Malagasy mi Maori mk Macedonian ml Malayalam mn Mongolian mo Moldavian mr Marathi ms Malay mt Maltese my Burmese na Nauru ne Nepali nl Dutch no Norwegian oc Occitan om Afan Oromo or Oriya pa Punjabi pl Polish ps Pashto Pushto pt Portuguese qu Quechua rm Rhaet...

Страница 98: ...terface section USB Standard USB 2 0 High Speed File System FAT 16 32 exFAT NTFS Maximum Power Supply Current DC 5 V 1 5 A 2 D A Converter 24 32 bit Audio Decoder MP3 WMA AAC WAV FLAC Vorbis DSD Video Decoder MPEG1 MPEG2 MPEG4 WMV H 264 MKV Bluetooth section Technology Bluetooth Ver 3 0 Frequency 2 402 2 480 GHz Output Power 4dBm MAX 0dBm AVE Power Class2 Maximum Communication range Line of sight ...

Страница 99: ... dB Oct Gain 8 7 6 5 4 3 2 1 0 dB Low pass filter Frequency 30 40 50 60 70 80 90 100 120 150 180 220 250 Hz Through Slope 6 12 dB Oct Gain 8 7 6 5 4 3 2 1 0 dB Position Front Rear Subwoofer Delay 0 6 1 m 0 01 m Step Gain 8 0 dB Subwoofer level 50 10 dB Digital Radio section DNX9170DABS Frequency Range L BAND 1452 960 1490 624 MHz BAND III 174 928 239 200 MHz Sensitivity 100 dBm S N Ratio dB 90 dB ...

Страница 100: ...edance 4 8 Ω Navigation section Receiver High sensitivity GPS receiver Reception Frequency 1575 42 MHz C A code Acquisition Times Cold 29 seconds typ All satellites at 130 dBm Without aiding Update Rate 1 second continuous Accuracy Position 2 5 meters CEP at 130 dBm Velocity 0 1 meter sec Position Method GPS Antenna External GPS antenna General Operating Voltage 14 4 V 10 5 16 V allowable Maximum ...

Страница 101: ...search In Motion and related trademarks names and logos are the property of Research In Motion Limited and are registered and or used in the U S and countries around the world Used under license from Research In Motion Limited Wi Fi is a registered trademark of Wi Fi Alliance THIS PRODUCT IS LICENSED UNDER THE AVC PATENT PORTFOLIO LICENSE FOR THE PERSONAL USE OF A CONSUMER OR OTHER USES IN WHICH I...

Страница 102: ...utors may be used to endorse or promote products derived from this software without specific prior written permission THIS SOFTWARE IS PROVIDED BY THE COPYRIGHT HOLDERS AND CONTRIBUTORS AS IS AND ANY EXPRESS OR IMPLIED WARRANTIES INCLUDING BUT NOT LIMITED TO THE IMPLIED WARRANTIES OF MERCHANTABILITY AND FITNESS FOR A PARTICULAR PURPOSE ARE DISCLAIMED IN NO EVENT SHALL THE FOUNDATION OR CONTRIBUTOR...

Страница 103: ...zerindeki zararlı etkileri önlerken kaynakların korunmasına da yardımcı olacaktır For DNX9170SM DNX5170SM Declaration of Conformity with regard to the RE Directive 2014 53 EU Declaration of Conformity with regard to the RoHS Directive 2011 65 EU Manufacturer JVC KENWOOD Corporation 3 12 Moriyacho Kanagawa ku Yokohama shi Kanagawa 221 0022 JAPAN EU Representative JVCKENWOOD NEDERLAND B V Amsterdams...

Страница 104: ......

Отзывы: