background image

MULTIPLE COMPACT DISC PLAYER

DPF-J9030

CD-4900M

INSTRUCTION MANUAL

KENWOOD CORPORATION

B60-4465-08 00 (K, T)

AP

  9909

This unit is designed for home use only. If the unit is
used in a location other than at home, such as in a
shop (for commercial use), in a car or in a ship, etc.,
and is damaged, a service fee may be charged even
during the warranty period.

This instruction manual is used to describe multiple
models listed above.
Model availability and features (functions) may differ
depending on the country and sales area.

Содержание CD-4900M

Страница 1: ...f the unit is used in a location other than at home such as in a shop for commercial use in a car or in a ship etc and is damaged a service fee may be charged even during the warranty period This instruction manual is used to describe multiple models listed above Model availability and features functions may differ depending on the country and sales area ...

Страница 2: ...th terminal of a three pin plug Safety precautions WARNING TO PREVENT FIRE OR ELECTRIC SHOCK DO NOT EXPOSE THIS APPLIANCE TO RAIN OR MOISTURE CAUTION TO REDUCE THE RISK OF ELECTRIC SHOCK DO NOT REMOVE COVER OR BACK NO USER SERVICEABLE PARTS INSIDE REFER SERVICING TO QUALI FIED SERVICE PERSONNEL RISK OF ELECTRIC SHOCK DO NOT OPEN THE LIGHTNING FLASH WITH ARROWHEAD SYMBOL WITHIN AN EQUILATERAL TRIAN...

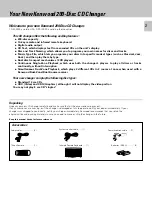
Страница 3: ...ne Dual Source receiver Your new changer can play the following disc types Standard 12 cm CDs CDV Video and CDG Graphics although it will not display the video portion You may not play 8 cm CD singles Unpacking Accessories Audio cables 2 System control cable 1 Batteries R6 AA 4 10 key Remote 1 Infrared Remote Keyboard 1 REMOTE CONTROL UNIT RC KB2 POWER CONFIRM BEST SEL TITLE INPUT ROOM B ROOM B CU...

Страница 4: ...gistration of DTS discs 28 Chapter4 SpecifyingandUsingDiscorTrackData 29 Registration of Title 30 Assigning Title TITLE INPUT mode 30 To change or delete a title 32 Listening to music by genre MUSIC TYPE mode 33 Registration of music type MUSIC TYPE SET mode 33 Registration of user s disc file USER FILE SET mode 34 Playing the music type or user file MUSIC TYPE PLAY mode Player A only 35 Disc sear...

Страница 5: ...r s precision optical pickup inspected periodically Depending on the operation environment humidity dust smoke etc this pickup should operate approximately 1 000 hours before requiring inspection To schedule inspection consult the store where you purchased the changer or visit the Kenwood USA Web site s Support area 7 Only player A supports DTS playback 8 Be sure to locate your changer on a level ...

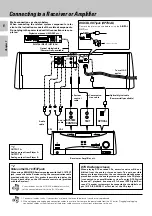
Страница 6: ...al 5 1 channel DTS Digital Sur round decoder system must be connected to the digital out put S P DIF AES EBU or TosLink of the CD player 2 Note on the SL 16 TEXT jack When using a KENWOOD Receiver equipped with the SL 16 TEXT jack connect it to the Receiver using the communication cable provided with this unit This makes it possible to display the disc and track titles on the LCD remote control un...

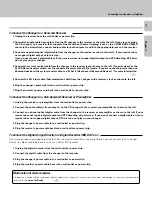
Страница 7: ...l outlet or power strip 7 Plug the receiver s power cord back into a wall outlet or power strip To Connect the Changer to a Non Kenwood Receiver or Preamplifier To Connect the Digital Output Directly to a Digital Recorder MD DAT etc 1 Unplug the digital recorder from the wall outlet or power strip 2 Connect the digital cable from the changer to the recorder 3 Plug the changer s power cable into a ...

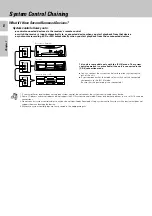
Страница 8: ...not support the SL16 system control mode Do not include these devices in a set of SL16 chained connections 3 Do not connect system control cables to any device not specified by Kenwood Using system control functions with a device that does not support them can damage the device 4 Make sure system control plugs are firmly seated in the appropriate jacks Notes Notes This unit is compatible only with...

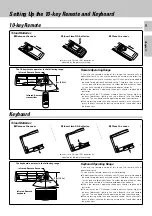
Страница 9: ...ks and setup Therefore they may not last as long as ordinary batteries Consider replacing them as soon as you have verified that the keyboard operates correctly When the remote s operating range gets shorter replace both batteries Do not install the CD changer where direct sunlight or high fre quency fluorescent lighting can shine directly into the remote sensor This can decrease the operating ran...

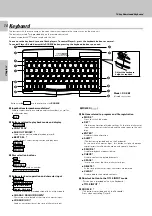
Страница 10: ...te and keyboard See Front Panel See 10 key Remote See Keyboard Multiple front panel display format that allow you to view detailed information about the disc currently playing See Front Panel Displays Your CD changer includes a standard remote and a remote keyboard for easier text entry You can use either device to control the changer For the sake of simplicity this manual provides stan dard remot...

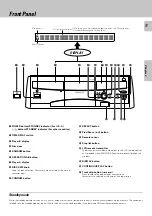
Страница 11: ...ays given in this manual are approximations only They may differ from what actually appears on the display Front Panel 1 POWER button STANDBY indicator For U S A button STANDBY indicator For other countries 2 TIMER PLAY switch 3 Player B display 4 Disc door 5 RANDOM button 6 OPERATION A B button 7 Player A display 8 DISC SKIP knob Used for disc selection Characters are selected at the time of char...

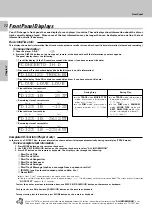
Страница 12: ...ecord company release date etc 8 Genre INFO Front Panel O L EE V O L E V I O L E V T 3 Disc title display if the CD contains encoded title data or if you have entered title data 1 D 3E 2 0 1 0 2 3 5 4 T 7 Remaining time of current disc 6 Elapsed time of current disc 1 D 3E 2 0 1 0 3 6 5 2 T In the TRACK mode information is displayed in order of 1 2 3 4 5 6 then 7 In the PGM mode RANDOM mode MUSIC ...

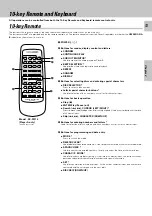
Страница 13: ...high speed Used as cursor buttons at the time of character input Skip 4 CHARACTER DOWN UP 5Buttons for entering numbers and letters Used for selection of disc numbers and track numbers as well as for character input 6Buttons for programming and data entry MODE Press to switch the mode DELETE CLEAR Used to delete the entered contents At the time of character input characters are deleted SPACE CHECK...

Страница 14: ...eyboard buttons as normal To control Player B hold down while ROOM B button pressing the keyboard buttons you need 10 key Remote and Keyboard REMOTE CONTROL UNIT RC KB2 POWER CONFIRM BEST SEL TITLE INPUT ROOM B ROOM B CURSOR R CURSOR L CONT PLAY DISC SEL USER FILE NAME SUB OUT MONIT DISC SKIP UP DISC SKIP DOWN CHARAC SRCH UP CHARAC SRCH DOWN REPEAT RANDOM DISPLAY DELETE 10 100 7 6 4 1 ENTER SET MO...

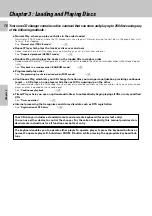
Страница 15: ...15 Operation of remote control unit Chapter 1 Chapter 2 Chapter 3 Chapter 4 Chapter 5 Chapter 6 Chapter 7 ...

Страница 16: ...y which plays the tracks on the loaded CDs in random order Random mode where the CD changer plays all tracks on all discs loaded in the carousel in random order without repeating any tracks See Playback in a random order RANDOM mode Programmed play order See Programming tracks in desired order PGM mode Continuous Play which lets your CD changer function as your own personal jukebox providing conti...

Страница 17: ...Insert discs with the label on the right side Playback is not possible when a disc is inserted the other way round Do not insert more than one disc in a slot When a disc not corresponding to CD TEXT is inserted searching for this disc will be facilitated when the title is registered at the time of disc insertion Registration of Title º Never let your hand or any object enter inside the unit 3Repea...

Страница 18: ...TEXT Repeat the above procedure so that the complete disc information is read into the CD player In the case of a non CD TEXT disc the D001 NO CD TEXT display will appear for approx 3 seconds This operation is not available during the continuous play mode 1 Please remove all CDs from the carousel before moving the unit 2 If blinking PLEASE WAIT is displayed when the disc door is opened do not atte...

Страница 19: ... pauses and plays the CD alternately To stop playback Each press of a button increases or decreases the disc number Holding the button depressed varies the disc numbers successively When the disc corresponds to CD TEXT or when the disc title has been registered the disc title will be displayed with scrolling Discs can be selected by the disc title Registration of Title º Display when disc No 123 i...

Страница 20: ...Same input method as other KENWOOD products To input 42 10 10 10 10 2 To input 115 100 10 5 To input 200 100 100 What is the normal play TRACK mode Playback is made from the first track The normal playback mode is called TRACK mode Press the CONFIRM button to confirm the present mode TRACK mode PGM mode BEST SELECTION mode MUSIC TYPE mode RANDOM mode REPEAT mode To set the unit to the TRACK mode A...

Страница 21: ...tion of Title º Repeat step 1 when it is required to change the disc number Press the numeric buttons in the following order Track No 8 8 Track No 14 1 4 Track No 20 2 0 When the disc corresponds to CD TEXT or when the track titles have been registered the track title is displayed Tracks can be selected by the track title Registration of Title º Playback starts If the selected disc is being played...

Страница 22: ...layback Press the REPEAT button twice REPEAT ON OFF To repeat one selected disc 3Start playback Within 8 seconds 2Select the disc number 4Switch REPEAT ON The disc number can be selected directly by using the DISC SELECTOR and numeric buttons in place of the DISC SKIP DOWN UP buttons For random repetition For music type or user file repetition fi For best selection repetition To cancel repeated pl...

Страница 23: ...formed when RANDOM OFF is selected or Select RANDOM OFF For random music type or random user file fi DISC SKIP DOWN UP ENTER 6 RANDOM F RANDOM F CHARACTER 4 DOWN UP 7 RANDOM F For repeated playback Press the REPEAT button to select REPEAT ON For continuous playback ALL DISC RANDOM only Press the CONTINUOUS PLAY button E 1 0 2 Each press switches the modes as follows 1 ONE DISC RANDOM 2 ALL DISC RA...

Страница 24: ...out inputting the track number ALL will be displayed When the disc corresponds to CD TEXT or when the track titles have been registered the track title is displayed Tracks can be selected by the track title Registration of Title º Program other tracks in the desired order by repeating steps 2 and 3 Up to 32 tracks can be programmed FULL is displayed when no more tracks can be programmed If you mak...

Страница 25: ... No is entered the track will be added to the end of the existing program Press the CHECK button repeatedly until the program No to be changed is displayed Press it while the PGM01 indicator blinks The track being played cannot be changed Example To clear tracks from the program To clear tracks from the end To clear all tracks When the P MODE button is pressed during playback playback in order of ...

Страница 26: ... mode For continuous playback in MUSIC TYPE PLAY mode fi For continuous playback in BEST SELECTION mode The OPERATION A B button is set to A during continuous play mode When the disc door is opened the continuous play mode is released and playback also stops It is not possible to select a DTS disc during continuous play mode With this feature the time required for disc change can be minimized so e...

Страница 27: ...itched on by the timer Read the instruction manual of the timer carefully 2Select the disc to be played Previous disc Next disc Within 8 seconds 1Select the disc number 2Play the disc To AC outlet 3Set the listening volume 1Adjust the volume on the amplifier or receiver 2Stop playback 4Set the timer for the desired ON time 5Set the TIMER PLAY switch to ON Read the instruction manual of the timer c...

Страница 28: ...ns To register another DTS disc repeat the procedure from step 3 DISPLAY A DISC SKIP DOWN UP Previous disc Next disc To quit DTS DISC SKIP mode Press the MODE button To delete the DTS registration Use the following procedure before moving or changing a DTS disc and register the disc again 1Perform steps 1 of Registration of DTS discs 2Select CANCEL DTS DISC DISC SKIP DOWN UP SET 3Select the DTS di...

Страница 29: ... press the keyboard buttons as normal To operate player B hold down ROOM B button while pressing the appropriate keyboard buttons You can use this internal processing to control various features such as Playing discs of a predefined or user specified Music Type that you can assign to each CD See Listening to music by genre MUSIC TYPE mode Playing discs by selecting disc titles either read from CDT...

Страница 30: ...may not be input correctly TITLE INPUT Press the TITLE INPUT button To enter the disc title C A Z B Flashing cursor One character is set and the cursor goes to the next digit Repeat this to enter the disc title 3Enter the disc title RANDOM DISPLAY 3 2 4 CONFIRM REPEAT 1 7 6 8 5 10 0 100 9 A B C D E F G BEST SELECTION H I J K L M N O P Q R S T U V X Y Z W SELECTOR DISC CONTINUOUS PLAY SUB OUT MONIT...

Страница 31: ...e C A Z B Flashing cursor 4Store the track title ENTER 6 ENTER Previous track Next track Previous track N e x t track Up to 20 track titles can be registered per disc by repeating steps from 1 to 4 for each To quit TITLE INPUT mode Press the MODE button I T L T I E T S R O E O M To register another track titles in the same disc repeat the entire procedure of To enter the track title To change the ...

Страница 32: ...cters Move with the CURSOR button When a title is to be deleted delete all characters one by one 3Delete the unnecessary character See Deletion 1 CURSOR LEFT RIGHT RANDOM DISPLAY 3 2 4 CONFIRM REPEAT 1 7 6 8 5 10 0 100 9 A B C D E F G BEST SELECTION H I J K L M N O P Q R S T U V X Y Z W SELECTOR DISC CONTINUOUS PLAY SUB OUT MONITOR 1 CURSOR LEFT RIGHT 3Execute title change or deletion To quit TITL...

Страница 33: ...D TEXT and contains a genre code that genre code is registered as the music type To confirm the genre code Complete CD Text Info Each press switches the modes as follows 1 MUSIC TYPE 2 DISC SEARCH 3 TITLE INPUT 4 ALL DATA READ 5 ALL INFORMATION 6 DTS DISC SKIP Select the desired disc 3 SET DISC SKIP DOWN UP Previous type Next type The disc number can be selected directly by using the numeric butto...

Страница 34: ...les If the CHECK button is pressed while the disc number is blinking the music type of the disc is displayed provided that its music type has been registered Each press switches the modes as follows USER FILE 1 USER FILE 2 USER FILE 3 USER FILE 4 USER FILE 5 USER FILE 6 USER FILE 7 USER FILE 8 USER FILE 1 1 D 2 2 T P Y E L C A E R To quit USER FILE SET mode Press the MODE button 1Play the music ty...

Страница 35: ... playback Playback is performed in increasing order of the disc numbers they were registered for the respective music type or user file Skipping to the next disc is done when the button is pressed If the disc to be played is being played in Player B the disc will be skipped Each time the CHECK button is pressed the registered disc numbers are displayed in increasing order of the disc numbers For r...

Страница 36: ...s the modes as follows 1 MUSIC TYPE 2 DISC SEARCH 3 TITLE INPUT 4 ALL DATA READ 5 ALL INFORMATION 6 DTS DISC SKIP If the selected disc is being played on Player B blinking DISCXXX BUSY is displayed and the disc will not be played 10 key Remote Main unit If a desired character is not provided on the remote control buttons input the character as follows Press the CHARACTER DOWN UP buttons or rotatin...

Страница 37: ...ge Opera Operetta Pop Music RAP Reggae Rock Music Rhythm Blues Sound Effects Sound Track Spoken Word World Music USER FILE 1 DISPLAY A The display flashes DISPLAY A The display flashes I D C S S C A E C R N H O D M M Y T E P E S R A H C M To quit M TYPE SEARCH mode Press the MODE button When the MODE button is pressed during M TYPE SEARCH mode the M TYPE SEARCH mode is cancelled The discs register...

Страница 38: ... SELECTION mode Player A only Playing the best selection file Press the BEST SELECTION button E B T S S 0 L E C E I T N O 3 The tracks are played in the order they are registered If a track to be played is located in the disc played on Player B that track will be skipped Each time the CHECK button is pressed the disc numbers and track numbers are displayed in the order they are registered For repe...

Страница 39: ...39 Chapter 1 Chapter 2 Chapter 3 Chapter 4 Chapter 5 Chapter 6 Chapter 7 ...

Страница 40: ...ks and cables and the primary player output A also has a digital output connection Not all playback features can be used by both players or zones The following chart shows which playback features are available for each player and or zone DTS playback Normal Play Track mode Random mode Repeat mode Program mode Continuous Play mode Music Type mode Best Selection mode Timed Play Remote control Infrar...

Страница 41: ...been loaded Remove the inserted disc and insert it in an idle slot In case of difficulty Symptom Cause Remedy CD Player Power plug is loosely connected With the power plug connected to the switched AC outlet of an amplifier the power of the amplifier is turned off Disc is loose Condensation occured on the optical lens unit Disc is too dirty Disc is cracked The connection cords are inserted loosely...

Страница 42: ...ion Important items Note related to transportation and movement Before transporting or moving this unit carry out the following op eration 1 Remove all discs from the carousel and close the disc door 2 Confirm that the flashing NO DISC display has changed to steady lighting and then switch off the power 3 Wait a few seconds then disconnect the power plug Memory backup function Stored contents for ...

Страница 43: ... that to which the receiver is connected Consult the dealer or an experienced radio TV technician for help CAUTION Use of controls or adjustments or performance of procedures other than those specified herein may result in hazardous radiation exposure In compliance with Federal Regulations following are reproductions of labels on or inside the product relating to laser product safety KENWOOD CORPO...

Страница 44: ...our records Record the serial number found on the back of the unit in the spaces designated on the warranty card and in the space provided below Refer to the model and serial numbers whenever you call upon your dealer for information or service on this product Model Serial Number ...

Отзывы: