background image

KCO-NO2  User’s  Manual 

90-0201-01 

Kele • 3300 Brother Blvd. • Memphis, TN  38133


Page: 10


WWW.KELE.COM 

Dipswitch 

Setting 

Threshold Set Points 

[ppm] 


NO

2


     CO 


Warn 

Alarm 

Warn 

Alarm 


0.7 

2.0 

15 

30 


1.0 

3.0 

25 

40 


2.0 

2.0 

30 

45 


2.5 

4.5 

35 

45 

FIGURE 8:  

Setting Warn & Alarm Set points


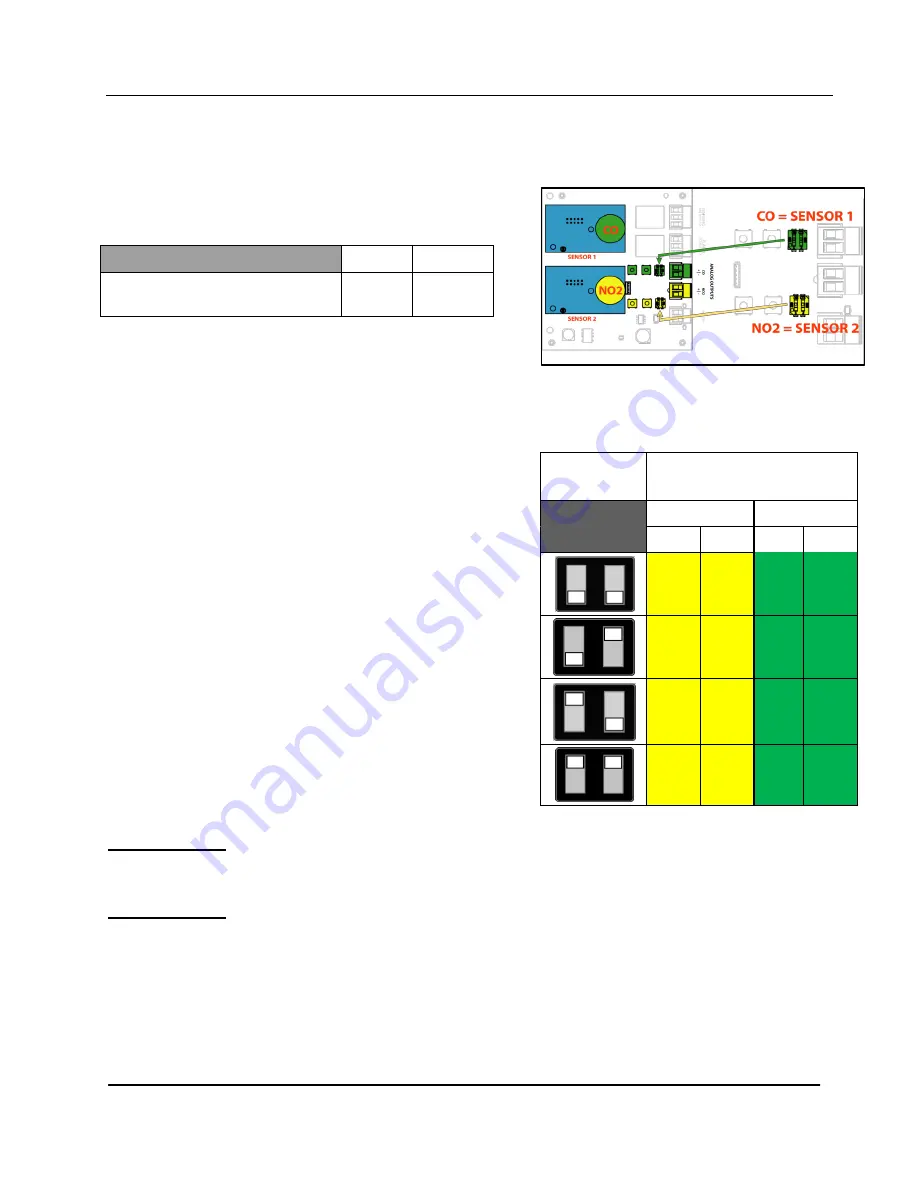
Figure 7

: Dip Switch Locations.  CO specific 

adjustments and connections are highlighted 

in yellow while NO

2

 specific adjustments 

and connections are in green. 

4.3  Setting Warning and Alarm Threshold 

The controller has a warning and alarm threshold for each gas.  These threshold values can be 
adjusted for each sensor via dip switches on the controller’s main board (shown in Figure 7)  Refer 
to details on setting the thresholds for each sensor in 
Figure 8. 


NO

2


CO 

Federal OSHA Personal 
Exposure Limit (PEL). 

5 ppm 

50 ppm 

TABLE 5: Federal OHSA exposure limits


(29 CFR 1910.1051 TABLE Z-1)


4.4  Warning and Alarm Conditions 

The controller has two LEDs on the front panel (one for 
each sensor).  These LEDs change color to indicate the 
controller’s current operational status.  Table 3 shows 
the behavior of the front panel LEDs during normal 
operation.   
Two dry-contact SPDT relays are provided on the 
controller, these relays activate during warning and 
alarm conditions.  Refer to 

Section 3.3


for location and 

wiring information.  
Readings for the two sensors are independently reported 
on the controller’s two 4 – 20mA powered current loop 
outputs during normal operation.  Theses outputs are 
electrically isolated from the operating power 
connection. 

Table 2 lists the operational conditions that force the 
analog outputs to their limits regardless of ambient gas 
concentrations. 

4.5 Abnormal operation 

Both of these conditions will put the KCO-NO2 into 
‘Sensor Error’ mode (see Table 2).   

Sensor Expired 

Happens only after a span calibration if the sensitivity of  the sensor has decreased by more 
than the manufacturers specification (usually 20%) 

Sensor Failure: 

Can happen at any time.  Caused when the sensor supervision circuitry detects a catastrophic 
loss of a senor’s sensitivity, usually caused by a depletion of  the senor’s electrolyte through a 
leak or evaporation.  


Содержание KCO-NO2

Страница 1: ...PRELIMINARY KCO NO2 Sensor User s Manual 90 0201 01 ...

Страница 2: ... Manual 90 0201 01 Kele 3300 Brother Blvd Memphis TN 38133 Page 2 WWW KELE COM Revision History Revision Date Changes 90 0201 00 3 18 21 Original Issue 90 0201 01 4 12 21 Change CO sensor ToS to 200 ppm from 100 ppm ...

Страница 3: ...n 7 4 Operational Description 8 4 1 Normal operation 8 4 2 Startup 9 4 3 Setting Warning and Alarm Threshold 10 4 4 Warning and Alarm Conditions 10 4 5 Abnormal operation 10 5 Sensor Calibration 11 5 1 Calibration Gases 11 5 2 Calibration Procedure 13 6 Sensor Module Replacement 14 6 1 Sensor Errors 14 6 2 Replacement Sensors 14 6 3 Field Replacement of Sensor Modules 14 7 Warranty 15 7 1 Duration...

Страница 4: ...W Control Relays Two separate SPDT relays for warning and alarm outputs UL rated 10 Amps max at 277 VAC RMS or 30 VDC Concentration Reporting Outputs Two powered 4 20 mA current loop outputs one for each sensor 4 mA output 0 ppm 20 mA full scale output Maximum loop resistance 510Ω Termination Pluggable screw terminals for use with 12 AWG or thinner wire Stranded wire recommend for 18 AWG or heavie...

Страница 5: ...ibration free surface near the middle of the area to be monitored about 5 feet above the floor It should be located where there is free airflow avoid corners or recesses The air vents on the sides of the enclosure should not be closer than 1 foot from the nearest perpendicular wall and must not be obstructed or painted over May be mounted in any orientation but hinge on the left side is most commo...

Страница 6: ...igure 6 2 Unplug the desired analog output screw terminal either the NO2 or CO terminal 3 Connect the signal wires paying close attention to the polarity 4 Plug the analog output screw terminal back into the controller 5 Repeat this process for both analog outputs then reconnect power 3 2 Relay Connections The controller has two SPDT dry contact relay output terminals shown in Figure 4 The relays ...

Страница 7: ...ed to the controller s relay output to the COM location of screw terminal 5 Plug the relay output screw terminal back into the correct location on controller board 3 3 Power Connection Power connection to the controller is made at the two terminal screw connector located at the bottom right side of the board highlighted in Figure 6 Power to the controller can be either AC or DC voltage DC voltage ...

Страница 8: ...unciator when elevated levels of carbon monoxide generated by gasoline engines and abbreviated CO or nitrogen dioxide from diesel engine exhaust and abbreviated NO2 are detected If the concentration of either gas exceeds its programmed alarm value a second set of alarm contacts is operated to trigger an alarm The controller has two independent sensor modules one for sensing carbon monoxide CO the ...

Страница 9: ...reshold the WARNING relay is deactivated the same action occurs for the ALARM relay The front cover has two LEDs indicators one for the CO and the other for the NO2 sensor module These LEDs illuminate different colors to indicate normal green warning yellow alarm red and error blinking red conditions see Table 3 The concentrations of CO and NO2 in the ambient air are reported at each senor s analo...

Страница 10: ...s change color to indicate the controller s current operational status Table 3 shows the behavior of the front panel LEDs during normal operation Two dry contact SPDT relays are provided on the controller these relays activate during warning and alarm conditions Refer to Section 3 3 for location and wiring information Readings for the two sensors are independently reported on the controller s two ...

Страница 11: ...or instructions on how to assemble and operate its gas supply components Each sensor must be sequentially calibrated with two different gases The Zero gas is the same for both sensors and is used for the zero calibration which must be done first The span gas is different for each sensor and used for the span calibration which MUST be done ONLY AFTER a successful zero calibration Each calibration i...

Страница 12: ...KCO NO2 User s Manual 90 0201 01 Kele 3300 Brother Blvd Memphis TN 38133 Page 12 WWW KELE COM FIGURE 10 Calibration Flowchart This procedure must be done twice first as Zero then as Span for each sensor ...

Страница 13: ...f not If successful blinking GREEN The sampling completed successfully Disconnect the gas and press the same button that started the calibration again for 3 seconds indicating the cal gas has been removed The LED then blinks GREEN YELLOW for 2 minutes indicating that the calibration was accepted If NOT successful blinking RED The sampling can be re started while the LED is blinking RED by pressing...

Страница 14: ...or has failed When front panel status LED is blinking red the sensor is no longer operational and must be replaced 6 2 Replacement Sensors Calibrated sensor modules are available from Kele Carbon Monoxide CO Nitrogen Dioxide NO2 Cal Kit KMOD CO KMOD NO2 UCK 3 kit 6 3 Field Replacement of Sensor Modules Sensor modules must be replaced when they reach their End of Life To replace a sensor module 1 O...

Страница 15: ...r ensuring that any product into which Products are incorporated other components used with DCS Products and the purposes for which DCS Products are used are appropriate and compatible with those Products If Kele determines that a returned Product does not conform to this warranty it will at Kele s discretion either repair or replace that Product and will ship the Product back to Buyer free of cha...

Страница 16: ...he sensor has reached the end of its operating life and must be replaced Contact Kele for a calibrated replacement module In harsh environments a sensor may fail prematurely During normal operation the sensor is regularly tested to detect common failures If a failure is detected the front panel status LED for that sensor will blink red and its concentration reporting analog output will stay at 20 ...

Отзывы: