


8 Special procedures
134
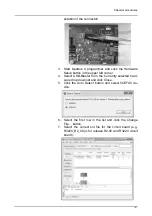
4.
An s2terminal connection is established to the unit. A
list of command shortcuts (macros) is printed. These
may be used to streamline the update process. Alterna-
tively, the commands can be typed in manually.
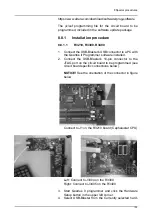
8.7.2
Software update
The embedded software release package consist of a
number of compatible software components. They can be
updated either:
manually - each software component is programmed
separately or
automatically - all software components are
programmed using a single command.
Automatic update is recommended for normal updates.
Manual update may be necessary in cases where the
automatic update fails or for troubleshooting purposes.
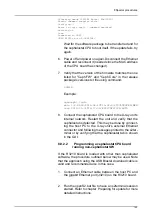
8.7.2.1
Automatic update
Press the F10 button and press enter, or type in manually:
xu R<ver_major>.<ver_minor>
Example:
xu R2.00
An automatic update of the embedded software is
performed. Follow the instructions printed in the s2terminal
prompt and wait for the update to complete.
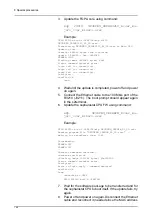
8.7.2.2
Manual update
When performing a manual update, the main/cephalostat
CPU core and firmware must be updated in a given order.
For other software components, the recommended order is
the following:
1) Update the Main CPU R3220 core.
2) Power off and on again.
3) Update the Main CPU firmware.
4) Update the GUI software.
5) Update the R3400 firmware and core.
Содержание ORTHOPANTOMOGRAPH OP 3D Pro
Страница 1: ...ORTHOPANTOMOGRAPH OP 3D Pro 3D Dental X Ray System Installation Manual ENGLISH 216363 rev 1 0 805 5080...
Страница 2: ......
Страница 4: ......
Страница 8: ...iv rev...
Страница 18: ...1 Introduction 10...
Страница 22: ...2 Unit description 14 Panoramic lights 1 Midsagittal light 2 FH light 1 Image layer 2 TMJ light...
Страница 27: ...2 Unit description 19 2 6 Unit movements Panoramic unit movements R C J D...
Страница 29: ...2 Unit description 21...
Страница 30: ...2 Unit description 22...
Страница 38: ...4 PC requirements 30...
Страница 54: ...5 Installing the unit 46 4 Fasten the covers...
Страница 67: ...5 Installing the unit 59 C C D D Top cover of the column E E...
Страница 104: ...7 Cephalometric calibration and alignment 96...
Страница 111: ...7 Cephalometric calibration and alignment 103 3 Tighten the locking nut...
Страница 117: ...7 Cephalometric calibration and alignment 109...
Страница 128: ...8 Special procedures 120 6 Remove the arm from the column 4 nuts 7 Disassemble the arm...
Страница 132: ...8 Special procedures 124 right handed assembly Prism assembly for the left handed cephalostat...
Страница 158: ...8 Special procedures 150...
Страница 165: ...9 OP 3D Pro Pre sales check list 157 9 11 Notes comments...
Страница 166: ...9 OP 3D Pro Pre sales check list 158 9 12 Dimensions 463...
Страница 167: ...9 OP 3D Pro Pre sales check list 159 9 13 Dimensions with cephalostat...
Страница 168: ...9 OP 3D Pro Pre sales check list 160...