7 Cephalometric calibration and alignment
97
7.2.4
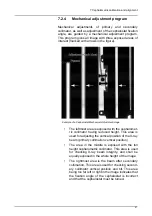
Mechanical adjustment program
Mechanical adjustments of primary and secondary
collimator, as well as adjustment of the cephalostat fixation
angle, are guided by a mechanical adjustment program.
This program gives an image with three exposed areas of
interest (marked with arrows in the figure).
•
The leftmost area is exposed with the cephalomet-
ric collimator having reduced height. This area is
used for adjusting the vertical position of the X-ray
beam (primary collimation vertical position).
•
The area in the middle is exposed with the full
height cephalometric collimator. This area is used
for checking X-ray beam integrity, and shall be
equally exposed in the whole height of the image.
•
The rightmost area is the beam after secondary
collimation. This area is used for checking second-
ary collimator vertical position and tilt. This area
being too far left or right in the image indicates that
the fixation angle of the cephalostat is incorrect
and that the cephalostat must be turned.
Example of a Cephalostat Mechanical Adjustment image.
Содержание ORTHOPANTOMOGRAPH OP 3D Pro
Страница 1: ...ORTHOPANTOMOGRAPH OP 3D Pro 3D Dental X Ray System Installation Manual ENGLISH 216363 rev 1 0 805 5080...
Страница 2: ......
Страница 4: ......
Страница 8: ...iv rev...
Страница 18: ...1 Introduction 10...
Страница 22: ...2 Unit description 14 Panoramic lights 1 Midsagittal light 2 FH light 1 Image layer 2 TMJ light...
Страница 27: ...2 Unit description 19 2 6 Unit movements Panoramic unit movements R C J D...
Страница 29: ...2 Unit description 21...
Страница 30: ...2 Unit description 22...
Страница 38: ...4 PC requirements 30...
Страница 54: ...5 Installing the unit 46 4 Fasten the covers...
Страница 67: ...5 Installing the unit 59 C C D D Top cover of the column E E...
Страница 104: ...7 Cephalometric calibration and alignment 96...
Страница 111: ...7 Cephalometric calibration and alignment 103 3 Tighten the locking nut...
Страница 117: ...7 Cephalometric calibration and alignment 109...
Страница 128: ...8 Special procedures 120 6 Remove the arm from the column 4 nuts 7 Disassemble the arm...
Страница 132: ...8 Special procedures 124 right handed assembly Prism assembly for the left handed cephalostat...
Страница 158: ...8 Special procedures 150...
Страница 165: ...9 OP 3D Pro Pre sales check list 157 9 11 Notes comments...
Страница 166: ...9 OP 3D Pro Pre sales check list 158 9 12 Dimensions 463...
Страница 167: ...9 OP 3D Pro Pre sales check list 159 9 13 Dimensions with cephalostat...
Страница 168: ...9 OP 3D Pro Pre sales check list 160...


