9
8
ENGLISH
Before arranging any connection make sure that the power
cord is unplugged from the mains. All connections must be
made with the device off.
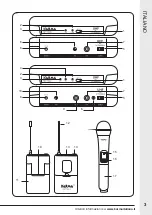
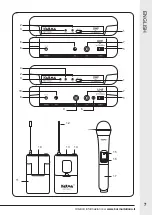
1. Make sure that the transmitters’ batteries are charged and if necessary replace
them by removing the case cover (11-17). Be careful to respect the polarities
indicated. If you use bodypack transmitters, plug the microphone’s connector into
the socket (14).
2. Place correctly the receiving base at a minimum distance of at least 1 mt from
the floor or from the walls and connect it to mixers or amplifiers via the Jack 6,3
mm socket (7). The output signal is of unbalanced microphone type. If you have
bought the double microphone model, you have a further socket (9) available for
the signal of the second wireless microphone.
3. Connect the adaptor to the back socket (8) and than to the 230V power source.
Warning: don’t connect the adaptor to the mains socket before connecting it to the
microphone: this could cause a spark and damage the device.
4. If you use a bodypack transmitter, the back clip (18) will allow you to fasten it your
belt for easy carriage.
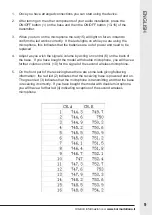
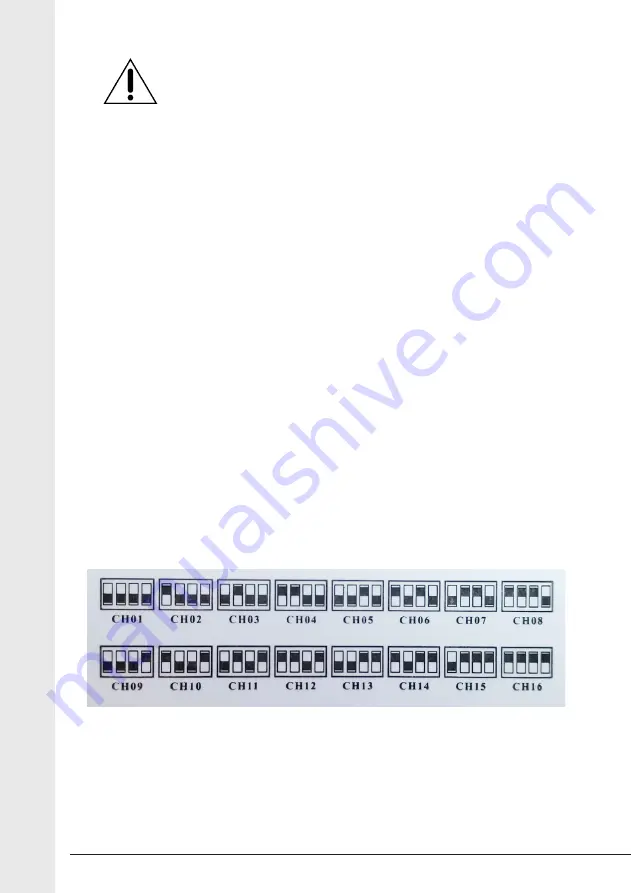
5. This wireless microphone can operate on 16 UHF channels. If a frequency is
disturbed or if you use more wireless microphones of the same model, it will be
enough to change operating frequency. In order to work, base and microphone
must operate on the same frequency. To set them put the switches (5) of the base
and of the microphones in the same position.
7
6
Prima di effettuare i collegamenti, assicuratevi di aver
scollegato la spina dalla presa elettrica. Tutti i
collegamenti devono avvenire ad apparecchio spento.
1. Assicuratevi che le batterie inserite nei microfoni trasmittenti siano cariche ed
eventualmente sostituitele rimuovendo il coperchio(11-17). Abbiate cura di
rispettare le polarità indicate. Nel caso in cui utilizziate trasmettitori di tipo lavalier,
inserite la spina del microfono nella presa(14).
2. Posizionate corretamente la base ricevente rispettando una distanza minima di
1mt da pavimento o pareti e collegandola a mixer o amplificatori tramite la presa
Jack 6,3mm(7). Il segnale in uscita è di tipo microfonico sbilanciato. Nei modelli
SET 7300/7300LAV troverete anche una presa XLR(7a) per segnali di tipo
bilanciato. Nel caso in cui abbiate acquistato il modello con doppio microfono,
avrete a disposizione una seconda presa(9) per il segnale del secondo
radiomicrofono.
3. Collegate l’alimentatore alla presa posteriore(8) e quindi alla presa elettrica
domestica 230V. Attenzione: non collegate l’alimentatore alla presa elettrica prima
di aver collegato lo spinotto: ciò potrebbe provocare una scintilla e danneggiare
l’apparecchio.
4. Se utilizzate un trasmettitore lavalier, la clip posteriore(18) vi consentirà di
agganciarlo a cintura per il comodo trasporto.
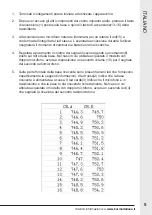
5. Questo radiomicrofono è in grado di operare su 16 canali. Nel caso in cui una
frequenza risultasse disturbata o nel caso di utilizzo di più radiomicrofoni dello
stesso modello, sarà sufficiente cambiare la frequenza operativa. Per poter
funzionare, base e microfono devono operare sulla stessa frequenza. Per settarli
ponete gli switch(5) della base e dei microfoni nella stessa posizione.
Istruzioni per i collegamenti


