background image

NanoParticle Nebulizer: Operation 

Liquid NanoParticle Sizer User Guide 

35 

Version 1.0.1 

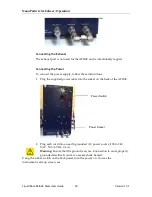
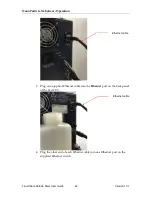
Connecting the Power 

To connect the power supply, follow these instructions: 

1.


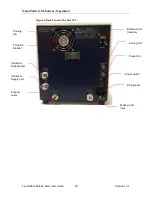
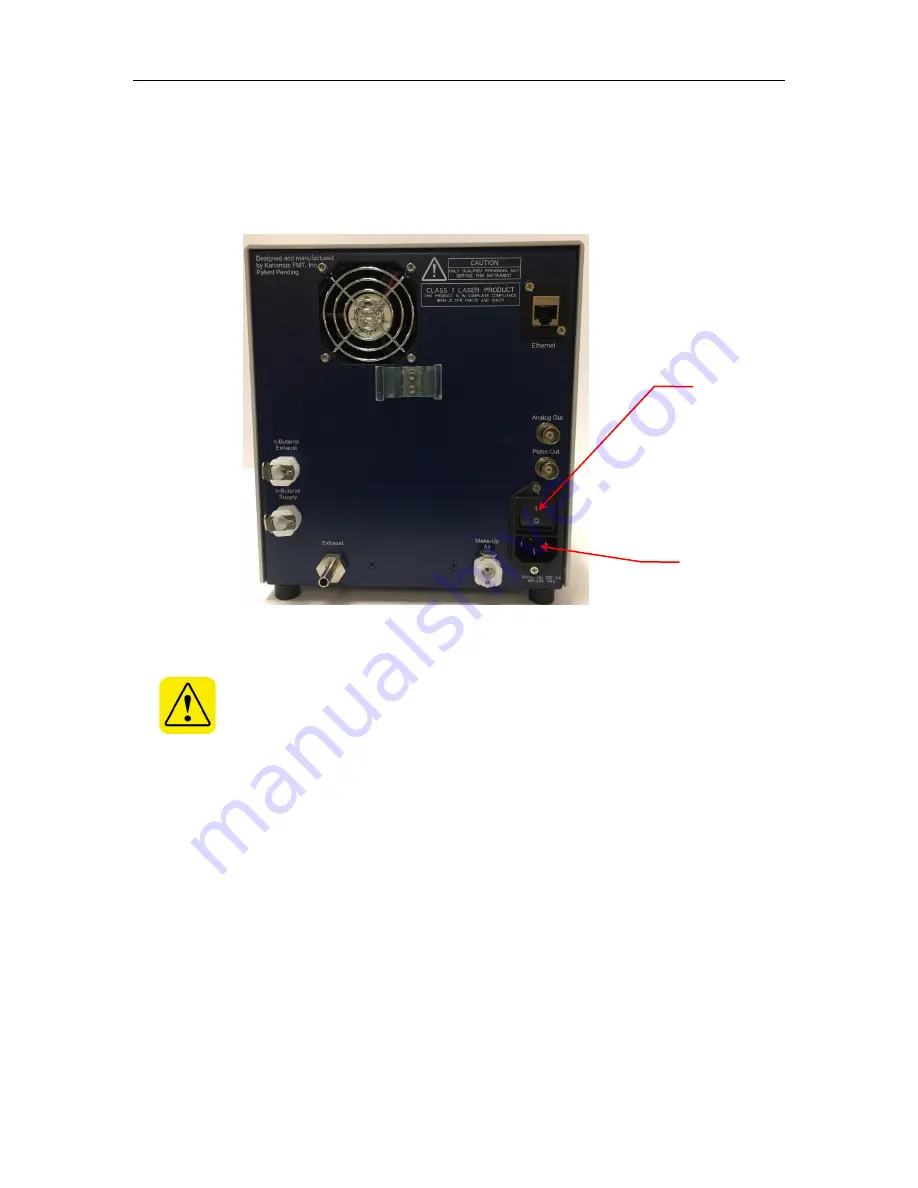
Plug the supplied power cable into the AC plug socket on the back panel 
of the Fast CPC.  


2.


Plug the cord into an earth-grounded AC power source (100 to 240 VAC, 
50 to 60 Hz, 0.6 A). 
 

Warning:

 Ensure that the ground is secure. Connection to an improperly 

grounded electrical source is a severe shock hazard. 


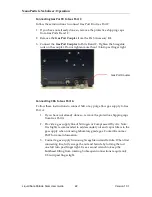
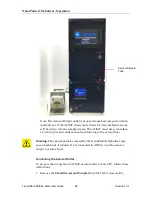
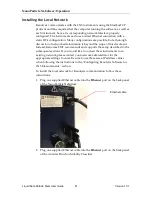
Connecting the BNC Cable 

To connect the BNC Cable, follow these instructions: 

1.


Remove the BNC Cable from the LNS Accessory Kit. 

2.


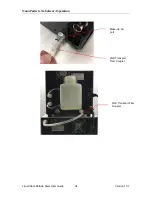
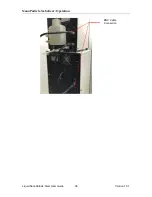
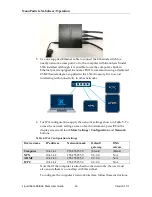
Connect the BNC Cable to 

Pulse Output

 (on the Fast CPC) and 

Pulse 

Input

 (on the AFIMC). 

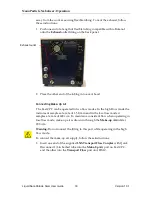
Power socket 

Power switch 


Содержание FMT 9310

Страница 1: ...Part Number 1979310 Version 1 0 1 Liquid NanoParticle Sizer System Model 9310 User Manual ...

Страница 2: ... February 2020 Version 1 0 1 May 2020 Changed network router to Ethernet switch Added note about contacting network admin when connecting to existing network All trademarks appearing in this manual are the property of their respective owners Kanomax FMT Inc may have patents or pending patent applications trademarks copyrights or other intellectual property rights covering subject matter in this do...

Страница 3: ...o any defect failure or damage caused by improper use or improper or inadequate maintenance and care Kanomax FMT Inc shall not be obligated to furnish service under this warranty a to repair damage resulting from attempts by personnel other than Kanomax FMT Inc representatives to install repair or service the product b to repair damage resulting from improper use or connection to incompatible equi...

Страница 4: ...the Compressed Air or Nitrogen Supply 14 Connecting the Power 15 Connecting the Ultrapure Water Supply 15 Connecting the Sample Inlet 16 Controlling the External Injection Pump with the NanoParticle Nebulizer 18 Warming Up the Nebulizer 19 Installing the Annular Flow Ion Mobility Classifier 20 Connecting Gas Port B to Gas Port C 22 Connecting CDA to Gas Port A 22 Connecting the Exhaust 23 Connecti...

Страница 5: ... Time 55 Changing the Fast CPC Network Settings 57 Changing the Fast CPC Flow Settings 58 Configuring Kanolysis Software for LNS Measurements 60 Adding Liquid NanoParticle Sizer Devices 61 Adding an LNS System for Measurements 65 Adding Samples for LNS Analyses 68 Defining Methods for LNS Analyses 70 Creating a New Experiment for LNS Analyses 73 Editing an Existing Experiment for LNS Analyses 78 P...

Страница 6: ...CDA Clean Dry Air CMP Chemical Mechanical Planarization DNVR Dissolved Non volatile Residue EU European Union FCPC Fast Condensation Particle Counter IPv4 Internet Protocol Version 4 kPa Kilo Pascals LNS Liquid NanoParticle Sizer mA Milliamperes NPN NanoParticle Nebulizer NVR Non volatile Residue PEEK Polyether Ether Ketone high purity chemical resistant plastic PFA Perfluoralkoxy high purity chem...

Страница 7: ... Sizer Follow the procedures described in this manual to use the instrument safely Warning Warnings are used for the following purposes To indicate that unsafe use of the instrument could result in serious injury to you or cause irrevocable damage to the instrument To indicate that if you do not follow the procedures described in this manual you may damage the instrument To draw attention to impor...

Страница 8: ...ic shocks ensure that all electrical outlets are grounded The aerosol particles created by the Model 9310 Liquid NanoParticle Sizer may pose a health risk if inhaled If not connected to other instrumentation vent the aerosol output to a fume hood Follow the instructions for all inlet and outlet connections Incorrect connections will cause the nebulizer to malfunction The air or nitrogen supplied t...

Страница 9: ...e water leaving an aerosol of particles suspended in the carrier gas The aerosol is then combined with clean dry air Up to 1 5 L min of dry aerosol flow can be drawn from the aerosol outlet The aerosol particles are electrically charged using a safe and reliable soft x ray charger The AFIMC sorts the particles by size in an electric field and is capable of classifying particles from 5 500 nm in si...

Страница 10: ...concentrations Instruments that provide relative particle concentrations can lead to significant misinterpretations when comparing different samples because they only provide measurements of relative concentrations within each sample Cited in three SEMI Guides In SEMI C92 the LNS is used to determine the quality of ion exchange resin In SEMI C79 the LNS evaluates the efficiency of sub 15 nanometer...

Страница 11: ... 1 0 1 clever insights to this unique technology and the gracious feedback they have provided during the development of this product Patent numbers 8 272 253 and 8 573 034 have been issued to CTA and licensed by Kanomax FMT Inc Patent number 7 852 465 has been issued to Kanomax FMT Inc ...

Страница 12: ...Unpacking the NanoParticle Nebulizer To unpack the NanoParticle Nebulizer follow these instructions 1 Carefully remove the nebulizer from its shipping container Save the original packing materials for use when shipping the nebulizer back to Kanomax FMT Inc for service or for moving the nebulizer to a different location Warning If the NanoParticle Nebulizer is returned to Kanomax FMT Inc in anythin...

Страница 13: ...ping the ion mobility classifier back to Kanomax FMT Inc for service or for moving the ion mobility classifier to a different location Warning If the AFIMC is returned to Kanomax FMT Inc in anything other than the original shipping container you will be charged for any damage that occurs during shipping If you do not have the original shipping container contact Kanomax FMT Inc at 651 762 7762 Cust...

Страница 14: ...ture if necessary 5 Make sure all the items listed in 6 Table 3 were included in the Fast CPC shipment If any of the items are missing or damaged please call Kanomax FMT Inc at 651 762 7762 Customers in Asia please call 81 6 6877 0183 Table 3 Fast CPC Model 3650 Packing List Part Number Description Quantity FCPC 3650 Fast CPC 1 1973650 Fast CPC User Manual Printed 1 1330001 Power Supply Cable USA ...

Страница 15: ... Packing List Part Number Description Quantity 1330010 BNC cable 1 1979310 LNS User Manual Printed 1 2671002 LNS QuickInstall Guide printed 1 LNS Transport Flow Coupler Transport Flow Coupler assembly 1 1611063 Classifier Aerosol Coupler assembly 1 LNS Volume Standard LNS Volume Standard 5E17 nm3 ml 1 3020035 Aerosol sample tube 1 1330011 Ethernet switch 1 1330005 Ethernet cable 4 1320004 USB to E...

Страница 16: ...e sample introduction A length of inch OD x 0 156 ID High Purity PFA tubing sufficient to reach from the instrument to your water supply PFA tubing flaring tool tube gripper and heat gun Ultrapure Water supply Note Water pressure should be 20 70 psi at 100 ml min Conductive tubing for transporting the generated aerosol shipped with the LNS aerosol size spectrometer A supply of clean dry compressed...

Страница 17: ...ength of PFA tubing 2 Hold the tubing with a tube gripper 3 Rotate one end of the tubing evenly over the heat gun 4 As soon as the end of the tubing becomes clear push it onto a flaring tool in your required size Note If you remove the tubing from the flaring tool too soon the end shrinks If you overheat the tube the tubing will buckle 5 Hold in place until the tubing is cool at least two minutes ...

Страница 18: ...odule is combined inside the device downstream of the pump Follow these instructions to connect the water drain 1 Remove the protective cap from the Waste Outlet on the back panel 2 Using a 6 ft length of inch OD polyethylene tubing with a Swagelok fitting on one end insert the tubing into the Waste Outlet fitting on the back panel Dilution Flow Flowmeter UPW Inlet Power Socket Ethernet Port inact...

Страница 19: ...your drain Do not connect the waste line to a container in tight coupling manner where the pressure will fluctuate beyond ambient conditions Connecting the Compressed Air or Nitrogen Supply The air or nitrogen supplied to the NanoParticle Nebulizer must be clean dried oil free and regulated at 345 414 kPa 50 60 psi at 2 slpm Follow these instructions to connect the compressed air supply 1 Remove t...

Страница 20: ...ning Ensure that the ground is secure Connection to an improperly grounded electrical source is a severe shock hazard Connecting the Ultrapure Water Supply Ultrapure water must be supplied to the nebulizer through a inch diameter Teflon PFA tube specially adapted to fit the UPW Inlet fitting on the front panel of the nebulizer To prepare the PFA tube for attachment to the UPW Inlet fitting take th...

Страница 21: ... flows through the instrument and out through the waste line Ensure that the UPW Inlet has no leaks If you see any leaks tighten the fitting Connecting the Sample Inlet To connect the Sample Inlet follow these instructions 1 On the front panel turn the Sample Selector Valve to DIRECT 2 Remove the 1 4 28 plug protective cap from the Sample Inlet fitting 3 Install the supplied 1 4 28 tube adapter to...

Страница 22: ...e tab to the left and lifting the holder up 6 Slot the tubing into the tube holder Place the orange tube positioner on the far right of the tubing against the tube holder Stretch the tubing and put the white positioner into the far left slot 7 Hook the tube holder onto the pump and snap down into place 8 Set the lever at the marked position 9 Place the end of the tubing in a suitable drain contain...

Страница 23: ...rnal injection peristaltic pump can be controlled by the NanoParticle Nebulizer To connect the pump and the NanoParticle Nebulizer follow these instructions 1 Plug the provided RS 232 cable into the Serial port on the back panel of the NanoParticle Nebulizer 2 Plug the other end of the cable into the RS232 IN port on the back panel of the peristaltic pump Serial Port ...

Страница 24: ...cker switch on the back panel turn the power on You see the instrument splash screen shown below and the nebulizer automatically begins its warm up procedure The warm up procedure may take up to 15 minutes Press F1 to view the warmup status on the Device Status screen Figure 4 NanoParticle Nebulizer Warmup Screen RS232 Cable ...

Страница 25: ...noParticle Sizer User Guide 20 Version 1 0 1 Installing the Annular Flow Ion Mobility Classifier Figure 5 and Figure 6 show the front and back panels of the Annular Flow Ion Mobility Classifier AFIMC Model 3660 Figure 5 Front panel of the AFIMC ...

Страница 26: ...article Sizer User Guide 21 Version 1 0 1 Components of the back panel are shown in Figure 6 below Figure 6 Back panel of the AFIMC Gas Port C Ethernet Port Serial Port Gas Port A Power Socket Power Switch Gas Port B Pulse In Analog In Cooling Fan ...

Страница 27: ...Follow these instructions to connect Soft x ray purge flow gas supply to Gas Port A 1 If you have not already done so remove the protective shipping caps from Gas Port A 2 Provide a gas supply line of Nitrogen or Compressed Dry Air Note It is highly recommended to add secondary oil and vapor filters to the gas supply when not using laboratory grade gas Contact Kanomax FMT for more information 3 Co...

Страница 28: ...llow these instructions 1 Plug the supplied power cable into the socket on the back of the AFIMC 2 Plug each cord into an earth grounded AC power source 100 to 240 VAC 50 to 60 Hz 0 6 A Warning Ensure that the ground is secure Connection to an improperly grounded electrical source is a severe shock hazard Using the rocker switch on the back panel turn the power on You see the instrument warmup scr...

Страница 29: ...NanoParticle Nebulizer Operation Liquid NanoParticle Sizer User Guide 24 Version 1 0 1 Figure 7 Press F1 to view the warmup status on the Device Status screen ...

Страница 30: ...follow these instructions 1 Place the AFIMC on top of the NanoParticle Nebulizer 2 Remove the protective cap from the Aerosol Output fitting on the front panel 3 Using the provided Aerosol Sample Tube connect the aerosol output from the NanoParticle Nebulizer to the inlet of the AFIMC Use the shortest practical length of tubing to minimize particle losses through diffusion ...

Страница 31: ...he AFIMC must draw more than 1 L min to prevent condensation from forming in the aerosol lines Warning The aerosol particles created by the NanoParticle Nebulizer may pose a health risk if inhaled If not connected to AFIMC vent the aerosol output to a fume hood Connecting the Aerosol Outlet To prepare the connection of AFIMC aerosol outlet to Fast CPC follow these instructions 1 Remove the Classif...

Страница 32: ...NanoParticle Nebulizer Operation Liquid NanoParticle Sizer User Guide 27 Version 1 0 1 2 Install the Classifier Aerosol Coupler onto the aerosol outlet on top of the AFIMC ...

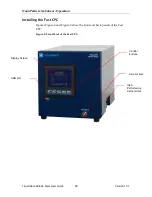
Страница 33: ...izer User Guide 28 Version 1 0 1 Installing the Fast CPC Figures Figure 8 and Figure 9 show the front and back panels of the Fast CPC Figure 8 Front Panel of the Fast CPC Aerosol inlet Control buttons Display Screen USB port High Performance Aerosol inlet ...

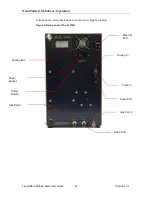
Страница 34: ...Sizer User Guide 29 Version 1 0 1 Figure 9 Back Panel of the Fast CPC Plug socket Ethernet port inactive Exhaust outlet Cooling fan Power switch Analog Out Fill bottle bracket Pulse Out switch n Butanol Exhaust port n Butanol Supply port Make up Air inlet ...

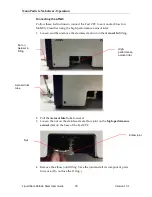
Страница 35: ...inlet 1 Loosen and then remove the stainless steel nut on the Aerosol In fitting 2 Pull the Aerosol Inlet tube forward 3 Loosen the nut on the stainless steel elbow joint on the high performance aerosol inlet on the base of the Fast CPC 4 Remove the elbow joint fitting Save the joint and all its component parts for reuse Do not lose the O ring Aerosol Inlet tube Elbow joint Nut Nut on Aerosol In f...

Страница 36: ...C to the Fast CPC inlet Hand tighten both nuts Do not over tighten Connecting the n Butanol Supply The fill bottle and bottle bracket are supplied with the Fast CPC To mount the n Butanol bracket and fill bottle follow these instructions 1 Using a Phillips screwdriver remove the two screws on the back panel of the Fast CPC beneath the fan 2 Using the screws attach the bottle bracket to the back of...

Страница 37: ...outlet 6 Carefully pour n Butanol into the fill bottle Do not fill past the n Butanol exhaust fitting level The n Butanol will not flow into the CPC until the connections are made the instrument is powered on and the warm up cycle is complete Warning n Butanol n butyl alcohol is flammable and toxic follow appropriate chemical handling procedures Connecting the Exhaust The air flow containing n But...

Страница 38: ...flow modes In the high flow mode the instrument samples at a rate of 1 5 L min and in the low flow mode it samples at a rate of 600 ccm To maintain a consistent flow when operating in low flow mode make up air is drawn in through the Make up Air inlet at 900 ccm Warning Do not connect the fitting to this port while operating in the high flow mode To connect the make up air supply follow these inst...

Страница 39: ...NanoParticle Nebulizer Operation Liquid NanoParticle Sizer User Guide 34 Version 1 0 1 LNS Transport Flow Coupler Make Up Air port LNS Transport Flow Coupler ...

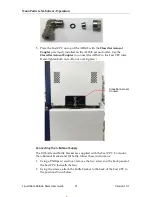
Страница 40: ...CPC 2 Plug the cord into an earth grounded AC power source 100 to 240 VAC 50 to 60 Hz 0 6 A Warning Ensure that the ground is secure Connection to an improperly grounded electrical source is a severe shock hazard Connecting the BNC Cable To connect the BNC Cable follow these instructions 1 Remove the BNC Cable from the LNS Accessory Kit 2 Connect the BNC Cable to Pulse Output on the Fast CPC and P...

Страница 41: ...NanoParticle Nebulizer Operation Liquid NanoParticle Sizer User Guide 36 Version 1 0 1 BNC Cable Connection BNC Cable Connection ...

Страница 42: ...lly begins its warm up procedure Note The warm up procedure may take up to 15 minutes When the warm up cycle is complete n Butanol begins to fill the internal reservoir Press F1 to view the warm up status on the Device Status screen Figure 10 Fast CPC Warmup Screen If you experience any problems installing your Model 9310 Liquid NanoParticle Sizer system please contact Kanomax FMT Inc at 651 762 7...

Страница 43: ...ning the Microsoft Windows 10 operating system is required in order to use Kanolysis Recommended minimum system capabilities are as follows Intel Core i5 8300 2 3GHz CPU 8GB RAM 128GB SSD with at least 1GB of available storage space Wired network interface adapter Gigabit Ethernet If support for other platforms such as Mac OS and Linux is desired please contact Kanomax FMT Inc to discuss possible ...

Страница 44: ...e below 4 Run Windows Explorer 5 In Windows Explorer navigate to the folder containing the one observed in step 3 Note It may be convenient to begin by entering APPDATA in the location bar since this is typically equivalent to entering the path C Users name AppData Roaming 6 Right click on the data folder and select Send to Compressed zipped folder ...

Страница 45: ...ontact Kanomax FMT Inc for support Otherwise follow the instructions in the Installing Kanolysis section on page 37 Uninstalling Kanolysis To uninstall the software use the standard tool provided by the operating system e g in Windows 10 search for Add or Remove Programs or run the Settings application and click on Apps Note that custom program data such as collected measurements are not automatic...

Страница 46: ...ope of this document Instead Kanomax FMT recommends and supports the setup described in the subsequent sections If you would like to connect these instruments to an existing network please contact your network administrator for the appropriate settings to enter Be sure to use those same IP address values when following the instructions in the Configuring Kanolysis Software for LNS Measurements sec...

Страница 47: ...Sizer User Guide 42 Version 1 0 1 3 Plug one supplied Ethernet cable into the Ethernet port on the back panel of the Fast CPC 4 Plug the other end of each Ethernet cable into one Ethernet port on the supplied Ethernet switch Ethernet cable Ethernet cable ...

Страница 48: ... 6 For IPv4 configurations apply the network settings shown in Table 5 To access the network settings screen of each instrument press F2 on the display screen and touch More Settings Configuration and Network buttons Table 5 IPv4 Configuration Settings Device name IP address Network mask Default gateway DNS servers Computer 10 41 4 1 255 255 255 0 blank blank NPN 10 41 4 2 255 255 255 0 0 0 0 0 N ...

Страница 49: ... Right click on the Ethernet adapter that is connected to the instrument network then select Properties from the context menu to open the network adapter properties window 10 Select Internet Protocol Version 4 TCP IPv4 then click Properties 11 Enter the corresponding network settings then click OK to close the Internet Protocol Version 4 TCP IPv4 Properties dialog window 12 Click OK to apply the c...

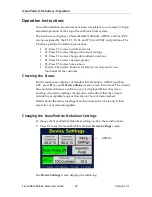
Страница 50: ...w home screen System The System button is for factory use only and is non functional for the customer Checking the Status On the touchscreen displays of NanoParticle Nebulizer AFIMC and Fast CPC press F1 to see the Device Status screen of each instrument The current time and date hh mm ss dd mm yyyy is displayed below the screen heading Any status readings displayed in red indicate that the status...

Страница 51: ...oading new firmware UPW On Off allows you to turn UPW supply on and off to avoid flooding before the instrument is warmed up UPW flow allows you to set the online dilution flow rate Pressure Setpoint allows you to set the sample pressure More details about the default setpoint values of the above parameters can be found in the NanoParticle Nebulizer User Manual included in the NanoParticle Nebuliz...

Страница 52: ...ours to change the hours Day to change the day Month to change the month and Year to change the year Use the on screen keypad to enter a value for any of the parameters you wish to change then touch Enter Note buttons index the number buttons set the cursor sets the sign on the number 5 Press Set Time The date and time appear below the heading on the Device Status screen Calibration ...

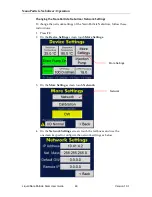
Страница 53: ... To change the network settings of the NanoParticle Nebulizer follow these instructions 1 Press F2 2 On the Device Settings screen touch More Settings 3 On the More Settings screen touch Network 4 On the Network Settings screen touch the textboxes and use the onscreen keypad to configure the network settings as below Network More Settings ...

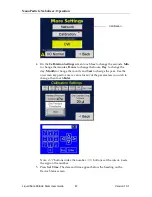
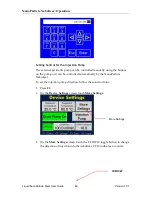
Страница 54: ...using the buttons on the pump or it can be controlled automatically by the NanoParticle Nebulizer To set the injection pump direction follow these instructions 1 Press F2 2 On the Device Settings screen touch More Settings 3 On the More Settings screen touch the CCW CW toggle button to change the direction of injection into the nebulizer CCW indicates a counter CCW CW More Settings ...

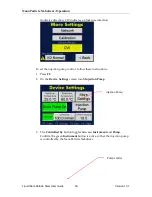
Страница 55: ...ction To set the injection pump control follow these instructions 1 Press F2 2 On the Device Settings screen touch Injection Pump 3 The Controlled by button toggles between Instrument and Pump Confirm the green Instrument button is active so that the injection pump is controlled by the NanoParticle Nebulizer Injection Pump Pump control ...

Страница 56: ...e AFIMC Settings screen The AFIMC Settings screen displays the following Device directs you to the AFIMC Device Settings screen Measurement directs you to the AFIMC Measurement Settings screen Configuration directs you to the Additional Settings screen Changing the Device Settings To change the device configuration settings of AFIMC follow these instructions 1 Press F2 Configuration Device ...

Страница 57: ...rge flow o Setpoint is the setpoint flow rate of the charge conditioner purge flow in ccm Mobility Classifier allows you to change settings of the ion mobility classifier o Voltage shows the current working status of the ion mobility classifier high voltage power supply o Control is the source of control for the high voltage power supply confirm it is set to Program for LNS operations o Setpoint i...

Страница 58: ...f the Annular Flow Ion Mobility Sizer AFIMC Fast CPC system o IMC Inlet is an automatically calculated value based on the Inlet Flow and Charge Conditioner Purge Flow settings o CPC Inlet is the aerosol flow rate at the Aerosol Inlet of the Fast CPC o CPC Meas is the inspected aerosol flow rate of the Fast CPC confirm it is set at the default value of 300 ccm for LNS operations Changing the Date a...

Страница 59: ... Hours to change the hours Day to change the day Month to change the month and Year to change the year Use the on screen keypad to enter a value for any of the parameters you wish to change then touch Enter Note buttons index the number buttons set the cursor sets the sign on the number Changing the AFIMC Network Settings To change the network settings of the AFIMC follow these instructions 1 Pres...

Страница 60: ...Network screen touch the textboxes and use the onscreen keypad to configure the network settings as below Turning AFIMC Data Logging On To turn AFIMC data logging on follow these instructions 1 Press F3 2 On the Data Management screen if the data logging is not already on touch the Data Logging On Off toggle button to turn data logging on Configure Network ...

Страница 61: ...nalog Out allows you to change the Analog Output signal settings Flow Settings directs you to the Fast CPC Flow Settings screen More Settings directs you to the Fast CPC More Settings screen More details about the Analog Out function can be found in the Fast CPC User Manual included in the Fast CPC Accessory Kit Changing the Date and or Time To change the date and time of Fast CPC follow these ins...

Страница 62: ...e Date 4 On the Time Date Settings screen touch Day to change the day Month to change the month Year to change the year Hour to change the hour Min to change the minutes and Sec to change the seconds Use the on screen keypad to enter a value for any of the parameters you wish to change then touch Enter Time Date More Settings ...

Страница 63: ...he sign on the number Press Set Time The date and time appear below the heading on the Device Status screen Changing the Fast CPC Network Settings To change the network settings of the Fast CPC follow these instructions 1 Press F2 2 On the Device Settings screen touch More Settings 3 On the More Settings screen touch Network Network More Settings ...

Страница 64: ...Settings The flow setting buttons allow you to turn the Butanol Sample and Sheath flows On Off and to choose the Inlet Flow rate To change the flow settings follow these instructions 1 Press F2 2 On the Device Settings screen touch Flow Settings 3 On the Flow Settings screen touch the Butanol Flow Sample Flow and Sheath Flow toggle buttons to turn each flow On if they are not already on Flow Setti...

Страница 65: ...ersion 1 0 1 4 The Inlet Flow can be switched between high 1 5 lpm and low Inlet Flow mode 0 6 lpm touch the Inlet Flow toggle button In high flow mode the button is blue in low flow mode the button is gray Set the Inlet Flow at 0 6 lpm if it is not already set so Inlet Flow ...

Страница 66: ... following structure for data organization Figure 11 Kanolysis Software Data Organization Structure To configure the Kanolysis software for making LNS measurements follow these instructions 1 On the computer with Kanolysis installed double click the Kanolysis icon to launch the Kanolysis software 2 Confirm the Liquid NanoParticle Sizer module is shown on the main panel ...

Страница 67: ...1 Adding Liquid NanoParticle Sizer Devices To add device settings for the Liquid NanoParticle Sizer system follow these instructions 1 Click the button to the upper right corner of the Kanolysis Home screen in the drop down list click Devices 2 On Devices screen click Add device Devices ...

Страница 68: ...Nebulizer Device name is the name of the connected NanoParticle Nebulizer unit Device vendor is the vendor of the connected NanoParticle Nebulizer unit Device driver is the model number of the connected NanoParticle Nebulizer unit Connection is the network TCP IP configurations of the connected NanoParticle Nebulizer unit 4 Click SAVE button and exit 5 Back on Devices screen click Add device ...

Страница 69: ...tion for the Annular Flow Ion Mobility Classifier Device name is the name of the connected AFIMC unit Device vendor is the vendor of the connected AFIMC unit Device driver is the model number of the connected AFIMC unit Connection is the network TCP IP configurations of the connected AFIMC unit 7 Click SAVE button and exit 8 Back on Devices screen click Add device ...

Страница 70: ...tion for the Fast CPC Device name is the name of the connected Fast CPC unit Device vendor is the vendor of the connected Fast CPC unit Device driver is the model number of the connected Fast CPC unit Connection is the Network TCP IP configurations of the connected Fast CPC unit 10 Click SAVE button and exit 11 On Devices screen click the button on each device panel ...

Страница 71: ...all devices are connected with green Connected banners displayed Adding an LNS System for Measurements To define a Liquid NanoParticle Sizer system with connected devices follow these instructions 1 Click the button to the upper right corner of the software window in the drop down list click Systems ...

Страница 72: ...noParticle Sizer system System name is the name of the connected LNS system System type is the configuration type of the connected LNS system Peristaltic Pump is the peristaltic pump unit to be used for the connected LNS system which is recognized as the NanoParticle Nebulizer unit that pump is connected to via an RS 232 serial cable Nebulizer is the NanoParticle Nebulizer unit to be used for the ...

Страница 73: ... 68 Version 1 0 1 Electrostatic Classifier is the AFIMC unit to be used for the connected LNS system Condensation Particle Counter is the Fast CPC unit to be used for the connected LNS system 4 Click SAVE button and exit 5 Click button to go back to Kanolysis home screen ...

Страница 74: ...ructions 1 Click button to the upper right corner of the Kanolysis Home screen In the drop down list click Samples 2 On Samples screen click NEW SAMPLE button 3 On New Sample screen fill in the Basic information fields with following information of the new sample Device name automatically is a checkbox allows you to select if a device automatically generated sample name is desired Samples ...

Страница 75: ...Lot name allows you to type in the lot number of the sample Offline dilution ratio allows you to type in the dilution ratio that has been applied to the sample prior to analysis Replicate allows you to type in the replicate number of the sample 4 Check the Sample is calibrant box if this pending sample is a volume standard to be used as a calibrant for the LNS system Type in its peak diameter and ...

Страница 76: ...lick SAVE and exit to the Samples screen 6 Repeat steps 2 5 to add more samples Defining Methods for LNS Analyses To define test methods for an LNS measurement follow these instructions 1 Click button to the upper right corner of the Kanolysis Home screen In the drop down list click Methods ...

Страница 77: ...ing information of the new method Method name allows you to define a name for the new method Peristaltic Pump allows you to configure the peristaltic pump settings for the new method o Loading flow rate is the fast forwarding flow rate to be applied when a sample is newly switched o Loading time is the time to fast forward the new sample at the loading flow rate defined above Methods ...

Страница 78: ...rature is the setpoint value of the operation temperature of the nebulizer module o Nebulizer Pressure is the setpoint value of the operation gas pressure of the nebulizer o Evaporator Temperature is the setpoint value of the operation temperature of the heated evaporator AFIMC allows you to configure the AFIMC settings for the new method o Number of scans is the number of replicated measurement s...

Страница 79: ...5 Repeat steps 2 4 to add more methods Creating a New Experiment for LNS Analyses To create an LNS experiment using the samples and methods defined above follow these instructions 1 Click button to the upper right corner of the Kanolysis Home screen In the drop down list click Experiments Alternatively you can also click the CREATE button on the Liquid NanoParticle Sizer panel ...

Страница 80: ... screen fill in fields with following information of the new method Experiment name allows you to define a name for the new experiment Equipment allows you to select an LNS system to be used for the new experiment Sequence allows you to define a test sequence for the new experiment Experiments CREATE button ...

Страница 81: ... ROW button to add sample sequence 4 Click before Sample name column to select a sample from the pop up list selected sample is highlighted in yellow Click X CLOSE to exit 5 From the drop down list of the Method name select a method for the corresponding sample Selected method is highlighted in gray ...

Страница 82: ... Version 1 0 1 6 Repeat steps 3 5 to complete the sample sequence 7 Click Options arrow check Use volume inspection rate from last calibrant data if no volume standard sample is included in the sample sequence of this experiment Note this option must be disabled if there is ...

Страница 83: ...id NanoParticle Sizer User Guide 78 Version 1 0 1 no stored calibrant data on the copy of Kanolysis used for this experiment 8 Click NEXT button when all experiment configurations are complete 9 Click START to start the selected experiment ...

Страница 84: ... Liquid NanoParticle Sizer User Guide 79 Version 1 0 1 Editing an Existing Experiment for LNS Analyses To edit an existing LNS experiment follow these instructions 1 On Kanolysis Home screen Click the USE AN EXISTING EXPERIMENT banner ...

Страница 85: ...d by clicking the before an experiment name on Experiments screen Performing a Volume Standard Calibration for LNS Analyses It is suggested to perform a volume standard calibration of the LNS system on each day when an LNS measurement is scheduled To run a calibration with the LNS Volume Standard for the system follow the following instructions Note The volume standard calibration can be included ...

Страница 86: ...r Operation Liquid NanoParticle Sizer User Guide 81 Version 1 0 1 2 On Methods screen click NEW METHOD button 3 On Edit Method screen create a Volume Standard Check method with information shown in the figure below Methods ...

Страница 87: ...r Operation Liquid NanoParticle Sizer User Guide 82 Version 1 0 1 7 Click button to the upper right corner of the Kanolysis Home screen In the drop down list click Samples 8 On Samples screen click NEW SAMPLE button Samples ...

Страница 88: ...ndard with its corresponding Product name and Lot name check the Sample is calibrant box 10 Click SAVE and exit to the Samples screen 11 Click button to the upper right corner of the Kanolysis Home screen In the drop down list click Experiments Alternatively you can also click the CREATE button on the Liquid NanoParticle Sizer panel ...

Страница 89: ...icle Sizer User Guide 84 Version 1 0 1 12 Click ADD ROW button to add sample sequence 13 Click before Sample name column to select a sample from the pop up list selected sample is highlighted in yellow Click X CLOSE to exit Experiments CREATE button ...

Страница 90: ...t of the Method name select a method for the corresponding sample Selected method is highlighted in gray 15 Click NEXT button on the View Experiment screen click START to start the volume standard calibration experiment 16 Prepare the volume standard for injection and click Next to the bottom of the pop up window ...

Страница 91: ...izer User Guide 86 Version 1 0 1 17 Check all Device Status parameters are at their respective setpoints Out of range values will be displayed in red 18 The particle size distribution of the volume standard are shown in line plots on View Experiment screen ...

Страница 92: ...MPUTE button to calculate the Volumetric Inspection Rate in µL min Note The nominal range of the Volumetric Inspection Rate is 0 2 1 0 µL min If you experience any problems obtaining a Volumetric Inspection Rate value within the nominal range please contact Kanomax FMT Inc at 651 762 7762 Customers in Asia please call 81 6 6877 0183 ...

Страница 93: ...sure to drop to zero confirm that the pressure is zero by looking at the Device Status screen 2 Keep the power turned on and the compressed air flowing into the Air Inlet on the back panel 3 Connect the CDA N2 adapter fitting provided with the instrument to the UPW inlet port and apply clean dry air or nitrogen at 30 psi to the port Run for 2 hours 4 Remove the tubing and cap the UPW Inlet on the ...

Страница 94: ... the supply is drawing from the top of the bottle and the exhaust is feeding the bottom 2 Set the butanol flow in Prime mode 3 Place the empty bottle back in the bracket and reconnect 4 Operate the Fast CPC until the counts on the Device Status screen read 0 5 Disconnect the aerosol supply from either the Aerosol In fitting on the front panel or from the high performance aerosol inlet beneath the ...

Страница 95: ...Wetted Surface Materials PFA Teflon PTFE sapphire 316L stainless steel PEEK Ambient Temperature Range 15 35 C 59 95 F Ambient Relative Humidity Range 0 85 Maximum Water Temperature 80 C 176 F Dimensions WxDxH 23 9 x 23 9 x 35 5 14 46 18 with fittings Weight 6 kg 13 2 lb Power Universal 100 230 VAC 50 60 Hz 90 W max Output RJ 45 for Modbus USB FlashDrive Internal storage Micro SD Ultrapure Water In...

Страница 96: ...yl alcohol Flow control Critical orifices with internal pumps Aerosol sample flow 300 cm3 min Inlet flow 600 or 1500 cm3 min user selectable Sheath flow 300 cm3 min Aerosol inlet Front panel or vertical from the bottom user selectable fitting access on right side of instrument Dimensions WxDxH 8 5 7 5 8 5 21 6 cm 19 cm 21 6 cm Weight 6 8 kg 15 lb Power requirements 50 60 Hz 100 220 VAC 75 Watts I ...

Страница 97: ... 35 Sample Flow 60 Sheath Flow 60 Shipping 91 Shut Down 91 Specifications 93 Unpacking 9 Warmup 37 Warmup Screen 37 Injection Pump Connect 19 Control 50 Injection Direction 50 Installation 7 AFIMC 21 Bottle Bracket 31 Connect AFIMC and Fast CPC 26 30 Connect Air Supply 15 Connect BNC Cable 35 Connect Exhaust 33 Connect Make Up Air 33 Connect n Butanol Supply 31 Connect NPN and AFIMC 25 Connect Pow...

Страница 98: ...Shut Down 90 Specifications 92 Unpacking 7 Warmup 20 Warmup Screen 20 Operation AFIMC Settings 51 Change Date Time 46 54 57 Change Network Settings 48 55 59 Data Logging 56 Device Status 45 Fast CPC Settings 57 Injection Pump Control 49 Kanolysis Software Configuration 63 NanoParticle Nebulizer Settings 45 Operations Change Date Time 52 Packing List AFIMC 8 Fast CPC 10 LNS Accessory Kit 10 NanoPar...

Отзывы: