SEW IN COMFORT. SEW LONGER.™
ASSEMBLY INSTRUCTIONS
Kangaroo
ITEM NO.:
K8805 TeakK8807 GrayK8811 Ash White
Страница 1: ...SEW IN COMFORT SEW LONGER ASSEMBLY INSTRUCTIONS Kangaroo ITEM NO K8805 Teak K8807 Gray K8811 Ash White...
Страница 2: ...led cam bolt holes to help the cam bolts screw in better 4 Glue provided is to secure wood dowels in place and is optional If glue is used during assembly locate the appropriate hole for the dowel pla...
Страница 3: ...el 1 3 of 3 03 Front Right Leaf Support Panel 1 3 of 3 04 Rear Right Leaf Support Panel 1 3 of 3 Parts Box 1 1 of 3 ITEM DESCRIPTION QTY PACK X Left side panel 1 1 of 3 Z Right side panel 1 1 of 3 Y P...
Страница 4: ...x14 Ball Catch x2 Magnet x5 8x16 Fix Bolt x20 4x20 Fix Bolt x2 Pre installed parts s4 b2 r3 h2 b3 m t1 t2 Drawer Runners Caster Bracket 8x30 Dowel Pin x26 d1 3 5x35 Screw x4 c1 b1 s1 a c2 c5 s3 h1 Pa...
Страница 5: ...Plate Caster x5 8x16 Fix Bolt x20 Allen Wrench x1 t2 b1 a Attach t2 Plate Casters to underside of Panel G using b1 Fix Bolts Tighten with a Allen Wrench Lock Casters and flip Panel G over 6x35 Cam Bo...
Страница 6: ...ions Kangaroo 6 Part 1 Cabinet Shell D X 8x30 Dowel Pin x16 6x35 Cam Bolt x2 c1 d1 Insert 12 d1 Dowel Pins into the edges of Panel D Insert 4 d1 Dowel Pins into the edges of Panel X Insert 2 c1 Cam Bo...
Страница 7: ...ch with s1 Screws to front edge of Panel Z Set aside the other parts of the ball catch to use later s1 b3 Y s1 b3 Insert 4 d1 Dowel Pins into the edges of Panel Y Attach b3 Ball Catch with s1 Screws t...
Страница 8: ...Lift Rail Right to Panel Z with s1 Screws following pre drilled holes Attach Lift Rail Left to Panel Y with s1 Screws following predrilled holes s1 TIP Spray a small amount of WD 40 or similar lubric...
Страница 9: ...shows panels upside down and from the back This is im portant for the next step attaching the base Panel G Part 1 Cabinet Shell 180 G Z D c5 5 8 Cam Cover x8 c2 Attach Panel G to Panels D X and Z as s...
Страница 10: ...lift assembly is complete the cables will retract making installation difficult If the block falls out before complete assembly Call Customer Service at 1 800 533 7347 ext 1 for assistance or visit ww...
Страница 11: ...rail tabs make sure the cable is hooked into the rail tabs on both sides NOTE See Page 10 for close up illustrations of Lift Panel assembly Cut the zip tie on the wooden block but DO NOT remove the bl...
Страница 12: ...nstructions Kangaroo 12 Part 2 Lift Panel Plastic guides Lift rail Cable Lift rail Rail tabs REMINDER Our Customer Service Agents are ready to help if you run into trouble Please call us at 1 800 533...
Страница 13: ...3 Top Support Leaf and Quilt Panel A 6x35 Cam Bolt x10 c1 Insert c1 Cam Bolts into Panel A 180 c5 Lower Panel A inserting cam bolts on Panel A onto cams on Panels X D Y and Z Tighten cam locks and ap...
Страница 14: ...nment Pin x2 s4 14mm Wrench x1 Caster x2 r3 t2 Attach h2 Butt Hinges to Panels O1 and O2 using s1 Screws Attach m Magnet Catch Plates to underside of Panels O1 and O2 using s2 Screws Screw s4 Alignmen...
Страница 15: ...x2 s4 Part 3 Top Support Leaf and Quilt Panel Attach h2 Butt Hinges to Panels O3 and O4 using s1 Screws Attach m Magnet Catch Plates to the underside of Panels O3 and O4 using s2 Screws Screw s4 Align...
Страница 16: ...Instructions Kangaroo 16 Part 3 Top Support Leaf and Quilt Panel O1 O2 D s1 h2 3 5x14 Screw x24 s1 Z O4 O3 Attach Panels O1 and O2 to Panel D using s1 Screws Attach Panels O3 and O4 to Panel Z using s...
Страница 17: ...A1 m s1 Attach m Magnets to Panel A1 using s1 Screws as shown Attach h2 Butt Hinges to Panel A1 using s1 Screws as shown Attach m Magnets using s1 Screws to Panel A5 as shown Attach h2 Butt Hinges usi...
Страница 18: ...1 Z D s1 h2 3 5x14 Screw x18 s1 Extend Gate Leg Panels O1 and O2 Balance Panel A1 on gate legs and attach h1 Hinges to Panel A top using s1 Screws Extend Support Panels O3 and O4 Balance Panel A5 on s...
Страница 19: ...Catch Plate x1 m Knob x2 4x20 Fix Bolt x2 h1 b2 Attach c1 Cam Bolts to Panel L Attach m Magnet Catch Plate with s2 Screws Attach h1 Knobs with b2 Fix Bolts K s1 b3 Attach remaining b3 Ball Catch parts...
Страница 20: ...L2 Insert c1 Cam Bolts on Panel L into cam locks on Panels L1 and L2 Tighten cams and apply c2 Cam Covers 5 8 Cam Cover x4 c2 3 5x35 Screw x4 s3 To reach the pre drilled screw holes on the sides of Pa...
Страница 21: ...IP Gently open and close the drawers a few times to engage the Soft Close mechanism Click Panel K into place Fully extend the cabinet rails align drawer rails and slide drawers into caddy p1 A3 Magnet...
Страница 22: ...A3 L Please do not place sewing machine or serger on A3 Support Panel It is a cover panel only Part 4 Drawer Unit and Front Panel Slide Panel A3 into place inserting threaded dowel pins into pre dril...
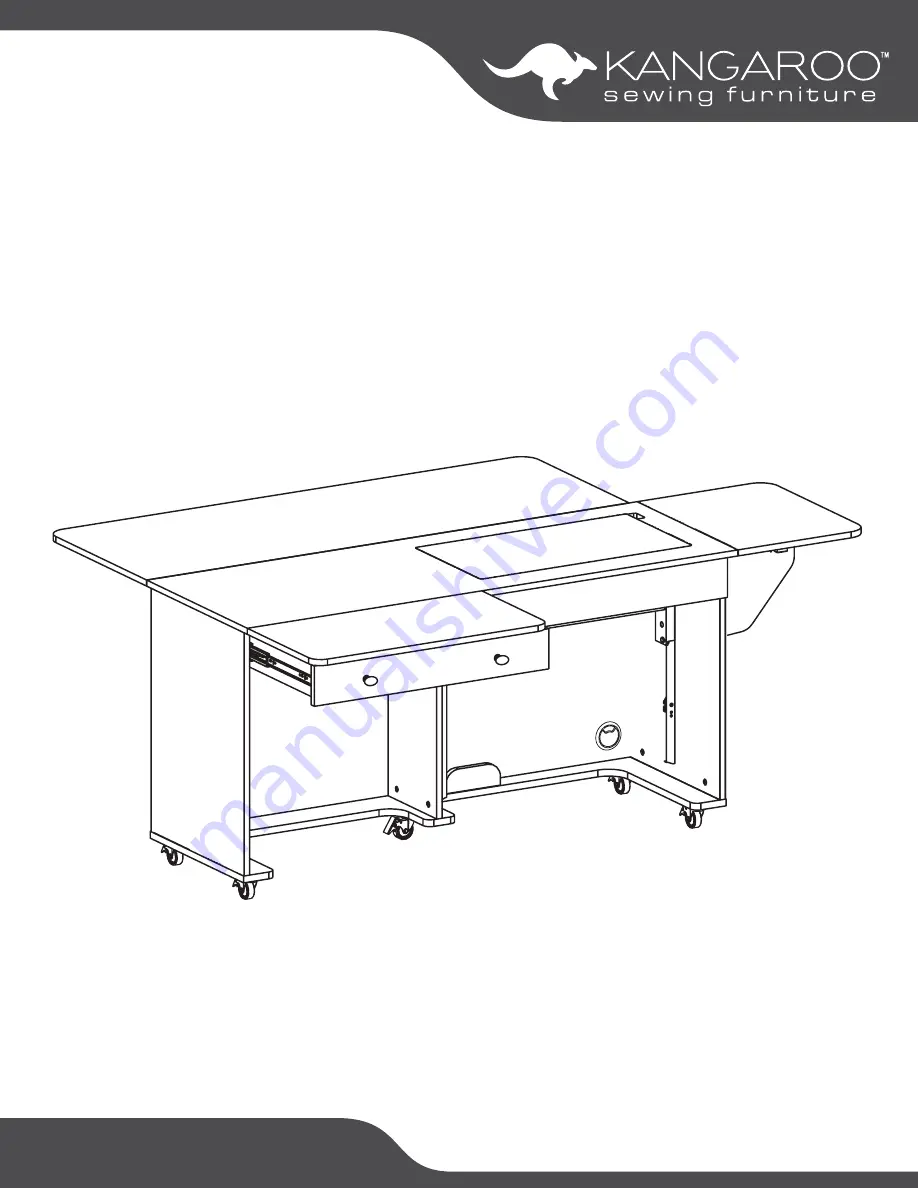
Страница 23: ...Assembly Instructions Kangaroo 23 Completed Kangaroo Cabinet...
Страница 24: ...d use nor any condition resulting from incorrect or inadequate maintenance cleaning care or neglect cuts or scratches caster damage as a result of moving furniture fully loaded or with locked casters...
Страница 25: ...ists straighter stitches and an elevated sewing experience Arrow s 1 Rated Height Adjustable Sewing Chair is a must have accessory for your dream sewing room Cute comfortable and convenient our lovabl...