HDMX88-18G
4K UHD+ 8×8 HDMI Matrix Switcher with USB Power Outputs
All Rights Reserved
MPN# HDMX88-18G
Страница 1: ...HDMX88 18G 4K UHD 8 8 HDMI Matrix Switcher with USB Power Outputs All Rights Reserved MPN HDMX88 18G...
Страница 2: ...t KanexPro reserves the right to make improvements to this document and or product at any time and withoutnotice COPYRIGHT NOTICE No part of this document may be reproduced transmitted transcribed sto...
Страница 3: ...this product throughany openings or empty slots in the unit as you may damage parts inside the unit Do not attach the power supply cabling to buildingsurfaces Use only the supplied power supply unit P...
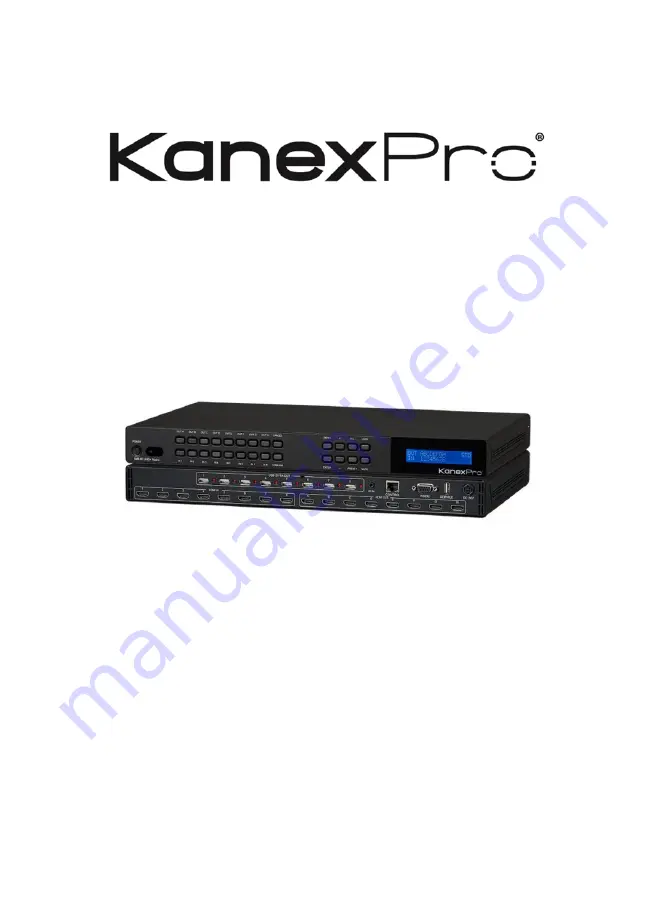
Страница 4: ...and Functions 3 6 1 Front Panel 3 6 2 Rear Panel 4 6 3 Remote Control 5 6 4 LCD Menu 6 6 5 IR Cable Pin Assignments 7 6 6 RS 232 Protocol 7 6 7 Telnet Control 8 6 8 RS 232 and Telnet Commands 9 6 9 We...
Страница 5: ...ideo extension over HDMI AOC cabling The matrix can be fully controlled via RS 232 IR and Web based GUI using Ethernet where end users can switch control and manage the matrix using graphical and visu...
Страница 6: ...ignal up to 5m via HDMI port Supports standard 1080p WUXGA resolutions up to 2560x1080 60Hz HDR Dolby Vision HDCP 2 2 Compliant Smart EDID DIP switch for proper display output Supports latest High Spe...
Страница 7: ...output you wish to route a source to the letter will flash in the LCD to indicate selection Next press the IN button of the input 1 8 you wish to route to the selected output Repeat this process as m...
Страница 8: ...uts When a MUTE input is in use it will show up as M within the routing display LCD WINDOW Displays the unit s menu settings andinformation 6 2 Rear Panel HDMI IN 1 8 Connect to HDMI source equipment...
Страница 9: ...1 8 you wish to route to the selected outputs Finally press ENTER to confirm your selection In User Mode Press the OUT key followed by the key A H of the output you wish to route to Next press the IN...
Страница 10: ...N Press IN to navigate up within menus or to begin the selection of an input for routing Minus OUT Press OUT to navigate down within menus or to begin the selection of outputs for routing 6 4 LCD Menu...
Страница 11: ...HCP Info Display 6 5 IR Cable Pin Assignments Infrared Power Ground 6 6 RS 232 Protocol UNIT TERMINAL SERIAL PORT SETTINGS Pin Pinout Pin Pinout Baud Rate 19200 1 1 Data Bits 8 2 TxD 2 RxD Parity Bits...
Страница 12: ...cmd and press Enter In Mac OS X Click Go Applications Utilities Terminal Once in the CLI Command Line Interface type telnet followedby the IP address of the unit and 23 then hit Enter This will conne...
Страница 13: ...ORY IPCONFIG DEFAULT Reset Ethernet settings to the factory defaults SET FACTORY OUT ROUTE DEFAULT Reset all routing to the factory defaults SET POWER N1 Turn the unit on or off standby Available valu...
Страница 14: ...custom code N1 0000 7FFF Hex Code GET IR IN CUSTOM CODE Show the current IR custom code SET FAN CONTROL MODE N1 Set the internal fan control mode Available values for N1 0 Always On 1 Auto GET FAN CON...
Страница 15: ...N1 ON Locked OFF Unlocked GET KEYLOCK Show the current front panel key lock state GET FW VER Show the unit s firmware version 6 8 2 Matrix Commands COMMAND DESCRIPTION VARIABLES SET OUT N1 ROUTE N2 Ro...
Страница 16: ...t Port GET ALL OUT ROUTE Show the current routing for all inputs and outputs SET CURRENT ROUTE TO PRESET N1 Save the current input output routing to preset N1 N1 1 8 Preset Number SET ROUTE PRESET N1...
Страница 17: ...H Output Port SET IN N1 NAME N2 Set the name of input N1 to N2 N1 1 8 Input Port N2 Input Name 32 chars max GET IN N1 NAME Show the current name of input N1 N1 1 8 Input Port SET OUT N1 NAME N2 Set t...
Страница 18: ...t 6 8 3 Test Pattern Commands COMMAND DESCRIPTION VARIABLES SET PATTERN N1 MODE N2 Enable or disable the test pattern on output N1 N1 A H Output Port N2 ON OFF Enable Disable GET PATTERN N1 MODE Show...
Страница 19: ...utput timings SET PATTERN N1 TYPE N2 Set the test pattern to use on output N1 N1 A H Output Port Available values for N2 1 Black 2 White 3 Red 4 Green 5 Blue 6 Magenta 7 Yellow 8 Cyan 9 Color Bar GET...
Страница 20: ...en theEDID mode is set to All Input Available values for N1 1 Internal 1 2 Internal 2 3 Internal 3 4 Internal 4 5 Internal 5 6 Internal 6 7 User 1 8 User 2 9 User 3 10 User 4 11 User 5 12 User 6 13 Us...
Страница 21: ...N2 1 Internal 1 2 Internal 2 3 Internal 3 4 Internal 4 5 Internal 5 6 Internal 6 7 User 1 8 User 2 9 User 3 10 User 4 11 User 5 12 User 6 13 User 7 14 User 8 15 Sink A 16 Sink B 17 Sink C 18 Sink D 19...
Страница 22: ...Show the contents of Internal EDID N1 as hex data N1 1 6 Internal EDID SET USER N1 EDID DATA N2 Set the EDID data used by User EDID N1 Note The data block is comma delimited and cannot contain any spa...
Страница 23: ...N N1 HDCP STATUS Show the current HDCP status of the source connected to input N1 N1 1 8 Input Port Available result codes 0 HDCP OFF 1 HDCP 1 x 2 HDCP 2 2 GET OUT N1 HDCP STATUS Show the current HDCP...
Страница 24: ...CRIPTION VARIABLES SET IP MODE N1 Set the IP addressassignment mode Available values for N1 0 Static IP Mode 1 DHCP Mode GET IP MODE Show the current IP mode GET IPCONFIG Show the current complete IP...
Страница 25: ...port GET HOSTNAME Show the current hostname SET WEBGUI USERNAME N1 Set the User login name for the WebGUI N1 User Name 16 chars max GET WEBGUI USERNAME Show the WebGUI User login name SET WEBGUI PASS...
Страница 26: ...t s default IP address is192 168 1 50 By clicking on one of the listed devices you will be presented withthe network details of that particular device IP Mode If you choose you can alter the static IP...
Страница 27: ...nged withinthe System Settings tab of the WebGUI if desired The following function tabs will always display on left side of the WebGUI to aidwith navigation Note The unit s default IP address is192 16...
Страница 28: ...lick on the button of the preferred HDMI input port If desired you may select more than one output prior to selecting the input As you select each buttonthey will change their color to orange The new...
Страница 29: ...wed innames Output Video Mute Each output can be individually muted black video no audio To mute an output please click on the switchso it reads ON Pattern Timing This setting configures the output re...
Страница 30: ...they are made Input Edit Each input allows for Individual control over the name of the input and the behavior of HDCP To edit the settings of an input portplease click the Edit icon Set Input Name To...
Страница 31: ...will open Hovering the mouse over each button will display the current routing stored within it You may also name the Preset at this stage byselecting the Edit icon Click the center of the Preset s b...
Страница 32: ...EDID Settings item you would like to change An EDID Upload window will appear allowing you to locate and uploadthe preferred EDID file bin format from a local PC Once the correct file has been select...
Страница 33: ...input selecting ALL allows for a single EDID to be assigned to all inputs EDID Source Click on the preferred input s to open the EDID Source management window Multiple inputs can be selected at once...
Страница 34: ...IR channel used to control the matrix using the included remote If this setting is changed thedipswitches inside the remote control s battery compartment must also be changed to match Note By default...
Страница 35: ...g changing the password for the Administrator account and both the user nameand password for the General User account Note The General User account has limited access to theWebGUI and can only change...
Страница 36: ...P netmask and gateway addresses may be manuallyset When in DHCP mode the unit will attempt to connect to a local DHCP server and obtain IP netmask and gateway addressesautomatically Please press Save...
Страница 37: ...lt state After the reset is complete the unit will reboot automatically Firmware Upgrade To update the unit s firmware click the Choose File button to open the file selection window and then select th...
Страница 38: ...AM Blu ray Players Set top Boxes 4K UHDTV 4K UHDTV 4K UHDTV 4K UHDTV HDMI Inputs Wireless Router RS 232 Equipped PC Laptop LAN USB 5V 1A OUT 6 7 8 Power Supply 1 2 3 60 3m 7m 3m HDMI Outputs IR Extend...
Страница 39: ...Hz 4 4 4 8 bit IR Frequency 30 50kHz 30 60kHz under ideal conditions Baud Rate 19200bps Power Supply 24V 6 25A DC US EU standards CE FCC UL certified ESD Protection Human Body Model 12kV Air Discharge...
Страница 40: ...0 768 60 70 75 85 1280 800 60 1280 1024 60 1360 768 60 1600 1200 60 1920 1200 60 RB Supported TV Resolutions Hz Input Output 720 480i 59 94 60 720 576i 50 720 480p 59 94 60 720 576p 50 1280 720p 50 60...
Страница 41: ...HDCP High bandwidth Digital ContentProtection HDMI High Definition Multimedia Interface HDR High Dynamic Range HTTP HyperText Transfer Protocol IP Internet Protocol IR Infrared LCD Liquid Crystal Dis...
Страница 42: ...HDMX88 18G Brea California www kanexpro com...