background image

SDA

Lüftungskomponenten

Assembly, installation and operating instructions

12

6

Installation and wiring

6.1

Requirements governing the installation site

Only install and assemble the unit if the following conditions are met:

Make sure that the wall/ceiling is sufficiently load-bearing to take the weight of the unit (

Technical data [

}

 9]

).

Make sure that the ceiling is sufficiently load-bearing to take the weight of the unit (

Technical data [

}

 9]

).

Make sure that the unit is securely suspended/standing.
Ensure that the airflow can circulate freely.

6.2

Installation

2 people are needed to install the unit.

CAUTION!

Risk of injury from sharp metal housing!

The inner metal of the casing can have sharp edges.

Wear suitable protective gloves.

6.2.1 Installing the SDA

General installation information

When aligning the unit, make sure that the air connectors are on the room side.
Ensure that there is access to the air intake spigots for connection of the ventilation ducts supplied by others.
Fix any ducts or flexible hoses for supply and extract air to the air connectors with self-tapping screws.
Make sure that the connection is sufficiently air-tight.

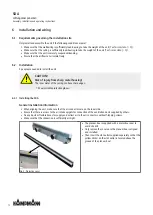
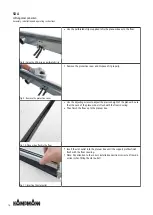
Fig. 3: Protective cover

The plenum box is supplied with a protective cover to
avoid site dirt.
Only remove the cover once the plenum box is aligned
and installed.
Then insert the slot outlet supplied separately so that the
yellow sticker on the slot outlet is located above the
groove of the plenum box!

Содержание SDA 1SDA010500NSELOBS00000000

Страница 1: ...SDA Assembly installation and operating instructions Keep these instructions in a safe place for future use Issue08 22EN SAP No 1385039...

Страница 2: ......

Страница 3: ...7 3 1 General transport instructions 7 3 2 Scope of delivery 7 3 3 Storage 8 3 4 Packaging 8 4 Technical data 9 5 Construction and function 10 5 1 Overview 10 5 2 Brief description 10 5 3 Dimensions...

Страница 4: ...ontained in this manual In addition all local occupational health and safety at work regulations apply as do general safety provisions governing the use of the equipment Illustrations in this guide ar...

Страница 5: ...n aged 8 years or more and also by people with reduced physical sensory or mental cap abilities or a lack of experience and knowledge if they are supervised or have been instructed in the safe use of...

Страница 6: ...prevention regulations Guidelines and recognised technical regulations i e Association of German Electricians VDE regulations DIN and EN standards VDI 6022 maintenance personnel must be trained to Ca...

Страница 7: ...ecord any transport damage on the transportation documents or on the transport company s delivery note Submit a complaint to the freight forwarder IMPORTANT NOTE Warranty claims can only be made withi...

Страница 8: ...expose to aggressive media Protect from direct sunlight Avoid mechanical vibrations and shocks IMPORTANT NOTE Under certain circumstances packages can carry storage instructions that exceed the requi...

Страница 9: ...ure loss p Pa 500 1 30 97 48 44 35 118 59 65 40 141 70 91 2 30 85 85 34 35 105 105 52 40 127 127 74 1000 1 30 85 85 34 35 105 105 52 40 127 127 74 2 30 73 146 25 35 93 186 40 40 114 228 60 1500 1 30 7...

Страница 10: ...diffuser for supplying air along fa ades and interior walls Different air directions can be pre set through the 100 mm long ABS nozzle elements The SDA aluminium profiles can be ordered in various RAL...

Страница 11: ...sions with 1 row slot diffuser Slot length mm 500 1000 1500 2000 A mm 498 998 1498 1998 B mm 27 5 27 5 27 5 27 5 C mm 95 95 95 95 D mm 124 5 249 5 374 5 499 5 E mm 249 499 749 999 Tab 2 Dimensions wit...

Страница 12: ...om sharp metal housing The inner metal of the casing can have sharp edges Wear suitable protective gloves 6 2 1 Installing the SDA General installation information When aligning the unit make sure tha...

Страница 13: ...oor with rawlplugs and screws Fig 5 Delivery condition of the connecting panels With strip installations the connecting panels are pre installed as shown when delivered Fig 6 Loosening the screws of t...

Страница 14: ...erly Fig 10 Plenum box flush in the floor Use the adjusting screws to adjust the precise height of the plenum box so that the neck of the plenum box is flush with the floor covering Then finish the fl...

Страница 15: ...nstallation and operating instructions 15 6 2 2 Nozzle installation options 3 air stream shapes are possible depending on the installation position of the nozzles 20 20 20 20 one sided 20 diverging ve...

Страница 16: ...n met so that the unit can function safely and properly Structural tests Check that the unit is securely standing and fixed Check the horizontal installation suspension of the unit Check whether all c...

Страница 17: ...s that come into contact with air internal surfaces of the unit outlet elements etc for dirt or deposits dur ing maintenance and use a commercially available product to remove Cleaning the junction bo...

Страница 18: ......

Страница 19: ......

Страница 20: ...ch Ebert Str 128 130 49811 Lingen Ems T 49 591 7108 660 F 49 591 7108 173 E export kampmann de W Kampmann eu Country Contact Great Britain Kampmann UK Ltd Dial House Govett Avenue Shepperton Middlesex...

Отзывы: