LVT1190-010A
[UJ]
INSTRUCTIONS
MICRO COMPONENT SYSTEM
UX-H100
—Consists of CA-UXH100 and SP-UXH100
Cover_UX-H100[UJ].p65
04.4.26, 3:41 PM
1
Страница 1: ...LVT1190 010A UJ INSTRUCTIONS MICRO COMPONENT SYSTEM UX H100 Consists of CA UXH100 and SP UXH100 ...
Страница 2: ...ve screws covers or cabinet 2 Do not expose this appliance to rain or moisture CAUTION Do not block the ventilation openings or holes If the ventilation openings or holes are blocked by a newspaper or cloth etc the heat may not be able to get out Do not place any naked flame sources such as lighted candles on the apparatus When discarding batteries environmental problems must be considered and loc...
Страница 3: ...or ventilation by placing on a stand with a height of 10 cm or more Side view CA UXH100 10 cm 15 cm 1 cm 15 cm 15 cm 1 cm CA UXH100 15 cm 15 cm SP UXH100 SP UXH100 IMPORTANT FOR LASER PRODUCTS 1 CLASS 1 LASER PRODUCT 2 CAUTION Do not open the top cover There are no user serviceable parts inside the unit leave all servicing to qualified service personnel 3 CAUTION Visible and invisible laser radiat...
Страница 4: ...or similar names or marks unless mentioned otherwise Basic and common information that is the same for many functions is grouped in one place and is not repeated for each procedure For instance we do not repeat the information about turning on off the unit setting the volume changing the sound effects and others which are explained in the section Basic and Common Operations on pages 8 and 9 The fo...
Страница 5: ...er Interval Spacing 10 Tuning in to a Station 10 Presetting Stations 11 Tuning in to a Preset Station 11 Playing Back Discs 12 Playing Back the Entire Disc Normal Play 12 Basic Disc Operations 13 Programming the Track Playing Order Program Play 13 Repeating Tracks Repeat Play 14 Playing at Random Random Play 14 Displaying the Remaining Time during Playback 14 Playing Back Tapes 15 Playing Back a T...
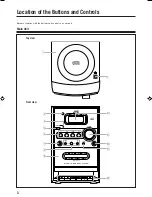
Страница 6: ...iliar with the buttons and controls on your unit Main Unit OPEN COMPACT DIGITAL AUDIO 1 2 COMPACT DIGITAL AUDIO STANDBY CD PHONES DOWN 4 8 7 TIMER UP AUX TAPE FM AM AUX VOLUME UX H100 MICRO COMPONENT SYSTEM 3 4 5 6 7 9 8 r q w e p Top view Front view ...
Страница 7: ...sc cover 12 2 0 OPEN disc cover open 12 3 Remote sensor 5 4 STANDBY lamp 8 5 STANDBY ON button 8 19 6 Source buttons CD 8 TAPE FM AM AUX Pressing one of these buttons also turns on the unit 7 PHONES jack 9 8 MULTI CONTROL buttons DOWN 4 7 UP 9 Cassette holder 15 p Display window q VOLUME control 9 w AUX jack 7 17 e TIMER button 20 r Tape operation buttons 15 17 recording play fast backward fast fo...
Страница 8: ...4 REPEAT button 14 5 PLAY MODE button 11 13 14 6 SOUND button 9 7 BASS TREBLE button 9 8 STANDBY ON button 8 10 19 9 SLEEP button 20 p CLOCK TIMER button 8 19 q DISPLAY button 8 w REMAIN button 14 e SET button 8 19 r CANCEL button 19 t FM MODE button 10 y VOLUME buttons 9 u FADE MUTING button 9 SLEEP DISPLAY CANCEL SET PRESET UP REPEAT PLAY MODE FM MODE CLOCK TIMER SOUND BASS TREBLE FADE MUTING VO...
Страница 9: ... leave the batteries in the battery compartment when you are not going to use the remote control for an extended period of time Otherwise the remote control will be damaged from battery leakage Connections To connect speakers You can connect the speakers using the speaker cords 1 Hold the clamp of the speaker terminal 2 Insert the end of the speaker cord into the terminal Match the polarity of the...
Страница 10: ...uipment and AUX jacks by using audio cords with mini plugs not supplied When the audio equipment has pin jacks for audio output Be sure that the pin plugs of the audio cords are colored white plugs and jacks are for left audio signals and red ones for right audio signals Adjusting the Voltage Selector Before plugging in the unit set the correct voltage for your area with the voltage selector on th...
Страница 11: ...l indication alternately To adjust the clock On the remote control ONLY 1 Press CLOCK TIMER repeatedly to show the current time indication When the unit is in standby mode be sure that is not flashing 2 Press SET The hour indication starts flashing 3 Press 4 or to adjust the hour then press SET The minute indication starts flashing 4 Press 4 or to adjust the minute then press SET The built in cloc...
Страница 12: ...olume level also cancels the muting VOLUME FADE MUTING Selecting the Sound Modes You can select one of the 4 sound modes This function also affects the sound from headphones This function only affects the playback sound and does not affect your recording On the remote control ONLY To select the sound modes press SOUND repeatedly Each time you press the button the sound mode changes as follows ROCK...
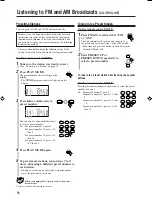
Страница 13: ...in so that the MONO indicator goes off In stereo mode you can hear stereo sound when a stereo program is broadcast Changing the station also cancels the MONO mode Listening to FM and AM Broadcasts FM AM Continued Setting the Tuner Interval Spacing You can select 10 kHz or 9 kHz apart for the AM tuner interval spacing and 100 kHz or 50 kHz apart for the FM tuner interval spacing The interval settin...
Страница 14: ...tuner preset function before shipment This is not a malfunction You can preset the stations you want into memory by following the presetting method There is a time limit in doing the following steps If the setting is canceled before you finish start again from step 2 On the remote control ONLY 1 Tune in to the station you want to preset See Tuning in to a Station on page 10 2 Press PLAY MODE The p...
Страница 15: ... playing CD Rs or CD RWs read their instructions or cautions carefully User edited CD Rs CD Recordable and CD RWs CD ReWritable can be played only if they are already finalized This unit supports multi session discs up to 5 sessions This unit cannot play packet write discs Some CD Rs or CD RWs may not play on this unit because of their disc characteristics damage or stain on them or if the player ...
Страница 16: ...he Track Playing Order Program Play You can arrange the order in which tracks play before you start playing You can program up to 32 tracks On the remote control ONLY 1 Place a disc If the current source is not the CD player press CD 6 then 7 before going to the next step 2 Press PLAY MODE The PRGM program indicator appears on the display 3 Press or 4 to select the track number then press PLAY MOD...
Страница 17: ...gramming procedure To clear the program Press PLAY MODE then press 7 before or after playback The PRGM indicator disappears from the display The programmed tracks are also erased in the following cases When pressing 0 OPEN to open the disc cover When turning off the unit When changing the source Repeating Tracks Repeat Play You can have all the tracks the program or individual track currently play...
Страница 18: ...tte press while playback is stopped DO NOT turn off the unit while playing back or recording a tape The cassette deck or tapes may be damaged The use of C 120 or longer tape is not recommended since characteristic deterioration may occur and this tape easily jams in the pinch rollers and the capstans This unit is not compatible with type II and type IV tapes For tape operations use buttons on the ...
Страница 19: ...quipment is properly connected to the unit See page 7 1 Set the volume level to the minimum position 2 Press AUX AUX appears on the display 3 Start playing the external equipment 4 Adjust the volume level to the level you want to listen to To exit AUX mode select other source For operation of the external equipment Refer to its instructions Using an External Equipment ...
Страница 20: ...ecording from discs FM AM broadcasts or external equipment wind the leader tape first to ensure that the recording will be made without losing any music To protect your recordings Cassettes have two small tabs on the back to protect against unexpected erasure or re recording To protect your recording remove these tabs To re record on a protected tape cover the holes with adhesive tape Recording Ad...
Страница 21: ...of the tape down See also page 15 2 Close the cassette holder gently 3 Press CD 3 8 to select the CD player as the source 4 Press 7 to stop the disc playback If you want to start recording from a particular track select the beginning track using UP or DOWN 4 then go to the next step If you want to make a program perform steps 2 to 4 on page 13 After making a program go to the next step 5 Press rec...
Страница 22: ...ing these timers make sure the built in clock is set correctly see page 8 Using the Daily Timer You can store three Daily timer settings and use one of settings at once How the Daily Timer actually works When the on time comes the unit automatically turns on and automatically turns off standby after 60 minutes Once the timer has been set it will be activated at the same time everyday until the tim...
Страница 23: ...the remote control ONLY 1 Press SLEEP The SLEEP indicator flashes on the display Each time you press the button the length of time changes as follows 2 Wait for about 5 seconds after specifying the length of time The SLEEP indicator remains lit on the display To check the remaining time until shut off time press SLEEP once The remaining time until shut off time appears for about 5 seconds To chang...
Страница 24: ...e careful not to scratch the surface of the disc when placing it back in its case Avoid exposure to direct sunlight temperature extremes and moisture To clean the disc Wipe the disc with a soft cloth in a straight line from center to edge DO NOT use any solvent such as conventional record cleaner spray thinner or benzine to clean the disc Handling cassette tapes If the tape is loose in its cassett...
Страница 25: ... cannot be played Replace the disc Reconnect the antenna correctly and securely Change the position and direction of the AM loop antenna Extend FM antenna and orient to the best reception position Put the disc in with the label side up They cannot be played Cover the holes with adhesive tape Unplug the AC power cord then plug it back in Remove the obstruction Replace the batteries See page 6 Signa...
Страница 26: ...VICTOR COMPANY OF JAPAN LIMITED EN Mains AC Line Instruction not applicable for Europe U S A Canada Australia and U K IMPORTANT for mains AC line BEFORE PLUGGING IN do check that your mains AC line voltage corresponds with the position of the voltage selector switch provided on the outside of this equipment and if different reset the voltage selector switch to prevent from a damage or risk of fire...
Страница 27: ...0 007A UW INSTRUCTIONS MANUAL DE INSTRUCCIONES INSTRUÇÕES MICRO COMPONENT SYSTEM SISTEMAS DE MICROCOMPONENTES SISTEMA DE MICRO COMPONENTES UX H100 Consists of CA UXH100 and SP UXH100 English Español Português ...
Страница 28: ...ión completamente se apagan todas las lámparas e indicaciones Ninguna posición del botón STANDBY ON conseguirá desconectar la red de alimentación eléctrica Cuando la unidad está en espera la lámpara STANDBY se enciende en rojo Cuando la unidad está encendida la lámpara STANDBY se apaga La alimentación puede controlarse mediante control remoto CUIDADO botão STANDBY ON Desligue a ficha da tomada da ...
Страница 29: ...paratus PRECAUCIÓN No obstruya las rendijas o los orificios de ventilación Si las rendijas o los orificios de ventilación quedan tapados con un periódico un trozo de tela etc no se podrá disipar el calor No ponga sobre el aparato ninguna llama al descubierto como velas encendidas Cuando tenga que descartar las pilas tenga en cuenta los problemas ambientales y observe estrictamente los reglamentos ...
Страница 30: ...haber ninguna obstrucción en las áreas mostradas por las dimensiones de la siguiente figura 3 Parte inferior Sitúe el equipo sobre una superficie nivelada Mantenga un espacio adecuado para permitir el paso del aire y una correcta ventilación colocando el equipo sobre un soporte de 10 cm o más de altura PRECAUÇÃO Ventilação adequada Para evitar riscos de choques elétricos e incêndios e prevenir ava...
Страница 31: ... el servicio a personal técnico cualificado 3 PRECAUCIÓN Radiación láser visible e invisible en caso de apertura o con interbloqueo averiado o defectuoso Evite la exposición directa a los haces 4 REPRODUCCIÓN DE LA ETIQUETA ETIQUETA DE PRECAUCIÓN COLOCADA EN EL INTERIOR DE LA UNIDAD PARA PRODUTOS LASER IMPORTANTE 1 PRODUTO LASER DE CLASSE 1 2 PRECAUÇÃO não abrir a cobertura superior Dentro da unid...
Страница 32: ...ame or similar names or marks unless mentioned otherwise Basic and common information that is the same for many functions is grouped in one place and is not repeated for each procedure For instance we do not repeat the information about turning on off the unit setting the volume changing the sound effects and others which are explained in the section Basic and Common Operations on pages 8 and 9 Th...
Страница 33: ... Tuner Interval Spacing 10 Tuning in to a Station 10 Presetting Stations 11 Tuning in to a Preset Station 11 Playing Back Discs 12 Playing Back the Entire Disc Normal Play 12 Basic Disc Operations 13 Programming the Track Playing Order Program Play 13 Repeating Tracks Repeat Play 14 Playing at Random Random Play 14 Displaying the Remaining Time during Playback 14 Playing Back Tapes 15 Playing Back...
Страница 34: ... familiar with the buttons and controls on your unit Main Unit OPEN COMPACT DIGITAL AUDIO 1 2 COMPACT DIGITAL AUDIO STANDBY CD PHONES DOWN 4 8 7 TIMER UP AUX TAPE FM AM AUX VOLUME UX H100 MICRO COMPONENT SYSTEM 3 4 5 6 7 9 8 r q w e p Top view Front view ...
Страница 35: ...1 Disc cover 12 2 0 OPEN disc cover open 12 3 Remote sensor 5 4 STANDBY lamp 8 5 STANDBY ON button 8 19 6 Source buttons CD 8 TAPE FM AM AUX Pressing one of these buttons also turns on the unit 7 PHONES jack 9 8 MULTI CONTROL buttons DOWN 4 7 UP 9 Cassette holder 15 p Display window q VOLUME control 9 w AUX jack 7 17 e TIMER button 20 r Tape operation buttons 15 17 recording play fast backward fas...
Страница 36: ...nit 4 REPEAT button 14 5 PLAY MODE button 11 13 14 6 SOUND button 9 7 BASS TREBLE button 9 8 STANDBY ON button 8 10 19 9 SLEEP button 20 p CLOCK TIMER button 8 19 q DISPLAY button 8 w REMAIN button 14 e SET button 8 19 r CANCEL button 19 t FM MODE button 10 y VOLUME buttons 9 u FADE MUTING button 9 SLEEP DISPLAY CANCEL SET PRESET UP REPEAT PLAY MODE FM MODE CLOCK TIMER SOUND BASS TREBLE FADE MUTIN...
Страница 37: ... NOT leave the batteries in the battery compartment when you are not going to use the remote control for an extended period of time Otherwise the remote control will be damaged from battery leakage Connections To connect speakers You can connect the speakers using the speaker cords 1 Hold the clamp of the speaker terminal 2 Insert the end of the speaker cord into the terminal Match the polarity of...
Страница 38: ...r equipment and AUX jacks by using audio cords with mini plugs not supplied When the audio equipment has pin jacks for audio output Be sure that the pin plugs of the audio cords are colored white plugs and jacks are for left audio signals and red ones for right audio signals Adjusting the Voltage Selector Before plugging in the unit set the correct voltage for your area with the voltage selector o...
Страница 39: ...ormal indication alternately To adjust the clock On the remote control ONLY 1 Press CLOCK TIMER repeatedly to show the current time indication When the unit is in standby mode be sure that is not flashing 2 Press SET The hour indication starts flashing 3 Press 4 or to adjust the hour then press SET The minute indication starts flashing 4 Press 4 or to adjust the minute then press SET The built in ...
Страница 40: ...he volume level also cancels the muting VOLUME FADE MUTING Selecting the Sound Modes You can select one of the 4 sound modes This function also affects the sound from headphones This function only affects the playback sound and does not affect your recording On the remote control ONLY To select the sound modes press SOUND repeatedly Each time you press the button the sound mode changes as follows ...
Страница 41: ... again so that the MONO indicator goes off In stereo mode you can hear stereo sound when a stereo program is broadcast Changing the station also cancels the MONO mode Listening to FM and AM Broadcasts FM AM Continued Setting the Tuner Interval Spacing You can select 10 kHz or 9 kHz apart for the AM tuner interval spacing and 100 kHz or 50 kHz apart for the FM tuner interval spacing The interval se...
Страница 42: ...the tuner preset function before shipment This is not a malfunction You can preset the stations you want into memory by following the presetting method There is a time limit in doing the following steps If the setting is canceled before you finish start again from step 2 On the remote control ONLY 1 Tune in to the station you want to preset See Tuning in to a Station on page 10 2 Press PLAY MODE T...
Страница 43: ...fore playing CD Rs or CD RWs read their instructions or cautions carefully User edited CD Rs CD Recordable and CD RWs CD ReWritable can be played only if they are already finalized This unit supports multi session discs up to 5 sessions This unit cannot play packet write discs Some CD Rs or CD RWs may not play on this unit because of their disc characteristics damage or stain on them or if the pla...
Страница 44: ...ng the Track Playing Order Program Play You can arrange the order in which tracks play before you start playing You can program up to 32 tracks On the remote control ONLY 1 Place a disc If the current source is not the CD player press CD 6 then 7 before going to the next step 2 Press PLAY MODE The PRGM program indicator appears on the display 3 Press or 4 to select the track number then press PLAY...
Страница 45: ... programming procedure To clear the program Press PLAY MODE then press 7 before or after playback The PRGM indicator disappears from the display The programmed tracks are also erased in the following cases When pressing 0 OPEN to open the disc cover When turning off the unit When changing the source Repeating Tracks Repeat Play You can have all the tracks the program or individual track currently ...
Страница 46: ...assette press while playback is stopped DO NOT turn off the unit while playing back or recording a tape The cassette deck or tapes may be damaged The use of C 120 or longer tape is not recommended since characteristic deterioration may occur and this tape easily jams in the pinch rollers and the capstans This unit is not compatible with type II and type IV tapes For tape operations use buttons on ...
Страница 47: ...al equipment is properly connected to the unit See page 7 1 Set the volume level to the minimum position 2 Press AUX AUX appears on the display 3 Start playing the external equipment 4 Adjust the volume level to the level you want to listen to To exit AUX mode select other source For operation of the external equipment Refer to its instructions Using an External Equipment ...
Страница 48: ...en recording from discs FM AM broadcasts or external equipment wind the leader tape first to ensure that the recording will be made without losing any music To protect your recordings Cassettes have two small tabs on the back to protect against unexpected erasure or re recording To protect your recording remove these tabs To re record on a protected tape cover the holes with adhesive tape Recordin...
Страница 49: ...art of the tape down See also page 15 2 Close the cassette holder gently 3 Press CD 3 8 to select the CD player as the source 4 Press 7 to stop the disc playback If you want to start recording from a particular track select the beginning track using UP or DOWN 4 then go to the next step If you want to make a program perform steps 2 to 4 on page 13 After making a program go to the next step 5 Press...
Страница 50: ...e using these timers make sure the built in clock is set correctly see page 8 Using the Daily Timer You can store three Daily timer settings and use one of settings at once How the Daily Timer actually works When the on time comes the unit automatically turns on and automatically turns off standby after 60 minutes Once the timer has been set it will be activated at the same time everyday until the...
Страница 51: ... On the remote control ONLY 1 Press SLEEP The SLEEP indicator flashes on the display Each time you press the button the length of time changes as follows 2 Wait for about 5 seconds after specifying the length of time The SLEEP indicator remains lit on the display To check the remaining time until shut off time press SLEEP once The remaining time until shut off time appears for about 5 seconds To c...
Страница 52: ...ng Be careful not to scratch the surface of the disc when placing it back in its case Avoid exposure to direct sunlight temperature extremes and moisture To clean the disc Wipe the disc with a soft cloth in a straight line from center to edge DO NOT use any solvent such as conventional record cleaner spray thinner or benzine to clean the disc Handling cassette tapes If the tape is loose in its cas...
Страница 53: ...k It cannot be played Replace the disc Reconnect the antenna correctly and securely Change the position and direction of the AM loop antenna Extend FM antenna and orient to the best reception position Put the disc in with the label side up They cannot be played Cover the holes with adhesive tape Unplug the AC power cord then plug it back in Remove the obstruction Replace the batteries See page 6 S...
Страница 54: ... line voltage corresponds with the position of the voltage selector switch provided on the outside of this equipment and if different reset the voltage selector switch to prevent from a damage or risk of fire electric shock IMPORTANTE para la línea de la red CA ANTES DE ENCHUFAR EL EQUIPO compruebe si la tensión de la línea de la red a CA corresponde con la posición del selector de tensión situado...
Страница 55: ...LVT1190 008A US INSTRUCTIONS MICRO COMPONENT SYSTEM UX H100 Consists of CA UXH100 and SP UXH100 CA UXH100 SP UXH100 English ...
Страница 56: ...ve screws covers or cabinet 2 Do not expose this appliance to rain or moisture CAUTION Do not block the ventilation openings or holes If the ventilation openings or holes are blocked by a newspaper or cloth etc the heat may not be able to get out Do not place any naked flame sources such as lighted candles on the apparatus When discarding batteries environmental problems must be considered and loc...
Страница 57: ...or ventilation by placing on a stand with a height of 10 cm or more Side view CA UXH100 CA UXH100 IMPORTANT FOR LASER PRODUCTS 1 CLASS 1 LASER PRODUCT 2 CAUTION Do not open the top cover There are no user serviceable parts inside the unit leave all servicing to qualified service personnel 3 CAUTION Visible and invisible laser radiation when open and interlock failed or defeated Avoid direct exposu...
Страница 58: ...ame or similar names or marks unless mentioned otherwise Basic and common information that is the same for many functions is grouped in one place and is not repeated for each procedure For instance we do not repeat the information about turning on off the unit setting the volume changing the sound effects and others which are explained in the section Basic and Common Operations on pages 8 and 9 Th...
Страница 59: ... Tuner Interval Spacing 10 Tuning in to a Station 10 Presetting Stations 11 Tuning in to a Preset Station 11 Playing Back Discs 12 Playing Back the Entire Disc Normal Play 12 Basic Disc Operations 13 Programming the Track Playing Order Program Play 13 Repeating Tracks Repeat Play 14 Playing at Random Random Play 14 Displaying the Remaining Time during Playback 14 Playing Back Tapes 15 Playing Back...
Страница 60: ... familiar with the buttons and controls on your unit Main Unit OPEN COMPACT DIGITAL AUDIO 1 2 COMPACT DIGITAL AUDIO STANDBY CD PHONES DOWN 4 8 7 TIMER UP AUX TAPE FM AM AUX VOLUME UX H100 MICRO COMPONENT SYSTEM 3 4 5 6 7 9 8 r q w e p Top view Front view ...
Страница 61: ...1 Disc cover 12 2 0 OPEN disc cover open 12 3 Remote sensor 5 4 STANDBY lamp 8 5 STANDBY ON button 8 19 6 Source buttons CD 8 TAPE FM AM AUX Pressing one of these buttons also turns on the unit 7 PHONES jack 9 8 MULTI CONTROL buttons DOWN 4 7 UP 9 Cassette holder 15 p Display window q VOLUME control 9 w AUX jack 7 17 e TIMER button 20 r Tape operation buttons 15 17 recording play fast backward fas...
Страница 62: ...nit 4 REPEAT button 14 5 PLAY MODE button 11 13 14 6 SOUND button 9 7 BASS TREBLE button 9 8 STANDBY ON button 8 10 19 9 SLEEP button 20 p CLOCK TIMER button 8 19 q DISPLAY button 8 w REMAIN button 14 e SET button 8 19 r CANCEL button 19 t FM MODE button 10 y VOLUME buttons 9 u FADE MUTING button 9 SLEEP DISPLAY CANCEL SET PRESET UP REPEAT PLAY MODE FM MODE CLOCK TIMER SOUND BASS TREBLE FADE MUTIN...
Страница 63: ... NOT leave the batteries in the battery compartment when you are not going to use the remote control for an extended period of time Otherwise the remote control will be damaged from battery leakage Connections To connect speakers You can connect the speakers using the speaker cords 1 Hold the clamp of the speaker terminal 2 Insert the end of the speaker cord into the terminal Match the polarity of...
Страница 64: ...r equipment and AUX jacks by using audio cords with mini plugs not supplied When the audio equipment has pin jacks for audio output Be sure that the pin plugs of the audio cords are colored white plugs and jacks are for left audio signals and red ones for right audio signals Adjusting the Voltage Selector Before plugging in the unit set the correct voltage for your area with the voltage selector o...
Страница 65: ...ormal indication alternately To adjust the clock On the remote control ONLY 1 Press CLOCK TIMER repeatedly to show the current time indication When the unit is in standby mode be sure that is not flashing 2 Press SET The hour indication starts flashing 3 Press 4 or to adjust the hour then press SET The minute indication starts flashing 4 Press 4 or to adjust the minute then press SET The built in ...
Страница 66: ...he volume level also cancels the muting VOLUME FADE MUTING Selecting the Sound Modes You can select one of the 4 sound modes This function also affects the sound from headphones This function only affects the playback sound and does not affect your recording On the remote control ONLY To select the sound modes press SOUND repeatedly Each time you press the button the sound mode changes as follows ...
Страница 67: ... again so that the MONO indicator goes off In stereo mode you can hear stereo sound when a stereo program is broadcast Changing the station also cancels the MONO mode Listening to FM and AM Broadcasts FM AM Continued Setting the Tuner Interval Spacing You can select 10 kHz or 9 kHz apart for the AM tuner interval spacing and 100 kHz or 50 kHz apart for the FM tuner interval spacing The interval se...
Страница 68: ...the tuner preset function before shipment This is not a malfunction You can preset the stations you want into memory by following the presetting method There is a time limit in doing the following steps If the setting is canceled before you finish start again from step 2 On the remote control ONLY 1 Tune in to the station you want to preset See Tuning in to a Station on page 10 2 Press PLAY MODE T...
Страница 69: ...fore playing CD Rs or CD RWs read their instructions or cautions carefully User edited CD Rs CD Recordable and CD RWs CD ReWritable can be played only if they are already finalized This unit supports multi session discs up to 5 sessions This unit cannot play packet write discs Some CD Rs or CD RWs may not play on this unit because of their disc characteristics damage or stain on them or if the pla...
Страница 70: ...ng the Track Playing Order Program Play You can arrange the order in which tracks play before you start playing You can program up to 32 tracks On the remote control ONLY 1 Place a disc If the current source is not the CD player press CD 6 then 7 before going to the next step 2 Press PLAY MODE The PRGM program indicator appears on the display 3 Press or 4 to select the track number then press PLAY...
Страница 71: ... programming procedure To clear the program Press PLAY MODE then press 7 before or after playback The PRGM indicator disappears from the display The programmed tracks are also erased in the following cases When pressing 0 OPEN to open the disc cover When turning off the unit When changing the source Repeating Tracks Repeat Play You can have all the tracks the program or individual track currently ...
Страница 72: ...assette press while playback is stopped DO NOT turn off the unit while playing back or recording a tape The cassette deck or tapes may be damaged The use of C 120 or longer tape is not recommended since characteristic deterioration may occur and this tape easily jams in the pinch rollers and the capstans This unit is not compatible with type II and type IV tapes For tape operations use buttons on ...
Страница 73: ...al equipment is properly connected to the unit See page 7 1 Set the volume level to the minimum position 2 Press AUX AUX appears on the display 3 Start playing the external equipment 4 Adjust the volume level to the level you want to listen to To exit AUX mode select other source For operation of the external equipment Refer to its instructions Using an External Equipment ...
Страница 74: ...en recording from discs FM AM broadcasts or external equipment wind the leader tape first to ensure that the recording will be made without losing any music To protect your recordings Cassettes have two small tabs on the back to protect against unexpected erasure or re recording To protect your recording remove these tabs To re record on a protected tape cover the holes with adhesive tape Recordin...
Страница 75: ...art of the tape down See also page 15 2 Close the cassette holder gently 3 Press CD 3 8 to select the CD player as the source 4 Press 7 to stop the disc playback If you want to start recording from a particular track select the beginning track using UP or DOWN 4 then go to the next step If you want to make a program perform steps 2 to 4 on page 13 After making a program go to the next step 5 Press...
Страница 76: ...e using these timers make sure the built in clock is set correctly see page 8 Using the Daily Timer You can store three Daily timer settings and use one of settings at once How the Daily Timer actually works When the on time comes the unit automatically turns on and automatically turns off standby after 60 minutes Once the timer has been set it will be activated at the same time everyday until the...
Страница 77: ... On the remote control ONLY 1 Press SLEEP The SLEEP indicator flashes on the display Each time you press the button the length of time changes as follows 2 Wait for about 5 seconds after specifying the length of time The SLEEP indicator remains lit on the display To check the remaining time until shut off time press SLEEP once The remaining time until shut off time appears for about 5 seconds To c...
Страница 78: ...ng Be careful not to scratch the surface of the disc when placing it back in its case Avoid exposure to direct sunlight temperature extremes and moisture To clean the disc Wipe the disc with a soft cloth in a straight line from center to edge DO NOT use any solvent such as conventional record cleaner spray thinner or benzine to clean the disc Handling cassette tapes If the tape is loose in its cas...
Страница 79: ...k It cannot be played Replace the disc Reconnect the antenna correctly and securely Change the position and direction of the AM loop antenna Extend FM antenna and orient to the best reception position Put the disc in with the label side up They cannot be played Cover the holes with adhesive tape Unplug the AC power cord then plug it back in Remove the obstruction Replace the batteries See page 6 S...
Страница 80: ...IMMDWBET 2004 VICTOR COMPANY OF JAPAN LIMITED EN CS Mains AC Line Instruction not applicable for Europe U S A Canada Australia and U K IMPORTANT for mains AC line BEFORE PLUGGING IN do check that your mains AC line voltage corresponds with the position of the voltage selector switch provided on the outside of this equipment and if different reset the voltage selector switch to prevent from a damag...