JVC LVT0865-004A Скачать руководство пользователя страница 1

For Customer Use:

Enter below the Model No. and Serial 
No. which are located either on the rear, 
bottom or side of the cabinet. Retain this 
information for future reference.

Model No.

Serial No.

LVT0865-004A

[B]

INSTRUCTIONS

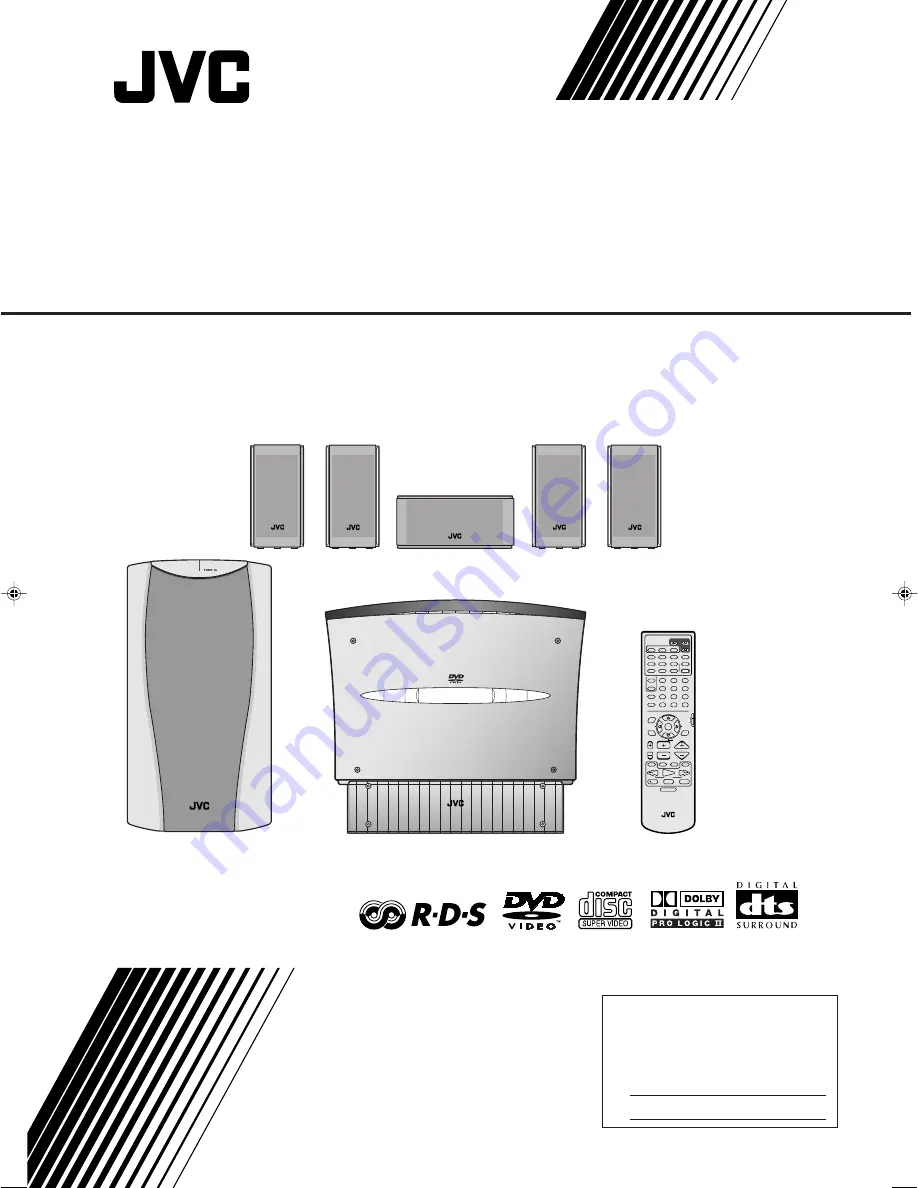
DVD DIGITAL CINEMA SYSTEM

TH-V70R

Consists of XV-THV70R, SP-PWV70, SP-XSV70, and SP-XCV70

D V D   D I G I T A L   C I N E M A   S Y S T E M

T H - V

7 0 R

RM–STHV70R

DVD CINEMA SYSTEM

CHANNEL

VOLUME

TV VOL

TUNING

STOP

DIMMER

PAUSE

FF/

/REW

TV/VIDEO

1

MUTING

¡

REC

PLAY

DOWN

UP

MEMORY

STROBE

DVD

VCR 1

AUDIO

AUX

ANGLE

FM/AM

SUBTITLE

DECODE

RETURN

DIGEST

ZOOM

VFP

TOP MENU

MENU

ZOOM

CONTROL

 SUBWOOFER 

+

EFFECT

– 

    CENTER     

+

– 

    REAR-R     

+

TEST

SLEEP

TV

VCR

SETTING

TV RETURN

ENTER

ON

SCREEN

CHOICE

DVD

SURROUND

MODE

FM MODE

1

2

3

4

5

6

7

8

9

10

0

+10

100+

RDS

TV

AUDIO

VCR

+

– 

    REAR-L     

+

SOUND

RDS DISPLAY

PTY SEARCH

TA/NEWS/INFO

PTY

(

PTY

9

cover_TH-V70R[B]1

02.3.12, 6:32 PM

1

Содержание LVT0865-004A

Страница 1: ... V D D I G I T A L C I N E M A S Y S T E M T H V 7 0 R RM STHV70R DVD CINEMA SYSTEM CHANNEL VOLUME TV VOL TUNING STOP DIMMER PAUSE FF REW TV VIDEO 1 MUTING REC PLAY DOWN UP MEMORY STROBE DVD VCR 1 AUDIO AUX ANGLE FM AM SUBTITLE DECODE RETURN DIGEST ZOOM VFP TOP MENU MENU ZOOM CONTROL SUBWOOFER EFFECT CENTER REAR R TEST SLEEP TV VCR SETTING TV RETURN ENTER ON SCREEN CHOICE DVD SURROUND MODE FM MODE...

Страница 2: ...hich is coloured blue must be connected to the terminal which is marked with the letter N or coloured black The wire which is coloured brown must be connected to the terminal which is marked with the letter L or coloured red IF IN DOUBT CONSULT A COMPETENT ELECTRICIAN CAUTION To reduce the risk of electrical shocks fire etc 1 Do not remove screws covers or cabinet 2 Do not expose this appliance to...

Страница 3: ...ion by placing on a stand with a height of 10 cm more XV THV70R IMPORTANT FOR LASER PRODUCTS REPRODUCTION OF LABELS 1 CLASS 1 LASER PRODUCT 2 CAUTION Visible and invisible laser radiation when open and interlock failed or defeated Avoid direct exposure to beam 3 CAUTION Do not open the top cover There are no user serviceable parts inside the Unit leave all servicing to qualified service personnel ...

Страница 4: ...equipment switched on when it is unattended unless it is specifically stated that it is designed for unattended operation or has a standby mode Switch off using the switch on the equipment and make sure that your family know how to do this Special arrangements may need to be made for infirm or handicapped people DON T use equipment such as personal stereos or radios so that you are distracted from...

Страница 5: ......

Страница 6: ...your choice temporarily 35 Creating the realistic sound fields 37 Dolby Surround 37 DTS Digital Surround 37 DAP modes 38 All Channel Stereo 38 Selecting the surround mode 39 Using Dolby Pro Logic II Dolby Digital and DTS Digital Surround 39 Using DAP Modes and All Channel Stereo 40 Advanced operations 41 Using the on screen bar 41 Showing the on screen bar 41 Basic operation through the on screen ...

Страница 7: ... the copyguard system activates and the picture may not be played back correctly Safety precautions Avoid moisture water and dust Do not place the system in moist or dusty places Avoid high temperatures Do not expose the system to direct sunlight or do not place it near a heating device When you are away When away on travel or otherwise for an extended period of time remove the plug from the wall ...

Страница 8: ...ay window 3 Button name indicators 21 4 button 21 5 SOURCE button 22 6 4 reverse skip button 30 7 7 stop button 29 8 3 play button 29 9 0 open close button 27 p VOLUME buttons 22 q forward skip button 30 w 8 pause button 28 50 e Remote sensor 19 r Illumination lamps 21 Rear panel 1 System cord CONNECTOR 12 2 AUX IN jacks 14 3 DIGITAL IN jack 14 4 AV COMPU LINK jacks These jacks are provided for us...

Страница 9: ... 9 8 7 6 5 3 2 1 4 3 2 1 8 9 p 6 5 4 q q Placed vertically with DISP SET set to V Placed horizontally with DISP SET set to H Powered subwoofer LEFT RIGHT LEFT MAX REVERSE NORMAL MIN RIGHT SPEAKER IMPEDANCE VOLUME PHASE SUB WOOFER FRONT SPEAKERS CONNECTOR FROM XV THV70R CENTER SPEAKER 4 16 CAUTION SPEAKER IMPEDANCE CAUTION 4 16 REAR SPEAKERS SPEAKER IMPEDANCE CAUTION 4 16 8 1 2 3 4 5 6 7 Powered su...

Страница 10: ...9 6 TOP MENU button 43 7 MENU button 43 58 8 CONTROL buttons VCR 71 TV 20 9 SLEEP button 24 p SETTING button 70 q ON SCREEN button 41 w ENTER button Cursor 2 3 5 buttons Operating buttons for RDS PTY 9 34 PTY 34 TA NEWS INFO 35 PTY SEARCH 34 e CHOICE button 60 67 RDS DISPLAY button 33 r CHANNEL buttons 20 71 t TV VOL buttons 20 y TV VIDEO button 20 u Operating buttons 1 30 51 4 REW TUNING DOWN 30 ...

Страница 11: ...aying back CD Rs or CD RWs read their instructions or cautions carefully CD RWs may require a longer readout time This is caused by the fact that the reflectance of CD RWs is lower than for regular CDs Note on Region Code DVD players and DVDs have their own Region Code numbers This system can play back only DVDs recorded with the color system of PAL whose Region Code numbers include 2 If a DVD wit...

Страница 12: ...tion and high resolution still images which have a resolution four times greater than moving pictures High resolution still image display You can display high quality images four times clearer than moving pictures Menu driven playback A selection menu is displayed when you start playing a Video CD and SVCD disc with the Playback Control feature The selection menu shows a list of numbers for select...

Страница 13: ...L H V FM EXT LOOP DIGITAL IN OPTICAL RGB Y C AV OUT AV DISP SET H V AC IN Getting started 7 When placing the center unit vertically Slide the DISP SET selector to V vertically 7 When placing the center unit horizontally Slide the DISP SET selector to H horizontally SOURCE VOL D V D D I G I T A L C I N E M A S Y S T E M T H V 7 0 R ATT RDS TA NEWS INFO ATT RESUME TUNED STEREO AUTO MUTING RDS TA NEW...

Страница 14: ... stand NOTE Avoid an unstable place when placing the center unit vertically Make sure to place it on the level surface VIDEO S VIDEO Y PB PR VIDEO OUT COMPONENT ANTENNA DISP SET AUX TOSP PW V70 IN ACIN AV COMPU LINK AM COA XIAL 75 AM R L H V FM EXT LOO P DIGITAL IN OPT ICAL D V D D I G I T A L C I N E M A S Y S T E M T H V 7 0 R VIDEO S VIDEO VIDEO OUT ANTENNA DISP SET AUX TOSP PW V70 IN ACIN AV C...

Страница 15: ... can enjoy better quality pictures If the TV accomodates the S video signal set the RGB Y C selector to Y C If the TV accomodates the composite video signal only set the RGB Y C selector to RGB VIDEO S VIDEO VIDEO OUT ANTENNA DISP SET AUX TOSP PWV70 IN ACIN AV COMPU LINK AM COAXIAL 75 AM R L H V FM EXT LOOP DIGITAL IN OPTICAL RGB Y C AV OUT AV VIDEO S VIDEO RGB Y C To composite video input To S vi...

Страница 16: ...ntenna connected Connecting AM MW loop antenna Setting up AM MW loop antenna Attach the AM MW loop to its base by snapping the tabs on the loop into the slot in the base NOTES Disconnect the supplied FM Antenna before attaching a 75 Ω coaxial connector the kind with a round wire going to an outdoor antenna We recommend that you use a coaxial cable to the FM antenna since it is well shielded agains...

Страница 17: ...ain the best possible sound from this system you need to place all satellite speakers at the same distance from the listening position with the front of each speaker faced toward the listener When you cannot place them at the same distance from the listening position you can make adjustment as if those speakers are placed at the best position See page 65 Normally place the powered subwoofer in fro...

Страница 18: ...EVERSE NORMAL MIN RIGHT SPEAKER IMPEDANCE VOLUME PHASE SUB WOOFER FRONT SPEAKERS CONNECTOR FROM XV THV70R CENTER SPEAKER 4 16 CAUTION SPEAKER IMPEDANCE CAUTION 4 16 REAR SPEAKERS SPEAKER IMPEDANCE CAUTION 4 16 LEFT RIGHT LEFT RIGHT SPEAKER IMPEDANCE FRONT SPEAKERS CENTER SPEAKER 4 16 CAUTION SPEAKER IMPEDANCE CAUTION 4 16 REAR SPEAKERS SPEAKER IMPEDANCE CAUTION 4 16 Connect the speaker cords Conne...

Страница 19: ...io jack NOTES If you connect a sound enhancing device such as a graphic equalizer between the source components and this system the sound output through this system may be distorted When playing a video component such as a VCR To listen to the sound operate this system Select AUX as the source to play See page 22 To see the picture connect the video output jack of the component to the video input ...

Страница 20: ... the power cord of the center unit When a power failure occurs The speakers will not produce any sound if the power cord of the powered subwoofer is removed from the AC outlet while the center unit is turned on In this case press AUDIO on the remote control or on the center unit to turn off the power plug in the powered subwoofer then press AUDIO or again LEFT RIGHT LEFT RIGHT CENTER SPEAKER SPEAK...

Страница 21: ...g rear speakers to the wall Injury to personnel or damage to equipment may result if the speakers are attached in a location which interferes with daily activities Attaching speakers to the brackets 1 Use the supplied screws to attach the brackets to the rear speakers 2 Adjust the angle of the rear speakers Loosen the screw slightly make an adjustment and then tighten the screw firmly CAUTION If t...

Страница 22: ...fied person such as a qualified constructor The screws needed for attachment are not supplied Use screws which are compatible with the strength and material of the pillar or wall When attaching the center unit the screws must be secured tightly in all three locations Failure in attaching the center unit to the wall using all three holes on the back of the center unit makes for an unstable attachme...

Страница 23: ...center unit to fall down Make sure that the connected cords will not interfere with daily activities and that the users will not be caught in the cords Do not pull the connected cords with excessive force Check regularly that none of the screws are loose In the event that the center unit has fallen turn the power off disconnect the power plug from the AC outlet and contact your dealer for an inspe...

Страница 24: ...atteries Place batteries in the remote control so they match the polarity to and to Use the correct type of batteries Batteries that look similar may differ in voltage Always replace both batteries at the same time Do not expose batteries to heat or flame Operating the system from the remote control Aim the remote control directly at the remote sensor on the center unit To control other components...

Страница 25: ...can perform the following operations on the TV CHANNEL Changes the channels 1 10 0 10 100 Selects the channel Manufacturers codes for TV Manufacturers codes are subject to change without notice If they are changed this remote control cannot operate the equipment RM STHV70R DVD CINEMA SYSTEM CHANNEL VOLUME TV VOL TUNING STOP DIMMER PAUSE FF REW TV VIDEO 1 MUTING REC PLAY DOWN UP MEMORY STROBE DVD V...

Страница 26: ...n the display window When DVD AUX or AUX DIGITAL is selected as the source see page 22 the opening screen appears on the TV screen Opening screen The following messages may appear in the message area depending on the status of this system LOADING EJECT Appears when inserting or removing a disc NOW READING Appears when the system is reading the disc information REGION CODE ERROR Appears when the re...

Страница 27: ...erate the tuner See page 31 Each time you press the button the band alternates between FM and AM MW AUX Select a component connected to the AUX IN jacks or DIGITAL IN jack See page 14 Each time you press the button the source alternates between AUX and AUX DIGITAL On the center unit Press SOURCE repeatedly until the source name you want appears on the display Each time you press the button the sou...

Страница 28: ...CINEMA SYSTEM CHANNEL VOLUME TV VOL TUNING STOP DIMMER PAUSE FF REW TV VIDEO 1 MUTING REC PLAY DOWN UP MEMORY STROBE DVD VCR 1 AUDIO AUX ANGLE FM AM SUBTITLE DECODE RETURN DIGEST ZOOM VFP TOP MENU MENU ZOOM CONTROL SUBWOOFER EFFECT CENTER REAR R TEST SLEEP TV VCR SETTING TV RETURN ENTER ON SCREEN CHOICE SURROUND MODE FM MODE 1 2 3 4 5 6 7 8 9 10 0 10 100 TV AUDIO VCR SOUND REAR L PTY SEARCH DVD RD...

Страница 29: ...in 60min 90min 120min 150min back to the beginning Example When 150min is selected To check the remaining time until the shut off time Press SLEEP once The remaining time until the shut off time appears on the display window for a while To change the remaining time until the shut off time Press SLEEP repeatedly Each time you press the button the shut off time changes To cancel the sleep timer Pres...

Страница 30: ... cases above occur when playing a disc or software encoded with Dolby Digital DTS Select this if the cases above occur when playing a disc or software encoded with DTS Digital Surround NOTES When DOLBY D or DTS is selected if the signal encoded with another digital format comes in you cannot listen to the sound DIGITAL or indicator flashes Changing the source returns the decode mode to AUTO PCM au...

Страница 31: ...evel of the subwoofer You can adjust the output level within the range from 10 dB to 10 dB NOTES You can also change the output level of the subwoofer through the choice menu shown on the TV screen See page 65 Once you have adjusted the output level of the subwoofer the adjustment is memorized for each source Basic adjustment of auto memory This unit memorizes sound settings for each source When y...

Страница 32: ...use other than RDS DVD RDS 0 button DVD AUDIO CD SUPER VCD VIDEO CD PLAY button 3 button Preventing screen burn out with the screen saver A TV screen may be burned out if a static picture is displayed for a long time To prevent this the system automatically dims the screen if a static picture is displayed for over 5 minutes the screen saver function Pressing any button will cancel the screen saver...

Страница 33: ...E On the center unit Press 8 To return to normal playback Press PLAY or 3 on the center unit When the center unit is placed horizontally the moving panel closes after inserting the disc After the system reads the disc information playback starts To remove a disc Press 0 again The disc comes out from the disc slot EJECT appears on the display window and on the TV screen NOTE When the center unit is...

Страница 34: ...s STOP or 7 on the center unit again 7 Starting playback again From the remote control Press PLAY On the center unit Press 3 7 When the resume playback is set to ON see page 66 When the system stored the position where playback has been stopped playback starts from the stored position the resume playback The RESUME indicator goes off When the stored position has been cleared playback starts from t...

Страница 35: ...ip to the beginning of the current chapter or track press 4 once To skip chapters or tracks backward press 4 as many times as required NOTES This function may not work for some DVDs While playing a VCD or SVCD with the PBC function and 4 may be used for the operations of menu driven playback see pages 7 and 43 Locating a desired selection using Number buttons You can locate the desired title chapt...

Страница 36: ...a time limit in doing the following steps If the setting is cancelled before you finish start from step 2 again From the remote control ONLY 1 Tune in the station you want to preset see Tuning in to stations manually If you want to store the FM reception mode for an FM station select the reception mode you want See Selecting the FM reception mode on page 32 ATT L C R MPEG 2 RESUME TUNED STEREO AUT...

Страница 37: ... FM station The FM reception mode appears on the display window Each time you press the button the FM reception mode alternates between AUTO MUTING and MONO AUTO MUTING When a program is broadcasted in stereo you will hear stereo sounds The STEREO indicator lights up on the display window When in monaural you will hear monaural sounds This mode is also useful to suppress static noise between stati...

Страница 38: ...dication on the display window changes to show you the following information PS PTY RT Frequency Normal indication back to the beginning PS Program Service While searching PS appears and then the station names will be displayed NO PS appears if no signal is sent PTY Program Type While searching PTY appears and then the type of the broadcast program will be displayed NO PTY appears if no signal is ...

Страница 39: ... page 35 3 Press PTY SEARCH again while the PTY code selected in the previous step is still on the display window While searching SEARCH and the selected PTY code alternate on the display window The system searches 30 preset FM stations stops when it finds the one you have selected and tunes in that station To continue searching after the first stop Press PTY SEARCH again while the indications on ...

Страница 40: ...Music from the so called golden age of popular music Folk M Music which has its roots in the musical culture of a particular nation Document Programs concerning factual matters presented in an investigative style TEST Broadcasts for testing emergency broadcast equipment or unit Alarm Emergency announcement Classification of the PTY codes for some FM stations may be different from the above list Sw...

Страница 41: ...rts broadcasting the program you have selected the system automatically switches to the station The indicator of received PTY code starts flashing When the program is over the system goes back to the previously tuned station but the Enhanced Other Network function still remains activated CASE 2 If the FM station you are listening to is broadcasting the program you have selected The system continue...

Страница 42: ...ight rear speaker Left front speaker Subwoofer Left rear speaker Right front speaker D V D D I G I T A L T H E A T E R S Y S T E M T H V 7 0 Center speaker You can use the following Surround modes to reproduce a realistic sound field Dolby Digital Used to reproduce multichannel soundtracks of the software encoded with Dolby Digital Dolby Digital 5 1 ch DOLBY D encoding method so called discrete mu...

Страница 43: ...th this system LIVE CLUB Gives the feeling of a live music club with a low ceiling DANCE CLUB Gives a throbbing bass beat HALL Gives clear vocal and the feeling of a concert hall PAVILION Gives the spacious feeling of a pavilion with a high ceiling These DAP modes can be used to add the acoustic surround effects while reproducing 2 channel stereo software either analog or Linear PCM and can give y...

Страница 44: ...is set to the correct position Set it to DVD to use other than RDS DVD RDS Using Dolby Pro Logic II Dolby Digital and DTS Digital Surround Once you have adjusted the sound the adjustment is memorized for each source From the remote control ONLY 1 Start playing back software When playing a conponent connected to the AUX IN or the DIGITAL IN jack change the source to AUX or AUX DIGITAL See page 22 2...

Страница 45: ...aying a conponent connected to the AUX IN or the DIGITAL IN jack change the source to AUX or AUX DIGITAL TOP MENU MENU ZOOM CONTROL SUBWOOFER EFFECT CENTER REAR R TEST SLEEP TV VCR SETTING TV RETURN ENTER ON SCREEN CHOICE SURROUND MODE FM MODE 1 2 3 4 5 6 7 8 9 10 0 10 100 SOUND REAR L PTY SEARCH DVD RDS TA NEWS INFO PTY PTY9 RDS DISPLAY SOUND button EFFECT button SURROUND MODE button Sound settin...

Страница 46: ...7 Select this to change the time information 5 See page 42 8 Select this to repeat playback See page 54 9 Select this for the time search function See page 49 p Select this for the chapter search function See page 48 q Select this to change the audio language or channel See pages 47 and 48 w Select this to change the subtitle language See page 46 e Select this to change the view angle See page 44 ...

Страница 47: ...Y Cursor and ENTER buttons ON SCREEN button Changing the time information You can change the time information in the on screen bar and the display window on the center unit 7 During playback or while stopped 1 Press ON SCREEN twice The on screen bar appears on the TV 2 Press Cursor 3 2 to move to TIME in the on screen bar 3 Press ENTER Each time you press the button the time information changes as...

Страница 48: ...tem The system starts playback from the selected item Example To select the number Example To select 3 press 3 To select 11 press 10 then 1 To return to the menu Press RETURN When NEXT or PREVIOUS is shown on the TV screen To go to the next page press FF To return to the previous page press 4 REW NOTES If you want to play a PBC compatible Video CD SVCD without using the PBC function perform any of...

Страница 49: ... REAR R TEST SLEEP TV VCR SETTING TV RETURN FM MODE 1 2 3 4 5 6 7 8 9 10 0 10 100 TV AUDIO VCR SOUND REAR L ANGLE button 1 1 1 3 1 3 1 1 3 2 1 3 3 1 3 Using the on screen bar 7 During playback 1 Press ON SCREEN twice The on screen bar appears on the TV 2 Press Cursor 3 2 to move to in the on screen bar then press ENTER The following pop up window appears under the on screen bar Example The first v...

Страница 50: ...ges you can select the subtitle language to be displayed on the TV When a DVD contains audio languages soundtrack you can select the language sound track to listen to You can also select the audio channel of a Video CD SVCD disc Selecting the subtitle language Using the direct button 7 During playback 1 Press SUBTITLE The following pop up window appears on the TV Example DVD ENGLISH is selected ou...

Страница 51: ...tons ON SCREEN button 8 5Mbps DVD VIDEO TITLE 14 TIME 1 25 58 CHAP 23 OFF 1 3 1 3 1 3 TIME CHAP ENGLISH Selecting the audio language Using the direct button 7 During playback 1 Press AUDIO The following pop up window appears on the TV Example ENGLISH is selected out of 3 audio languages recorded 2 Press AUDIO repeatedly to select the desired audio language Each time you press the button the audio ...

Страница 52: ...aoke by selecting the audio channel to play The sounds of each audio channel depends on the contents of the disc Using the direct button 7 During playback 1 Press AUDIO The following pop up window appears on the TV Example ST stereo is selected out of 3 audio channels recorded 2 Press AUDIO repeatedly to select the desired audio channel Each time you press the button the audio channels change Exam...

Страница 53: ... TV 2 Press Cursor 3 2 to move to CHAP in the on screen bar then press ENTER The following pop up window appears under the on screen bar 3 Press Number buttons 0 10 to enter the desired chapter number Example To select chapter number 8 Press 8 To select chapter number 10 Press 10 To select chapter number 37 Press 3 then 7 To correct a mis entry Repeat step 3 until the correct number appears in the...

Страница 54: ...then press Number buttons to enter the correct number TIME _ _ _ _ _ TIME 2 _ _ _ _ TIME 2 3 _ _ _ TIME 2 34 _ _ TIME 2 34 0 _ TIME 2 34 08 Locating a desired scene from the digest display The system can display the opening scene of each title or chapter on a DVD or each track of a Video CD SVCD You can select a desired title or track from the opening scenes shown on the TV screen 7 For DVD While ...

Страница 55: ...ayback functions including frame by frame strobe slow motion and zoom Frame by frame playback 7 During playback Press PAUSE repeatedly Each time you press the button the still picture advances to the next frame To return to normal playback Press PLAY or 3 on the center unit NOTE You can perform the above operation using 8 on the center unit Showing continuous still pictures 7 During playback 1 Pre...

Страница 56: ...s as follows x 1 2 x 1 4 x 1 8 Example when x4 zoom is selected While zoomed in the current magnification and the zoomed in position of the scene appears at the left top of the screen While zoomed out only the current magnification appears 2 While zoomed in press Cursor 2 3 5 to move the zoomed in position To return to normal playback Press ENTER NOTES While zoomed in the picture may look coarse W...

Страница 57: ...o 4 BRIGHTNESS Controls the brightness of the screen 16 to 16 CONTRAST Controls the contrast of the screen 16 to 16 SATURATION Controls the color depth of the screen 16 to 16 TINT Controls the tint of the screen 16 to 16 SHARPNESS Controls the sharpness of the screen 0 to 3 Y DELAY Controls the color gap of the screen 2 to 2 3 Press ENTER VFP menu disappears and the following pop up window appears...

Страница 58: ...ack The total program time indication on the display window returns to normal indication To turn off the on screen bar Press ON SCREEN NOTE When all of the programmed tracks have been played the program playback stops Playing back tracks in random order 7 While stopped 1 Press ON SCREEN twice The on screen bar appears on the TV 2 Press Cursor 3 2 to move to RND in the on screen bar then press ENTE...

Страница 59: ...REEN To cancel the repeat playback Repeat from step 1 select OFF in step 3 then press ENTER TV RETURN ENTER ON SCREEN CHOICE SURROUND MODE FM MODE 100 PTY SEARCH DVD RDS TA NEWS INFO PTY PTY9 RDS DISPLAY Cursor and ENTER buttons ON SCREEN button DVD AUDIO CD SUPER VCD VIDEO CD 8 5Mbps DVD VIDEO TITLE 14 TIME 1 25 58 CHAP 23 OFF 1 3 1 3 1 3 TIME CHAP OFF DVD AUDIO CD SUPER VCD VIDEO CD Repeating a ...

Страница 60: ...s are recorded on a disc set the MP3 JPEG setting in the PICTURE menu to MP3 See page 62 Some MP3 discs may not be played back because of their disc characteristics or recording conditions DVD RDS This system can play MP3 files recorded on a CD R or CD RW MP3 disc Before performing the operation in this section from the remote control press DVD to use the remote control for the MP3 disc operations...

Страница 61: ...10 then 4 To select 24 press 10 10 then 4 To select 110 press 10 ten times then 10 The entered number appears in the track number indication then playback starts from the track you have specified Operations through the MP3 control display You can search and play the desired groups and tracks through the MP3 control display 7 MP3 control display MP3 CONTROL Group 01 03 Time 00 00 14 Track 01 14 Tot...

Страница 62: ...characteristics or recording conditions Baseline JPEG format Used for digital cameras web etc Progressive JPEG format Used for web Lossless JPEG format An old type and rarely used now DVD RDS This system can play JPEG files such as the digital photographs recorded on a CD R and CD RW JPEG disc Before performing the operation in this section from the remote control press DVD to use the remote contr...

Страница 63: ...mber buttons 0 10 10 to enter the file number Example To select 3 press 3 To select 14 press 10 then 4 To select 24 press 10 10 then 4 To select 110 press 10 ten times then 10 The selected file number appears in the file number indication then the slide show playback starts from the file you have specified To return to the JPEG control display Press MENU TOP MENU MENU ZOOM CONTROL SUBWOOFER EFFECT...

Страница 64: ...age 61 You can select the initial languages for the disc menu audio and subtitle You can also select the language used on the TV screen while operating this system PICTURE menu see page 62 You can select the desired options concerning a picture or monitor screen SPK SETTING menu see page 64 You can make the speaker settings according to the size and layout of your speakers You can also adjust the ...

Страница 65: ...hem and pressing ENTER makes its sub menu appear on the TV You can set them using Cursor 2 3 5 and ENTER as explained in this basic procedure TV RETURN ENTER ON SCREEN CHOICE SURROUND MODE FM MODE 0 100 PTY SEARCH DVD RDS TA NEWS INFO PTY PTY9 RDS DISPLAY CHOICE button Cursor and ENTER buttons ENGLISH ENGLISH ENGLISH LANGUAGE MENU LANGUAGE ON SCREEN LANGUAGE AUDIO LANGUAGE SUBTITLE USE TO SELECT U...

Страница 66: ...ST Sesotho SU Sundanese SV Swedish SW Swahili TA Tamil TE Telugu TG Tajik TH Thai TI Tigrinya TK Turkmen TL Tagalog TN Setswana TO Tonga TR Turkish TS Tsonga TT Tatar TW Twi UK Ukrainian UR Urdu UZ Uzbek VI Vietnamese VO Volapuk WO Wolof XH Xhosa YO Yoruba ZU Zulu AA Afar AB Abkhazian AF Afrikaans AM Ameharic AR Arabic AS Assamese AY Aymara AZ Azerbaijani BA Bashkir BE Byelorussian BG Bulgarian BH...

Страница 67: ...lect this when the aspect ratio of your TV is 4 3 conventional TV While viewing a wide screen picture the black bars appear on the top and the bottom of the screen 4 3 PS Pan Scan conversion Select this when the aspect ratio of your TV is 4 3 conventional TV While viewing a wide screen picture the black bars do not appear however the left and right edges of the pictures will not be shown on the sc...

Страница 68: ...d guidelines L 21 to L 1 CENTER R 1 to R 21 by 1 step CENTER The outputs of the left and right front speakers are identical L 21 to L 1 and R 1 to R 21 As the number increases the output from one speaker becomes smaller than the other speaker s When you select 21 you cannot output the sound from the speaker Within the range from 10 to 10 by 2 step ON Select this to diminish the distortion of the b...

Страница 69: ...connected is about 10 cm 80 Hz Select this when the cone speaker unit built in the smallest speaker connected is about 12 cm Resets all speaker settings to the inital settings SPK SETTING menu SIZE menu CAUTION When using the supplied speakers select SMALL for each Selecting LARGE may damage the speakers NOTE When SMALL is selected for the front speakers you cannot select LARGE for the center spea...

Страница 70: ...hen NONE is selected for the center speaker or rear speakers in the SIZE menu you cannot enter the LEVEL menu See page 64 0 dB LEVEL RETURN CENTER SPEAKER LEFT REAR SPEAKER TEST TONE RIGHT REAR SPEAKER 0 dB 0 dB 0 dB SUB WOOFER You cannot select CENTER SPEAKER when one of the DAP modes is selected as the surround mode See page 39 You cannot select CENTER SPEAKER LEFT REAR SPEAKER and RIGHT REAR SP...

Страница 71: ... this function OFF Select this to deactivate 60 This system turns off by itself if playback does not restart within 60 minutes 30 This system turns off by itself if playback does not restart within 30 minutes OFF Select this to deactivate This item is provided for use in the future It is currently not used DVD 1 DVD 2 DVD 3 Enter the PARENTAL LOCK sub menu See page 67 OTHERS menu NOTE You can sele...

Страница 72: ...to cancel this function 7 Press Number buttons 0 9 to enter a four digit number as your password then press ENTER The moves to EXIT 8 Press ENTER The OTHERS menu resumes To return to the normal screen Press CHOICE NOTE Remember your password or make a note of it You need to enter your password to change the setting or release the lock To change the setting see page 68 Setting DVD preferences Curso...

Страница 73: ...e correct password 4 Press Cursor 5 repeatedly to move to the item you want to change then press ENTER 5 Press Cursor 5 repeatedly to change the setting then press ENTER 6 Press Number buttons 0 9 to enter your password then press ENTER The new setting is stored NOTES You cannot set the Parental Lock before you set your password See page 67 If you go out of the PARENTAL LOCK sub menu before settin...

Страница 74: ...and Nevis KP Korea Democratic People s Republic of KR Korea Republic of KW Kuwait KY Cayman Islands KZ Kazakhstan LA Lao People s Democratic Republic LB Lebanon LC Saint Lucia LI Liechtenstein LK Sri Lanka LR Liberia LS Lesotho LT Lithuania LU Luxembourg LV Latvia LY Libyan Arab Jamahiriya MA Morocco MC Monaco MD Moldova Republic of MG Madagascar MH Marshall Islands ML Mali MM Myanmar MN Mongolia ...

Страница 75: ... size of each speaker See page 64 FRNT D front speakers distance CNTR D center speaker distance REAR D rear speakers distance Set the distance from the listening position to the speakers See page 65 CROSS CROSS OVER Select the cutoff frequency of the subwoofer according to the front speakers used with this system See page 64 LFE ATT Diminish the distortion of the bass sound from the subwoofer whil...

Страница 76: ...ng VCR CONTROL you can use the following buttons for operating your VCR PLAY Starts playback STOP Stops operation PAUSE Pauses playback Fast forwards a video tape 1 Rewinds a video tape REC Press this button together with PLAY to start recording Press this button together with PAUSE to pause recording CHANNEL Changes the TV channels on the VCR RM STHV70R DVD CINEMA SYSTEM CHANNEL VOLUME TV VOL TUN...

Страница 77: ...isture To clean the disc Wipe the disc with a soft cloth in a straight line from center to edge Maintenance DO NOT use any solvent such as conventional record cleaner spray thinner or benzine to clean the disc Cleaning the system Stains on the system Should be wiped off with a soft cloth If the unit is heavily stained wipe it with a cloth soaked in water diluted neutral detergent and wrung well th...

Страница 78: ...decode mode See page 25 PROBLEM Power does not come on Power is not supplied to the powered subwoofer The remote control does not work No sound Troubleshooting Use this chart to help you solve daily operational problems If there is any problem you cannot solve contact your JVC service center POSSIBLE CAUSE The power cord is not connected to an AC outlet or the center unit The power cord of the sub...

Страница 79: ...ected correctly Left right balance is not set properly The speaker setting is incorrect Lightning or electronic noise interferes with operation of the microcomputer Immediately after beginning to heat the room the system was moved to a cold location causing condensation to form inside The video cord or SCART cable is not connected correctly The RGB Y C selector is not set correctly TV input select...

Страница 80: ...supplied FM antenna is not properly extended and positioned Beat Cut mode is not set properly while listening to an AM MW broadcast The received signal is too weak The station is too far away The sleep timer or auto standby function is activated DISP SET selector is not set correctly SOLUTION Replace the disc Add the file extension mp3 Mp3 mP3 or MP3 to their file names See page 55 Replace the dis...

Страница 81: ...re is called the multiangle function Multichannel DVD is specified to have each sound track constitute one sound field Multichannel refers to a structure of sound tracks having three or more channels Multilanguage When a title is created to cope with multiple languages it is generally called a multilanguage title Parental lock A feature of this system to automatically determine whether or not to r...

Страница 82: ...cy 32 kHz 44 1 kHz 48 kHz Video section Color System PAL Horizontal Resolution 500 lines Signal to Noise Ratio 66 dB Composite signal when RGB is selected Output Level Composite 1 0 V p p 75 Ω S video Y 1 0 V p p 75 Ω S video C 0 286 V p p 75 Ω SOURCE VOL SOURCE VOL D V D D I G I T A L C I N E M A S Y S T E M T H V 7 0 R On a wall With the legs 325 mm 311 5 mm 86 mm 105 5 mm 140 mm 325 mm 237 mm T...

Страница 83: ...to 20 kHz Dimensions W H D 68 mm 134 mm 109 mm Mass 410 g 7 Center Speaker SP XCV70 Speakers 7 cm 4 cm Bass reflex Magnetically Shielded Power Handling Capacity 30 W Impedance 4 Ω Frequency Range 90 Hz to 20 kHz Dimensions W H D 153 mm 70 mm 109 mm Mass 430 g 7 Accessories Remote control 1 Batteries 2 Stand 1 for the center unit Legs 2 for the stand FM antenna 1 AM MW loop antenna 1 Power cord 1 S...

Страница 84: ...VICTOR COMPANY OF JAPAN LIMITED 0402TMMMDWJEM J VC EN ...

Отзывы: