53
Selecting the Recording Control Mode
In order to record in the recording control mode, you need to
specify the scheduler settings (
Page 53), image recording
Page 55), and picture quality settings
Page 58) in the main menu [Camera Record Setting].
1
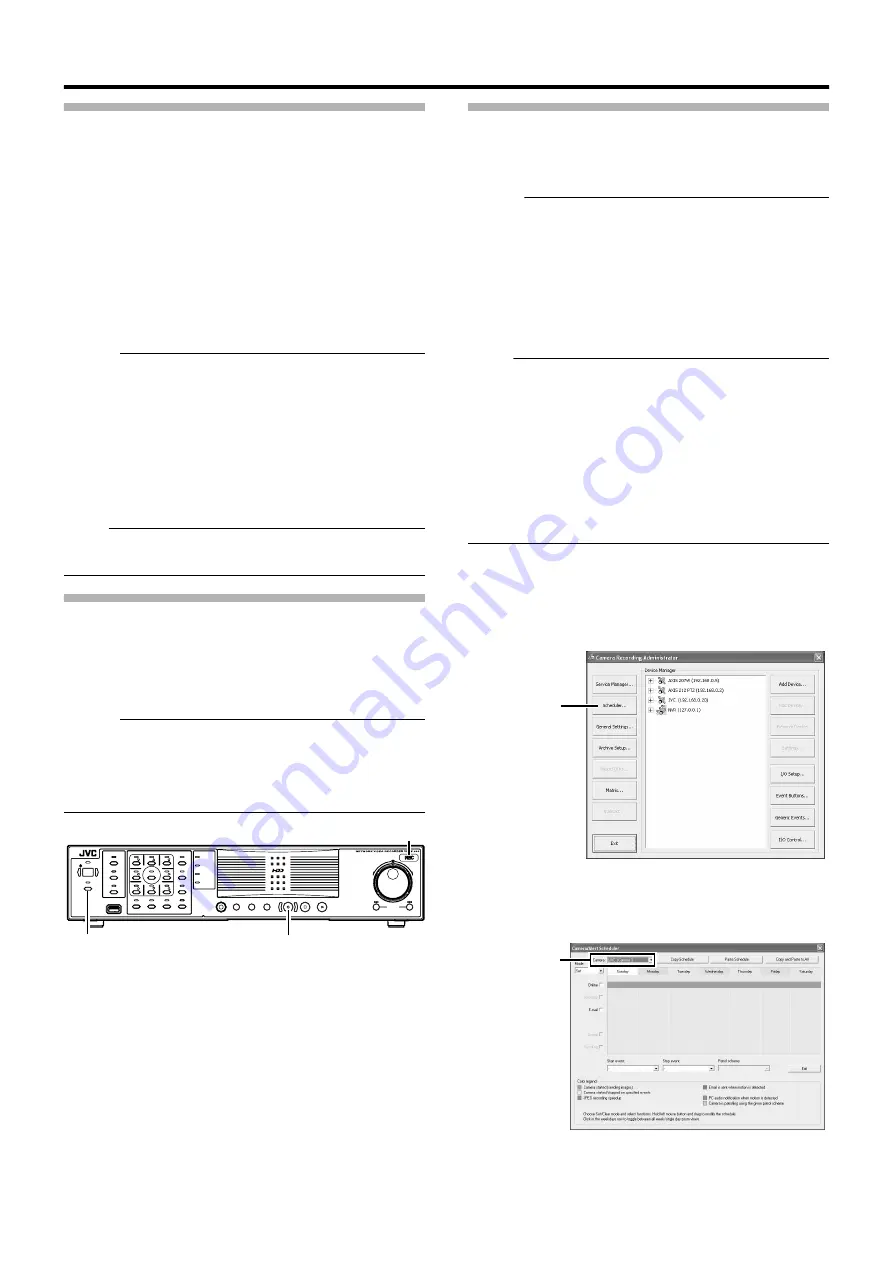
Press and hold down the [REC CONTROL]
button while camera recording is stopped
([REC] indicator is off).
●
The [REC CONTROL] indicator lights up and the unit
switches to the recording control mode.
●
Recording will be executed according to the camera
record settings.
Memo :
●
To stop recording, press and hold down the [REC/STOP] button
during recording in a mode other than recording control (the
[REC] indicator lights up or appears blinking). After the light of
the [REC] indicator goes off, press and hold the [REC
CONTROL] button.
●
To exit the recording control mode, press and hold down the
[REC CONTROL] or [REC/STOP] button.
●
Depending on camera status or other circumstances, it may take
a while before recording starts after switching to the recording
control mode.
Note :
●
Do not turn off the power while you are configuring the camera
recording settings.
Selecting the Manual Recording Mode
1
Press the [REC/STOP] button
●
The unit switches to the manual recording mode and
starts recording from all cameras.
●
The [REC] indicator lights up.
Memo :
●
To exit the manual recording mode, press and hold down the
[REC/STOP] button. Upon doing so, the light of the [REC]
indicator goes off.
●
To clear all recording modes, press and hold down the [REC/
STOP] button.
Scheduler Setting
This feature lets you specify when to switch each camera to the
online mode, as well as the online/offline mode of cameras when an
event occurs.
Memo :
●
When in the online mode, the camera executes recording
according to the camera record settings.
●
When in the offline mode, recording is not executed regardless
of the camera record settings.
●
You can specify the time zone during which e-mail alerts are
triggered when motion is detected. You can also specify the time
zone to activate automatic patrolling (
Page 93) when using
PTZ cameras.
●
The minimum unit of time that you can specify is 5 minutes.
Note :
●
The online/offline mode has no impact on the manual recording,
[EXT REC IN] signal recording, and emergency recording
modes.
●
Even when
A
offline
B
or
A
Event
B
is specified in the scheduler, the
camera switches to the
A
Online
B
mode if [Start cameras on
remote live requests](
Page 106) is specified in [General
Settings] and live images are displayed on the [NVR Viewer].
●
During the interval that is set to
A
Offline
B
, recording will not be
performed even when in the
A
Online
B
mode. During the interval
that is set to
A
Event
B
, recording is performed according to the
recording settings when the unit switches to the
A
Online
B
mode.
1
Select [Camera Record Setting] from the main
menu
2
Click the [Scheduler...] button
●
The [Scheduler...] screen appears.
3
Select the camera for which you want to set a
schedule from [Camera].
OPERATE
REC CONTROL
LIVE/BROWSE
SELECT
PTZ/PRESET
SERIAL
㧝
㧞
㧟
㧠
㧡
㧢*1/'
㧣
㧥
㧤
CANCEL
ZOOM OUT
ZOOM IN
ENTER
WARNING
ALARM
HDD
LOCK
SEARCH
FUNCTION
ALARM CLEAR
KEY
REC/STOP
STOP(PB)
PLAY
SKIP
REV
FWD
[REC] Indicator
[REC CONTROL] Button/Indicator
[REC/STOP] Button
[Camera Recording Administator] Screen
[Scheduler...]
Button
[Scheduler] Screen
Select a Camera
Содержание LST0728-001C
Страница 2: ...IMPORTANT SAFEGUARDS I ...
Страница 7: ...VI ...
Страница 8: ...SICHERHEITSVORKEHRUNGEN for Germany VII ...
Страница 9: ...VIII E VR N900U 1600E VR N900U E VR N900U 1600E VR N900U E VR N900U E VR N900U ...
Страница 167: ...159 ...
Страница 168: ...LST0728 001C NETWORK VIDEO RECORDER VR N1600U VR N1600E VR N900U ...


