background image

Bluetooth Control

63

English


Ñ

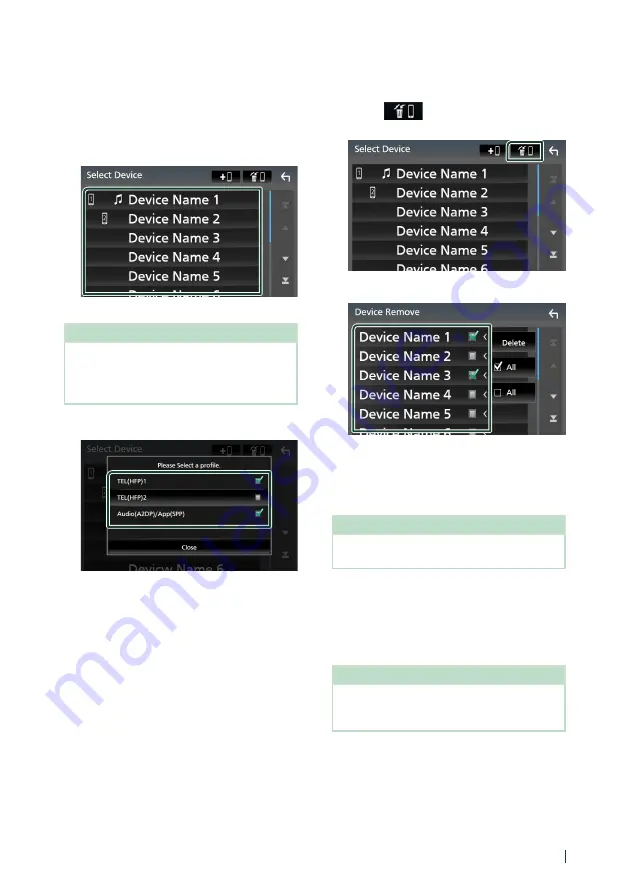
Connect the Bluetooth device

Touch 

[

Select Device

]

 on the Bluetooth 

Setup screen.

Touch the name of the device you want 
to connect.

h

h

Profile select screen appears.

NOTE

•  If the icon is lighted, it means that the unit will 

use that device.

•  You cannot select an Android smartphone 

connected as an Android Auto device.

Set each profile as follows.


[

TEL (HFP) 1

]

[

TEL (HFP) 2

]

Select when the device is connected with 
the unit as hands-free phone 1 or 2.


[

Audio (A2DP)/App (SPP)

]

Select to interwork with an application 
installed in a smartphone or to use as an 
audio player.

Touch 

[

Close

]

.

To delete the registered Bluetooth 
device

Touch 

[

]

 on the Select Device 

screen.

Touch the device name to check.


[

þ

 All

]

Selects all Bluetooth devices.


[

¨

 All

]

Clears all check marks.

NOTE

•  You cannot select an Android smartphone 

connected as an Android Auto device.

Touch 

[

Delete

]

.

h

h

Confirmation message appears.

Touch 

[

Yes

]

.

h

h

All the selected device(s) is deleted.

NOTE

•  If the device compatible with wireless Apple 

CarPlay is deleted, the same device is deleted 
from the Apple CarPlay device list screen.

Содержание KW-M865BW

Страница 1: ...apan Audio Society IM405_ref_K_En_11 K 2020 JVCKENWOOD Corporation MONITOR WITH DVD RECEIVER KW V960BW MONITOR WITH RECEIVER KW M865BW INSTRUCTION MANUAL Updated information the latest Instruction Manual system updates new functions etc is available from https www jvc net cs car ...

Страница 2: ... to the GPL LGPL embedded in this product are encouraged to read the terms of the corresponding license before use Because each individual license is prescribed by a third party other than JVCKENWOOD Corporation the original English of the license is presented EULA Ñ Ñ Software License Agreement JVCKENWOOD Corporation hereinafter called Licensor holds either the copyright to the embedded software ...

Страница 3: ...prior written consent from Licensor Article 8 Cancellation of the Agreement Licensor reserves the right to cancel this agreement forthwith and claim compensation from User for the damages caused by such cancellation when User 1 Breaches any of the provisions of this agreement or 2 Has received a petition for seizure provisional seizure provisional disposition or any other kind of compulsory execut...

Страница 4: ...e search Operation 24 DVD Disc Menu Operation 25 DVD SETUP 26 APPS 27 Apple CarPlay Operation 27 Android Auto Operation 30 Wireless Mirroring Operation 32 USB Mirroring Operation 33 USB 35 Connecting a USB device 35 USB Basic Operation 35 Search Operation 37 iPod iPhone 38 Preparation 38 iPod iPhone Basic Operation 39 Search Operation 40 Tuner 41 Tuner Basic Operation 41 Memory Operation 42 Select...

Страница 5: ... 75 Display Setup 76 AV Setup 78 Controlling Audio 79 3 way speaker system setup 79 Speaker X over setup 80 Controlling General Audio 82 Equalizer Control 82 Volume Offset 83 Zone Control 84 Sound Effect 85 Listening Position DTA 86 Audio Setup memory 88 Remote control 89 Battery Installation 89 Functions of the Remote control Buttons 89 Connection Installation 91 Before Installation 91 Installing...

Страница 6: ...r directly to the unit may damage its mechanical parts Wiping the faceplate with a hard cloth or using a volatile liquid such as thinner or alcohol may scratch the surface or erase the screened print Ñ Ñ Lens fogging When you turn on the car heater in cold weather dew may form on the lens in the disc player of the unit due to condensation This condensation on the lens also called lens fogging may ...

Страница 7: ...g accuracy than using GPS only Ñ Ñ Caution for Smartphone Users Simultaneously running multiple applications on your smartphone while screen sharing places heavy demand on the microprocessor of the phone potentially affecting communication and performance For best results while pairing with your JVC receiver please be sure to close any unused applications How to read this manual The screens and pa...

Страница 8: ...o 15 when you keep pressing P 12 2 Disc insert slot A slot to insert a disc media 3 FNC Displays the popup menu screen Pressing for 1 second starts the voice recognition function P 68 While Apple CarPlay or Android Auto is connected starts the function on the Apple CarPlay or the Android Auto screen When neither Apple CarPlay Android Auto nor a Bluetooth Hands Free phone is connected pressing and ...

Страница 9: ... use this unit first time 1 Set each item as follows Language Select the language used for the control screen and setting items Default is American English en 1 Touch Language 2 Touch Language Select 3 Select the desired language 4 Touch For details see User Interface Setup P 73 Clock Sets the synchronization of the clock and adjusts it For details see Calendar clock settings P 11 Display Set the ...

Страница 10: ...curity Code Setup You can set up a security code to protect your receiver system against theft When the Security Code function is activated the code cannot be changed and the function cannot be deactivated Note that the Security Code can be set with a 4 to 8 digit number of your choice Preparation Set DEMO to OFF in the Special screen P 75 1 Press the FNC button h h Popup menu appears 2 Touch h h ...

Страница 11: ...screen h h Security Code Set screen appears 2 Enter the current registered security code and touch Enter 3 Enter a new security code with 4 to 8 digit number and touch Enter 4 Enter the same code again and touch Enter The new security code is registered To clear the security code 1 Touch Security Code Cancellation on the Security screen h h Security Code Set screen appears 2 Enter the current regi...

Страница 12: ... screen gently to select an item on the screen Touch and hold Touch the screen and keep your finger in place until the display changes or a message is displayed Flick Slide your finger quickly to the left or right on the screen to change the page You can scroll a list screen by flicking up down on the screen Swipe Slide your finger up or down on the screen to scroll the screen Gesture Touch Contro...

Страница 13: ...st This icon appears only when Android Auto is connected and two or more devices can be used as Android Auto source 1 Function key1 to 3 The current screen changes to the one you have set The function key1 and 2 are set to Camera and Audio function as default For the function setting refer to Customize popup menu functions P 74 Displays the view camera screen P 56 Displays the Audio screen P 79 To...

Страница 14: ...et mode by sliding 2 fingers upward downward 5 Displays the SETUP screen P 72 Display the HOME screen 1 Press the FNC button h h Popup menu appears 2 Touch h h HOME screen appears Source selection screen description You can display icons of all playback sources and options on the source selection screen To change pages flick your finger leftward rightward on the screen 2 3 4 1 1 Changes playback s...

Страница 15: ...itches to the USB Mirroring screen from the connected iPhone Android smartphone P 33 Displays the Audio screen P 79 Displays the screen you have set in the Customize Favorite Key screen P 74 Touch and hold to display the Customize Favorite Key screen 4 Turns off the AV source P 16 Turns off the unit P 9 For sources and information displayed when an ADS adapter is connected see OEM Features Operati...

Страница 16: ...rce 1 Press the FNC button h h Popup menu appears 2 Touch h h HOME screen appears 3 Touch 4 Touch AV Off Customize Short cut source icons on HOME screen You can arrange the positions of the source icons as you like 1 Press the FNC button h h Popup menu appears 2 Touch h h HOME screen appears 3 Touch 4 Touch and hold the icon which you want to move in the customizing mode 5 Drag the icon to the des...

Страница 17: ...th a short cut For the short cut setting refer to Customize Short cut source icons on HOME screen P 16 3 Content list Displays the track file station channel list 4 Connected Bluetooth device information 5 Artwork information You can select whether to display an artwork and song information or only song information in more detail Touching the artwork area switches to the VU meter The Disc USB iPod...

Страница 18: ...eys from this screen 6 1 2 3 4 5 1 Displays the list type selection window 2 Displays a music movie file list 3 Text scroll Scrolls the displayed text 4 etc Keys with various functions are displayed here Plays all tracks in the folder containing the current track Jumps to the letter you entered alphabetical search Moves to the upper hierarchy level 5 Page scroll You can change pages to display mor...

Страница 19: ...the split widget mode is selected you should put the fingers on each of the windows before slide To change the widget format Slide two fingers upward downward to switch between the big and the split widget mode Photo Frame Widget You can display a slideshow of the image files stored in the USB memory on the HOME screen Ñ Ñ Preparation Select ON for Photo Frame Widget in the Widget SETUP screen P 2...

Страница 20: ...Widget Determine whether to use the photo frame widget ON Default OFF Photo Frame SETUP Make settings related to photo play display 7 Touch To Photo Frame Setup 1 Touch Photo Frame SETUP on the Widget SETUP screen 2 Set each item as follows Sort Order Specify a file sorting criterion By Name Ascending By Name Descending By Date Newest First Default By Date Oldest First Slide Show Interval Specify ...

Страница 21: ...le CarPlay or Android Auto source to other one to display the popup menu screen DVD VCD Basic Operation Most functions can be controlled from the source control screen and playback screen NOTE The screen shot below is for DVD It may be different from the one for VCD 1 When the operation keys are not displayed on the screen touch 7 area Control screen 1 2 3 4 5 DVD VCD 2 Video screen 7 6 8 6 1 Info...

Страница 22: ...f the icons are as follows D play B fast forward A fast backward I stop R resume stop H pause slow playback slow reverse playback For confirmation of current playing position You can drag the circle left or right to change the playing position 4 Operation keys E F Searches for the previous next content Touch and hold to fast forward or fast backward the disc DH Plays or pauses Touch to attenuate r...

Страница 23: ... name are displayed if there is no tag information Disc media only Touch to display the Folder List screen See File search Operation P 24 Disc media only Change the text size of the information smaller when the Small Audio Text is set to ON in the User Interface screen P 73 3 Play mode indicator Playing time D B etc Current play mode indicator Meanings of the icons are as follows D play B fast for...

Страница 24: ...ies the music file Video screen 10 9 9 9 File search area Video file only Touch to search for the next previous file 10 Key display area Video file only Touch to display the control screen File search Operation Disc media only You can search for a file according to hierarchy NOTE For operations in the list screen see List screen P 18 1 Touch 1 h h Folder List screen appears 2 Touch the desired fol...

Страница 25: ...witch among subtitle languages Touch Subtitle Each time you touch this key subtitle languages are switched To switch among audio languages Touch Audio Each time you touch this key audio languages are switched To switch among picture angles Touch Angle Each time you touch this key picture angles are switched These keys may not function depending on the disc Ñ Ñ Highlight control Highlight control l...

Страница 26: ...software is in use Screen Ratio Sets the screen display mode 16 9 Default Displays wide pictures 4 3 LB Displays wide pictures in the Letter Box format having black stripes at the top and bottom of screen 4 3 PS Displays wide pictures in the Pan Scan format showing pictures cut at the right and left ends Ñ Ñ Language setup This setting is for the languages used for the menu subtitle and voice 1 To...

Страница 27: ...by the connection via Bluetooth Touching on the Apple CarPlay Device List screen P 28 displays Bluetooth pairing waiting dialog Referring to Register the Bluetooth device P 60 and registering the iPhone the iPhone will be connected wirelessly Wired connection 1 Connect your iPhone using KS U62 via the USB Black terminal P 96 When an iPhone compatible with Apple CarPlay is connected to the USB Blac...

Страница 28: ...pup menu appears 2 Touch h h HOME screen appears 3 Touch h h SETUP screen appears 4 Touch AV h h AV screen appears 5 Touch Apple CarPlay Device List 6 Select a device The Apple CarPlay device connected via the USB and the registered Apple CarPlay devices ready for wireless connection are displayed Displays a Bluetooth pairing waiting dialog For details see Register the Bluetooth device P 60 Displa...

Страница 29: ...he icon design may change depending on the iOS version To exit the Apple CarPlay screen 1 Press the FNC button h h Popup menu appears 2 Touch h h HOME screen appears Ñ Ñ Use Siri You can activate Siri 1 Press the FNC button for 1 second Press for 1 second 2 Talk to Siri To deactivate 1 Press the FNC button Ñ Ñ Switch to the Apple CarPlay screen while listening to another source 1 Press the FNC but...

Страница 30: ... the USB terminal P 97 To use the hands free function connect the Android smartphone via Bluetooth When an Android smartphone compatible with Android Auto is connected to the USB terminal the device is connected via Bluetooth automatically and the Bluetooth Hands Free phone currently connected is disconnected 2 Unlock your Android smartphone 3 Press the FNC button h h Popup menu appears 4 Touch 5 ...

Страница 31: ...displays information To exit the Android Auto screen 1 Press the FNC button h h Popup menu appears 2 Touch h h HOME screen appears Ñ Ñ Using voice control 1 Press the FNC button for 1 second Press for 1 second 2 Start speaking NOTE When you press and hold the FNC button while inputting voice you can start over from the beginning To cancel 1 Press the FNC button Ñ Ñ Switch to the Android Auto scree...

Страница 32: ...ars 2 Touch h h HOME screen appears 3 Touch 4 Touch Wireless Mirroring P 15 h h The App screen is displayed 5 Operate your Android smartphone to activate the Wireless Mirroring function then connect to this unit 6 Select KW V KW M as the network to use h h When the connection is established then the same screen displayed on the Android smartphone is displayed NOTE Apps is discontinued when the pow...

Страница 33: ...oring for JVC application Ñ Ñ Connect the device Screen is mirrored through USB Black terminal connection while audio is shared via Bluetooth connection between this unit and your smartphone For Android smartphones 1 Pair your Android smartphone with this unit via Bluetooth See Register the Bluetooth device P 60 Select A2DP SPP Audio App 2 Press the FNC button 3 Touch 4 Touch 5 Touch USB Mirroring...

Страница 34: ...ing mirroring audio and or video will be disturbed or paused Some applications may not support audio sharing Some operations may not work depending on the compatibility between this unit Mirroring for JVC application and your smartphone Ñ Ñ Operation keys on the mirroring screen On the USB mirroring screen the following virtual hard keys are available The keys are hidden when no operation is done ...

Страница 35: ...n this manual indicates a flash memory device About the file system The file system should be the one of the following FAT16 FAT32 exFAT NTFS NOTE Install the USB device in the place where it will not affect safe driving You cannot connect a USB device via a USB hub and Multi Card Reader Take backups of the audio files used with this unit The files can be erased depending on the operating conditio...

Страница 36: ...e circle left or right to change the playing position Video file only 4 Operation keys 1 Searches track file For details on search operation see Search Operation P 37 E F Searches the previous next track file Touch and hold to fast forward or fast backward DH Plays or pauses Touch to attenuate restore the sound 5 Content list Touch the right side of the screen to display the Content list Touch aga...

Страница 37: ...e desired item in the list Repeat this step until you find the desired file Ñ Ñ Link search Audio file only You can search for a file of the same artist album genre as that in the current track 1 Touch Link Search 2 Touch the desired tag type You can select from artists albums and genres h h The list corresponding to your selection appears 3 Touch the desired item in the content list Ñ Ñ Folder se...

Страница 38: ... turn off Apple CarPlay by operating the iPhone at functional setup before connecting iPhone For details of the setup method contact the manufacturer of the terminal Plug the iPod iPhone into the gray USB terminal with the KS U62 optional accessory Only one iPod iPhone can be connected 1 Connect the iPod iPhone using the KS U62 P 96 2 Press the FNC button h h Popup menu appears 3 Touch h h HOME sc...

Страница 39: ...ys 1 Searches for a track file For details on search operation see Search Operation P 40 E F Searches for the previous next track file Touch and hold to fast forward or fast backward DH Plays or pauses Touch to attenuate restore the sound 5 Content list Touch the right side of the screen to display the Content list Touch again to close the list Displays the playing list When you touch a track file...

Страница 40: ...ch the desired category h h The list corresponding to your selection appears 3 Touch to select the desired item in the list Repeat this step until you find the desired file Ñ Ñ Link search You can search for a file of the same artist album genre composer as that in the current track 1 Touch Link Search 2 Touch the desired tag type You can select from artists albums genres and composers h h The lis...

Страница 41: ...ction panel Touch the left side of the screen to display the function panel Touch again to close the panel TI FM only Selects the traffic information mode For details see Traffic Information P 43 SETUP FM only Displays the Tuner SETUP screen For details see Tuner SETUP P 43 SSM FM only Presets stations automatically For details see Auto memory P 42 PTY FM only Searches for a program by program typ...

Страница 42: ...t to store the station for 2 seconds until a beep sounds Selecting Operation Ñ Ñ Preset select You can list and select memorized stations This function can be used from the remote control P 90 1 Touch on the right side of the screen Select a station from the list Ñ Ñ Search by program type FM only You can tune in the station broadcasting the specified type of program when listening to FM 1 Touch o...

Страница 43: ...orized When the traffic information is received next time this unit recalls the volume setting automatically To cancel Traffic Information Touch Cancel Tuner SETUP FM only You can set tuner related parameters 1 Touch on the left side of the screen Touch SETUP h h Tuner SETUP screen appears 2 Set each function as follows Area Setting The tuner channel interval changes depending on the area where yo...

Страница 44: ...sXM Connect Vehicle Tuner using either one of the two methods below For users in U S A Online Visit www siriusxm com activatenow Phone Call SiriusXM Listener Care at 1 866 635 2349 For users in Canada Online Visit https www siriusxm ca help activation help Phone Call XM customer Care at 1 877 438 9677 NOTE To use SiriusXM Satellite Radio the optional accessory is necessary Control screen 7 3 1 5 4...

Страница 45: ...tails see SiriusXM SETUP P 50 Replay Live Touch to turn on or off the replay mode See Replay P 47 Traffic Weather For SXV300 1 Traffic Weather Now allows you to access the latest report whenever you want to hear it Select your city from the set up menu see Select a City for Traffic Weather P 55 and touch Traffic Weather to check the latest report It will start from the beginning White Played alrea...

Страница 46: ... for 2 seconds until a beep sounds Preset select You can list and select memorized channels This function can be used from the remote control P 90 To select from the preset list 1 Touch on the right side of the screen Select a channel from the list Direct search You can tune in a channel directly 1 Touch on the left side of the screen Touch Direct Channel 2 Enter the channel number and touch Enter...

Страница 47: ...are dynamic and can change often allowing you to discover new channels You can set whether to be notified when the featured seasonal theme is updated P 55 Replay You can replay the last 60 minutes of the program from the current channel 1 Touch L or Replay on the function panel E F Press to skip to the previous next track Press and hold to rewind or fast forward DH Plays or pauses Replay time bar ...

Страница 48: ...nel songs will be played from the beginning of each track TuneStart You can enable disable TuneStart See TuneStart P 55 NOTE Compatible with SXV200 or later tuner models TuneScan TuneScan is a feature that plays samples from the starts of multiple buffered songs from each of the SmartFavorites channels that predominantly play music selections You have easy access to a large sampling of music conte...

Страница 49: ... Compatible with SXV300 or later tuner models Content Alerts When a broadcast program related to the registered artist song or team starts an Alert Content List screen appears to allow you to switch the current channel to the relevant channel 1 When the broadcast of the registered content starts an Alert Content List screen appears 2 Select a content from the list NOTE Touch Type Select a desired ...

Страница 50: ...for this game Cancel Touch to cancel SportsFlash alert No alerts for this game will be displayed afterward NOTE Compatible with SXV300 or later tuner models To learn how to set up the SportsFlash alert function see SportsFlash setup P 54 SiriusXM SETUP 1 Touch on the left side of the screen Touch SETUP h h SiriusXM SETUP screen appears See the following sections for each setting Set up the parenta...

Страница 51: ...ure content and user selected channels 1 Touch Parental Control on the SiriusXM SETUP screen 2 Touch User Mature or OFF User Locks only the selected channels Mature Locks channels classified as mature only OFF Deactivates the parental mature and user locks 3 Enter the parental code you originally input in as stated in Parental code P 51 and touch Enter When selecting User This allows you to limit ...

Страница 52: ...ory 3 Touch each channel in the list and set to ON or OFF NOTE To delete the skip channel setting touch Disable All and then touch YES on the confirmation screen Touch Info Change Select a desired item content info channel name artist name song title category name Direct Channel and Preset Memory functions allow you to select channels Ñ Ñ Content Alerts setup Activating content alert 1 Touch Conte...

Страница 53: ...the list you want to select þ All Selects all contents All Clears all check marks 3 Touch Delete and then touch YES on the confirmation screen To select a Team Get alerted when your favorite sports team is playing on another SiriusXM channel with GameAlert 1 Touch My Games 2 Touch the desired league in the list 3 Touch the team s in the list you want to select NOTE You can select þ up to 30 teams ...

Страница 54: ...he SiriusXM SETUP screen h h Team Set screen appears 2 Touch Edit 3 Touch the desired league in the list 4 Touch each team s in the list you want to select 5 Touch twice Edit Sets and removes teams Priority Sets the priority of a team Clear Removes all teams that have been set Touch Clear When the confirmation screen appears touch YES NOTE SportsFlash is available on SXV300 or later tuner models U...

Страница 55: ...on the SiriusXM SETUP screen 2 Touch T and U to select a city 3 Touch Close Ñ Ñ Selecting Featured Bands Update Messages You can set whether to be notified when the featured seasonal theme is updated 1 Touch Featured Bands Update Messages on the SiriusXM SETUP screen Featured Bands Update Messages is turned on or off Ñ Ñ TuneStart 1 Touch Tune Start on the SiriusXM SETUP screen The TuneStart is tu...

Страница 56: ...em as follows 2 1 1 Camera Switching Keys 1 Touch to switch the view camera It is necessary to set Camera Assignment Settings beforehand except Rear See To set up the camera assignment settings P 57 2 Camera off Touch to exit the camera screen 1 When two or more cameras of rear front left right and 3rd are connected with this unit Camera Setup 1 Press the FNC button h h Popup menu appears 2 Touch ...

Страница 57: ...ra screen P 56 2 Select the item to set up FRONT VIEW CAMERA Set the camera assignment from view camera connected to Front view camera input terminal 3rd VIEW CAMERA Set the camera assignment from view camera connected to 3rd view camera input terminal AV IN Set the camera assignment from view camera connected to AV IN input terminal 3 Select the view camera to set up 4 2 5 1 3 1 Picture from view...

Страница 58: ...screen 3 Adjust the parking guidelines by selecting the mark 4 Adjusting the position of the selected mark A B C D Make sure that lines A and B are horizontally parallel and that lines C and D are of the same length NOTE Touch Initialize and then touch Yes to set all the marks to their initial default position External audio video players AV IN 1 Connect an external component to the AV IN input te...

Страница 59: ...te radio source provided for the vehicle Displays the control screen of the media player source provided for the vehicle Displays the control screen of the Bluetooth streaming source provided for the vehicle Displays information about the Radar Detector Displays information about the instruments such as a speedometer Displays information about the air conditioner of the vehicle Displays informatio...

Страница 60: ...he cell phone and Bluetooth audio player This unit conforms to the following Bluetooth specifications Version Bluetooth Ver 5 0 Profiles Cell phone HFP V1 7 Hands Free Profile SPP Serial Port Profile PBAP Phonebook Access Profile Audio player A2DP Advanced Audio Distribution Profile AVRCP V1 6 Audio Video Remote Control Profile Sound codec LDAC SBC AAC NOTE The units supporting the Bluetooth funct...

Страница 61: ...egister an iPhone on the Apple CarPlay Device List screen P 28 When neither Apple CarPlay Android Auto nor a Bluetooth Hands Free phone is connected pressing and holding the FNC button displays Bluetooth pairing waiting dialog 7 Search for the unit KW V KW M from your smartphone cell phone Complete steps 7 to 10 within 30 seconds 8 Operate your smartphone cell phone according to the displayed mess...

Страница 62: ...he Bluetooth connection icon appears on the screen NOTE When registering the iPhone that is available for Apple CarPlay wirelessly a confirmation message appears Yes Displays the Apple CarPlay screen for wireless connection No Apple CarPlay is not connected When using Apple CarPlay see Select an Apple CarPlay device P 28 Bluetooth Setup NOTE The Bluetooth Setup is disabled while using Apple CarPla...

Страница 63: ...as hands free phone 1 or 2 Audio A2DP App SPP Select to interwork with an application installed in a smartphone or to use as an audio player 4 Touch Close To delete the registered Bluetooth device 1 Touch on the Select Device screen 2 Touch the device name to check þ All Selects all Bluetooth devices All Clears all check marks NOTE You cannot select an Android smartphone connected as an Android Au...

Страница 64: ...source is disabled while using Apple CarPlay The Bluetooth audio source is disabled when the device set as Audio App is using Android Auto Ñ Ñ Bluetooth basic operation Control screen 3 2 1 4 6 5 1 Artwork VU meter Displays hides artwork area When touched switches the artwork to the VU meter 2 Play mode indicator Playing time D H Current play mode indicator Meanings of individual icons are as foll...

Страница 65: ... the connected device If the operation keys do not appear operate from the player Depending on your cell phone or audio player sound may be heard and controlled but text information may not appear If the volume is too low raise it on your cell phone or audio player It is recommended that you change the playback quality from priority on sound quality to priority on stable connection in the settings...

Страница 66: ...the telephone function by connecting the Bluetooth telephone to this unit NOTE While Apple CarPlay or Android Auto is connected the Bluetooth Hands Free function and two Bluetooth devices connections cannot be used Only the Apple CarPlay or Android Auto Hands Free function can be used Ñ Ñ Make a call 1 Press the FNC button h h Popup menu appears 2 Touch h h HOME screen appears 3 Touch 4 Touch Phon...

Страница 67: ...nds free function Call using call records 1 Touch 2 Select the phone number from the list Call using the phonebook 1 Touch 2 Touch 3 Select the initial Characters with no corresponding name will not appear A first character with an accent character such as ü can be searched for with a non accent character u A character with an accent character in a sentence cannot be searched for 4 Select the pers...

Страница 68: ...ll phone connected to this unit You can search the cell phone phonebook by voice The functionality depends on the cell phone 1 Press the FNC button for 1 second Press for 1 second h h Voice Recognition screen appears 2 Start speaking NOTE You can use the voice recognition function by touching on the Hands Free screen You can use the voice recognition function for the connected cell phone if you se...

Страница 69: ...ur voice Output the dial tone Touch DTMF to display the tone input screen You can send tones by touching desired keys on the screen Switching between speaking voice output destinations Touching each time switches speaking voice output destinations between the cell phone and the speaker Call waiting When you receive a new call while talking on the phone you can answer the newly received call by tou...

Страница 70: ...ering a phone number P 68 Delete To delete a preset number touch Delete and then touch OK on the confirmation screen Ñ Ñ Phonebook transfer You can transfer phonebook data from your Bluetooth smartphone using PBAP 1 Touch 2 Touch h h Phonebook data transfer starts NOTE If the Phonebook contains more than 1000 entries only 1000 entries are transferred The 1001st and later entries are not transferre...

Страница 71: ...kers All Default Outputs sound from all speakers Auto Response Set the automatic response time to pick up an incoming call OFF Default Turns off the Automatic response function 1 5 10 15 20 25 30 Sets the ringing time second Auto Pairing When set to ON the Apple Auto Pairing function is turned on to automatically register the iPod touch or iPhone connected to this unit ON Default Turns on the Appl...

Страница 72: ...e screen Normal Displays video at the ratio of 4 3 Auto DVD VCD and disc media 16 9 video is displayed in the Full mode and 4 3 video is displayed in the Regular mode USB device Displays video fully vertically or horizontally with no ratio change NOTE Settings to adjust vary depending on the current source System Setup 1 Press the FNC button h h Popup menu appears 2 Touch h h HOME screen appears 3...

Страница 73: ...stacles around the car ON Always displays information Dyn Default Displays information when the sensor detects obstacles OFF Cancels this function This can be set when the iDatalink commercially available is connected Parking Assist Position Select where to display information about obstacles on the screen left or right Left Right Default This can be set when the iDatalink commercially available i...

Страница 74: ...E You can also change the assignment when you touch and hold Favorite icon on the HOME screen If it is your first time to touch Favorite icon after installation Customize Favorite Key screen will appear Ñ Ñ Customize popup menu functions You can register a function for each of the function key1 to 3 Function key1 key2 key3 To register a function 1 Touch Customize FNC Menu on the User Interface scr...

Страница 75: ...t the date then adjust the time 7 Touch Set Special Setup You can setup special parameters 1 Press the FNC button h h Popup menu appears 2 Touch h h HOME screen appears 3 Touch h h SETUP screen appears 4 Touch Special h h Special screen appears 5 Set each parameter as follows DEMO Select the demonstration mode Default is ON Operation Guide Display Determine whether to show the touch screen operati...

Страница 76: ...icle light control switch is turned on or off OSD Clock Select if you want to display the clock while the screen is off or while watching DVD video and video files USB Disc media etc ON Default OFF Wallpaper Customize You can change the wallpaper image or color P 76 Viewing Angle If it is hard to see the image on the screen evenly adjust the viewing angle The smaller the negative value the more wh...

Страница 77: ... an original image You can load an image from the connected USB device and set it as the wallpaper image Before starting this procedure it is necessary to connect the device which has the image to load 1 Touch User1 Select on the Wallpaper Customize screen 2 Select the image to load 3 Touch Enter h h The selected image is loaded and the display returns to the Wallpaper Customize screen NOTE Touchi...

Страница 78: ... 0 AV OUT You can select an AV source to be output from the AV OUTPUT port OFF AV IN DISC USB or iPod You cannot select AV IN if the AV IN input terminal is used for camera You cannot select iPod if it is connected via Bluetooth If you select USB iPod Tuner DISC Music CD Disc media or Bluetooth audio as the main source you cannot select USB or iPod as the AV output source If you select Wireless Mi...

Страница 79: ...ION Connecting 3 way speakers with the 2 way mode selected can break the speakers 1 Press the FNC button h h Popup menu appears 2 Touch h h HOME screen appears 3 Touch h h Source selection screen appears 4 Touch AV Off 5 Press the FNC 1 button and the 2 button for 1 second at the same time 1 2 h h Speaker system select screen appears 6 Select the crossover network mode h h A confirmation screen ap...

Страница 80: ... speaker type and size are selected the speaker crossover network is set automatically Location Only for Front Rear Select the speaker position you have installed Tweeter Only for Front You can set up the tweeter when you are selecting front speakers None Small Medium Large Xʼover Display the speaker crossover setup screen You can adjust the crossover frequency that was set automatically when you ...

Страница 81: ...l Medium Large in Speaker Setup 3 Only when Subwoofer is set to a mode other than None in Speaker Setup When Speaker network is set to 3 way FREQ High Pass High Pass Filter adjustment HPF FREQ LPF FREQ Band Pass Band Pass Filter adjustment When Mid Range Speaker is selected on the Speaker Select screen FREQ Low Pass Low Pass Filter adjustment When Woofer is selected on the Speaker Select screen Sl...

Страница 82: ...t equalizer by selecting the optimized setting for each category 1 Press the FNC button h h Popup menu appears 2 Touch h h HOME screen appears 3 Touch h h SETUP screen appears 4 Touch Audio h h Audio screen appears 5 Touch EQ SW Level 6 Touch the screen and set the Graphic Equalizer as desired Gain level area in dotted frame Adjust the gain level by touching each frequency bar You can select a fre...

Страница 83: ... wirelessly Ñ Ñ Save the EQ curve 1 Adjust the EQ curve 2 Touch Memory 3 Select where to save Volume Offset Finely adjust the volume of the current source to minimize the difference in volume between different sources 1 Press the FNC button h h Popup menu appears 2 Touch h h HOME screen appears 3 Touch h h SETUP screen appears 4 Touch Audio h h Audio screen appears 5 Touch Volume Offset 6 Touch or...

Страница 84: ...inal is also switched to the same source When the dual zone function is set to on the following functions are not available Output from the subwoofer Subwoofer Level Bass Boost P 85 Equalizer Control Sound Effect Listening Position P 82 85 86 Speaker Setup P 80 High resolution Sound Source File Playback When the dual zone is selected and audio source other than OFF is selected as Rear Source the s...

Страница 85: ...the driving noise by boosting specific frequencies in the audio signal OFF ON Space Enhancement Select the feeling of sound space enhancement OFF Small Medium Large This setting is not available for the Tuner source K2 Turn ON OFF the K2 function Technology to extrapolate and supplement with proprietary algorithm the high frequency range that is cut off when encoding Sound Response Virtually make ...

Страница 86: ... Front Focus P 87 Ñ Ñ Listening Position Adjust the sound delay time so that the sounds from different speakers arrive at the listener sitting on the selected seat at the same time 1 Touch Listening Position on the Position DTA screen 2 Select a listening position from Front R Right front Front L Left front Front All All front and All Position DTA control You can fine adjust your listening positio...

Страница 87: ... Touch Adjust 2 Touch Delay 3 Set each parameter as follows Sound Image LR Front Focus the sound image on the front of front seats Sound Image LR Rear Focus the sound image on the front of rear seats Size of the Virtual Sound Field Adjust the size of sound image to meet your taste If the sound image is shifted from the front move it back by Sound Image LR Front or Sound Image LR Rear Subwoofer Del...

Страница 88: ...screen appears 4 Touch Audio h h Audio screen appears 5 Touch Audio Memory SETUP Memory Lock or unlock the Audio SETUP Memory Recall Clear Audio SETUP Memory Memorize the current audio settings Fader Balance Speaker X over Equalizer User Preset SW Level Position DTA Sound Effect P 79 Audio SETUP Recall Recall the memorized audio setting Audio SETUP Clear Clear the Audio SETUP Memory and the curren...

Страница 89: ... the pedals while driving Do not leave the battery near fire or under direct sunlight A fire explosion or excessive heat generation may result Do not recharge short break up or heat the battery or place it in an open fire Such actions may cause the battery to leak fluid If spilled fluid comes in contact with your eyes or on clothing immediately rinse with water and consult a physician Danger of ex...

Страница 90: ...within 3 seconds allows you to determine the preset number of single digit For the VCD source allows you to enter the single digit track number directly when PBC is ON and the menu is displayed To enter the double digit track number see Direct search mode P 90 CLR Deletes a character while in direct search mode ENT Performs the selected function Ñ Ñ Direct search mode Using the remote control you ...

Страница 91: ... protection function may have been activated Therefore the speaker wire should be checked If your car s ignition does not have an ACC position connect the ignition wires to a power source that can be turned on and off with the ignition key If you connect the ignition wire to a power source with a constant voltage supply such as with battery wires the battery may be drained If the console has a lid...

Страница 92: ...5 x 8 mm x6 6 M5 x 8 mm x6 7 3 5 m x1 8 x1 9 x1 Ñ Ñ Installation procedure 1 To prevent a short circuit remove the key from the ignition and disconnect the terminal of the battery 2 Make the proper input and output wire connections for each unit 3 Connect the speaker wires of the wiring harness 4 Connect the wiring harness wires in the following order ground battery ignition 5 Connect the wiring h...

Страница 93: ...ther than the supplied one may cause a drop in positioning accuracy Depending on the type of car reception of the GPS satellite signals might not be possible with an inside installation Please install this GPS antenna in an area away from any antennas that are used with CB radios or satellite televisions The GPS antenna should be installed at a position that is spaced at least 12 inch 30 cm from c...

Страница 94: ... s reverse lamp harness when using the optional rear view camera To steering remote To use the steering wheel remote control feature you need an exclusive remote adapter not supplied matched to your car If no connections are made do not let the cable come out from the tab Purple Black To rear right speaker To rear left speaker To front right speaker To front left speaker Speaker impedance 4 8 Ω Pu...

Страница 95: ... input For more information see To set up the camera assignment settings P 57 AV IN input 1 2 3 4 Camera input Accessory 9 Mini plug to RCA cable When connecting to an external amplifier connect its ground wire to the car s chassis to avoid damaging the unit White Black Gray Black Green Black Purple Black Speaker impedance 4 8 Ω Purple Green Gray White To mid range left speaker Subwoofer Preout To...

Страница 96: ... device USB device 2 USB Gray terminal 1 USB Black terminal 1 Accessory 2 Black 1 m 3 Accessory 3 Gray 1 m 3 1 USB maximum power supply current DC 5 V 1 5 A 2 Sold separately 3 See Securing the USB extension cable P 96 Ñ Ñ Securing the USB extension cable Secure the USB extension cable with insulating tape or the like so that its connectors are not disconnected Ñ Ñ Connecting an iPod iPhone Lightn...

Страница 97: ... supply current DC 5 V 1 5 A 2 Sold separately 3 See Securing the USB extension cable P 96 4 USB Gray terminal does not support USB Mirroring Ñ Ñ Connecting the camera 2 Front view camera 1 Left side view camera and Right side view camera 1 Accessory 9 AV IN input Rear view camera input Yellow Front view camera input Yellow 3rd view camera input Yellow Rear view camera 1 1 Sold separately 2 See Ca...

Страница 98: ... function The specified disc does not play but another one plays instead The disc is quite dirty Clean the disc See Precautions on handling discs P 6 The disc is severely scratched Try another disc instead The sound skips when an audio file is being played The disc is scratched or dirty Clean the disc See Precautions on handling discs P 6 The recording condition is bad Record the file again or use...

Страница 99: ...er The iPod Bluetooth audio player is selected as a source although no iPod Bluetooth audio player is connected Change the source to any source other than iPod Bluetooth Connect an iPod Bluetooth audio player and change the source to iPod Bluetooth again No Media file The connected USB device contains no playable audio file Media was played that doesn t have data recorded that the unit can play Se...

Страница 100: ...the Apple CarPlay is started by connecting wirelessly or when the iPhone compatible with wireless Apple CarPlay is registered in Apple CarPlay Device List Check the connection of the GPS antenna or plug in over USB to use Apple CarPlay The speed sensor and the GPS antenna must be connected to use Apple CarPlay wirelessly Please verify the proper connections or plug in by USB to use Apple CarPlay T...

Страница 101: ...R v CD RW v DTS CD Video CD VCD v Super video CD Photo CD CD EXTRA r Only music CD session can be played HDCD r Normal music CD sound quality CCCD Others Dualdisc Super audio CD r Only CD layer can be played v Playback is possible r Playback is partly possible Playback is impossible 1 Incompatible with 8 cm 3 inch discs Use of DualDisc When playing a DualDisc on this unit the surface of the disc t...

Страница 102: ...iles It is recommended that a car audio system should be configured with all High Resolution Audio compatible products from player to speaker to enjoy its high quality sound Acceptable Video files Profile Max Picture size Max bit rate Audio format MPEG 1 mpg mpeg 352 240 352 288 1 5 Mbps MPEG Audio Layer 2 MPEG 2 mpg mpeg MP ML 720 480 720 576 8 Mbps MPEG Audio Layer 2 H 264 MPEG 4 AVC mp4 m4v avi...

Страница 103: ... shot from multiple angles you can select a favorite angle 16 9 LB Indicates the type of screen for the image The left mark indicates that a wide image picture 16 9 is displayed on a standard TV set screen 4 3 with a black band at both the top and bottom of the screen letter box Operation regulatory marks With this DVD some functions of this unit such as the play function may be restricted dependi...

Страница 104: ... Kannada ko Korean ks Kashmiri ku Kurdish ky Kirghiz la Latin lb Luxembourgish ln Lingala lo Laotian lt Lithuanian lv Latvian Lettish mg Malagasy mi Maori mk Macedonian ml Malayalam mn Mongolian mo Moldavian mr Marathi ms Malay mt Maltese my Burmese na Nauru ne Nepali nl Dutch no Norwegian oc Occitan om Afan Oromo or Oriya pa Punjabi pl Polish ps Pashto Pushto pt Portuguese qu Quechua rm Rhaeto Ro...

Страница 105: ... section USB Standard USB 2 0 High Speed File System FAT16 FAT32 exFAT NTFS Maximum Power Supply Current DC 5 V 1 5 A 2 D A Converter 24 bit 32 bit Audio Decoder MP3 WMA AAC WAV FLAC Vorbis Video Decoder MPEG 1 MPEG 2 MPEG 4 WMV H 264 MKV Frequency Response KW M865BW 192 kHz 20 88 000 Hz 96 kHz 20 44 000 Hz 48 kHz 20 22 000 Hz 44 1 kHz 20 20 000 Hz Total Harmonic Distortion KW M865BW 0 010 1 kHz S...

Страница 106: ...28 dBμ 25 μV Video section Color System of External Video Input NTSC External Video Input Level RCA jacks 1 Vp p 75 Ω External Video Input Level mini jack 1 Vp p 75 Ω External Audio Max Input Level mini jack 2 V 25 kΩ Video Output Level RCA jacks 1 Vp p 75 Ω Audio Output Level mini jack 0 9 V 10 kΩ Audio section Maximum Power Front Rear 50 W 4 Typical Power Output Front Rear Full Bandwidth Power a...

Страница 107: ... 8 7 6 5 4 3 2 1 0 dB Low pass filter Frequency 30 40 50 60 70 80 90 100 120 150 Hz Through Slope 12 18 24 dB Oct Gain 8 7 6 5 4 3 2 1 0 dB General Operating Voltage 12V DC car battery Installation Dimensions W H D 178 100 155 mm 7 3 15 16 6 1 8 inch Weight KW V960BW 2 1 kg 4 63 lbs KW M865BW 1 7 kg 3 75 lbs NOTE Although the effective pixels for the liquid crystal panel is given as 99 99 or more ...

Страница 108: ...reserved Google Android Google Play and Android Auto are trademarks of Google LLC To use Android Auto on your car display you ll need an Android Auto compatible vehicle or aftermarket stereo an Android phone running Android 5 0 or higher and the Android Auto app Wi Fi is a registered trademark of Wi Fi Alliance The Wi Fi CERTIFIED Logo is a certification mark of Wi Fi Alliance Linux is the registe...

Страница 109: ...ither the name of the Xiph org Foundation nor the names of its contributors may be used to endorse or promote products derived from this software without specific prior written permission THIS SOFTWARE IS PROVIDED BY THE COPYRIGHT HOLDERS AND CONTRIBUTORS AS IS AND ANY EXPRESS OR IMPLIED WARRANTIES INCLUDING BUT NOT LIMITED TO THE IMPLIED WARRANTIES OF MERCHANTABILITY AND FITNESS FOR A PARTICULAR ...

Страница 110: ...oration 2967 3 ISHIKAWA MACHI HACHIOJI SHI TOKYO JAPAN THIS PRODUCT COMPLIES WITH DHHS RULES 21 CFR SUBCHAPTER J IN EFFECT AT DATE OF MANUFACTURE Location Top plate KW V960BW This transmitter must not be co located or operated in conjunction with any other antenna or transmitter ISED CAUTION This device contains licence exempt transmitter s receiver s that comply with Innovation Science and Econom...

Страница 111: ...recto del reciclaje y la eliminación de residuos ayuda a conservar los recursos y evita al mismo tiempo efectos perjudiciales en la salud y el medio ambiente Informação sobre a eliminação de pilhas Este produto não deve ser eliminado como lixo doméstico geral Devolva a pilha usada ao revendedor ou entidade autorizada para que a mesma seja devolvida ao fabricante ou importador A reciclagem e a elim...

Страница 112: ......

Отзывы: