JVC KD-SX1500R Скачать руководство пользователя страница 1

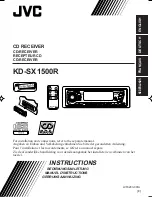
KD-SX1500R

CD RECEIVER

CD-RECEIVER
RECEPTEUR CD
CD-RECEIVER

For installation and connections, refer to the separate manual.
Angaben zu Einbau und Verkabelung entnehmen Sie bitte der gesonderten Anleitung.
Pour l’installation et les raccordements, se référer au manuel séparé.
Zie de afzonderlijke handleiding voor details aangaande het installeren en verbinden van het
toestel.

ENGLISH

DEUTSCH

FRANÇAIS

NEDERLANDS

LVT0203-001A

[E]

40Wx4

SEL

PTY

ANNOUNCE

SSM

KD-SX1500R

COMPACT

DIGITAL AUDIO

TEXT

MO

RND

LO

RDS

C D

DAB

FM/AM

DISP

7

8

9

DAB / CD CHANGER CONTROL

AUDIO CRUISE

10

11

12

/I

ATT

CD-CH

TA

DAB  CONTROL

INSTRUCTIONS

BEDIENUNGSANLEITUNG

MANUEL D’INSTRUCTIONS

GEBRUIKSAANWIJZING

COVER.KD-SX1500R[E].E/G/F/N

99.4.26, 10:25 AM

3

Содержание KD-SX1500R

Страница 1: ...dements se référer au manuel séparé Zie de afzonderlijke handleiding voor details aangaande het installeren en verbinden van het toestel ENGLISH DEUTSCH FRANÇAIS NEDERLANDS LVT0203 001A E 40Wx4 SEL PTY ANNOUNCE SSM KD SX1500R COMPACT DIGITAL AUDIO TEXT MO RND LO RDS C D DAB FM AM DISP 7 8 9 DAB CD CHANGER CONTROL AUDIO CRUISE 10 11 12 I ATT CD CH TA DAB CONTROL INSTRUCTIONS BEDIENUNGSANLEITUNG MAN...

Страница 2: ... all servicing to qualified service personnel 4 CAUTION This CD player uses invisible laser radiation and is equipped with safety switches to prevent radiation emission when unloading CDs It is dangerous to defeat the safety switches 5 CAUTION Use of controls adjustments or performance of procedures other than those specified herein may result in hazardous radiation exposure Name Rating plate Caut...

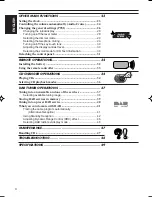
Страница 3: ...hing your favorite program PTY Search 14 Other convenient RDS functions and adjustments 16 Automatic selection of the station when using the number buttons 16 Setting the TA volume level 16 Automatic clock adjustment 16 CD OPERATIONS 18 Playing a CD 18 Locating a track or a particular portion on a CD 19 Selecting CD playback modes 20 Playing a CD Text 21 SOUND ADJUSTMENTS 22 Adjusting the sound 22...

Страница 4: ...trol panel 31 REMOTE OPERATIONS 32 Installing the battery 32 Using the remote controller 33 CD CHANGER OPERATIONS 34 Playing CDs 34 Selecting CD playback modes 36 DAB TUNER OPERATIONS 37 Tuning into an ensemble and one of the services 37 Selecting available tuning range 38 Storing DAB services in memory 39 Tuning into a preset DAB service 40 What you can do more with DAB 41 Tracing the same progra...

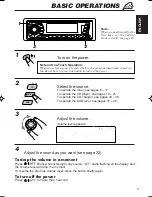
Страница 5: ...ee pages 34 36 To operate the DAB tuner see pages 37 46 3 Adjust the volume Volume level appears 4 Adjust the sound as you want see page 22 To drop the volume in a moment Press briefly while listening to any source ATT starts flashing on the display and the volume level will drop in a moment To resume the previous volume level press the button briefly again To turn off the power Press for more tha...

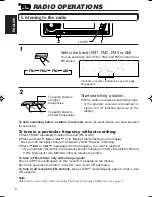
Страница 6: ...al is flashing 3 Press or 4 repeatedly until the frequency you want is reached If you hold down the button the frequency keeps changing in 50 kHz intervals for FM and 9 kHz intervals for AM MW LW until you release the button To tune in FM stations only with strong signals Press LO RPT Local Repeat so that Local On appears on the display Each time you press the button Local On and Local Off alterna...

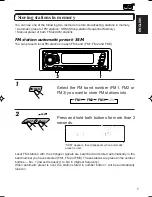
Страница 7: ...equency to No 6 highest frequency When automatic preset is over the station stored in number button 1 will be automatically tuned in Storing stations in memory You can use one of the following two methods to store broadcasting stations in memory Automatic preset of FM stations SSM Strong station Sequential Memory Manual preset of both FM and AM stations FM station automatic preset SSM You can pres...

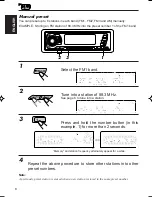
Страница 8: ...y and station frequency alternately appear for a while 1 Select the FM1 band 2 Tune into a station of 88 3 MHz See page 6 to tune into a station 3 Press and hold the number button in this example 1 for more than 2 seconds 4 Repeat the above procedure to store other stations into other preset numbers Note A previously preset station is erased when a new station is stored in the same preset number ...

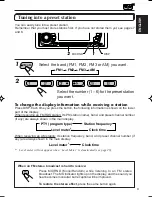
Страница 9: ...t the band FM1 FM2 FM3 or AM you want 2 Select the number 1 6 for the preset station you want To change the display information while receiving a station Press DISP Each time you press the button the following information is shown on the lower part of the display When receiving an FM RDS station Its PS station name band and preset channel number if any are always shown in the main display When rec...

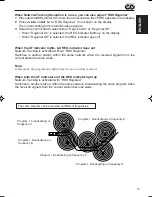
Страница 10: ...etwork Tracking Reception When driving in an area where FM reception is not good the tuner built in this unit automatically tunes in another RDS station broadcasting the same program with stronger signals So you can continue to listen to the same program in its finest reception no matter where you drive See the illustration on the next page Two types of the RDS signals are used to make Network Tra...

Страница 11: ... Network Tracking is activated without RDS Regional Switches to another station within the same network when the received signals from the current station become weak Note In this mode the program may differ from the one currently received When both the AF indicator and the REG indicator light up Network Tracking is activated with RDS Regional Switches to another station within the same network br...

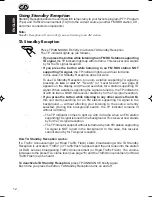
Страница 12: ...h its frame NOW this receiver stands by for the TA signal reception If you press the button while listening to any other source than AM this unit starts searching for an FM station supporting TA signal in the background without affecting your listening to the source currently selected During this background search the TP indicator remains lit without its frame The TP indicator comes to light up wi...

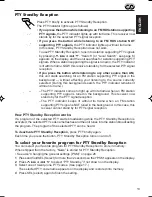
Страница 13: ...e The PTY indicator comes to light up with its frame when an FM station supporting PTY signal is tuned in the background This receiver now stands by for the PTY signal reception The PTY indicator keeps lit without its frame when an FM station supporting PTY signal is NOT tuned in the background In this case this receiver cannot stand by for PTY signal reception How PTY Standby Reception works If a...

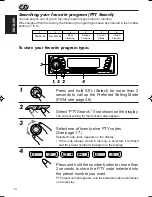
Страница 14: ... will appear on the display 4 Press and hold the number button for more than 2 seconds to store the PTY code selected into the preset number you want PTY preset number appears and the selected code name flashes on the display Pop Music 1 2 3 4 5 6 Serious Classics Current Affairs Varied Speech Rock Music Easy Listening Searching your favorite program PTY Search You can search one of your 6 favorit...

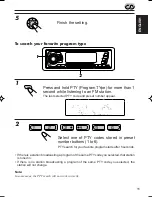
Страница 15: ...ar 2 Select one of PTY codes stored in preset number buttons 1 to 6 PTY search for your favorite program starts after 5 seconds If there is a station broadcasting a program of the same PTY code you selected that station is tuned in If there is no station broadcasting a program of the same PTY code you selected the station will not change Note In some areas the PTY search will not work correctly SE...

Страница 16: ...own The current setting for this function also appears 3 Rotate the control dial to set the volume to the level 0 to 50 you want 4 Press SEL again to finish the setting Automatic clock adjustment When shipped from the factory the clock built in this unit has been set to be readjust automatically using the CT Clock Time data in the RDS signal If you do not want to use automatic clock adjustment fol...

Страница 17: ...orts on commerce trading the stock market etc Children s Progs programs Entertainment programs for children Social Affairs Programs on social activities Religion Programs dealing with any aspect of belief or faith or the nature of existence or ethics Phone In Programs where people can express their views either by phone or in a public forum Travel Touring Programs about travel destinations package...

Страница 18: ...he loading slot The unit turns on draws a CD and starts playback automatically 2 Close the control panel by hand Notes When a CD is inserted upside down Please Eject flashes on the display When you open the control panel by pressing 0 the CD automatically ejects When you play a CD Text the disc title performer then the first track title appears before the current track and elapsed playing time app...

Страница 19: ...t tracks is located and played back Press 4 briefly while playing a CD to go back to the beginning of the current track Each time you press the button consecutively the beginning of the previous tracks is located and played back To go to a particular track directly Press the number button corresponding to the track number to start its playback To select a track number from 1 6 Press 1 7 6 12 brief...

Страница 20: ...nately When the random mode is turned on the RND indicator lights up on the display and a track randomly selected starts playing To play back tracks repeatedly Repeat Play You can play back the current track repeatedly Each time you press LO RPT Local Repeat while playing a CD CD repeat play mode turns on and off alternately When the repeat mode is turned on the RPT indicator lights up on the disp...

Страница 21: ...haracters See also Selecting the scroll mode for CD Text information on page 30 Some characters or symbols will not be shown and be blanked on the display To prohibiting CD ejection You can prohibit CD ejection and can lock a CD in the loading slot While pressing CD press and hold for more than 2 seconds No Eject flashes on the display for about 5 seconds and the CD is locked and cannot be ejected...

Страница 22: ... Left only R06 Right only balance Loudness Turning on off the loudness function On Off Volume Adjust the volume 00 min 50 max Notes If you are using a two speaker system set the fader level to 00 The human ear is less sensitive to low and high frequencies at low volumes The loudness function can boost these frequencies to produce well balanced sound at low volume level 2 Adjust the level Note Norm...

Страница 23: ...ur 1 Select Clock Hour if not shown on the display 2 Adjust the hour 3 Set the minute 1 Select Clock Minute 2 Adjust the minute 4 Set the clock system 1 Select Clock 24H 12H 2 Select 24H or 12H 5 Finish the setting To check the current clock time while the unit is turned off press DISP The power turns on the clock time is shown for 5 seconds then the power turns off SEL 1 2 1 2 1 2 SEL 5 2 3 4 2 3...

Страница 24: ...rom the factory this mode is set to Cruise Off Cruise 1 Select this if your car is relatively quiet Cruise 2 Select this if your car is relatively loud The volume increase rate is twice as much as that of the Cruise 1 setting Cruise Off Cancels Audio Cruise 3 2 1 4 1 Press and hold SEL Select for more than 2 seconds so that PSM appears on the display 2 Select Cruise Mode if not shown on the displa...

Страница 25: ...ake Audio Cruise function correctly NOTICE that a number of factors such as electric power steering wipers power windows air conditioner etc do generate noises and as a result may cause Audio Cruise not to function correctly If this is the main cause of malfunction connect the memory backup lead yellow lead directly to the car battery to prevent these noises from affecting Audio Cruise 1 Start the...

Страница 26: ...ng Mode control Basic Procedure Changing the general settings PSM 1 Press and hold SEL Select for more than 2 seconds so that PSM appears on the display 2 Select the PSM item you want to adjust See page 27 3 Select or adjust the PSM item selected above 4 Finish the setting 3 2 1 4 SEL SEL SEL ...

Страница 27: ...Back Advance Back Advance 24H 12H 24H 29 programme types See page 17 See page 14 28 Cruise 2 25 Boost 01 15 29 Muting 1 Beep On Contrast 01 10 Contrast 05 Scroll Once Headline Only See page 44 See page 44 See pages 10 and 41 When connecting the DAB tuner you can adjust these items When you select Cruise 1 or Cruise 2 for Audio Cruise you can adjust these items Press SEL Select when the setting is ...

Страница 28: ...s 4 Press SEL to finish the setting Notes Though Clock or Level Meter is selected you can show the other indications for a while by pressing DISP You can select Level Meter only when Level Meter is set to be activated See below Turning on off the level meter You can turn on or off the level meter indication When shipped from the factory Level Meter On is selected Level Meter On Level meter is turn...

Страница 29: ...larly on those having a control dial for dimming In this case set the dimmer mode to Dimmer On or Dimmer Off Selecting the telephone muting This mode is used when a cellular phone system is connected Depending on the phone system used select either Muting 1 or Muting 2 whichever mutes the sounds from this unit When shipped from the factory Muting Off is selected Muting 1 Select this if this settin...

Страница 30: ...s or 4 to select Contrast if not shown on the display The current setting for this function also appears 3 Rotate the control dial to adjust the contrast level 01 to 10 4 Press SEL to finish the setting Selecting the scroll mode for CD Text information You can select Scroll Mode for the CD Text information display if it consists of more than 32 characters When shipped from the factory Scroll Once ...

Страница 31: ...left side of the control panel to fix it to the panel holder Note on cleaning the connectors If you frequently detach the control panel the connectors will deteriorate To minimize this possibility periodically wipe the connectors with a cotton swab or cloth moistened with alcohol being careful not to damage the connectors Connectors Detaching the control panel You can detach the control panel when...

Страница 32: ... remote controller decreases replace the battery WARNING Store the batteries in a place which children cannot reach If a child accidentally swallows the battery immediately consult a doctor Do not recharge short disassemble or heat the batteries or dispose of in a fire Doing any of these things may cause the batteries to give off heat crack or start a fire Do not leave the batteries with other met...

Страница 33: ...tening to the CD changer Each time you press the button the disc number decreases and the selected disc starts playing 4 Functions the same as the control dial on the main unit Note This button does not function for the preferred setting mode adjustment 5 Select the source Each time you press FUNC Function the source changes 6 Searches stations while listening to the radio FM AM By pressing briefl...

Страница 34: ...discs correctly If Reset 1 Reset 8 appears on the display something is wrong with the connection between this unit and the CD changer If this happens check the connection connect the connecting cord s firmly if necessary then press the reset button of the CD changer Playing CDs Select the CD automatic changer Each time you press the button you can select CD and CD automatic changer If a CD is not ...

Страница 35: ...second Press and hold while playing a CD to fast forward the track Press and hold 4 while playing a CD to reverse the track Press briefly while playing a CD to go ahead to the beginning of the next track Each time you press the button consecutively the beginning of the next tracks is located and played back Press 4 briefly while playing a CD to go back to the beginning of the current track Each ti...

Страница 36: ...s at random Random 1 Lights All tracks of the current disc then the tracks of the next disc and so on Random 2 Flashes All tracks of all discs inserted in the magazine To play back tracks repeatedly Repeat Play Each time you press LO RPT Local Repeat while playing a CD CD repeat play mode changes as follow Mode RPT Indicator Plays repeatedly Repeat 1 Lights The current track or specified track Rep...

Страница 37: ...lled services to form one ensemble With the DAB tuner connected with this unit you can enjoy these DAB services Tuning into an ensemble and one of the services A typical ensemble has 6 or more programs services broadcast at the same time After tuning into an ensemble you can select a service you want to listen to 1 Select the DAB band DAB 1 DAB 2 or DAB 3 You can select any one of DAB 1 DAB 2 and ...

Страница 38: ...uning range correctly tuning or searching speed will become faster When shipped from the factory the tuning range for each DAB band has been set to VHF L BAND REMEMBER if you do the following operation the microcomputer built in the DAB tuner will be reset to the initial settings 1 Press and hold DAB for more than 2 seconds 2 Rotate the control dial to select a proper frequency band for the DAB ba...

Страница 39: ...a service of the ensemble you want 4 Press and hold the number button 1 6 for more than 2 seconds Note When you store a DAB service while listening to a secondary service the unit beeps and primary service is also stored in the same preset number In this case when you press the preset number button primary service is recalled first See page 40 DAB Ex When you press number button 1 1 3 2 4 Preset n...

Страница 40: ...r that you must store services first If you have not stored them yet see pages 39 1 Select the DAB band DAB 1 DAB 2 or DAB 3 you want Each time you press the button the DAB band changes as follows 2 Select the number 1 6 for the preset DAB service primary you want When secondary services are available for the preset channel you can select the secondary services by pressing same number button repea...

Страница 41: ...he malfunction of this unit To use Alternative Reception When shipped from the factory all Alternative Receptions are activated 1 Press and hold SEL select for more than 2 seconds so that PSM appears on the display 2 Press or 4 to select Alternative if not shown on the display 3 Rotate the control dial until the Alternative Reception type you want to use appears The current setting Y Yes activated...

Страница 42: ...tton while listening to any other source than AM The TP indicator comes to light up with its frame when a service supporting Road Traffic Flash signal or an FM RDS station supporting TA signal is tuned in the background This receiver now stands by for the Road Traffic Flash signal or TA signal reception The TP indicator keeps lit without its frame when a service supporting Road Traffic Flash signa...

Страница 43: ...en a service supportingAnnouncement signal is tuned in the background This receiver now stands by for the Announcement signal reception The ANNOUNCE indicator keeps lit without its frame when a service supporting Announcement signal is NOT tuned in the background In this case this receiver cannot stand by for Announcement signal reception How Announcement Standby Reception works If a service of th...

Страница 44: ...Event Special Event Radio Info information Sports News and Financial News 4 Press 5 or to activate or deactivate theAnnouncement Standby Reception of the selected type Select Y to activate the type selected in above step Select N to deactivate the type selected in above step 5 Repeat step 3 and 4 to set the other types of Announcement Standby Reception 6 Press SEL select again to finish the settin...

Страница 45: ...or PTY signal reception How PTY Standby Reception works If a service starts broadcasting the selected PTY while the PTY Standby Reception is activated the selected PTY name flashes and the unit tunes into the service The service of the selected PTY can be heard To deactivate PTY Standby Reception press PTY briefly again Each time you press the button PTY Standby Reception turns on and off To selec...

Страница 46: ...the display The DRC indicator lights up with its frame only when the unit received DRC signal from the tuned service Selecting DAB radio text display mode You can select the DAB radio text DLS Dynamic Label Segment display mode When shipped from the factory On is selected On Text segments are sequentially scrolled if it consists of more than 32 characters Headline Only Shows the Headline Only and ...

Страница 47: ... or ball point pen etc Moisture condensation Moisture may condense on the lens inside the CD player in the following cases After starting the heater in the car If it becomes very humid inside the car Should this occur the CD player may malfunction In this case eject the CD and leave the unit turned on for a few hours until the moisture evaporates CAUTIONS Do not insert 8cm 3 3 16 CDs single CDs in...

Страница 48: ...t the unit The clock setting and preset stations stored in memory are erased Causes CD is inserted upside down You are driving on rough roads CD is scratched Connections are incorrect The volume level is set to the minimum level Connections are incorrect Signals are too weak The antenna is not connected firmly No CD is in the loading slot or in the magazine CD is inserted incorrectly This unit is ...

Страница 49: ...11 3 dBf 1 0 µV 75 Ω 50 dB Quieting Sensitivity 16 3 dBf 1 8 µV 75 Ω Alternate Channel Selectivity 400 kHz 65 dB Frequency Response 40 to 15 000 Hz Stereo Separation 30 dB Capture Ratio 1 5 dB MW Tuner Sensitivity 20 µV Selectivity 35 dB LW Tuner Sensitivity 50 µV CD PLAYER SECTION Type Compact disc player Signal Detection System Non contact optical pickup semiconductor laser Number of channels 2 ...

Страница 50: ...0499MNMMDWJES EN GE FR NL VICTOR COMPANY OF JAPAN LIMITED ...

Отзывы: