16
Installation
Installing the unit
Ñ
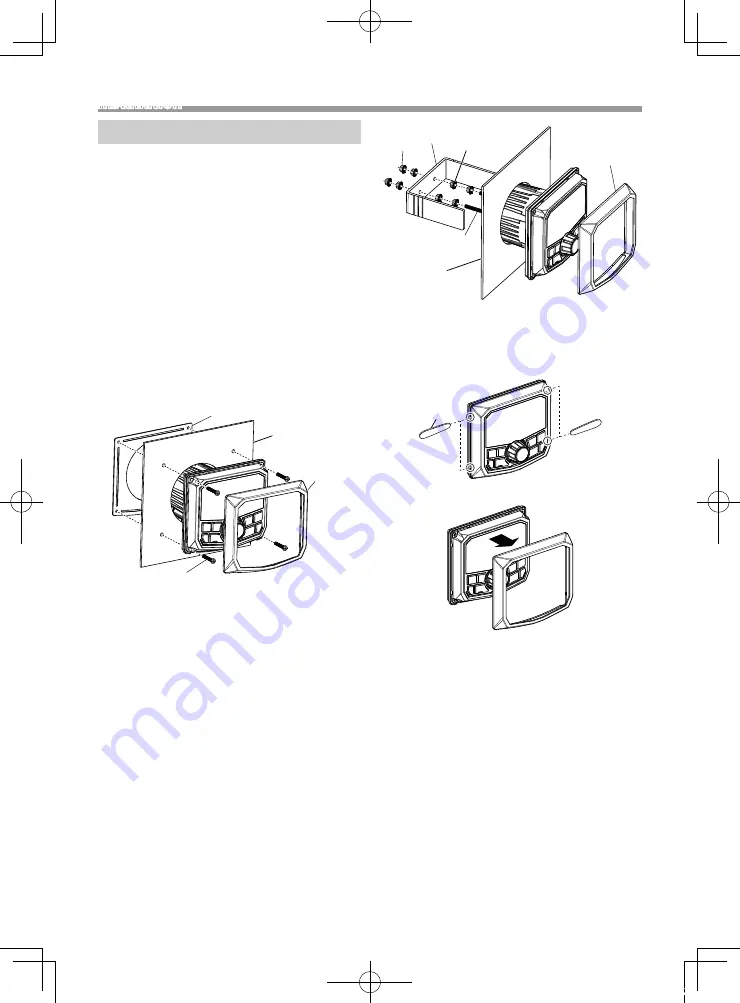
Mounting (Using Mounting Plate)
To mount the unit, you will need to find a flat surface
with adequate clearance behind it that provides
enough clearance for the unit and all it’s necessary
wiring.
1) Once you have determined a mounting location,
you will need to cut a circular hole 77 mm (3inch)
in diameter.
2) After the hole is cut slide the unit and wiring
through the hole.
3) Slide the mounting plate (accessory
2
) over the
backside of the unit and secure with the supplied
screws (accessory
4
).
4) Press on the trim plate (accessory
1
) to the front
side of the unit.
5) Plug in all wiring harnesses and cables. Refer to the
wiring diagram for wire harness connection types.
4
M3.5 × 25 mm
1
2
Panel
(Max. 8 mm)
Ñ
Mounting (Using U Bracket)
To mount the unit, you will need to find a flat surface
with adequate clearance behind it that provides
enough clearance for the unit and all it’s necessary
wiring.
1) Attach the screw with nut (accessory
6
) to the
back of the unit.
2) Once you have determined a mounting location,
you will need to cut a circular hole 77 mm (3inch)
in diameter.
3) After the hole is cut slide the unit and wiring
through the hole.
4) Take the bracket (accessory
3
) and slide over the
two studs on the back of the unit. Tighten down
with supplied nuts (accessory
5
).
5) Press on the trim plate (accessory
1
) to the front
side of the unit.
6) Plug in all wiring harnesses and cables. Refer to the
wiring diagram for wire harness connection types.
3
5
5
6
M4 × 37 mm
Panel
(Max. 15 mm)
1
Ñ
Removing the trim plate
1) Use the extraction key (accessory
8
) to lever out
the four tabs (two on the left part, two on the right
part).
8
2) Pull the trim plate forward.
B5A-3196-30_KD-MR1BTS_K.indb 16
2019/04/02 17:22


