background image

20

Remote control buttons and functions

HV-32/28D40BK / LCT1596-001A-U / ENGLISH

3D CINEMA SOUND function

You can enjoy sounds with a wider 
ambience.

• This function does not work for the sound 

from headphones.

Press the 

3

 button and choose 

“ON”, “MONO” or “OFF”.
ON:

Choose to add the 3D CINEMA SOUND 

effect to stereo sound.

MONO:

Choose to add the 3D CINEMA SOUND 
effect to mono sound.

OFF:

Choose to cancel the 3D CINEMA SOUND 
effect.

• The 3D CINEMA SOUND effect can be 

adjusted with the “3D CINEMA 
SOUND” menu (see page 33).

Using the FREEZE function

This function can only be used when 

watching Analogue terrestrial 

broadcasting.

You can view the current programme as a 
still picture.

1 Press the 

f

 button

The still picture of the current picture will 
appear.

To cancel the FREEZE function:

Press the 

f

 button, the 

p


p

 buttons or 

the number buttons.

• The FREEZE function does not work 

while a sub-picture is displayed.

• The still picture cannot be output from 

the TV.

• The FREEZE function does not work 

for pictures of 1125i signal.

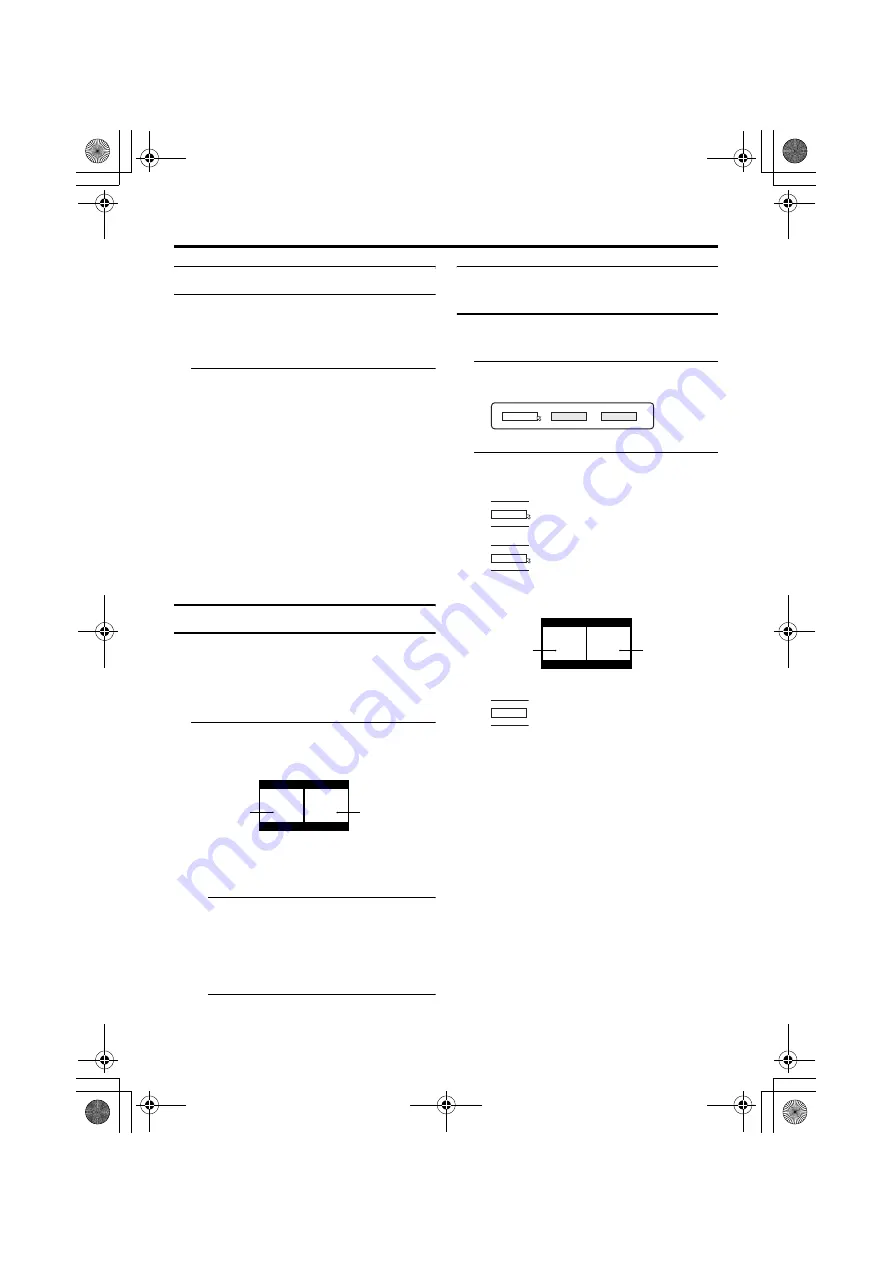
Using the MULTI-PICTURE 

function 

When watching Digital terrestrial 

broadcasting (DVB-T):

1 Press the 

X

 button

The MULTI-PICTURE menu appears.

2 Press the 

5

 buttons and choose 

2, then press the 

a

 button

2-pictures multi:

• You can watch Digital terrestrial 

broadcasting (DVB-T) in the main-
picture. You can watch the Analogue 

terrestrial broadcasting or EXT picture 
in the sub-picture.

• When the Digital terrestrial 

broadcasting (DVB-T) in the main-
picture is 16:9 FULL, the main-picture 

aspect ratio is 16:9.

• The main-picture sound is emitted 

from the TV speaker. If headphones 
are connected, you can listen to the 
sub-picture sound. Adjust the 

headphone volume with 
HEADPHONE VOLUME in the 
SOUND menu. The main-picture 

sound cannot be listened to with the 
headphones.

D1056-EN

current

programme

still picture

1

D0101-EN

2

12

D0102

1

D0103

2

Choose to return to one screen.

Choose to change to 2-pictures multi.

D1056-EN

Main-

picture

Sub-

picture

D0104

12

This cannot be chosen when watching 

Digital terrestrial broadcasting (DVB-T).

HV-32&28D40BK_Eng.book  Page 20  Wednesday, April 21, 2004  1:17 PM

Содержание InteriArt HV-28D40BK

Страница 1: ...ll Cover Cover01 Integrated Digital Colour Television INSTRUCTIONS HV 32D40BK HV 28D40BK Trade Mark of the DVB Digital Video Broadcasting Project 1991 to 1996 Number 3081 LCT1596 001A U_Cover fm Page 1 Friday April 23 2004 11 19 AM ...

Страница 2: ... taken to ensure optimal results and operational safety Before attempting to use this equipment read the operating instructions thoroughly Ensure that all electrical connections including the mains plug extension leads etc have been made in accordance with the manufacturer s instructions If ever in doubt about the installation operation or safety of this equipment consult your dealer Handle all gl...

Страница 3: ...ISH How to move the TV When moving the TV make sure that it is held by two people as shown in the illustration Be careful not to trap your hands when putting the TV down 1 2 3 HV 32 28D40BK_Eng book Page 3 Wednesday April 21 2004 1 17 PM ...

Страница 4: ...OR MOISTURE CAUTION Operate only from the power source specified AC 220 240 V 50 Hz on the unit Avoid damaging the AC plug and power cord When you are not using this unit for a long period of time it is recommended that you disconnect the power cord from the main outlet The main power button on the TV does not fully isolate the TV from the mains supply If you are not going to use this TV for a lon...

Страница 5: ...strial broadcasting DVB T and Analogue terrestrial broadcasting depending on the area in which you live you may not be able to receive Digital terrestrial broadcasting DVB T For details of the Digital terrestrial broadcasting DVB T service area refer to the FREEVIEW website etc HV 32 28D40BK_Eng book Page 5 Wednesday April 21 2004 1 17 PM ...

Страница 6: ...perating a JVC brand VCR or DVD player 24 Teletext function 25 Basic operation Digital 25 Basic operation Analogue 26 Using the List Mode 26 Hold 27 Sub page 27 Reveal 27 Size 27 Index 27 Cancel 27 Using the TV s menu 28 Basic operation 28 PICTURE menu 29 PICTURE MODE 29 CONTRAST 29 BRIGHT 29 SHARP 29 COLOUR 29 HUE 29 COLOUR TEMP 29 FEATURES 30 SOUND menu 33 STEREO I II 33 BASS 33 TREBLE 33 BALANC...

Страница 7: ...compatible VCR set the DECODER EXT 2 function to ON For details see DECODER EXT 2 on page 41 Otherwise you will not be able to watch scrambled channels When receiving Digital terrestrial broadcasting DVB T reception can suddenly be lost if the signal becomes weak Use a correctly installed high performance antenna When connecting via a device with an antenna terminal such as a VCR depending on the ...

Страница 8: ...s from the end making sure the and polarities are correct Follow the warnings printed on the batteries Battery life is about six months to one year depending on how much you use the remote control The batteries we supply are only for setting up and testing your TV please replace them as soon as you need to If the remote control does not work properly replace the batteries Initial settings When the...

Страница 9: ... PR LIST menu appears If you want to you can now edit the programme numbers PR using the EDIT PR LIST function For details see Edit PR List on page 49 If you do not want to edit programme numbers PR go to the next step 3 Press the H button The EDIT PR LIST menu disappears and the Analogue terrestrial broadcasting AUTO PROGRAM starts The AUTO PROGRAM menu appears and received TV channels are automa...

Страница 10: ... will not be set Programme number PR6 is not normally set If a TV channel you want to view is not set to a programme number PR you can set it manually To set an Analogue terrestrial broadcasting channel see EDIT MANUAL Analogue on page 36 To set a Digital terrestrial broadcasting DVB T channel see Manual Search on page 52 The AUTO PROGRAM function does not set the programme number PR 0 AV for your...

Страница 11: ...llowing features To use T V LINK functions A T V LINK compatible VCR means a JVC video cassette recorder with the T V LINK logo or with one of the following logos However these VCRs may support some or all of the features described earlier For details see your VCR instruction manual Q LINK a trademark of Panasonic Corporation Data Logic a trademark of Metz Corporation Easy Link a trademark of Phil...

Страница 12: ...oder when recording a TV channel by using the TV s output because the VCR s own tuner cannot properly receive that channel when recording Digital terrestrial broadcasting DVB T If you change channels or perform other operations while a Digital terrestrial broadcasting DVB T channel is being recorded a window appears asking whether to stop the recording Press the a button to stop the recording or t...

Страница 13: ...Caution The main power button on the TV does not fully isolate the TV from the AC supply If you are not going to use the TV for a long period be sure to disconnect the AC plug from the AC socket Turn the TV on from standby mode Press the P p buttons to turn the TV on from standby mode Choose a TV channel Press the P p buttons to choose a programme number PR or an EXT terminal The EXT terminal cann...

Страница 14: ...K LCT1596 001A U ENGLISH Adjust the volume 1 Press the r Volume button once The volume level indicator appears 2 Press the q buttons while the volume level indicator is displayed HV 32 28D40BK_Eng book Page 14 Wednesday April 21 2004 1 17 PM ...

Страница 15: ...ton f g Freeze Swap button Turn the TV on or off from standby mode Press the standby button to turn the TV on or off When the TV is turned on the power lamp lights green The power can be turned on by pressing the TV DTV button p p buttons or Number buttons 9 3 5 8 6 7 0 1 2 4 To turn the TV on or off set the VCR TV DVD switch on the remote control to the TV position and press the button If the VCR...

Страница 16: ...signal and regular video signal composite signal For details see S IN S VIDEO input on page 42 If you do not have a clear picture or no colour appears change the colour system manually See COLOUR SYSTEM on page 31 If you choose an EXT terminal with no input signal the EXT terminal number becomes fixed on the screen This TV set has a function which can automatically change over the input according ...

Страница 17: ...pressed the programme information appears for approximately 1 minute When the h Information button is pressed while the information is being displayed the information disappears The time display in the programme information uses the time information which is included in the Digital terrestrial broadcasting DVB T Depending on the channel the time information may not be correct When watching Analogu...

Страница 18: ...ng to the picture aspect ratio Choose the optimum one from the following ZOOM modes AUTO When a WSS Wide Screen Signalling signal which shows the aspect ratio of the picture is included in the broadcast signal or the signal from an external device the TV automatically changes the ZOOM mode to 16 9 ZOOM mode or FULL mode according to the WSS signal If a WSS signal is not included the picture is dis...

Страница 19: ...ording Choose the ZOOM mode 1 Press the c button to display the ZOOM menu 2 Press the 6 buttons to choose a ZOOM mode Then press the a button The picture expands and the chosen ZOOM mode is displayed in about 5 seconds The ZOOM mode may be automatically changed by the control signal from an external device When you want to return to the previous ZOOM mode choose the ZOOM mode again Adjusting the v...

Страница 20: ...TV The FREEZE function does not work for pictures of 1125i signal Using the MULTI PICTURE function When watching Digital terrestrial broadcasting DVB T 1 Press the X button The MULTI PICTURE menu appears 2 Press the 5 buttons and choose 2 then press the a button 2 pictures multi You can watch Digital terrestrial broadcasting DVB T in the main picture You can watch the Analogue terrestrial broadcas...

Страница 21: ...s from external devices are not displayed When set to 2 pictures multi the main picture can be changed by pressing the p p buttons The sub picture screen can be changed by pressing the p buttons When set to 12 pictures multi and there are more than 12 pictures the next or previous 12 screens can be displayed by pressing the p buttons When set to 2 pictures multi press the g swap button to switch t...

Страница 22: ... does not work when the MULTI PICTURE function is being used The ZOOM function does not work when the MULTI PICTURE function is being used To return the multi picture to one screen Press the X button press the 5 buttons to choose one screen and then press the a button Pressing the TV DTV button will also return the display to one screen Using the GUIDE Use when watching Digital terrestrial broadca...

Страница 23: ...sed the guide screen disappears and the normal screen returns When the TV is being watched it automatically changes to the channel of the scheduled programme when the start time of the scheduled program is reached The scheduling function does not work when the TV is turned off Cancelling a scheduled programme Display the guide screen choose a programme which has the scheduled icon and press the a ...

Страница 24: ...R set the switch to the VCR position You can turn the VCR on or off with the standby button DVD When you are operating the DVD player set the switch to the DVD position You can turn the DVD player on or off with the standby button You can also press the H or T button and display the DVD disc menu screen and then operate by pressing the 7 buttons 2 Press the VCR DVD Control Button to control your V...

Страница 25: ...pressed the TV returns to television broadcasting With Digital terrestrial broadcasting DVB T in addition to digital teletext broadcasting at the same time as normal broadcasting there are also channels with just digital teletext broadcasting The aspect ratio when watching a channel with just digital teletext broadcasting is the same as the aspect ratio of the picture watched previously When you p...

Страница 26: ...rk in the TV and text mode or Text mode You cannot operate menus when viewing a teletext programme Using the List Mode You can store the numbers of your favourite teletext pages in memory and call them up quickly using the colour buttons To store the page numbers 1 Press B button to go into the List mode The page numbers you have stored are displayed at the bottom of the screen 2 Press a colour bu...

Страница 27: ...ch time you press the E Reveal button text is hidden or revealed Size You can double the height of the teletext display Press the F Size button Index You can return to the index page instantly Press the G Index button Returns to page 100 or a previously specified page Cancel You can search for a teletext page while watching TV 1 Press the number button to enter a page number or press a colour butt...

Страница 28: ...tton to return to the previous menu Press the TV DTV or H button to exit from the menu Types of menu The menu guide area can be made to appear and disappear for some menus While the menu is displayed press the h button to change between the guide area being displayed and not displayed The guide area for some menus will still be displayed even if the h button is pressed This is not a fault TV DTV D...

Страница 29: ...an adjust the picture tint 2 reddish 3 greenish You can change the HUE setting picture hue when the colour system is NTSC 3 58 or NTSC 4 43 COLOUR TEMP You can select one of three COLOUR TEMP modes three tones of white to adjust the white balance of the picture Since white is the colour which is used as a reference for all the other colours changing the COLOUR TEMP mode affects the appearance of a...

Страница 30: ...R effect is set to the maximum If you set the DIGITAL VNR function to AUTO HIGH but still notice some noise change the setting from AUTO HIGH to MAX The MAX setting is not suitable for high quality pictures which contain very little noise Super DigiPure The Super DigiPure function uses the latest in digital technology to give you a natural looking picture The Super DigiPure function includes the f...

Страница 31: ... images with the NTSC colour system When the MOVIE THEATRE function is set to AUTO or ON the motion may appear unnatural when viewing images with the NTSC colour system Colour DigiPure Makes the colour outline stand out and increases the sharpness giving a clearer picture ON Colour DigiPure works Normally use with this function turned on OFF Colour DigiPure doesn t work This gives a less clear pic...

Страница 32: ...ose another colour system manually When in the Programme numbers PR 0 AV to PR 99 you cannot choose NTSC 3 58 or NTSC 4 43 COLOUR SYSTEM cannot be chosen when you are watching the EXT 4 picture 4 3 AUTO ASPECT You can choose one of three ZOOM modes REGULAR PANORAMIC or 14 9 ZOOM as the ZOOM mode for the normal picture 4 3 aspect ratio 1 Choose 4 3 AUTO ASPECT then press the a button 2 Press the 6 ...

Страница 33: ...tween the left and right speaker 2 turn the left speaker s volume level up 3 turn the right speaker s volume level up HEADPHONE VOLUME Adjust the volume of the sub picture sound which is heard through the headphones when set to 2 pictures multi 2 Reduce volume 3 Increase volume When not set to 2 pictures multi the headphone volume is adjusted with the r q volume buttons 3D CINEMA SOUND Press the 3...

Страница 34: ...MER function Press the 2 button to set the period of time to OFF CHILD LOCK When there is a TV channel you do not want your children to watch you can use the CHILD LOCK function to lock out the TV channel Even when a child chooses a programme number PR for a locked TV channel the screen will change to blue and display n CHILD LOCK so the TV channel cannot be viewed Unless you enter a pre set ID nu...

Страница 35: ...D number Perform step 1 of To set the CHILD LOCK function After confirming the ID number press the TV DTV button to exit the menu Even if you reset the lock temporarily it does not mean that the CHILD LOCK function set for the TV channel is cancelled The next time anyone tries to view the TV channel it will be locked again When you want to cancel the CHILD LOCK function you must perform the operat...

Страница 36: ...gramme number PR of a TV channel ID This function registers a channel name ID to a TV channel INSERT This function adds a new TV channel in the current programme numbers PR list by using the CH number You cannot use the INSERT function if you do not know the channel number of a TV channel Use the MANUAL function to register a TV channel in the programme number PR DELETE This function deletes a TV ...

Страница 37: ...r of a TV channel For the relationship between a channel number and a CH number see CH NUMBER on page 40 MOVE 1 Press the 6 buttons to choose a TV channel Every time you press the 6 buttons the programme number PR changes and the picture of the TV channel stored in the programme number PR appears on the screen 2 Press the 3 button to start the MOVE function 3 Press the 6 buttons to choose a new pr...

Страница 38: ...n to give a channel name ID to a TV channel You can give your own unique channel name ID to the TV channel When you have finished step 3 do not go to step 4 Press the 5 buttons to move the cursor and press the 6 buttons to choose each character of the channel name ID Then press the a button to register the channel name ID to the TV channel Before performing INSERT or MANUAL operation A CH number u...

Страница 39: ...e number PR for a new TV channel 2 Press the blue button to activate the MANUAL function To cancel the MANUAL function Press the b button 3 Press the green or red button to search for a TV channel Scanning stops when the TV finds a TV channel Then the TV channel is displayed 4 Press the green or red button repeatedly until the TV channel you want appears If the TV channel reception is poor Press t...

Страница 40: ...e a or 3 button The sub menu of the PICTURE TILT function appears 2 Press the 6 buttons until the picture becomes level Then press the a button CH Channel CH 21 E21 CH 22 E22 CH 23 E23 CH 24 E24 CH 25 E25 CH 26 E26 CH 27 E27 CH 28 E28 CH 29 E29 CH 30 E30 CH 31 E31 CH 32 E32 CH 33 E33 CH 34 E34 CH 35 E35 CH 36 E36 CH 37 E37 CH 38 E38 CH 39 E39 CH 40 E40 CH 41 E41 CH 42 E42 CH 43 E43 CH 44 E44 CH 45...

Страница 41: ...n on the VCR and then press the a button to transmit the data to recording device The T V LINK menu disappears once the data transmission ends 7 If you have another TV channel capable of being unscrambled with a Decoder repeat steps 2 to 6 If the DECODER EXT 2 function has been set to ON but the TV channel cannot be unscrambled check the following Has the decoder been connected to the VCR properly...

Страница 42: ...minal 2 Press the yellow button and set the S IN S VIDEO input Then press the a button An S IN S VIDEO input mark is displayed You can view an S VIDEO signal Y C signal instead of the regular video signal composite signal To cancel the S IN S VIDEO input setting Press the yellow button and turn off S IN S VIDEO input mark The regular video signal composite signal pictures are resumed The EXT 1 ter...

Страница 43: ...he output signals of the devices connected to other EXT terminals or with the picture and sound from a TV channel you are currently viewing Caution Every time you dub check this DUBBING setting beforehand This setting may change automatically when Timers DTV Timer Recording or Direct Rec of the T V LINK function is used 1 Press the 5 buttons to choose the arrow from the menu 2 Press the 6 buttons ...

Страница 44: ... TV also turns off the output from the EXT 2 terminal When you choose an EXT terminal as an output you can view a TV programme or a picture from the other EXT terminal while dubbing the picture from a device connected to the EXT terminal onto a VCR connected to the EXT 2 terminal The RGB signals from TV games cannot be output Teletext programmes cannot be output ATTENUATOR Turn the attenuator ON w...

Страница 45: ...er recording you are unable to view the SET UP menu or the DTV menu 1 Choose Timers and press the a button The TIMER menu appears When the h Information button is pressed the help screen appears When it is pressed again the previous screen is returned to 2 Press 6 buttons to choose the timer number and then press the a button The timer setting window appears 3 Use the 6 buttons number buttons and ...

Страница 46: ...ins flashing at three minutes before the timer start time When you are watching TV at the time a message appears on the screen to inform you the timer is about to start If the TV is in Standby the power lamp lights orange while timer recording is in progress When performing timer recording with a T V LINK compatible recording device test the timer recording before you record the programme There ar...

Страница 47: ...pears When the b button is pressed the previous screen is returned to When the TV DTV or H buttons are pressed the menu disappears When the h Information button is pressed the help screen appears When it is pressed again the previous screen is returned to Audio Language With Digital terrestrial broadcasting DVB T a number of languages can be broadcast at the same time Choose the language you want ...

Страница 48: ...s the 5 buttons to choose Enable or Disable Enable factory settings The Digital terrestrial broadcasting DVB T software is automatically updated every day at 3 00 am When enabled the TV also searches for new software whenever it goes to standby Disable The Digital terrestrial broadcasting DVB T software is not automatically updated Manually updating the Digital terrestrial broadcasting DVB T infor...

Страница 49: ... or unlock the Edit PR List s Lock Edit PR List The Edit PR List can be used to do the following delete registered channels edit channel names lock channels so that they cannot be watched by children set Favorites so that you can easily choose from only the channels you often watch Choose Edit PR List and press the a button EDIT PR LIST appears Sometimes you may notice a drop in picture quality wh...

Страница 50: ...el is deleted If you do not want to delete the chosen channel choose No and press the a button Perform Installation see page 52 to re register a channel that you have deleted Editing a channel name 1 Press the 5 buttons and choose Edit Name on the bar at the bottom of the screen 2 Press the 6 buttons and choose the channel to be edited and then press the a button The edit window appears 3 Press th...

Страница 51: ...hen you forget the PIN code for the Lock you can unlock locked channels by performing Automatic Search see Installation on page 52 Setting the favourite channels If only channels that you often watch are set as favourite channels you can choose from just those channels when the p p buttons are pressed After setting the favourite channels check that Favourite Mode in Configuration see page 47 is se...

Страница 52: ... to registering all the channels that can be received it will reset the timer settings When Factory Settings is chosen and the a button is pressed the confirmation window appears To perform Factory Settings choose Yes and press the a button To cancel choose No and press the a button Common Interface Choose when a pay television reception module is inserted into the Common Interface slot on the bac...

Страница 53: ... best EXT terminal Connecting cables are not supplied If the VCR s audio output is in mono connect the VCR s AUDIO OUT audio output terminal and the TV s EXT 5 Audio L MONO terminal with an audio cable 1 VCR composite signal 2 VCR composite signal S VIDEO signal 3 T V LINK compatible VCR composite signal S VIDEO signal 4 Decoder 5 DVD player composite signal S VIDEO signal 6 DVD player composite s...

Страница 54: ...nother device onto the VCR connected to the EXT 2 terminal For details on how to do this see DUBBING on page 43 TV output from the EXT 1 terminal The video sound signal of a Analogue terrestrial broadcasting channel you are viewing is always output from the EXT 1 terminal Changing over a programme number PR also changes over the TV output from the EXT 1 terminal The video sound signal from an EXT ...

Страница 55: ...V and amplifier off To prevent magnetism from the speakers adversely effecting the TV screen use magnetic shielded speakers for the front speakers Note that connecting cables are not supplied The output from the AUDIO OUT terminal is not interrupted by headphone connection to the TV You cannot cut the sound from the front speaker even if you connect a headphone to the TV Adjust the volume of the e...

Страница 56: ...ption BLUE BACK on page 35 to change the BLUE BACK function setting to OFF If the SYSTEM setting for a TV channel is incorrect it may prevent the sound from being issued Follow the description EDIT MANUAL Analogue on page 36 to use the MANUAL function to try to change the SYSTEM setting Poor picture If noise snow totally blocks out the picture there may be a problem with the aerial or aerial cable...

Страница 57: ...orn out Follow the description Putting the batteries into the remote control on page 8 and replace them with new batteries Have you attempted to use the remote control from the sides or rear of the TV or from more than seven metres away from the TV Use the remote control in front of your TV or from less than seven metres away When you are viewing a teletext programme you cannot operate the menus P...

Страница 58: ...recaution ask your service technician to inspect it Touching the screen may cause you to feel a slight electric shock due to its static electricity This is unavoidable due to the construction of the picture tube It is not a problem with the TV You can rest assured that this static discharge is not harmful When set to 2 pictures multi adjust the headphone sound with HEADPHONE VOLUME in the SOUND me...

Страница 59: ... Audio L R inputs and RGB inputs are available Analogue TV broadcast outputs Video and Audio L R are available EXT 2 terminal Euroconnector 21 pin SCART Video input S VIDEO Y C input Audio L R inputs and RGB inputs are available Video and Audio L R outputs are available EXT 1 EXT 3 EXT 5 TV DTV The DTV signal is converted to analogue and then outputted T V LINK functions are available EXT 3 termin...

Страница 60: ... 2004 VICTOR COMPANY OF JAPAN LIMITED HV 32 28D40BK LCT1596 001A U All Cover Cover04 LCT1596 001A U 0404 T CR JMUK HV 32 28D40BK_Eng book Page 1 Wednesday April 21 2004 1 17 PM ...

Отзывы: