background image

EN

Managing Files

EDITING

CAUTION

Do not remove the recording medium or 

perform any other operation (such as turning 

off the power) while accessing files. Also, 

be sure to use the provided AC adapter, as 

the data on the recording medium may be 

corrupted if the battery becomes exhausted 

during operation. If the data on the recording 

medium becomes corrupted, format the 

recording medium to use the medium again. 

Capturing a Still Image from a Video

You can capture the desired scene from a 

recorded video, and store it as a still image.
Preparation:

 Select 

!

 mode.

 Select the playback mode.

Press SNAPSHOT when playback is 

paused.

NOTE

 Captured still images are stored at a 

resolution of 640 x 360 (if the video was 

recorded in 16:9) or 640 x 480 (if the video 

was recorded in 4:3). The image can be 

elongated in the horizontal or vertical 

directions depending on the quality of the 

source video file.

 The continuous shooting function cannot be 

used to capture images.

 You cannot capture video during playback.

Deleting Files

 Protected files cannot be deleted. To delete 

them, release the protection first.

 Once files are deleted, they cannot be 

restored. Check files before deleting.

Preparation:

 Select 

!

 or 

#

 mode.

 Select the playback mode.

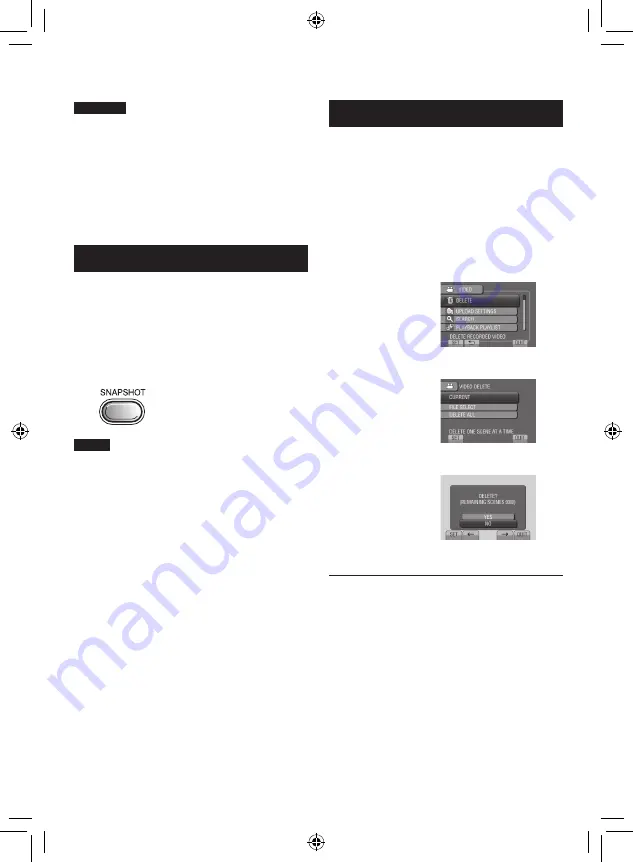
1

  Touch MENU.

2

  Select [DELETE].

3

  Select [CURRENT].

4

  Select [YES].

You can select the previous or next file by 

selecting 

{

 or 

}

.

To quit the screen

Select [QUIT].

Содержание GZ-MG610SEK

Страница 1: ...S EN CAMCORDER ENGLISH Dear Customers Thank you for purchasing this camcorder Before use please read the safety information and precautions contained in pages 6 and 7 to ensure safe use of this product GZ MG610SEK ...

Страница 2: ...tment Adjust the strap and fasten Fasten the strap when you grip the camcorder When carrying the camcorder please be careful not to drop it Grip Strap Fasten Power charge lamp blinks Charging goes out Charging finished Battery Pack AC Adapter To AC Outlet 110V to 240V Open the cover The battery pack is not charged at the time of purchase Access lamp blinks Accessing files Do not remove the AC adap...

Страница 3: ... for at least 2 seconds Touch the sensors with your finger The sensors do not function if you touch them with your finger nail or with gloves on S Select CLOCK SETTING T Select the city closest to the area where you use the camcorder U Select ON if daylight saving time is effective V Set the date and time Slide your finger up and down on the sensor Then touch OK Touch sensor Sets the date and time...

Страница 4: ...S Start recording Press the START STOP button to start recording and press it again to stop Remaining space on the hard disk Video Quality Record standby Recording Q Slide the mode switch to select video mode R Select recording mode The mode changes when you press the button The auto recording indicator appears ...

Страница 5: ... forget to make copies after recording To copy files onto DVD discs Z p 27 To dub files to a VCR DVD recorder Z p 34 To play back a created disc Z p 28 To edit files on your computer Z p 29 Q Select playback mode The mode changes when you press the button R Select the desired file Index screen S Select F Touch OK Playback screen ...

Страница 6: ... to fall resulting in damage CAUTION To avoid electric shock or damage to the unit first firmly insert the small end of the power cord into the AC Adapter until it is no longer wobbly and then plug the larger end of the power cord into an AC outlet IMPORTANT for owners in the U K Connection to the mains supply in the United Kingdom DO NOT cut off the mains plug from this equipment If the plug fitt...

Страница 7: ...ols are only valid in the European Union If you wish to dispose of these items please do so in accordance with applicable national legislation or other rules in your country for the treatment of old electrical and electronic equipment and batteries SOME DO S AND DON TS ON THE SAFE USE OF EQUIPMENT This equipment has been designed and manufactured to meet international safety standards but like any...

Страница 8: ...ge Playback 23 Manual Recording 24 Changing to Manual Recording Mode 24 Backlight Compensation 24 Manual Setting in Menu 24 USING WITH TV Viewing Files on TV 25 Connection with TV 25 Playback Operation 25 EDITING Managing Files 26 Capturing a Still Image from a Video 26 Deleting Files 26 COPYING Copying Files 27 Using a DVD Burner 27 Creating a DVD using a PC 29 Dubbing Files to a VCR DVD Recorder...

Страница 9: ...using it again If a malfunction occurs stop using the camcorder immediately and consult your nearest JVC dealer Recorded data may be erased while the camcorder is being repaired or inspected Back up all data before requesting repairs or inspections Because camcorders may be used for demonstration in a shop the demonstration mode is set to on by default To deactivate the demonstration mode set DEMO...

Страница 10: ...N Accessories GETTING STARTED AP V20M BN VF808U AC Adapter Power Cord Battery Pack AV Cable USB Cable CD ROM Core Filter NOTE Make sure to use the provided cables for connections Do not use any other cables ...

Страница 11: ...er to the USB Cable The core filter reduces interference caused when connecting to other devices Connect the end of the cable with the core filter to the camcorder Release the stopper 3 cm Wind once To be connected to the camcorder ...

Страница 12: ...12 EN Index NOTE Be careful not to cover 0 1 and 2 during shooting The LCD monitor can rotate 270 ...

Страница 13: ... 23 0 LED Light Z p 21 1 Lens 2 Stereo Microphone 3 DC Connector 4 START STOP Button Z p 19 5 AV Connector Z p 25 34 6 USB Connector Z p 27 30 7 Tripod Mounting Socket 8 microSD Card Slot 9 Battery Release Button Tripod Mounting Align the camcorder stud hole with the tripod stud and the mounting socket with the screw and then rotate the camcorder clockwise to mount it to the tripod NOTE Do not use...

Страница 14: ...klight Compensation Indicator Z p 24 1 Brightness Control Indicator Photometry Area Control Indicator 2 Shutter Speed During Video Recording Only Mode Indicator EXPORT Mode Indicator Z p 35 Counter Upload Mode Indicator Z p 36 Video Quality B ULTRA FINE C FINE D NORMAL E ECONOMY Remaining Time MREC Appears during recording M Q Appears during record standby mode Digital Image Stabilizer DIS Indicat...

Страница 15: ...otion The number on the left shows speed Battery Indicator Date Time Z p 16 Volume Level Indicator During Still Image Playback 1 6 5 5 1 11 2009 Mode Indicator Quick Review Indicator Z p 20 Folder File Number Slide Show Playback Indicator Battery Indicator Date Time Z p 16 Switching indication modes on LCD monitor Each time you touch DISPLAY indications on LCD monitor switch as shown below In reco...

Страница 16: ... time BN VF808U Provided 1 h 50 m BN VF815U 2 h 40 m BN VF823U 3 h 40 m To detach the battery pack NOTE You can also use the camcorder with just the AC adapter The actual recording time may shorten depending on the recording environment such as when recording scenes with fast moving subject Please do not pull or bend the AC adapter plug and cable This may damage the AC adapter Date Time Setting 1 ...

Страница 17: ... performing steps 1 4 Z p 16 5 Select AREA SETTING 6 Select the city closest to the area you are traveling To return to the previous screen Select To quit the screen Select QUIT Language Setting The language on the display can be changed 1 Open the LCD monitor to turn on the camcorder 2 Touch MENU 3 Select DISPLAY SETTINGS 4 Select LANGUAGE 5 Select the desired language To return to the previous s...

Страница 18: ...ta that had already been recorded MultiMediaCards are not supported Insert a microSD card Preparation Close the LCD monitor to turn off the camcorder 1 Open the microSD card cover 2 Firmly insert the card with its clipped edge first 3 Close the microSD card cover To remove a microSD card Push the microSD card once After the card comes out a little pull it out NOTE Insert and remove the microSD car...

Страница 19: ...ideo recording Press SNAPSHOT Slide the mode switch to select video mode NOTE The video recording mode is automatically selected when you turn off the camcorder and then turn on again If the camcorder is not operated for 5 minutes while the power is on it turns itself off automatically to conserve power Do not move or shake the camcorder suddenly during recording If you do so the driving sound hum...

Страница 20: ...TE DIS Digital Image Stabilizer does not function during still image recording If the camcorder is not operated for 5 minutes while the power is on it turns itself off automatically to conserve power Still Image Recording To view the last recorded image Select A after shooting Selecting during playback deletes that image To change the image quality Change the settings in IMAGE QUALITY To record st...

Страница 21: ...3 Select the desired setting ON The LED light remains on regardless of the surrounding conditions AUTO The LED light turns on automatically when shooting in insufficient light conditions OFF Deactivates this function Checking the Remaining Battery Power mode Press INFO twice or INFO and then select mode Press INFO To quit the screen Select QUIT or press INFO NOTE The recordable time display should...

Страница 22: ... back Some video may not be played back at all To delete a video Select when playback is stopped To change the number of thumbnails 6 thumbnails 20 thumbnails Move the zoom lever to W Operations during Video Playback On screen buttons N Return to the first scene of the file O Go to the first scene of the next file L Return to the index screen J Reverse search during playback E Frame by frame playb...

Страница 23: ...k mode The index screen appears Select the desired file Slide the mode switch to select still image mode Still Image Playback Operations during Still Image Playback On screen buttons P Change playback order of slide show in reverse direction F Change playback order of slide show in forward direction L Return to the index screen N Display the previous file F Start the slide show Q End the slide sho...

Страница 24: ...asing the exposure In the manual recording mode Select To cancel backlight compensation Select again NOTE If the LCD monitor is turned upside down is not displayed Change the setting when the LCD monitor is in the normal position Manual Setting in Menu In the manual recording mode 1 Touch MENU 2 Select MANUAL SETTING 3 Select the desired menu 4 Select the desired setting Depending on the kind of s...

Страница 25: ...f all units Playback Operation After the connection with TV is completed 1 Turn on the camcorder and the TV 2 Set the TV to its VIDEO mode 3 Only when connecting the camcorder to the VCR DVD recorder Turn on the VCR DVD recorder and set the VCR DVD recorder to its AUX input mode 4 Start playback on the camcorder Z p 22 23 Viewing Files on TV AV Cable DC Connector AC Adapter To AC Outlet AV Connect...

Страница 26: ...e Press SNAPSHOT when playback is paused NOTE Captured still images are stored at a resolution of 640 x 360 if the video was recorded in 16 9 or 640 x 480 if the video was recorded in 4 3 The image can be elongated in the horizontal or vertical directions depending on the quality of the source video file The continuous shooting function cannot be used to capture images You cannot capture video dur...

Страница 27: ...sing a DVD Burner Supported discs 12cm DVD R DVD RW Regarding DVD R discs only unused DVD R discs can be used Regarding DVD RW discs used DVD RW discs can also be used but they need to be formatted before recording Formatting a disc deletes all content recorded on the disc up until that time Dual layer discs cannot be used Regarding finalization after copying The disc is automatically finalized so...

Страница 28: ...ining files are copied on the second disc To cancel copying select STOP Copying Video Files that Have Never Been Copied Files that have never been copied to the DVD discs are automatically selected and copied 1 Open the LCD monitor to turn on the camcorder 2 Press DIRECT DVD 3 Select EXECUTE The DVD disc begins to be created When COMPLETED appears touch OK When INSERT NEXT DISC PRESS STOP TO EXIT ...

Страница 29: ...ium M 1 4 GHz or higher Intel CoreTM Duo 1 5 GHz or higher RAM At least 512 MB To check the PC specification Right click on Computer or My Computer in the Start menu and select Properties NOTE Make sure your PC has a recordable DVD drive If your system does not meet the requirements it is recommended to copy files using the DVD burner Z p 27 Macintosh users may use the software included with their...

Страница 30: ...the PC 3 Click All volume in camcorder and click Next 4 Click Start Backup starts To disconnect the camcorder from the PC 1 Right click the icon Safely Remove Hardware on the task bar and select Safely remove USB Mass Storage Device 2 Follow the on screen instructions and make sure that the device can be safely removed 3 Disconnect the USB cable and close the LCD monitor NOTE It takes time to back...

Страница 31: ...ct into the user list Preparation Make backup on the PC 1 Double click the icon and open the calendar 2 Select Movies only 3 Click 4 Input the name of the new user list and click OK 5 Double click the recording date The files recorded on the day are displayed 6 Drag the file and drop into the user list To add other files into the user list repeat steps 5 and 6 ...

Страница 32: ... step 4 3 Drag the file and drop into the part at the bottom and click Next 4 Input the disc name select the top menu style and click Next 5 Click Start NOTE For detail on operating Everio MediaBrowser click Help and refer to MediaBrowser Help Adobe Reader must be installed to read MediaBrowser Help Adobe Reader can be loaded from Adobe s web site http www adobe com For assistance in operating the...

Страница 33: ... their subject matter JVC cannot answer questions regarding basic operation of your PC or questions regarding specifications or performance of the OS other applications or drivers Pixela Region Language Phone USA and Canada English 1 800 458 4029 toll free Europe UK Germany France and Spain English German French Spanish 800 1532 4865 toll free Other Countries in Europe English German French Spanis...

Страница 34: ... to the VCR DVD recorder s instruction manual To stop dubbing Stop recording on the VCR DVD recorder To hide the date or icons on the screen Change the settings in DISPLAY ON TV Switching indication modes on LCD monitor Each time you touch DISPLAY indications on LCD monitor switch as shown below In recording mode All indications Indications for selected functions In playback mode All indications O...

Страница 35: ...t the playback mode 1 Press EXPORT 2 Select the file and set To check the content of the file select CHECK 3 Select DONE To cancel the export setting Select the file and select again To quit the screen 1 Select DONE 2 Select YES To confirm the export setting Press EXPORT on the index screen Transferring the Files to PC Preparation Install iTunes on a PC http www apple com itunes 1 Connect the camc...

Страница 36: ... the LCD monitor NOTE The upload mode turns off each time recording is finished Uploading Files to Websites Uploading Files For details on uploading files refer to the operation guide of MediaBrowser in the CD ROM 1 Connect the camcorder to the PC with the USB cable 2 Select UPLOAD If you cannot upload the file to YouTube You need your YouTube account to upload files to YouTube Create your account...

Страница 37: ...ct the HDD Turn off the camcorder wait for a while and start recording again Move away from a place where the camcorder is affected by excessive sound or vibration such as a concert hall A malfunction may occur in the HDD of the camcorder In this case record to a microSD card Insert a commercially available microSD card and set each of the REC MEDIA FOR VIDEO and REC MEDIA FOR IMAGE to SD Recordin...

Страница 38: ...t flash When recharging in either a hot or cold environment ensure that battery is being charged within the permitted temperature range If the battery pack is being recharged outside the permitted temperature range recharging may stop to protect the battery pack Cannot upload the file to YouTube Refer to Q A Latest Information Download Information etc in Click for Latest Product Info in the help o...

Страница 39: ...nsert the microSD card MultiMediaCard cannot be used Remove any dirt from the microSD card terminals Insert the microSD card before switching the power on Turn off the camcorder and turn it on again CANNOT TAKE MORE STILL IMAGES AT THE MOMENT Stop video recording and then record a still image If an microSD card is removed or inserted during video recording a still image cannot be recorded DROP DET...

Страница 40: ...trix system LED Light Within 1 5 m recommended shooting distance Connectors AV output Video output 1 0 V p p 75 W Audio output 300 mV rms 1 kW USB Mini USB type A and type B USB 2 0 compliant AC Adapter Power requirement AC 110 V to 240 V 50 Hz 60 Hz Output DC 11 V 1 A Still image Format JPEG Image size 832 x 624 Image quality FINE STANDARD Video Signal format PAL standard Recording Playback forma...

Страница 41: ...The HDD can record up to 9999 still images in either mode Recording medium Image size Quality microSD Card 256 MB 512 MB 1 GB 2 GB 4 GB 8 GB 4 3 832 x 624 FINE 990 1960 3980 7600 9999 9999 832 x 624 STANDARD 1490 2940 5970 9999 9999 9999 h hour m minute Required charging recording time approx Battery pack Charging time Recording time BN VF808U Provided 1 h 50 m 2 h 5 m BN VF815U 2 h 40 m 4 h 15 m ...

Страница 42: ...ium Be sure to follow the guidelines below to prevent corruption or damage to your recorded data Do not bend or drop the recording medium or subject it to strong pressure jolts or vibrations Do not splash the recording medium with water Do not use replace or store the recording medium in locations that are exposed to strong static electricity or electrical noise Do not turn off the camcorder power...

Страница 43: ...y high above 80 in direct sunlight in a closed car in summer near a heater in high places such as on a TV Leaving the unit in high places while a cable is connected may result in a malfunction if the cable is caught and the unit falls onto the floor To protect the unit DO NOT allow it to become wet drop the unit or strike it against hard objects subject it to shock or excessive vibration during tr...

Страница 44: ... 27 E Export to Library Mode 35 F Finalize 27 H Hard Disk 42 I iTunes 35 L Language Setting 17 LCD Monitor 14 42 LED Light 21 M Manual Recording 24 Menu Settings 37 microSD Card 18 N Number of Images 41 O On screen Recording Control 19 On screen Zoom Control 21 P Portable Media Player 35 Q Quick Review 19 20 R Recordable Time 41 Recording Medium 42 Remaining Battery Power 21 Remaining Recording Ti...

Отзывы: