background image

85

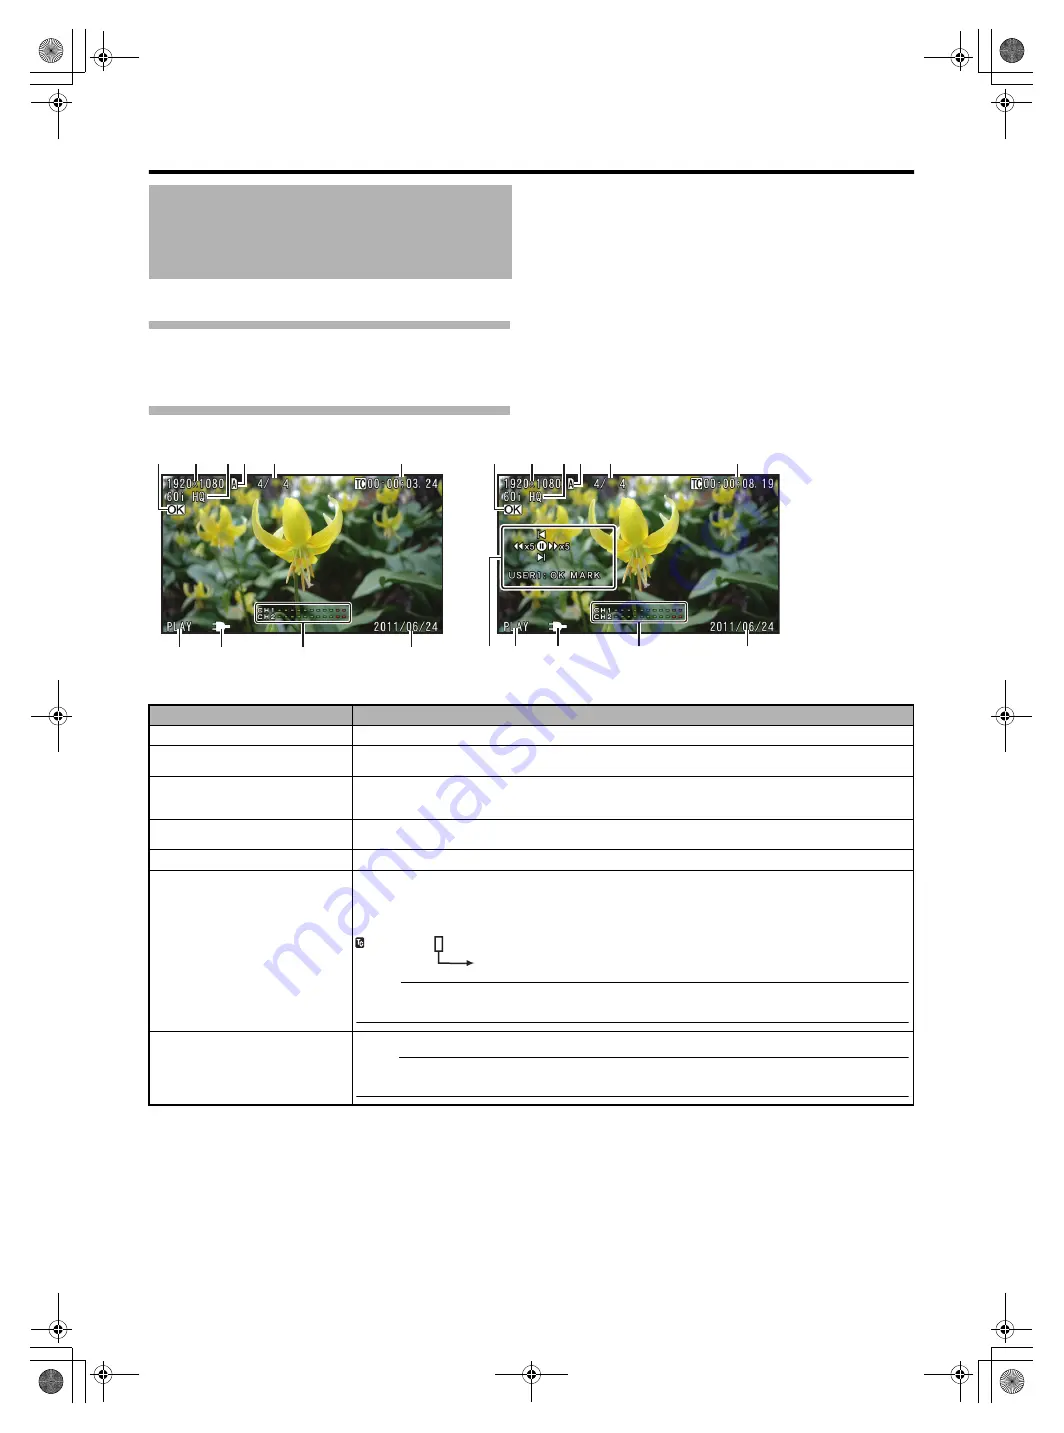
These are the status screens displayed in the Media mode.

STATUS 0 Screen

This screen displays the media status or event. It is also used to display warnings only.

STATUS 1 and STATUS 2 Screens

Status Screen in Media 
Mode

OK

OK

B

A

C

G

F

J

D

E

I

H

K

G

J

I

H

B

A

C

F

D

E

STATUS 1 Screen

STATUS 2 Screen

Item

Description

A

OK Mark

Appears when an OK mark is added. (

A

Page 56)

B

Resolution

Displays the video image resolution.
(1920

10

8

0, 1440

10

8

0, 12

8

0

720, 720

4

8

0, 720

576)

C

Frame Rate/Bit Rate

Displays the frame rate and bit rate in pairs.
(60p HQ, 

3

0p HQ, 60i HQ, 60p SP, 

3

0p SP, 60i SP, 50p HQ, 25p HQ, 50i HQ, 50p SP, 25p SP, 50i SP, 24p HQ, 

24p SP, 50i, 60i)

D

Media

Displays the media slot (A or B) of the currently played clip.
A key mark appears when the write-protect switch of the SDHC/SDXC card is set.

E

Clip Information

Displays current clip number/total number of clips.

F

Time Code (TC)/User

s Bit 

(UB)

Displays the time code (hour : minute : second : frame) or user

s bit data.

TC

:  Time Code

UB

:  User

s bit

The framing mode display for the time code is as follows.

Memo :                                                                                                                                                                                                                             

You can turn ON/OFF the display using [TC/UB] of [Status Display] in the [LCD/VF] menu.


(

A

Page 72)

G

Date/Time

Displays the date/time that is recorded on the currently played SDHC/SDXC card.

Note :                                                                                                                                                          

The date/time display style can be specified in [LCD/VF] menu 

B

[Status Display]

B

[Date Style]/[Time 


Style]. (

A

Page 72)

0 0 : 0 0 : 0 0 : 0 0

Colon (:) for non-drop frames
Dot (.) for drop frames

0 0 : 0 0 : 0 0 : 0 0

GY-HM150U.book  Page 85  Monday, September 5, 2011  1:48 AM

Содержание GY-HM150U

Страница 1: ...Y HM150U Serial No Please read the following before getting started Thank you for purchasing this JVC product Before operating this unit please read the instructions carefully to ensure the best possible performance In this manual each model number is described without the last letter U E which means the shipping destination U for USA and Canada E for Europe Only U models GY HM150U have been evalu...

Страница 2: ...e CAUTION RISK OF ELECTRIC SHOCK DO NOT OPEN CAUTION TO REDUCE THE RISK OF ELECTRIC SHOCK DO NOT REMOVE COVER OR BACK NO USER SERVICEABLE PARTS INSIDE REFER SERVICING TO QUALIFIED SERVICE PERSONNEL The lightning flash with arrowhead symbol within an equilateral triangle is intended to alert the user to the presence of uninsulated dangerous voltage within the product s enclosure that may be of suff...

Страница 3: ...onformity Model Number GY HM150U Trade Name JVC Responsible party JVC AMERICAS CORP Address 1700 Valley Road Wayne N J 07470 Telephone Number 973 317 5000 This device complies with Part 15 of FCC Rules Operation is subject to the following two conditions 1 This device may not cause harmful interference and 2 this device must accept any interference received including interference that may cause un...

Страница 4: ...al and electronic equipment and the battery with this symbol should not be disposed of as general household waste at its end of life Instead the products should be handed over to the applicable collection points for the recycling of electrical and electronic equipment as well as batteries for proper treatment recovery and recycling in accordance with your national legislation and the Directive 200...

Страница 5: ...electrical equipment of any kind it is better to be safe than sorry SOME DO S AND DON TS ON THE SAFE USE OF EQUIPMENT This equipment has been designed and manufactured to meet international safety standards but like any electrical equipment care must be taken if you are to obtain the best results and safety is to be assured DO read the operating instructions before you attempt to use the equipment...

Страница 6: ... Adjusting the Focus Manually 29 Using the Focus Assist Function 29 Shooting Different Scenes and Conditions Program AE 30 Enabling Lolux Mode 30 Using the Built in ND Filter 30 Adjusting the Exposure Manually 31 Using the Tele Macro Feature 32 Displaying the Zebra Pattern 32 Displaying the Zebra Pattern 32 Specifying the Luminance Level Range for Displaying Zebra Pattern 33 Adjusting the White Ba...

Страница 7: ...nize the SDXC card 90 Viewing Images on a Monitor 91 Wired Remote Control Connection 91 Restoring the SDHC SDXC Card 92 Restoring the SDHC SDXC Card 92 Clips Recorded to SDHC SDXC Cards 93 Folders in the SDHC SDXC Card 93 Clip Recorded Data and Clip Name 93 Recorded Clips 93 Others Error Displays and Actions 94 Tally Lamps 95 Troubleshooting 96 Specifications 98 How to use this manual Symbols used...

Страница 8: ...from Apple Inc You can edit the recorded clips directly with Final Cut Pro Recording in MP4 File Format This camera supports recording in the MP4 file format for NLE systems on Windows which can be utilized in a wide range of non linear editing environments Recording on SDHC SDXC Cards Class 6 10 The absence of mechanisms with the use of SDHC SDXC cards Class 6 10 as recording media brings about i...

Страница 9: ...to PCs via USB Port Files stored on an SDHC SDXC card can be retrieved to a PC Saving and Loading of Setting Files The current menu and camera recorder settings can be saved to an SDHC SDXC card Up to eight files In addition settings files stored on the SDHC SDXC card can also be loaded onto the camera recorder according to the shooting scene to reproduce the most suitable settings Application Sof...

Страница 10: ...direct sunlight or fire The built in battery may explode if it gets heated up Do not leave the card slot cover open for a long period of time Dirt entering the interior of the slot may cause it to malfunction Transportation Do not drop or hit this unit against a hard object when transporting Power Saving When this unit is not in use be sure to turn off the power in order to reduce power consumptio...

Страница 11: ...ons of use Do not use it at the following locations Places that are subject to direct sunlight high humidity or corrosion places near thermal equipment sandy or dusty places or in a car under the sun with the doors and windows closed Do not bend or drop the SDHC SDXC card or subject it to strong impact or vibration Do not splash the SDHC SDXC card with water Do not dismantle or modify the SDHC SDX...

Страница 12: ...ined images are not recorded on the SDHC SDXC card Do not press against the surface with force or subject it to strong impact Doing so may damage or break the screens Due to the characteristic of the viewfinder display device colors may appear on the images when you blink your eyes This is not a malfunction It does not affect the recorded images HDMI output or component output Characteristic CCD P...

Страница 13: ...order If the audio unit is not fully and securely tightened it will be loose and may drop off from the camera recorder during use 3 Connect the audio unit cable to the AUDIO IN terminal of the camera recorder Memo The clamp on the audio unit is for fixing the microphone cable and cannot be used to fix the audio unit cable A Page 15 Accessories AC Adapter AP V20M Battery BN VF823U Remote Control Un...

Страница 14: ...ecord trigger User 6 Button A Page 27 Button for starting or stopping recording You can also use it as a user button by assigning a specific feature in the menu setting to this button A Page 19 K Zoom lever A Page 28 For zooming to the Tele T or Wide W end L Accessory mounting screw hole M Microphone holder A Page 15 For mounting an external microphone N Knob Knob for locking the microphone in pla...

Страница 15: ...djustment A Page 28 P USER2 User 2 button A Page 19 A specific feature in the menu setting can be assigned to this button according to the user s preference Q USER1 User 1 button A Page 19 A specific feature in the menu setting can be assigned to this button according to the user s preference R CH 1 CH 2 CH 1 CH 2 recording level adjustment knob A Page 38 For adjusting the audio input level for th...

Страница 16: ... specific feature in the menu setting to this button A Page 19 I DISPLAY Display button For switching the displays on the LCD screen and viewfinder A Page 20 J REC Record trigger button A Page 27 Button for starting or stopping recording K LCD monitor A Page 20 L MENU THUMB Menu Thumbnail button The operation changes according to the status of the camera recorder During Camera mode Displays the me...

Страница 17: ... lamp A Page 25 Lights up in red during the Camera mode Memo During the USB mode both the MEDIA indicating lamp K and CAM indicating lamp L go out M ACCESS Access indicating lamp Lights up or blinks during recording or playback Grip Belt Side N STANDBY ON OFF CAM MEDIA Power Operation mode selection switch STANDBY ON OFF Turns the power On Off A Page 17 CAM MEDIA Sets this camera recorder to the C...

Страница 18: ...rm reverse search during playback or frame by frame reverse playback during pause M Down button Moves the cursor downward on the menu screen or thumbnail screen Advances to the next clip during playback N Right button Moves the cursor to the right on the menu screen or thumbnail screen It is also used to perform forward search during playback or frame by frame forward playback during pause O Up bu...

Страница 19: ... External Microphone You can attach a microphone to the microphone holder The supplied microphone is a phantom microphone 1 Turn the knob on the microphone holder anticlockwise to loosen and open the microphone holder 2 Place the microphone in the microphone holder 3 Turn the knob on the microphone holder clockwise to secure the microphone 4 Connect the microphone to the INPUT1 or INPUT2 XLR termi...

Страница 20: ...rging starts the indicating lamp blinks When charging is complete the indicating lamp lights up 3 Remove the battery by sliding it in the opposite direction after charging is complete Attaching the Battery 1 Turn off the power of the camera recorder 2 Attach the supplied battery With the battery mark D on the left insert it into the camera recorder and slide it to the left Removing the Battery 1 T...

Страница 21: ... mode fix the switch at the CAM MEDIA position for 1 second or longer Turning Off the Power 1 Set the STANDBY ON OFF switch to AOFFB Auto Power Off feature When Auto Power Off in the Others menu is set to AOnB the power turns off automatically when the camera recorder is not operated for 5 minutes or longer while running on battery A Page 74 Memo When both the battery and AC adapter are connected ...

Страница 22: ...value of the year can be set in the range of A2000B to A2063B Changing the Time after Initial Setting Setting the date time A Page 74 1 Select Others menu B Date Time The Date Time setting screen appears 2 Set the date and time A Move the cursor with the set lever H I and select the setting item B Change the values with the set lever JK 3 Press the center of the set lever after setting is complete...

Страница 23: ... USER1 and USER2 buttons function as the menu operation buttons A Page 58 Basic Operations in Menu Screen You can select whether to enable the illumination of the tally lamp Set using Tally in the Others menu A Page 74 When this is set to AOnB the tally lamp lights up in the recording mode Memo When the audio unit is attached the tally lamp on this camera recorder lower tally lamp in the above dia...

Страница 24: ... depending on the SDHC SDXC card in use and the battery condition A Page 63 Camera Resolution A Page 63 Frame Bit Rate Memo If the SDHC SDXC card contains files recorded by devices other than this camera recorder or files that are saved from a PC the recordable time may be shorter or data may not be properly recorded Up to 600 clips per File Format can be recorded to one SDHC SDXC card on this cam...

Страница 25: ...tting starts 6 Formatting is complete ACompleteB appears when formatting is complete Memo If you do not want to format the card select Cancel and press the center of the set lever to return to the previous screen If you remove the SDHC SDXC card during formatting AFormat Error B appears and the camera recorder returns to the previous screen During formatting menu operation is unavailable but you c...

Страница 26: ... screen You can display the camera status media information and various markers in the video image on the LCD monitor and viewfinder screens during shooting Besides camera and playback images the following characters are displayed on the LCD monitor and viewfinder Status screen A Page 23 Auto White display A Page 24 Menu setting screen A Page 24 Alarm display A Page 24 Marker and safety zone indic...

Страница 27: ...LCD Monitor During Clip Playback in Media Mode A Page 85 The display switches between the 3 screen types with every press of the DISPLAY button STATUS 0 B 1 B 2 B 0 Status Screen in USB Mode This screen displays the USB mode STATUS 0 Screen STATUS 1 Screen STATUS 4 Screen STATUS 2 Screen STATUS 3 Screen STATUS 0 Screen STATUS 1 Screen STATUS 2 Screen GY HM150U book Page 23 Monday September 5 2011 ...

Страница 28: ...0 screen and alarm will be displayed A Page 94 Error Displays and Actions Zebra Pattern Display Zebra pattern that indicates the luminance level of the video image can be displayed on this camera recorder You can set the luminance level for displaying the zebra pattern A Page 32 Displaying the Zebra Pattern Memo Use the following ways to turn ON OFF the zebra pattern display Press the ZEBRA 5 butt...

Страница 29: ...ss the SHUTTER button to display and change the value A Page 35 To adjust the aperture manually press the IRIS A M button and change the value with the iris dial A Page 36 Selecting a Focusing Mode There are two focusing modes namely Auto and Manual Setting to the Auto Focus mode 1 Press AF MF to display the Auto Focus icon AF on the screen Focus is adjusted automatically Setting to the Manual Foc...

Страница 30: ...QB is selected and 18 3 Mbps 1080i is 25 Mbps CBR when ASPB is selected List of Formats The following is a list of file formats and video formats that can be selected on this camera recorder When System Definition is set to AHD MPEG2 B When System Definition is set to ASD DV B When System Definition is set to ASD DV B the video format is fixed as follows Selecting the Aspect Ratio of SD Videos Sel...

Страница 31: ...tton for shooting You can operate with any of the three buttons 1 Press REC Recording starts 2 Press REC Recording stops Memo The maximum size for each clip is 4 GB QuickTime MP4 2 GB AVI The file is split into two or more files if the maximum size is exceeded Recording stops when there is no more space left on the SDHC SDXC card If Slot Mode in the Rec Mode menu is set to ASeriesB recording to th...

Страница 32: ...ideo clips in the currently selected slot can be reviewed When there are no clips in the selected slot Clip Review function is disabled Memo Clip Review is unavailable when Clip Continuous Rec is paused ASTBYCB yellow text and when Frame Rec is paused ASTBYFB yellow text To operate press and hold the REC button or use the user button assigned with ARec StopB to set to ASTBYCB white text ASTBYFB wh...

Страница 33: ...D VF menu B Shooting Assist B Focus Assist to AOffB Alternatively press the user button that is assigned the Focus Assist function Memo To change the contour color set using LCD VF menu B Shooting Assist B Color ABlueB AGreenB ARedB When using the Focus Assist function at a dark place the point where color is added may appear grainy making the contour color unclear When Display On TV in the A V Ou...

Страница 34: ...mode Press the LOLUX 3 button or the user button that is assigned with ALoluxB Memo When shooting in Lolux mode secure the camera recorder using a tripod as camera shakes may blur the image Shutter speed and gain cannot be adjusted in the Lolux mode Applicable to Full Auto shooting mode A Manual shooting mode M Adjust the amount of light from the lens by turning the ND FILTER switch ON OFF to enab...

Страница 35: ...se the value and make the image darker 3 Confirm the setting value Press the ADJ VOL knob The manual setting value is set The setting value 6 to 6 is displayed on the screen 4 After setting the value press the ADJ VOL knob for 1 second or longer to switch to the AE Lock mode An L mark appears after the setting value on the screen AE Lock Locks the exposure setting value Canceling AE Lock 1 Press t...

Страница 36: ...n specify the luminance level range for displaying the zebra pattern Displaying the Zebra Pattern There are two ways to display the zebra pattern A Set LCD VF menu B Shooting Assist B Zebra to AOnB A Page 70 B Assign the zebra function to a user button and press the button A Page 19 66 Set Main Menu B Camera Function B Switch Set B USER1 USER2 LOLUX 3 C REVIEW 4 ZEBRA 5 REC 6 to AZebraB A Page 66 ...

Страница 37: ...B appears when Auto White Balance is activated When the correct white balance is achieved AAUTO WHITE A B OKB appears for about 3 seconds Note Do not use highly reflective objects such as metals Doing so may result in improper white balance adjustment The Auto White function cannot provide optimum white balance with an object outside the adjustment range for example when it contains only a single ...

Страница 38: ...e when it contains only a single color or not enough white color The accuracy of FAW is inferior to that of Auto White Balance When the power of the camera recorder is turned on with the FAW mode selected it takes about 10 seconds for the FAW adjustment to complete Do not start recording during this interval Adjusting White Paint Applicable to Manual shooting mode M Adjusts the red R and blue B co...

Страница 39: ...Auto the shutter speed is automatically controlled 1 Set to the Manual shooting mode 2 Set to the shutter speed adjustment mode Press the SHUTTER button The shutter speed that is set in the manual mode is displayed 3 Select a shutter speed value Operate with the ADJ VOL knob The selected value is displayed 4 Confirm the shutter speed value Press the ADJ VOL knob Doing so exits the adjustment mode ...

Страница 40: ... Page 65 The AE Area screen in the Camera Function menu opens Photometry area frames are displayed at the center of the screen Select a photometry area from the left center and right frames on the screen or the entire screen 3 Select a photometry area Select a photometry area by pushing the set lever up down or to the left right When the entire screen is selected push the lever to the left right t...

Страница 41: ...djust the values while checking the picture quality on the camera Detail Knee Gamma Color Matrix Color Gain Memo For details of the respective items see the Camera Process menu A Page 67 Applicable to Full Auto shooting mode A Manual shooting mode M Reduces blurring of images due to camera shake 1 Check whether the image stabilizer feature is turned ON or OFF Image stabilizer OFF icon on status di...

Страница 42: ...ower supply make sure that it is not set to the MIC 48V position Adjusting the audio recording level Select a method for adjusting the audio recording level Configure the CH1 CH2 AUDIO SELECT switch Select whether to set each channel to the AUTO or MANUAL mode Reducing Wind Noise Wind noise for each microphone can be reduced Menu setting Set Record Set menu B Audio Set B Input1 Mic Wind Cut Input2...

Страница 43: ...Code The time code of the camera recorder s built in time code generator as well as user s bit can be recorded The time code generator comes in the preset and regeneration modes When in the preset mode you can set the time code and user s bit freely A Page 40 Recording time code and user s bit in the preset mode 1 Set TC Generator in the TC UB menu to ARec RunB or AFree RunB A Page 69 ARec RunB Th...

Страница 44: ...phasis on the number of frames ADropB The time code generator operates in the drop frame mode Use this setting when placing emphasis on the recording time Memo ADropB cannot be set when Record Format B Frame Bit Rate in the Record Set menu is set to 50 25 or 24 4 Select TC Preset and press the center of the set lever The time code preset screen appears 5 Set the time code hour minute second frame ...

Страница 45: ...ing A Page 56 Appending and Deleting OK Marks When the write protect switch on the SDHC SDXC card is set is displayed OK marks cannot be appended deleted Applicable to Camera mode You can split the clips freely without having to stop recording during shooting 1 Assign the AClip Cutter TrigB function to any of the user buttons Set Main Menu B Camera Function B Switch Set B USER1 USER2 LOLUX 3 C REV...

Страница 46: ...he same time Both the card slot marks turn red and the status indicators of both the card slots also blink in green 3 Stop recording Press the REC button again Recording to both slots stops and both the card slot marks turn white The same clips are recorded to both cards Memo During recording in the Dual Rec mode to two cards with a different amount of remaining space if the space of one card runs...

Страница 47: ...rd by the recovery function may fail If an error occurs on one of the cards while the Dual Rec operation is in progress recording of the erroneous card stops while that of the other card continues Operations on clips recorded in the Dual Rec mode such as clip deletion in the Media mode or appending of OK marks can only be performed on the card in the selected slot Applicable to Camera mode The Bac...

Страница 48: ... center of the set lever A Page 64 You can also press the user button that is assigned with ABackup TrigB or ARec StopB A Page 66 Recording to slot B stops and the card slot mark of slot B turns white unselected state The characters ABACKUPB changes back to white The status indicator of slot B lights up in green Memo During backup recording if the space of one card runs out recording stops only fo...

Страница 49: ...view Immediately after changing file format Immediately after changing video format Clip Continuous Rec In normal recording when the recording stops the image audio and accompanying data from the start till the end of the recording are recorded as one AclipB on the SDHC SDXC card This mode allows you to consolidate several rounds of Astart stop recordingB into one clip Example In normal recording ...

Страница 50: ...played When the power is turned off during recording or recording pause recording stops and power is cut off after a clip is generated If the power is cut off due to low battery power a proper clip may not be generated Frame Rec In normal recording when the recording stops the image and accompanying data from the start till the end of the recording are recorded as one AclipB on the SDHC SDXC card ...

Страница 51: ... of the clip until the amount is reached Padding 1 Set Rec Mode to AInterval RecB Set Main Menu B Record Set B Rec Mode to AInterval RecB A Page 64 The status display changes from ASTBYBBASTBYIB 2 Set the number of frames to record in Rec Frames Set using Main Menu B Record Set B Rec Frames A Page 64 3 Set the time interval to start recording in Rec Interval Set using Main Menu B Record Set B Rec ...

Страница 52: ...ate 2 Set to the Media mode The thumbnail screen appears The thumbnails of the clips that can be played back using the current video format are displayed Playing Back Recorded Clips Name Description A USER1 Button Appends or deletes an OK mark on the selected clip B USER2 Button Deletes the selected clip C MENU THUMB Button Displays the thumbnail screen menu Press this button to close the menu scr...

Страница 53: ...he clip for the last clip Press center Still During Still Mode W B Push to the right Forwards frame by frame C Push to the left Reverses frame by frame D Push upward Switches to the still mode at the beginning of the clip Switches to the still mode at the beginning of the previous clip with repeated operation E Push downward Switches to the still mode at the beginning of the next clip Switches to ...

Страница 54: ...he switch B F D G H J A C E I Name Description A Cursor continued Example of the moving order of the cursor total 22 clips B SDHC SDXC Card Displays the status of the inserted SDHC SDXC card selected SDHC SDXC card write protect switch and the need for restoring Use the SLOT SEL button to switch slots Clips in slot A and B cannot be displayed at the same time Write protect switch of the SDHC SDXC ...

Страница 55: ...on Set whether to display ATCB or ADate TimeB in the thumbnail menu Thumbnail Text A Page 53 Data time display depends on the settings in LCD VF B Status Display B Date Style of the Main Menu screen A Page 72 Time is displayed in 24 hour display regardless of the Time Style setting 1080 50i Unknown A B Name Description I Clip Mark Displays clip information properties A OK Mark Clip is appended wit...

Страница 56: ...me Record Format Image size frame rate bit rate Rec Mode Displayed only in the special recording modes not displayed in normal recording mode TC Time code at the start and end of recording Duration Clip length Creation Date Date created Memo The information of time and date displays in the following order Year Month Date Time Minute Second and Time zone A B is the break character between Year Mont...

Страница 57: ...xt For selecting the display method for the thumbnail text on the thumbnail screen TC Displays the recording start time code at the thumbnail text display area below the thumbnail Date Time Displays the recording start date time at the thumbnail text display area below the thumbnail Delete Clip For deleting clips A Page 54 Memo This item cannot be selected when ANo MediaB or ANo ClipB is displayed...

Страница 58: ...selected Write protect switch of the SDHC SDXC card is set is displayed During Thumbnail Screen Deleting with USER2 button 1 Select the clip to delete Select the clip to delete with the set lever JKH I 2 Press the USER2 button A screen to confirm deletion appears 3 Select Delete using the set lever JK and press the center of the set lever Deleting starts Memo Button operations are unavailable duri...

Страница 59: ...eletion During Playback or Pause Screen Deleting with USER2 button 1 Press USER2 button during clip playback A screen to confirm deletion appears 2 Select Delete and press the center of the set lever Deleting starts Deleting All Clips Deletes all clips that are displayed 1 Press the MENU THUMB button The thumbnail menu screen appears 2 Select Delete Clip B All Clips in the menu A screen to confirm...

Страница 60: ...p Memo The USER1 button is disabled displayed in gray and OK marks cannot be appended when the write protect switch of the SDHC SDXC card is set is displayed AOK Mark Added B is displayed when changing marks and other operations are unavailable During Playback or Pause Screen 1 Press USER1 button during clip playback An OK mark is appended to the clip Memo The clip pauses when an OK mark is append...

Страница 61: ...ray and OK marks cannot be deleted when the write protect switch of the SDHC SDXC card is set is displayed AOK Mark Deleted B is displayed when changing marks and other operations are unavailable During Playback or Pause Screen 1 Press the USER1 button when playing back a clip appended with OK mark The OK mark is deleted 1 GY HM150U book Page 57 Monday September 5 2011 1 48 AM ...

Страница 62: ...enu and Favorites Menu screens D MENU THUMB Button Displays the menu screen Main Menu is displayed by default when pressed During normal usage Main Menu is displayed if the previous menu operation ended at Main Menu and Favorites Menu if the previous menu operation ended at Favorites Menu Press this button to close the menu screen during menu display and return to the normal screen USER1 USER2 MEN...

Страница 63: ...Field Field for entering the title You can enter up to 8 characters for the Scene File subname or up to 4 characters for the Clip Name Prefix B Character Cursor Select a character using the key cursor D and press the center of the set lever to input the selected character at the position of the character cursor The character cursor moves to the next position on the right each time a character is i...

Страница 64: ...t Camera Resolution Frame Bit Rate Aspect Ratio Rec Mode A Page 64 Rec Frames Rec Interval Slot Mode A Page 64 Backup Rec Clip Set A Page 64 Clip Name Prefix Reset Clip Number Audio Set A Page 65 Input1 Mic Wind Cut Input2 Mic Wind Cut Internal Mic Wind Cut Audio Ref Level Internal Mic Level Camera Function A Page 65 Bars Tele Macro AE Area Switch Set A Page 66 Camera Process A Page 67 Detail Knee...

Страница 65: ...etting A Page 71 Status Display A Page 71 LCD Bright VF Bright LCD Backlight VF Slide SW A V Out A Page 73 Display On TV Video Output Component Output HDMI Output HDMI Color Setting HDMI Enhance Setting Audio Monitor Others A Page 74 Auto Power Off Tally Wireless Remote Reset All Date Time Time Zone System Information Media A Page 75 Format Media Restore Media Setup File Manage A Page 75 Load Scen...

Страница 66: ...fy settings related to the Focus Assist mode zebra pattern display screen size marker and safety zone In addition it is also used for selecting whether to display characters on the LCD monitor or viewfinder screen as well as for adjusting the picture quality of the LCD monitor screen A Page 70 A V Out Item for specifying connection settings with external devices A Page 73 Others Menu screen for sp...

Страница 67: ... When System Definition is set to ASD DV B this item is fixed as follows for the different models U model 720 x 480 E model 720 x 576 The selectable values of Frame Bit Rate vary according to the setting of this item Frame Bit Rate For setting the frame rate and encoding bit rate when System Definition is set to AHD MPEG2 B Selection can be made from 19 combinations of frame rate 60p 50p 30p 25p 2...

Страница 68: ...o ASeriesB and recordable media are loaded to both the slots pressing the REC button starts recording only to the card in the selected slot active slot When this is set to ADualB and recordable media are loaded to both the slots pressing the REC button starts simultaneous recording to the cards in both slots Backup Rec For starting stopping backup recording with REC STBY This item is selectable on...

Страница 69: ... setting the input level from the built in microphone Camera Function Menu Item Setting Values Function Bars On Off For setting whether to output color bars On Color bars are output Off Color bars are not output Memo When in the Full Auto shooting mode this item is fixed at AOffB and cannot be selected This item is selectable when System Definition in the Record Format menu is set to AHD MPEG2 B W...

Страница 70: ... REC 6 button is set to ARecB by default and can be used to start stop recording The ARecB function can only be assigned to the REC 6 button Setting Values Description None No function is assigned Load File Assigns the function of Load Scene File in the Setup File Manage menu A Page 75 OK Mark Assigns the function of appending deleting OK marks while recording a clip This function operates during ...

Страница 71: ...evel to show the gradation of the highlighted portion To check the gradation of a bright area set to AManualB and adjust the knee point manually Manual Enables manual adjustment of the knee point starting point of knee operation using ALevelB Auto Adjusts the knee point starting point of knee operation automatically according to the luminance level Level 100 95 90 85 For setting the starting point...

Страница 72: ... 1 Normal 14 to 1 Min For adjusting the B blue component in the AWB Auto White Balance mode Increase the number Strengthens the blue Decrease the number Weakens the blue Memo This item is selectable when the WHT BAL selection switch on the camera recorder is set to AAB or ABB When APRST PRESET B or the position assigned with the AFAWB function is set this item appears as A B and cannot be selected...

Страница 73: ... 39 TC Preset For setting the time code hour minute second frame Display Drop setting 02 02 25 20 Non Drop setting 02 02 25 20 Memo When TC Generator is set to ARegenB this item appears as A Regen B and cannot be selected UB Preset For setting the user s bit Digit by digit Display AB CD EF 01 Memo When TC Generator is set to ARegenB this item appears as A Regen B and cannot be selected Drop Frame ...

Страница 74: ...e setting When the HDMI COMPONENT OUT or A V OUT terminal is connected video images will not appear on the viewfinder Item Setting Values Function Focus Assist On Off For selecting whether to add color to the contour of the focused image upon switching the image to black and white Focus Assist function A Page 29 On Enables the Focus Assist function Off Disables the Focus Assist function Color Blue...

Страница 75: ...d area Safety Zone within the boundary of the aspect ratio selected in Aspect Ratio Center Mark 1 On Off For specifying whether to display a mark to indicate the screen center within the aspect ratio selected in Aspect Ratio On Displays the center mark Off Hides the center mark Item Setting Values Function Filter On Off For specifying whether to display the ND FILTER status in the status display o...

Страница 76: ...minutes AminB Capacity Displays the remaining battery power in percentage A B Memo The battery mark that appears before the value changes according to the remaining battery power red Less than 1 red 1 to 20 yellow 21 to 30 yellow 31 to 40 green 41 to 70 green 71 to 100 The remaining battery power and remaining time are intended as reference values for the shooting duration Time Display HH MM SS HH...

Страница 77: ...d HDMI Output 480i 480p 576i 576p Auto For selecting the resolution of video output from the HDMI terminal Set this item according to the monitor to be used Set this item when images are not properly displayed on a monitor that supports a maximum output of 1080i 480i Set this when connecting to a monitor that supports 480i Selectable when Frame Bit Rate is set to A60iB A60pB A30pB A24pB 480p Set t...

Страница 78: ... control is not accepted regardless of the setting Reset All Resets all menu settings Select AResetB in the Reset All menu and press the center of the set lever The message AResetting B appears Reset will not be performed if Cancel is selected Memo Date Time A Page 74 Time Zone A Page 74 Favorites Menu and Clip Number cannot be reset This item is not selectable when recording in Camera mode during...

Страница 79: ...tializing SDHC SDXC Cards Restore Media For restoring an SDHC SDXC card Select a card slot A or B select Restore from Cancel Restore and press the center of the set lever to restore the card A Page 92 Restoring the SDHC SDXC Card Memo This item appears only when the SDHC SDXC card needs to be restored However it is not selectable when recording in Camera mode and during Clip Review Setup File Mana...

Страница 80: ... to Favorites Menu cannot be performed in the following cases USER1 Add is displayed in gray in the operation guide Selected item is already added to Favorites Menu Number of menu items that can be added 20 items is exceeded 3 Press the USER1 button A screen to confirm the addition appears 4 Select Add and press the center of the set lever The selected menu item is added to Favorites Menu Memo Lon...

Страница 81: ...the menu or submenu item to delete 4 Press the USER2 button Delete Mark appears at the beginning of the item Memo When the USER2 button is pressed again while the menu item with Delete Mark is selected Delete Mark disappears 5 Press the USER1 button The option menu to exit the Favorites Menu editing mode appears 6 Select Save Exit and press the center of the set lever Memo Deletion is not complete...

Страница 82: ...the right I The header turns magenta and the editing mode is activated 3 Select the menu or submenu item to move and press the center of the set lever The moving mode is activated and a position selection bar for the move appears Adding Editing Frequently Used Menu Items Favorites Menu continued USER1 USER2 MENU THUMB T W REC PR O G R A M A E C REVIEW 4 ZEBRA 5 SLOTSEL DISPLAY LOLUX 3 USER1 Button...

Страница 83: ...new position 6 Press the USER1 button The option menu to exit the Favorites Menu editing mode appears 7 Select Save Exit and press the center of the set lever Memo Moving is not complete until the changes are saved with Save Exit To exit the editing mode without saving any changes select Exit without Saving To return to the editing mode select Cancel 5 4 7 GY HM150U book Page 79 Monday September 5...

Страница 84: ...me Rec recording pause A Page 47 STOP Unable to record to the card in the slot C Speaker Headphone Volume Appears during volume adjustment This is displayed for 3 seconds after the operation button is pressed The value ranges from 0 to 15 D Iris F Number Displays F number of the lens iris This item appears only during manual setting F1 8 F2 0 F2 2 F2 5 F2 8 F3 2 F3 5 F4 0 F4 5 F5 0 F5 6 F6 3 F7 1 ...

Страница 85: ...e Balance is displayed A Page 33 AUTO WHITE NG OBJECT A B Auto White object is defective A Page 33 AUTO WHITE ERROR LOW LIGHT A B Auto White illumination is insufficient A Page 33 AUTO WHITE ERROR OVER LIGHT A B Auto White illumination is excessive A Page 33 A AUTO FULL AUTO button is pressed during Full Auto shooting Mode is switched from Manual to Auto by pressing FULL AUTO button twice during M...

Страница 86: ...d slot in which recording is in progress Red card Unselected slot during Dual Rec or Backup Rec and slot in which recording is in progress Red card SDHC SDXC card requires restoring or formatting or SDHC SDXC card is not supported not of Class 6 10 type Warnings such as AINVALID MEDIAB appear in the remaining time display area A Page 94 Error Displays and Actions Write protect switch of SDHC SDXC ...

Страница 87: ...t for drop frames Example Time Code User s Bit D C A B 0 Same as STATUS 0 Screen A Page 80 1 Same as STATUS 1 Screen A Page 82 0 1 1 Appears only during warnings Item Description A Date Time Displays the current date and time Note The date time display style can be specified in LCD VF menu B Status Display B Date Style Time Style A Page 72 B Format Displays the file format for recording to the SDH...

Страница 88: ...GAIN Switch Settings Displays the setting values for each of the positions L M H on the GAIN switch 0dB 3dB 6dB 9dB 12dB 15dB 18dB AGC C Zoom Speed Switch Settings Displays the speed of zoom operation set with the set lever on the LCD monitor and remote control 2 1 Normal 1 D User Button Function Settings Displays the setting status of the USER1 USER2 LOLUX 3 C REVIEW 4 ZEBRA 5 and REC 6 buttons A...

Страница 89: ... 60i D Media Displays the media slot A or B of the currently played clip A key mark appears when the write protect switch of the SDHC SDXC card is set E Clip Information Displays current clip number total number of clips F Time Code TC User s Bit UB Displays the time code hour minute second frame or user s bit data TC Time Code UB User s bit The framing mode display for the time code is as follows...

Страница 90: ...ttery Power Displays the current status of the power supply in use Display Description Currently powered by an AC adapter red Less than 1 red 1 to 20 yellow 21 to 30 yellow 31 to 40 green 41 to 70 green 71 to 100 Currently powered by a battery Memo The display can be set using Battery Info of Status Display in the LCD VF menu A Page 72 J Media Status PLAY Playing STILL Pause FWD Forward searching ...

Страница 91: ...g a saved setup file enables you to reproduce the appropriate setup state speedily Scene file File that contains the menu settings ranging from video format settings to image creation settings such as device settings and shooting conditions as well as the contents of the Favorites Menu Make use of the Setup File Manage menu to save or load a setup file The following operations can be performed on ...

Страница 92: ...he set lever Saving starts and AStoring B appears on the screen Configuring Setup Files continued Store Scene File Menu Screen Cursor G A B D E H F C Name Description A Character Entry Field Field for entering the title You can enter up to 8 characters for the Scene File subname B Character Cursor Select a character using the key cursor D and press the center of the set lever to input the selected...

Страница 93: ... the center of the set lever Memo When the write protect switch of the inserted SDHC SDXC card is set a mark appears beside the SDHC SDXC card icon Setup files can be loaded from an SDHC SDXC card even if the write protect switch is set Setup files that are completely incompatible will not be displayed 4 Select Load on the confirmation screen and press the center of the set lever Loading starts an...

Страница 94: ...ting Disable the connection on the PC then remove the USB cable from the camera recorder Doing so exits the USB mode and switches the camera recorder to Camera mode Memo The procedure for disabling the USB connection varies according to the PC in use For details refer to the instruction manual of the PC When your PC cannot recognize the SDXC card Confirm and update the OS of your PC Managing Editi...

Страница 95: ... terminal is connected video images will not appear on the viewfinder When the HDMI COMPONENT OUT or A V OUT cable is inserted or removed noise may appear in the LCD monitor or viewfinder but this is not a malfunction It does not affect the recorded images Applicable to Camera mode The functions of the camera recorder can be configured using a wired remote control 1 Connect a wired remote control ...

Страница 96: ...estoring is complete When restoring is complete ACompleteB appears and the camera recorder returns to the Restore Media screen When no media that requires restoring is inserted the camera recorder returns to the Media menu screen Note Restore Media can only be selected in Camera mode However it cannot be selected while the camera recorder is recording Select Restore Media in Camera mode when the c...

Страница 97: ...aracters This is set to AxxxGB AxxxB denotes the last 3 digits of the serial number by default Memo Before recording starts you can set any characters for the clip name prefix by using Main Menu B Record Set B Clip Set B Clip Name Prefix A Page 64 Changes cannot be made after recording Recorded Clips Recorded materials may be split into several files by this camera recorder due to the file size Ho...

Страница 98: ...ge 92 CHECK LENS COVER The lens cover may be closed Only checked during startup Open the lens cover NO MEDIA REC button is pressed when an SDHC SDXC card is not inserted No SDHC SDXC card is found in the slot to record to during the Backup Rec mode Insert an SDHC SDXC card A Page 20 43 No Media No SDHC SDXC card is found in Media mode or when the thumbnail screen is displayed Insert an SDHC SDXC c...

Страница 99: ...displayed on a PC etc A Page 20 Replace the SDHC SDXC card with a new one READING MEDIA INFO Recording operation was performed while inserted card was being checked When a card is inserted press the record button after the card slot status indicator lights up GETTING OVERHEATED PLEASE TURN P OFF Battery temperature rose Turn off the power and wait for some time before using again Replace the batte...

Страница 100: ... dark or blurred Readjust the brightness of the LCD monitor screen and viewfinder A Page 20 Is ND FILTER set to AONB Is the iris closed Is the shutter speed setting too high The subject is too dark Use the Lolux mode to shoot A Page 30 Set exposure to the side A Page 31 Set to the manual shooting mode and increase the sensitivity using the GAIN switch A Page 25 Set the GAIN switch to AAGCB A Page ...

Страница 101: ...he Audio Set menu A Page 65 The time code and user s bit are not displayed Even in Camera mode or Media mode the time code and user s bit may not be displayed depending to the type of status display A Page 80 Is TC UB of Status Display in the LCD VF menu set to AOffB To display the time code and user s bit set it to a value other than AOffB A Page 72 The date and time are not displayed The date an...

Страница 102: ...ng GOP VBR 35 Mbps Max MPEG 2 HD SP mode MPEG 2 Long GOP CBR 25 Mbps 1440x1080i 19 Mbps 1280x720p MPEG 2 SD DV CBR 25 Mbps 720x480i GY HM150U only 720x576i GY HM150E only Audio signal LPCM 2ch 48 kHz 16 Bit Video format NTSC setting HD HQ mode 1920x1080 59 94i 29 97p 23 98p 1440x1080 59 94i 1280x720 59 94p 29 97p 23 98p HD SP mode 1440x1080 59 94i 1280x720 59 94p 29 97p 23 98p SD 720x480 59 94i GY...

Страница 103: ...s Approx 30 g 0 07 Ibs including button battery CH 2INPUT CH 1 3 4 5 2 1 2 3 0 CH 2 AUDIOINPUT AUTOMANUAL AUTOMANUAL USER1 GAIN L M H B A PRST WHT BAL IRIS A M A B FOCUS ZOOM ON ND FILTER OFF USER2 AF MF FULLAUTO AUDIO SELECT INPUT1 INPUT2 LINE MIC MIC 48V AWB INPUT2 INPUT1 REC 6 T W 135 114 100 102 154 179 184 200 272 366 138 30 The specifications and appearance of this product are subject to cha...

Страница 104: ...2011 JVC KENWOOD Corporation LST1229 001A GY HM150U GY HM150E HD MEMORY CARD CAMERA RECORDER GY HM150U book Page 100 Monday September 5 2011 1 48 AM ...

Отзывы: