background image

1

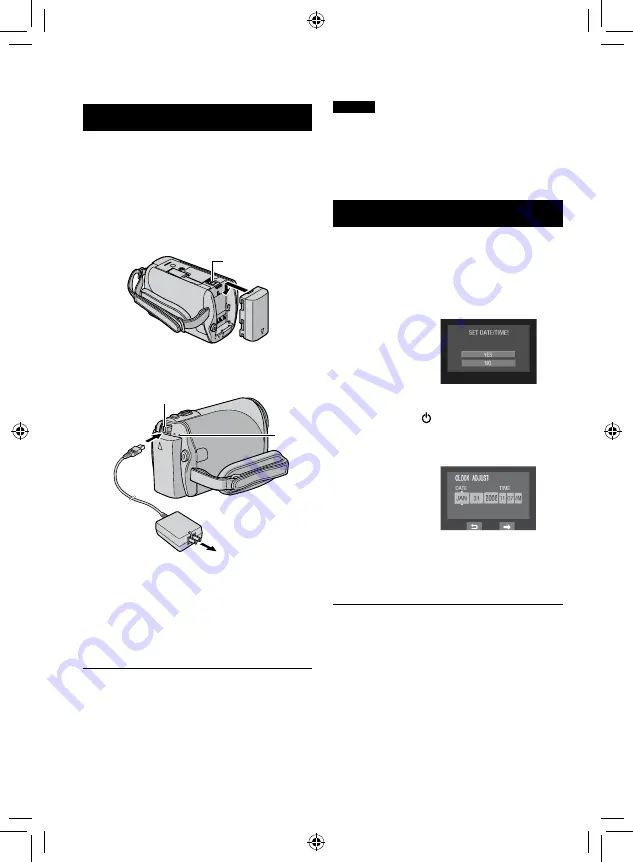
Charging the Battery Pack

1

Close the LCD monitor to turn off the 

camcorder.

2

Attach the battery pack.

battery pack.

Slide the battery pack down until it locks 

in place.

Bottom of the Camcorder

BATT.

3

Connect the AC adapter.

 The charge lamp blinks to indicate charging 

has started.

 When the lamp goes out, charging is 

finished. Unplug the AC adapter (or 

the power cord) from the AC outlet and 

disconnect the AC adapter from the 

camcorder.

L

 To detach the battery pack

Slide and hold 

BATT

. (

Z

 step 

2

), then 

remove the battery pack.

L

 To check the remaining battery power

See page 15.

NOTES

 You can also use the camcorder with just 

the AC adapter.

 Please do not pull or bend the AC adapter 

plug and cable. This may damage the AC 

adapter.

Date/Time Setting

1

Open the LCD monitor to turn on the 

camcorder.

2

When [SET DATE/TIME!] appears, 

select [YES] within 10 seconds.

If you do not select within 10 seconds, the 

screen disappears. In such case, press the 

power button ( ) and turn the camcorder 

on again.

3

Set the date and time.

Repeat this step to input the month, day, 

year, hour and minute.

4

Touch the OK button to finish.

L

 To change the date and time

1)  Touch the 

MENU

 button.

2)  Select [BASIC SETTINGS], and then 

[CLOCK ADJUST].

3)  Set the date and time.

L

 To return to the previous screen

Select 

@

.

L

 To quit the screen

Touch the 

MENU

 button.

Necessary Settings before Use

DC Jack

AC Adapter

To AC Outlet

(110V to 240V)

Charge 

lamp

Содержание Everio GZ-MS100

Страница 1: ...n the bottom of the camcorder and Serial No located on the battery pack mount of the camcorder below Model No Serial No Cher client Merci pour avoir acheté ce caméscope à mémoire Avant son utilisation prière de lire les informations de sécurité et les précautions des pages 4 et 5 pour assurer une utilisation sûre de votre appareil Pour une référence ultérieure Entrer le numéro de modèle situé au d...

Страница 2: ...t video mode R Select playback PLAY mode to display thumbnails on the screen Preparation 1 S Open the lens cover T Open the LCD monitor The camcorder turns on automatically BATT R Insert an SD card Format an SD card when using it for the first time Z pg 15 Q Attach the battery pack Charge the Battery Pack Z pg 14 ...

Страница 3: ...start recording S Select the desired file using the touch sensor And then touch the OK button to start playback SD To stop playback Select L L To view images on TV Z pg 19 L Don t forget to make copies after recording To copy files onto DVD discs Z pg 22 U When SET DATE TIME appears select YES within 10 seconds SET DATE TIME YES NO Z pg 6 V Set the date and time Z pg 14 ...

Страница 4: ...he ventilation holes If the ventilation holes are blocked by a newspaper or cloth etc the heat may not be able to get out No naked flame sources such as lighted candles should be placed on the apparatus When discarding batteries environmental problems must be considered and the local rules or laws governing the disposal of these batteries must be followed strictly The apparatus shall not be expose...

Страница 5: ...as been damaged in any way such as power supply cord or plug is damaged liquid has been spilled or objects have fallen into the apparatus the apparatus has been exposed to rain or moisture does not operate normally or has been dropped Remember that this camcorder is intended for private consumer use only Any commercial use without proper permission is prohibited Even if you record an event such as...

Страница 6: ...tton appearing at the bottom of the screen touch the touch sensor under the on screen button you want to select CAUTION Touch the sensors with your finger The sensors do not function if you touch them with your fingernail or with gloves on LSelecting an item from the menu list on the menu screen Q R MENU IMAGE QUALITY GAIN UP SHUTTER MODE BASIC SETTINGS Q Slide your finger up and down on the senso...

Страница 7: ...f the camcorder does not operate correctly reset the camcorder Z pg 33 Precautions on handling batteries Be sure to use the JVC BN VF808U VF815U VF823U battery packs If the camcorder is subjected to electrostatic discharge turn the power off before using it again If a malfunction occurs stop using the camcorder immediately and consult your local JVC dealer If a problem occurs when using the SD car...

Страница 8: ...o Recording 16 Still Image Recording 17 Playing Back Files 18 Video Still Image Playback 18 Watching Images on TV 19 EDITING COPYING Managing Files 20 Deleting Protecting Files 20 Copying Files 22 Using a DVD Burner to Copy Files from the Camcorder 22 PC OPERATION File Backup on a Windows PC 23 System Requirements 23 Software Installation 23 Connecting the Camcorder to the PC 25 File Backup on the...

Страница 9: ...ories AC Adapter AP V18U 14U Battery Pack BN VF808U Audio Video Cable USB Cable Z pg 22 25 and 29 CD ROM Z pg 23 28 NOTE Make sure to use the provided cables for connections Do not use any other cables GETTING STARTED ...

Страница 10: ...NOTES The LCD monitor can rotate 270 Power linked operation You can also turn the camcorder on off by opening closing the LCD monitor during the recording mode Be careful not to cover 4 5 7 and 9 during shooting ...

Страница 11: ... Button DIRECT DVD Z pg 22 Information Button INFO Z pg 15 Upload Upload Pre Record Mode Button UPLOAD Z pg 27 Auto Manual Mode Button AUTO MANUAL Mode Switch Video Recording Start Stop Button START STOP Z pg 16 Still Image Shooting Button SNAPSHOT Z pg 17 0 Zoom Lever W 7 T Z pg 18 Speaker Volume Control VOL Z pg 18 1 DC Jack DC Z pg 14 2 Audio Video Jack AV 3 USB Universal Serial Bus Jack 2 Z pg...

Страница 12: ...try Area Control Indicator 3 Shutter Speed During Video Recording Only Mode Indicator Counter Upload Pre Record Mode Indicator Appears during UPLOAD REC ON Z pg 27 Picture Quality B ULTRA FINE C FINE D NORMAL E ECONOMY Remaining Time Z pg 16 37 MREC Appears during recording Z pg 16 MQ Appears during record standby mode Digital Image Stabilizer DIS Indicator Appears when DIS is set to OFF Wind Cut ...

Страница 13: ...erse Slow Motion The number on the left shows speed SD Card Indicator Z pg 15 Volume Level Indicator Battery Indicator Z pg 35 Date Time Z pg 14 During Still Image Playback Mode Indicator Effect Mode Indicator Folder File Number Slide Show Playback Indicator Z pg 18 SD Card Indicator Z pg 15 Battery Indicator Z pg 35 Date Time Z pg 14 Switching indication modes on LCD monitor Each time you touch t...

Страница 14: ...amcorder with just the AC adapter Please do not pull or bend the AC adapter plug and cable This may damage the AC adapter Date Time Setting 1 Open the LCD monitor to turn on the camcorder 2 When SET DATE TIME appears select YES within 10 seconds If you do not select within 10 seconds the screen disappears In such case press the power button and turn the camcorder on again 3 Set the date and time R...

Страница 15: ...they may lose data that had already been recorded MultiMediaCards are not supported Cards used to record video on this camcorder cannot be played back on other devices Some card readers including internal card readers in PCs may not be able to support SDHC format If you use an SDHC card for recording and encounter any reading error the card reader you are using might be a non SDHC supported device...

Страница 16: ...n VIDEO QUALITY from the MENU LTo change the aspect ratio of the image 16 9 4 3 Change the settings in SELECT ASPECT RATIO from the MENU LTo record a video clip approx 10 minutes Before you start recording press UPLOAD button twice to UPLOAD REC ON Slide the mode switch to select video mode NOTES Video files are given the names MOV001 MOD to MOV009 MOD MOV00A MOD to MOV00F MOD and MOV010 MOD in or...

Страница 17: ...SNAPSHOT button fully to take the photo picture LTo view the image you just recorded Select A after shooting During the preview you can delete the image by selecting LTo change the picture quality Change the settings in IMAGE QUALITY from the MENU LTo record still images continuously Set to CONTINUOUS SHOOTING in SHUTTER MODE from the MENU Still Image Recording Preparation Insert an SD card Open l...

Страница 18: ... the file O Go to the first scene of the next file L Return to the index screen J Reverse search during playback E Frame by frame playback in reverse direction during pause F Playback Q Pause K Forward search during playback G Frame by frame playback in forward direction during pause Slow playback starts when you keep touching the sensor button under E G for a while LOperations during Still Image ...

Страница 19: ...connecting the camcorder to the VCR DVD recorder Turn on the VCR DVD recorder and set it to its AUX input mode 4 Start playback on the camcorder Z pg 18 16 9 TV 4 3 TV LIf the aspect ratio of the image is not correct as shown on the right Change the settings in SELECT TV TYPE from the MENU LTo display the camcorder s on screen display on TV Set DISPLAY ON TV to ON from the MENU Watching Images on ...

Страница 20: ...button to select playback mode The following screen illustrations are examples when performing DELETE 1 Touch the MENU button You can skip directly to the delete menu by selecting 2 Select DELETE or PROTECT CANCEL Deleting Protecting the Currently Displayed File After performing steps 1 2 3 Select CURRENT 4 When DELETE or PROTECT appears select YES You can select the previous or next file by selec...

Страница 21: ...fter performing steps 1 2 Z pg 20 3 Select DELETE ALL or PROTECT ALL 4 When DELETE ALL or PROTECT ALL appears select YES LTo quit the screen Select QUIT LTo release protection Select the protected file in step 4 Deleting Protecting Files Z pg 20 LTo release protection of all files 1 In step 3 select CANCEL ALL 2 Select YES ...

Страница 22: ...ing the disc is a play only disc so no more files can be added NOTE When using the optional DVD Burner read its instructions Connection with a DVD Burner Preparation Close the LCD monitor to turn off the camcorder NOTES Use the USB cable that came with the DVD burner It is recommended to use the AC Adapter as the power supply instead of the battery pack Copying Video Files that Have Never Been Cop...

Страница 23: ...rproducer 3 comp_dvd_drives jsp NOTE The system requirements information is not a guarantee that the provided software will work on all personal computers meeting those requirements Software Installation Please read the JVC SOFTWARE LICENSE AGREEMENT in the CD ROM instruction before you install software The following software is included in the CD ROM that came with your camcorder PowerCinema NE f...

Страница 24: ...Click Easy Installation If you want to specify the type of software to install or the installation destination folder etc select Custom Installation Follow the instructions on the screen to install the software 3 Click Yes 4 Select the desired language and click OK 5 Click Yes The software installation starts 6 Click Finish LWhen installation is completed The installed software is displayed in All...

Страница 25: ...when disconnecting the camcorder or turning off the power of the camcorder PC Failing to do so may cause damage to the camcorder and PC 1 Confirm that the access charge lamp on the camcorder does not light or blink If the access charge lamp lights or blinks wait until it is turned off before proceeding 2 Double click the Safely Remove Hardware or Unplug or Eject Hardware icon in the status bar 3 S...

Страница 26: ... up files into 2 Open the LCD monitor to turn on the camcorder 3 On the camcorder select PLAYBACK ON PC A dialog box appears on the PC 4 Select Open folder to view files using Windows Explorer and click OK 5 Select the folder you want to back up and drag drop it into the folder you created in step 1 SD_VIDEO Folder that contains video files If you want to back up files individually open this folde...

Страница 27: ...unt click Sign up to YouTube 6 Select video category and broadcast option Click Next The Video Title is automatically filled in during uploading process with the File name and the Description and Tags with Everio Video references Date information is also input If you want to modify this information sign on to your account on the YouTube website http www youtube com 7 Click on the check box and the...

Страница 28: ...r 1 5 The User s Guide is included on the CD ROM in PDF format 1 Load the provided CD ROM into the PC 2 Right click the CD ROM icon in My Computer then click Open 3 Double click the DOCS folder 4 Open the Start pdf file and click the button of the desired language NOTES You need to connect to the Internet to see the Tutorial Adobe Acrobat ReaderTM or Adobe Reader must be installed to read PDF file...

Страница 29: ...nclude any other files than those recorded with the camcorder Do not delete move or rename the files and folders in the camcorder from the computer It is recommended to use the AC Adapter as the power supply instead of the battery pack LWhen you have finished operation Always follow the procedures below when disconnecting the camcorder or turning the power of the camcorder computer off Failing to ...

Страница 30: ... if the SD card contains a DCIM folder 5 Select the folder you want to back up and drag drop it into the folder you created in step 1 SD_VIDEO Folder that contains video files If you want to back up files individually open this folder and drag drop files such as PRG001 one by one DCIM Folder that contains still image files If you want to back up files individually open this folder and drag drop fi...

Страница 31: ...y not appear depending on the FOLDER option setting Recording medium X number Folder Structure and Extensions Management information Contains the video file folders Contains the still image folders Management information for the media as a whole Video file Management information for the video files Contains management information files of event and or DVD creation information for the files taken w...

Страница 32: ...c operation of your PC or questions regarding specifications or performance of the OS other applications or drivers CyberLink Telephone fax support Location Language Office hours Mon to Fri Phone Fax Germany English German French Spanish Italian 9 00 am to 5 00 pm 49 700 462 92375 49 241 70525 25 Taiwan Mandarin 9 00 am to 6 00 pm 886 2 8667 1298 ext 333 886 2 8667 1300 Japan Japanese 10 00 am to ...

Страница 33: ...ach the battery pack once again and reattach it firmly Replace the dead battery with a fully charged one 14 14 The power does not turn on or the battery operation time is extremely short even after the battery is fully charged Make sure to use the camcorder under appropriate operating temperatures The battery is worn out and needs to be replaced Please purchase a new one 36 The power charge lamp o...

Страница 34: ... screen is displayed in the LCD monitor and no other operations can be performed Another operation is being attempted while a DVD burner that is turned on is connected Turn off the camcorder connected to the DVD burner or disconnect the USB cable The touch sensor or sensor button does not function Touch the sensors with your finger The sensors do not function if you touch them with your fingernail...

Страница 35: ... that is confirmed to operate correctly 15 VIDEO MANAGEMENT FILE IS DAMAGED RECOVERY IS REQUIRED TO RECORD PLAYBACK RECOVER The video management file is damaged Recovery is required to record or play back video files Select YES then touch the OK button to recover the video management file RECORDING FAILURE The writing speed of SD card is slow or the SD card is corrupted Use an SD card that is conf...

Страница 36: ... 1 5 m 4 9 ft recommended shooting distance Language English French Spanish Portuguese Japanese Korean Traditional Chinese LFor video Audio Format SD VIDEO Recording Playback format Video MPEG 2 Audio Dolby Digital 2 ch Signal format NTSC standard Recording mode video ULTRA FINE 720 x 480 pixels 8 5 Mbps VBR FINE 720 x 480 pixels 5 5 Mbps VBR NORMAL 720 x 480 pixels 4 2 Mbps VBR ECONOMY 352 x 240 ...

Страница 37: ...min 2 hr 30 min 5 hr 9 hr 55 min 19 hr 50 min Approximate number of storable images for still image Recording medium Image size Quality SD or SDHC Card 256 MB 512 MB 1 GB 2 GB 4 GB 8 GB 16 GB 640 x 480 FINE 1480 3030 6205 9999 9999 9999 9999 640 x 480 STANDARD 2115 4335 8865 9999 9999 9999 9999 Required charging recording time approx When the LED light is off and the monitor backlight is set to ST...

Страница 38: ...es can prevent complete charging store in a cool dry place Extended exposure to high temperatures will increase natural discharge and shorten service life fully charge and then fully discharge the battery every 6 months when storing the battery pack over a long period time remove from charger or powered unit when not in use as some machines use current even when switched off ATTENTION The battery ...

Страница 39: ...pping Fasten the grip belt securely When using the camcorder with a tripod attach the camcorder to the tripod securely If the camcorder drops you may be injured and the camcorder may be damaged When a child uses the unit there must be parental guidance Declaration of Conformity Model Number GZ MS100U Trade Name JVC Responsible party JVC AMERICAS CORP Address 1700 Valley Road Wayne N J 07470 Teleph...

Страница 40: ...DVD Burner 22 I Image Rotation 18 L LCD Monitor 10 12 38 M Macintosh 29 P Power Linked Operation 10 Protecting Files 20 R Recordable Time Number of Images 37 Recording Medium 38 Resetting the Camcorder 33 S SD Card 15 Slide Show 18 Speaker Volume 18 Still Image 17 T TV 19 U Upload 27 V Video 16 W Windows PC 23 ...

Страница 41: ...MEMO ...

Страница 42: ...ectionner vidéo R Sélectionner le mode de lecture PLAY pour afficher les vignettes sur l écran Préparation 1 Q Fixer la batterie Charger la batterie Z p 14 S Ouvrir le couvre objectif T Ouvrer l écran LCD Le caméscope se met automatiquement sous tension R Insérer une carte SD Formater une carte SD lorsqu elle est utilisée pour la première fois Z p 15 BATT ...

Страница 43: ...aité en utilisant le capteur tactile Puis toucher le bouton OK pour démarrer la lecture 5 Pour arrêter la lecture Sélectionner L LPour voir des images sur le téléviseur Z p 19 LNe pas oublier de faire des copies après l enregistrement Pour copier des fichiers sur des disques DVD Z p 22 U Lorsque SET DATE TIME REGLER DATE HEURE apparaît sélectionner YES OUI pendant 10 secondes SET DATE TIME YES NO ...

Страница 44: ...batteries doivent être strictement respectées L appareil ne doit pas être exposé à l égouttage ni aux éclaboussements Ne pas utiliser cet appareil dans une salle de bain ni dans des endroits avec de l eau Aussi ne pas placer de récipient rempli d eau ou de liquides tels des produits cosmétiques des médicaments des vases de fleurs des plantes en pot des tasses etc sur le dessus de cet appareil Si d...

Страница 45: ...dépannage est nécessaire lorsque l appareil a été endommagé d une façon ou d une autre tel que lorsque le cordon d alimentation ou la fiche est endommagé si du liquide a été renversé ou si des objets sont tombés à l intérieur de l appareil si l appareil a été exposé à la pluie ou à l humidité ne fonctionne pas normalement ou a fait une chute Noter que caméscope est destiné à un usage privé uniquem...

Страница 46: ...che apparaissant au fond de l écran touchez le bouton tactile sous la touche désirée PRÉCAUTION Touchez les capteurs avec votre doigt Les capteurs ne fonctionnent pas si vous les touchez avec un ongle ou avec des gants LSélection d une option dans la liste de menu dans l écran de menu Q R MENU IMAGE QUALITY GAIN UP SHUTTER MODE BASIC SETTINGS Q Déplacez votre doigt le long du capteur R Touchez la ...

Страница 47: ...ment le réinitialiser Z p 33 Précautions à prendre lors de la manipulation de la batterie Vous devez utiliser les bloc piles JVC BN VF808U VF815U VF823U Si le caméscope est soumis à une décharge électrostatique l éteindre avant de l utiliser à nouveau En cas de dysfonctionnement cesser immédiatement d utiliser le caméscope et consulter le revendeur JVC le plus proche En cas de problème lors de l u...

Страница 48: ...rs 18 Lecture de vidéos photos 18 Visualisation de photos sur le téléviseur 19 ÉDITION IMPRESSION Gestion des fichiers 20 Suppression Protection de fichiers 20 Copie de fichiers 22 Utilisation d un graveur DVD pour copier des fichiers du caméscope 22 UTILISATION DE L ORDINATEUR Sauvegarde de fichiers sur un ordinateur Windows 23 Configuration système requise 23 Installation du logiciel 23 Connexio...

Страница 49: ...Adaptateur secteur AP V18U 14U Batterie BN VF808U Câble audio vidéo Câble USB Z p 22 25 et 29 CD ROM Z p 23 28 REMARQUE Veiller à utiliser les câbles fournis pour les connexions Ne pas utiliser d autres câbles PRISE EN MAIN ...

Страница 50: ...D peut pivoter sur 270 Opération avec alimentation couplée Il est possible également allumer éteindre le caméscope en ouvrant fermant l écran LCD en mode d enregistrement Veiller à ne pas obstruer 4 5 7 et 9 lors de la prise de vue ...

Страница 51: ...che Informations INFO Z p 15 Touche Transfert Mode de pré enregistrement pour transfert UPLOAD Z p 27 Touche de mode Auto Manuel AUTO MANUAL Commutateur de mode Touche marche arrêt d enregistrement vidéo START STOP Z p 16 Touche de prise de photo SNAPSHOT Z p 17 0 Commande de zoom W 7 T Z p 18 Contrôle du volume du haut parleur VOL Z p 18 1 Prise CC DC Z p 14 2 Prise audio vidéo AV 3 Prise USB Uni...

Страница 52: ...3 Vitesse d obturation Pendant l enregistrement de vidéos uniquement Indicateur de mode Compteur Indicateur de mode de pré enregistrement pour transfert apparaît pendant le UPLOAD REC ON Z p 27 Qualité de l image B ULTRA FIN C FIN D NORMAL E ECONOMIE Durée restante Z p 16 37 MREC Apparaît pendant l enregistrement Z p 16 MQ Apparaît en mode d attente d enregistrement Indicateur du stabilisateur d i...

Страница 53: ...auche indique la vitesse Indicateur de carte SD Z p 15 Indicateur du niveau du volume Indicateur de la batterie Z p 35 Date Heure Z p 14 Pendant la lecture de photos Indicateur de mode Indicateur du mode d effet Numéro de dossier fichier Indicateur de lecture de diaporama Z p 18 Indicateur de carte SD Z p 15 Indicateur de la batterie Z p 35 Date Heure Z p 14 Modifications des indicateurs sur l écr...

Страница 54: ... ou de plier la fiche et le cordon de l adaptateur secteur Cela pourrait endommager l adaptateur secteur Réglage de la date et de l heure 1 Ouvrir l écran LCD pour allumer le caméscope 2 Lorsque REGLER DATE HEURE SET DATE TIME apparaît sélectionner OUI YES pendant 10 secondes Si vous ne sélectionnez pas pendant un délai de 10 secondes l écran disparaît En ce cas appuyer sur la touche d alimentatio...

Страница 55: ...ediaCards ne sont pas prises en charge Les cartes utilisées pour enregistrer des vidéos sur ce caméscope ne peuvent pas être lues sur d autres appareils Certains lecteurs de carte y compris des lecteurs de carte intégrés à des ordinateurs peuvent ne pas être compatibles avec le format SDHC Si on utilise une carte SDHC pour l enregistrement et qu une erreur de lecture se produise il se peut que le ...

Страница 56: ... dans QUALITE VIDEO dans le MENU LPour modifier le rapport de format de l image 16 9 4 3 Modifier les réglages dans CHOISIR RAPP FORMAT dans le MENU LPour enregistrer un clip vidéo environ 10 minutes Avant de démarrer l enregistrement appuyer deux fois sur la touche UPLOAD pour choisir UPLOAD REC ON Déplacer le commutateur de mode pour sélectionner le mode vidéo REMARQUES Les noms MOV001 MOD à MOV...

Страница 57: ...touche SNAPSHOT à mi course sans la relâcher L indicateur devient vert lorsque l image capturée est au point Enfoncer complètement la touche SNAPSHOT pour prendre la photo LPour visualiser la photo qui vient d être prise Sélectionner A après la prise de vue Sélectionner pour supprimer la photo lors de la visualisation LPour modifier la qualité de l image Modifier les réglages dans QUALITE IMAGE da...

Страница 58: ...N Retourner à la première scène du fichier O Passer à la première scène du fichier suivant L Retourner à l écran d index J Rechercher en arrière durant la lecture E Lecture image par image en arrière pendant une pause F Lecture Q Pause K Rechercher en avant durant la lecture G Lecture image par image en avant pendant une pause La lecture au ralenti démarre si vous gardez votre doigt sur le capteur...

Страница 59: ...toscope enregistreur de DVD Allumer le magnétoscope enregistreur de DVD et le régler sur son mode d entrée AUX 4 Lancer la lecture sur le caméscope Z p 18 TELEVISEUR 16 9 TELEVISEUR 4 3 LSi le rapport de format de l image est incorrect comme illustré ci contre Modifier les réglages dans SELECT FORMAT ECRAN dans le MENU LPour afficher l écran du caméscope sur le téléviseur Régler AFFICHER SUR TV su...

Страница 60: ...puyer sur la touche SELECT PLAY REC pour sélectionner le mode de lecture Les écrans suivants montrent comment supprimer des fichiers à l aide de l option SUPPRIMER 1 Toucher la touche MENU Sélectionner pour passer directement au menu de suppression 2 Sélectionner SUPPRIMER ou PROTEGER ANNULER Supprimer Protéger le fichier affiché Après avoir exécuté les étapes 1 2 3 Sélectionner ACTUEL 4 Lorsque S...

Страница 61: ... p 20 3 Sélectionner TOUT SUPPRIMER ou TOUT PROTEGER 4 Lorsque TOUT SUPPRIMER ou TOUT PROTEGER apparaît sélectionner OUI LPour quitter l écran Sélectionner FIN LPour annuler la protection Sélectionner le fichier protégé à l étape 4 Suppression Protection de fichiers Z p 20 LPour annuler la protection de tous les fichiers 1 À l étape 3 sélectionner TOUT ANNULER 2 Sélectionner OUI ...

Страница 62: ...ion le disque est un disque en lecture seule Aucun fichier supplémentaire ne peut être ajouté REMARQUE Si vous utilisez un graveur de DVD en option veuillez lire ses instructions Connexion à un graveur de DVD Préparation Fermer l écran LCD pour éteindre le caméscope REMARQUES Utiliser le câble USB qui accompagne le graveur de DVD Il est recommandé d utiliser l adaptateur secteur comme alimentation...

Страница 63: ...cer 3 comp_dvd_drives jsp REMARQUE Les informations relatives à la configuration requise ne sont pas une garantie que le logiciel fourni fonctionnera sur tous les ordinateurs disposant d une telle configuration Installation du logiciel Veuillez lire le fi chier Contrat de licence du logiciel JVC dans le CD ROM d instructions avant d installer le logiciel Les logiciels suivants sont inclus dans le ...

Страница 64: ... Cliquer sur Easy Installation Pour spécifier le type de logiciel à installer ou le dossier de destination pour l installation sélectionner Custom Installation Suivre les instructions sur l écran pour installer les logiciels 3 Cliquer sur Yes 4 Sélectionner la langue désirée puis cliquer sur OK 5 Cliquer sur Oui L installation du logiciel commence 6 Cliquer sur Terminer L Une fois l installation t...

Страница 65: ... éteindre le caméscope ou l ordinateur Un non respect de cette procédure peut endommager le caméscope et l ordinateur 1 Vérifier que le voyant d accès recharge du caméscope n est ni allumé ni clignotant Si le voyant d accès recharge est allumé ou clignote attendre qu il s éteigne avant de continuer 2 Double cliquer sur l icône Supprimer le périphérique en toute sécurité ou Déconnecter ou éjecter l...

Страница 66: ...ans le dossier créé à l étape 1 SD_VIDEO Dossier contenant des fichiers vidéo Pour sauvegarder les fichiers individuellement ouvrir ce dossier et déplacer les fichiers tels que PRG001 un par un DCIM Dossier contenant des fichiers de photo Pour sauvegarder les fichiers individuellement ouvrir ce dossier et déplacer les fichiers tels que PIC_0001 JPG un par un REMARQUE Pour plus de détails sur l uti...

Страница 67: ...e 6 Sélectionner la catégorie vidéo et l option de diffusion Cliquer sur Suivant Le titre du clip vidéo est créé automatiquement pendant le processus de transfert avec le nom du fichier et la description et les balises avec les références vidéo Everio Les informations de la date sont aussi entrées Si vous souhaitez modifier cette information connectez vous à votre compte sur le site web YouTube ht...

Страница 68: ...D ROM 1 Insérer le CD ROM fourni dans le lecteur CD de l ordinateur 2 Cliquer avec le bouton droit de la souris sur l icône du CD ROM dans Poste de travail puis cliquer sur Ouvrir 3 Cliquer deux fois sur le dossier DOCS 4 Ouvrir le fichier Start pdf et cliquer sur le bouton de la langue désirée REMARQUES Vous devez être connecté à l Internet pour visualiser les tutoriels Adobe Acrobat ReaderTM ou ...

Страница 69: ...pe n inclure aucun autre fichier que ceux enregistrés avec le caméscope Ne supprimer déplacer ni renommer aucun fichier ni dossier sur le caméscope depuis l ordinateur Il est recommandé d utiliser l adaptateur secteur comme alimentation à la place de la batterie LUne fois l utilisation terminée Toujours suivre la procédure ci dessous pour déconnecter le caméscope ou pour éteindre l appareil photo ...

Страница 70: ... démarre si la carte SD contient un dossier DCIM 5 Sélectionner le dossier à sauvegarder et le déplacer dans le dossier créé à l étape 1 SD_VIDEO Dossier contenant des fichiers vidéo Pour sauvegarder les fichiers individuellement ouvrir ce dossier et déplacer les fichiers tels que PRG001 un par un DCIM Dossier contenant des fichiers de photo Pour sauvegarder les fichiers individuellement ouvrir ce...

Страница 71: ... option DOSSIER Support d enregistrement X nombre Structure des dossiers et extensions Informations de gestion Contient les dossiers de fichiers vidéo Contient les dossiers de photos Informations de gestion du support d enregistrement dans son ensemble Fichier vidéo Informations de gestion des fichiers vidéos Contient des fichiers d information de gestion des informations d événement et ou de créa...

Страница 72: ... aux questions concernant les spécifications ou les performances du système d exploitation d autres applications ou pilotes CyberLink Assistance téléphonique par télécopie Emplacement Langue Heures d ouverture Du lundi au vendredi N de téléphone N de télécopie Allemagne Anglais Allemand Français Espagnol Italien De 9 00 am à 5 00 pm 49 700 462 92375 49 241 70525 25 Taiwan Mandarin De 9 00 am à 6 0...

Страница 73: ...eau la batterie et la remettre en place fermement Remplacer la batterie déchargée avec une batterie bien chargée 14 14 L appareil photo ne s allume pas ou la durée d opération de la batterie est extrêmement réduite même avec une batterie complètement chargée Veiller à utiliser le caméscope à des températures d opération adéquates La batterie est détériorée et doit être remplacée par une batterie n...

Страница 74: ...écran LCD et aucune autre opération n est possible Une autre opération est tentée alors qu un graveur DVD allumé est connecté à l appareil photo Éteindre le caméscope connecté au graveur de DVD ou déconnecter le câble USB Le capteur tactile ou le bouton tactile ne fonctionne pas Touchez les capteurs avec votre doigt Les capteurs ne fonctionnent pas si vous les touchez avec un ongle ou avec des gan...

Страница 75: ... une autre dont le bon fonctionnement est garanti 15 ERREUR DE FICHIER DE GESTION VIDEO UNE RESTAURATION EST REQUISE RESTAURER Le fichier de gestion vidéo est endommagé Il faut procéder à une restauration pour enregistrer ou lire des fichiers vidéo Sélectionner OUI puis toucher la touche OK pour restaurer le fichier de gestion vidéo ERREUR D ENREGISTREMENT La vitesse d écriture sur la carte SD est...

Страница 76: ...se de vue recommandée Langue Anglais Français Espagnol Portugais Japonais Coréen Chinois traditionnel LVidéo Audio Format SD VIDEO Format d enregistrement et de lecture Video MPEG 2 Audio Dolby numérique 2 voies Format du signal Norme NTSC Mode d enregistrement vidéo ULTRA FIN 720 x 480 pixels 8 5 Mbit s VBR FIN 720 x 480 pixels 5 5 Mbit s VBR NORMAL 720 x 480 pixels 4 2 Mbit s VBR ECONOMIE 352 x ...

Страница 77: ... min 19 h 50 min Nombre approximatif d images qu il est possible d enregistrer photos Support d enregistrement Taille qualité de l image Carte SD ou SDHC 256 MB 512 MB 1 GB 2 GB 4 GB 8 GB 16 GB 640 x 480 FIN 1480 3030 6205 9999 9999 9999 9999 640 x 480 STANDARD 2115 4335 8865 9999 9999 9999 9999 Temps de recharge d enregistrement requis approx Lorsque l éclairage LED est éteint et l éclairage de l...

Страница 78: ...ns un endroit frais et sec Toute exposition prolongée à de températures élevées accélérera la décharge naturelle et diminuera la durée de vie utile charger et décharger complètement la batterie tous les 6 mois lors d un entreposage pendant une période de temps prolongée retirer l appareil du chargeur ou le débrancher lorsque vous ne vous en servez pas certains appareils même éteints continuent de ...

Страница 79: ...éscope est à l intérieur Pour éviter une chute de l appareil Serrer la ceinture de la poignée fermement Lors de l utilisation du caméscope avec un trépied fixer fermement le caméscope sur le trépied Si le caméscope se détache et tombe il peut causer des blessures ou être endommagé Si un enfant utilise l appareil un adulte doit être présent Déclaration de conformité Numéro de modèle GZ MS100U Nom d...

Страница 80: ... alimentation couplée 10 G Graveur de DVD 22 M Macintosh 29 O Ordinateur Windows 23 P Protection des fichiers 20 Photo 17 R Réglage de l horloge 14 Réinitialisation le caméscope 33 Rotation de l image 18 S Suppression de fichiers 20 Support d enregistrement 38 T Téléviseur 19 Transfert 27 V Vidéo 16 Volume du haut parleur 18 Printed in Malaysia 0508ASR MW MD UC 2008 Victor Company of Japan Limited...

Отзывы: