background image

EN

This camcorder is designed to be used with 

high-definition or NTSC-type color television 

signals. It cannot be used with a television of a 

different standard.

Connection with TV

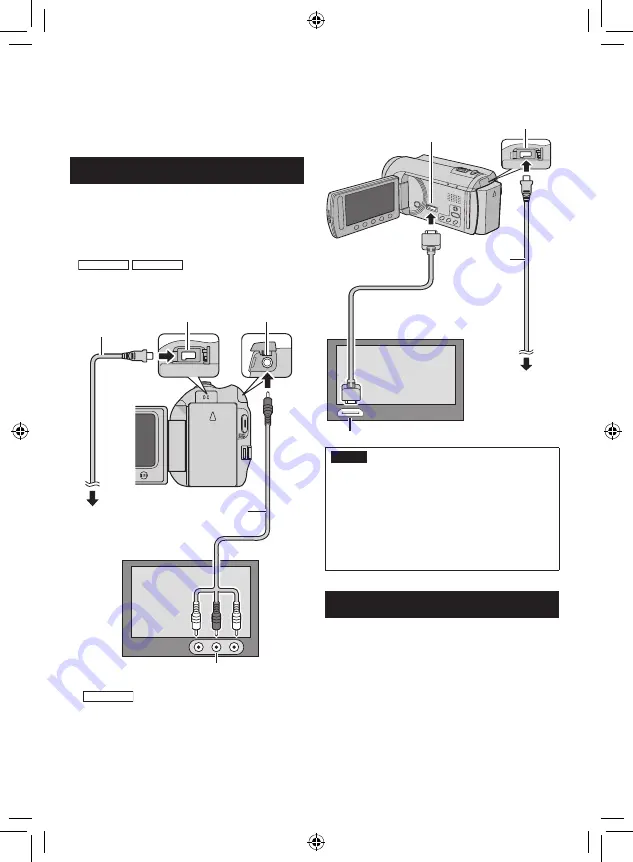
You can output videos from the AV connector 

or the HDMI mini connector. 

To connect using the AV connector

Preparation:


GZ-MG680


GZ-MG650

 Set [SWITCH TO 

ANALOG I/O] to [OUTPUT].

 Turn off all units.

GZ-MG680

 To connect using the HDMI 

mini connector

We recommend using the Category 2 HDMI 

cable (High Speed cable).

Preparation: Turn off all units.

NOTE

 When connecting to the HDMI cable, the 

image or sound may not appear on the TV 

properly depending on the TV connected. 

In such cases, perform the following 

operations.

  1)  Disconnect the HDMI cable and connect 

it again.

  2)  Turn off and on the camcorder again.

Playback Operation

After the connection with TV is completed

1

  Turn on the camcorder and the TV.

2

  Set the TV to its VIDEO mode.

3

  (Only when connecting the camcorder to 

the VCR/DVD recorder)


Turn on the VCR/DVD recorder, and 

set the VCR/DVD recorder to its AUX 

input mode.

4

  Start playback on the camcorder. 

(

Z

 p. 22, 23)

Viewing Files on TV

HDMI Mini Connector

AC Adapter

DC Connector

HDMI Connector

HDMI Cable (optional)

(Mini to full-sized HDMI cable)

To AC Outlet

AV Cable

DC Connector

AC Adapter

To AC Outlet

AV Connector

AV Input Connector

USING WITH TV

Содержание Everio GZ-MG630

Страница 1: ...r Before use please read the safety information and precautions contained in pages 2 and 3 to ensure safe use of this product For Future Reference Enter the Model No located on the bottom of the camcorder and Serial No located on the battery pack mount of the camcorder below Model No Serial No Cher client Nous vous remercions d avoir acheté ce caméscope Avant de commencer veuillez lire les informa...

Страница 2: ...uipment is installed in a cabinet or on a shelf make sure that it has sufficient space on all sides to allow for ventilation 10 cm 3 15 16 or more on both sides on top and at the rear Do not block the ventilation holes If the ventilation holes are blocked by a newspaper or cloth etc the heat may not be able to get out No naked flame sources such as lighted candles should be placed on the apparatus...

Страница 3: ...maged liquid has been spilled or objects have fallen into the apparatus the apparatus has been exposed to rain or moisture does not operate normally or has been dropped Remember that this camcorder is intended for private consumer use only Any commercial use without proper permission is prohibited Even if you record an event such as a show performance or exhibition for personal enjoyment it is str...

Страница 4: ...tment Adjust the strap and fasten Fasten the strap when you grip the camcorder When carrying the camcorder please be careful not to drop it Grip Strap Fasten Power charge lamp blinks Charging goes out Charging finished Battery Pack AC Adapter To AC Outlet 110V to 240V Open the cover The battery pack is not charged at the time of purchase Access lamp blinks Accessing files Do not remove the AC adap...

Страница 5: ... within 10 seconds When the message disappears press the power button for at least 2 seconds to turn off the power and then press it again for at least 2 seconds Touch the sensors with your finger The sensors do not function if you touch them with your finger nail or with gloves on Slide your finger up and down on the sensor Then touch OK V Set the date and time Touch sensor Sets the date and time...

Страница 6: ...S Start recording Press the START STOP button to start recording and press it again to stop Remaining space on the hard disk Video Quality Record standby Recording Q Slide the mode switch to select video mode R Select recording mode The mode changes when you press the button The auto recording indicator appears ...

Страница 7: ... forget to make copies after recording To copy files onto DVD discs Z p 27 To dub files to a VCR DVD recorder Z p 34 To play back a created disc Z p 28 To edit files on your computer Z p 29 Q Select playback mode The mode changes when you press the button S Select F Touch OK Playback screen R Select the desired file Index screen ...

Страница 8: ...ack 22 Still Image Playback 23 Manual Recording 24 Changing to Manual Recording Mode 24 Backlight Compensation 24 Manual Setting in Menu 24 USING WITH TV Viewing Files on TV 25 Connection with TV 25 Playback Operation 25 EDITING Managing Files 26 Capturing a Still Image from a Video 26 Deleting Files 26 COPYING Copying Files 27 Using a DVD Burner 27 Creating a DVD using a PC 29 Dubbing Files to a ...

Страница 9: ... again If a malfunction occurs stop using the camcorder immediately and contact www jvc ca or by phone at 1 800 964 2650 Recorded data may be erased while the camcorder is being repaired or inspected Back up all data before requesting repairs or inspections Because camcorders may be used for demonstration in a shop the demonstration mode is set to on by default To deactivate the demonstration mode...

Страница 10: ...U BN VF808U AC Adapter Battery Pack AV Cable USB Cable RM V751U CR2025 Remote Control Lithium Battery Pre installed in the remote control CD ROM Core Filter NOTE Make sure to use the provided cables for connections Do not use any other cables ...

Страница 11: ... when the remote sensor is directly exposed to sunlight or powerful lighting Pull out the battery holder by pressing the lock tab Effective distance Max 5 m 16 ft Remote Sensor Lock Tab Lithium Battery CR2025 Attaching the Core Filter to the USB Cable The core filter reduces interference caused when connecting to other devices Connect the end of the cable with the core filter to the camcorder Rele...

Страница 12: ...12 EN Index NOTE Be careful not to cover 1 2 3 and 4 during shooting The LCD monitor can rotate 270 ...

Страница 13: ...ting socket with the screw Camcorder Power Button GZ MG680 HDMI Mini Connector Z p 25 DISPLAY Button Z p 15 Speaker Zoom Lever Z p 21 Speaker Volume Control SNAPSHOT Button Z p 20 Touch Sensor OK Button MENU Button Mode Switch UPLOAD Button Z p 36 TITLE Button EXPORT Button Z p 35 DIRECT DVD Button Z p 28 INFO Button Z p 21 0 PLAY REC Button Z p 19 20 22 23 1 LED Light Z p 21 2 Remote Sensor 3 Len...

Страница 14: ...ndicator Z p 24 1 Brightness Control Indicator Photometry Area Control Indicator 2 Shutter Speed During Video Recording Only Mode Indicator EXPORT Mode Indicator Z p 35 Counter Upload Mode Indicator Z p 36 A GZ MG680 GZ MG650 Analog Input Indicator Video Quality B ULTRA FINE C FINE D NORMAL E ECONOMY Remaining Time MREC Appears during recording MQ Appears during record standby mode Digital Image S...

Страница 15: ...t shows speed Battery Indicator Date Time Z p 16 Volume Level Indicator GZ MG680 Output with 1080p During Still Image Playback 4 55 PM NOV 1 2009 Mode Indicator Quick Review Indicator Z p 20 Folder File Number Slide Show Playback Indicator Battery Indicator Date Time Z p 16 GZ MG680 Output with 1080p Switching indication modes on LCD monitor Each time you touch DISPLAY indications on LCD monitor s...

Страница 16: ... time BN VF808U Provided 1 h 50 m BN VF815U 2 h 40 m BN VF823U 3 h 40 m To detach the battery pack NOTE You can also use the camcorder with just the AC adapter The actual recording time may shorten depending on the recording environment such as when recording scenes with fast moving subject Please do not pull or bend the AC adapter plug and cable This may damage the AC adapter Date Time Setting 1 ...

Страница 17: ... performing steps 1 4 Z p 16 5 Select AREA SETTING 6 Select the city closest to the area you are traveling To return to the previous screen Select To quit the screen Select QUIT Language Setting The language on the display can be changed 1 Open the LCD monitor to turn on the camcorder 2 Touch MENU 3 Select DISPLAY SETTINGS 4 Select LANGUAGE 5 Select the desired language To return to the previous s...

Страница 18: ...ta that had already been recorded MultiMediaCards are not supported Insert a microSD card Preparation Close the LCD monitor to turn off the camcorder 1 Open the microSD card cover 2 Firmly insert the card with its clipped edge first 3 Close the microSD card cover To remove a microSD card Push the microSD card once After the card comes out a little pull it out NOTE Insert and remove the microSD car...

Страница 19: ...ideo recording Press SNAPSHOT Slide the mode switch to select video mode NOTE The video recording mode is automatically selected when you turn off the camcorder and then turn on again If the camcorder is not operated for 5 minutes while the power is on it turns itself off automatically to conserve power Do not move or shake the camcorder suddenly during recording If you do so the driving sound hum...

Страница 20: ...lizer does not function during still image recording If the camcorder is not operated for 5 minutes while the power is on it turns itself off automatically to conserve power Still Image Recording To view the last recorded image Select A after shooting Selecting during playback deletes that image To change the image quality Change the settings in IMAGE QUALITY To record still images continuously Se...

Страница 21: ... 3 Select the desired setting ON The LED light remains on regardless of the surrounding conditions AUTO The LED light turns on automatically when shooting in insufficient light conditions OFF Deactivates this function Checking the Remaining Battery Power mode Press INFO twice or INFO and then select mode Press INFO To quit the screen Select QUIT or press INFO NOTE The recordable time display shoul...

Страница 22: ... back Some video may not be played back at all To delete a video Select when playback is stopped To change the number of thumbnails 6 thumbnails 20 thumbnails Move the zoom lever to W Operations during Video Playback On screen buttons N Return to the first scene of the file O Go to the first scene of the next file L Return to the index screen J Reverse search during playback E Frame by frame playb...

Страница 23: ...k mode The index screen appears Select the desired file Slide the mode switch to select still image mode Still Image Playback Operations during Still Image Playback On screen buttons P Change playback order of slide show in reverse direction F Change playback order of slide show in forward direction L Return to the index screen N Display the previous file F Start the slide show Q End the slide sho...

Страница 24: ...asing the exposure In the manual recording mode Select To cancel backlight compensation Select again NOTE If the LCD monitor is turned upside down is not displayed Change the setting when the LCD monitor is in the normal position Manual Setting in Menu In the manual recording mode 1 Touch MENU 2 Select MANUAL SETTING 3 Select the desired menu 4 Select the desired setting Depending on the kind of s...

Страница 25: ...image or sound may not appear on the TV properly depending on the TV connected In such cases perform the following operations 1 Disconnect the HDMI cable and connect it again 2 Turn off and on the camcorder again Playback Operation After the connection with TV is completed 1 Turn on the camcorder and the TV 2 Set the TV to its VIDEO mode 3 Only when connecting the camcorder to the VCR DVD recorder...

Страница 26: ...e Press SNAPSHOT when playback is paused NOTE Captured still images are stored at a resolution of 640 x 360 if the video was recorded in 16 9 or 640 x 480 if the video was recorded in 4 3 The image can be elongated in the horizontal or vertical directions depending on the quality of the source video file The continuous shooting function cannot be used to capture images You cannot capture video dur...

Страница 27: ...sing a DVD Burner Supported discs 12cm DVD R DVD RW Regarding DVD R discs only unused DVD R discs can be used Regarding DVD RW discs used DVD RW discs can also be used but they need to be formatted before recording Formatting a disc deletes all content recorded on the disc up until that time Dual layer discs cannot be used Regarding finalization after copying The disc is automatically finalized so...

Страница 28: ...ining files are copied on the second disc To cancel copying select STOP Copying Video Files that Have Never Been Copied Files that have never been copied to the DVD discs are automatically selected and copied 1 Open the LCD monitor to turn on the camcorder 2 Press DIRECT DVD 3 Select EXECUTE The DVD disc begins to be created When COMPLETED appears touch OK When INSERT NEXT DISC PRESS STOP TO EXIT ...

Страница 29: ...ium M 1 4 GHz or higher Intel CoreTM Duo 1 5 GHz or higher RAM At least 512 MB To check the PC specification Right click on Computer or My Computer in the Start menu and select Properties NOTE Make sure your PC has a recordable DVD drive If your system does not meet the requirements it is recommended to copy files using the DVD burner Z p 27 Macintosh users may use the software included with their...

Страница 30: ...the PC 3 Click All volume in camcorder and click Next 4 Click Start Backup starts To disconnect the camcorder from the PC 1 Right click the icon Safely Remove Hardware on the task bar and select Safely remove USB Mass Storage Device 2 Follow the on screen instructions and make sure that the device can be safely removed 3 Disconnect the USB cable and close the LCD monitor NOTE It takes time to back...

Страница 31: ...ct into the user list Preparation Make backup on the PC 1 Double click the icon and open the calendar 2 Select Movies only 3 Click 4 Input the name of the new user list and click OK 5 Double click the recording date The files recorded on the day are displayed 6 Drag the file and drop into the user list To add other files into the user list repeat steps 5 and 6 ...

Страница 32: ... step 4 3 Drag the file and drop into the part at the bottom and click Next 4 Input the disc name select the top menu style and click Next 5 Click Start NOTE For detail on operating Everio MediaBrowser click Help and refer to MediaBrowser Help Adobe Reader must be installed to read MediaBrowser Help Adobe Reader can be loaded from Adobe s web site http www adobe com For assistance in operating the...

Страница 33: ... their subject matter JVC cannot answer questions regarding basic operation of your PC or questions regarding specifications or performance of the OS other applications or drivers Pixela Region Language Phone USA and Canada English 1 800 458 4029 toll free Europe UK Germany France and Spain English German French Spanish 800 1532 4865 toll free Other Countries in Europe English German French Spanis...

Страница 34: ...k screen is displayed for 5 seconds at the first and the last scene 4 At the point you want to start dubbing start recording on the VCR DVD recorder Refer to the VCR DVD recorder s instruction manual To stop dubbing Stop recording on the VCR DVD recorder To hide the date or icons on the screen Change the settings in DISPLAY ON TV Copying Files Continued Switching indication modes on LCD monitor Ea...

Страница 35: ...t the playback mode 1 Press EXPORT 2 Select the file and set To check the content of the file select CHECK 3 Select DONE To cancel the export setting Select the file and select again To quit the screen 1 Select DONE 2 Select YES To confirm the export setting Press EXPORT on the index screen Transferring the Files to PC Preparation Install iTunes on a PC http www apple com itunes 1 Connect the camc...

Страница 36: ... the LCD monitor NOTE The upload mode turns off each time recording is finished Uploading Files to Websites Uploading Files For details on uploading files refer to the operation guide of MediaBrowser in the CD ROM 1 Connect the camcorder to the PC with the USB cable 2 Select UPLOAD If you cannot upload the file to YouTube You need your YouTube account to upload files to YouTube Create your account...

Страница 37: ...off the camcorder wait for a while and start recording again Move away from a place where the camcorder is affected by excessive sound or vibration such as a concert hall A malfunction may occur in the HDD of the camcorder In this case record to a microSD card Insert a commercially available microSD card and set each of the REC MEDIA FOR VIDEO and REC MEDIA FOR IMAGE to SD Recording stops automati...

Страница 38: ...oes not appear on the TV properly When connecting to the HDMI cable the image or sound may not appear on the TV properly depending on the TV connected In such cases perform the following operations 1 Disconnect the HDMI cable and connect it again 2 Turn off and on the camcorder again GZ MG680 HDMI CEC functions do not work properly and the TV does not work in conjunction with the camcorder TVs may...

Страница 39: ...nsert the microSD card MultiMediaCard cannot be used Remove any dirt from the microSD card terminals Insert the microSD card before switching the power on Turn off the camcorder and turn it on again CANNOT TAKE MORE STILL IMAGES AT THE MOMENT Stop video recording and then record a still image If an microSD card is removed or inserted during video recording a still image cannot be recorded DROP DET...

Страница 40: ... Audio input 300 mV rms 50 kW Audio output 300 mV rms 1 kW GZ MG680 GZ MG650 only GZ MG680 HDMI HDMI Mini Connector USB Mini USB type A and type B USB 2 0 compliant AC Adapter Power requirement AC 110 V to 240 V 50 Hz 60 Hz Output DC 11 V 1 A Remote Control Power supply DC 3 V Battery life Approx 1 year depending on the frequency of use Operating distance Within 5 m 16 4 ft Operating temperature 0...

Страница 41: ...h 58 m 9 h 56 m Approximate number of images for still image The HDD can record up to 9999 still images in either mode Recording medium Image size Quality microSD Card 256 MB 512 MB 1 GB 2 GB 4 GB 8 GB 4 3 832 x 624 FINE 990 1960 3980 7600 9999 9999 832 x 624 STANDARD 1490 2940 5970 9999 9999 9999 h hour m minute Required charging recording time approx Battery pack Charging time Recording time BN ...

Страница 42: ...e as some machines use current even when switched off ATTENTION The product you have purchased is powered by a rechargeable battery that is recyclable Please call 1 800 8 BATTERY for information on how to recycle this battery Recording Medium Be sure to follow the guidelines below to prevent corruption or damage to your recorded data Do not bend or drop the recording medium or subject it to strong...

Страница 43: ...riods expose the lens to direct sunlight swing it excessively when using the hand strap swing the soft camcorder case excessively when the camcorder is inside it place the camcorder in dusty or sandy areas such as on a beach To prevent the unit from dropping Fasten the grip belt securely When using the camcorder with a tripod attach the camcorder to the tripod securely If the camcorder drops you m...

Страница 44: ... Hard Disk 42 HDMI 25 I iTunes 35 L Language Setting 17 LCD Monitor 14 42 LED Light 21 M Manual Recording 24 Menu Settings 37 microSD Card 18 N Number of Images 41 O On screen Recording Control 19 On screen Zoom Control 21 P Portable Media Player 35 Q Quick Review 19 20 R Recordable Time 41 Recording Medium 42 Remaining Battery Power 21 Remaining Recording Time 21 Remote Control 11 13 S Speaker vo...

Страница 45: ...MEMO ...

Страница 46: ...s allumées ne doit être placée sur l appareil En jetant des batteries aux ordures les problèmes d environnement doivent être pris en considération et les réglementations locales ou la législation concernant le rebut de ces batteries doivent être strictement respectées L appareil ne doit pas être exposé à l égouttage ni aux éclaboussements Ne pas utiliser cet appareil dans une salle de bain ni dans...

Страница 47: ...outes les instructions 5 Ne pas utiliser cet appareil à proximité de l eau 6 Ne nettoyer qu avec un chiffon sec 7 Ne pas boucher les ouvertures de ventilation Installer selon les instructions du fabricant 8 Ne pas installer à proximité de sources de chaleur telles que des radiateurs des accumulateurs de chaleur des poêles ou d autres appareils comprenant les amplificateurs qui produisent de la cha...

Страница 48: ...erie ou la carte microSD lorsque le voyant clignote ATTENTION Assurez vous d utiliser des batteries de JVC Si vous utilisez des batteries d autres fabricants les performances et la sécurité ne peuvent pas être garanties Ajuster la poignée Ajustez la dragonne et serrez Serrez la dragonne autour de la main en saisissant le caméscope Évitez de laisser tomber le caméscope lors de son utilisation Poign...

Страница 49: ...n délai de 10 secondes Lorsque le message disparaît appuyez au moins 2 secondes sur la touche marche arrêt pour éteindre l appareil appuyez alors de nouveau sur la touche au moins 2 secondes Touchez les capteurs avec votre doigt Les capteurs ne fonctionnent pas si vous les touchez avec un ongle ou avec des gants Déplacez votre doigt le long du capteur Touchez alors OK V Réglez la date et l heure C...

Страница 50: ...mode change lorsque vous appuyez sur la touche S L indicateur du mode d enregistrement automatique apparaît Commencez à enregistrer Appuyez sur la touche START STOP pour lancer l enregistrement appuyez de nouveau sur la touche pour arrêter Espace restant sur le disque dur Qualité vidéo Pause Enregistrement Q Déplacez le commutateur de mode pour sélectionner le mode vidéo ...

Страница 51: ...recherches avants arrières Z p 22 Pour visualiser des fichiers sur un téléviseur Z p 25 ATTENTION N oubliez pas de faire des copies après l enregistrement Pour copier des fichiers sur des disques DVD Z p 27 Pour copier des fichiers sur un magnétoscope enregistreur DVD Z p 34 Pour lire un disque créé Z p 28 Pour éditer des fichiers sur votre ordinateur Z p 29 Écran d index Écran de lecture ...

Страница 52: ...e d enregistrement manuel 24 Compensation de contre jour 24 Réglage manuel dans menu 24 UTILISATION AVEC UN TÉLÉVISEUR Visualiser des fichiers sur un téléviseur 25 Connexion à un téléviseur 25 Opération de lecture 25 Table des matières EDITION Gestion des fichiers 26 Capturer une photo d une vidéo 26 Supprimer des fichiers 26 COPIE Copier des fichiers 27 Utiliser un graveur de DVD 27 Créer un DVD ...

Страница 53: ... de l utiliser à nouveau En cas de dysfonctionnement cessez immédiatement d utiliser le caméscope et contactez www jvc ca ou par téléphone au 1 800 964 2650 Il se peut que les données enregistrées soient effacées lors de la réparation ou du contrôle du caméscope Sauvegardez toutes les données avant de faire une demande de réparation ou de contrôle Comme il se peut que le caméscope soit utilisé pou...

Страница 54: ...eur secteur Batterie Câble AV Câble USB RM V751U CR2025 Télécommande Pile au Lithium Préinstallée dans la télécommande CD ROM Filtre à noyau de ferrite REMARQUE Assurez vous d utiliser les câbles fournis pour les connexions N utilisez pas d autres câbles ...

Страница 55: ...umière du soleil ou à des éclairages puissants Retirez le logement de la pile en poussant sur le bouton de verrouillage Portée effective Max 5 m Capteur infrarouge Bouton de verrouillage Pile au Lithium CR2025 Fixer le filtre à noyau de ferrite sur le câble USB Le filtre à noyau de ferrite réduit les parasites causés lors de la connexion aux autres périphériques Connectez l extrémité du câble avec...

Страница 56: ...12 FR Index REMARQUE Assurez vous de ne pas obstruer 1 2 3 et 4 lors de la prise de vue L écran LCD peut pivoter sur 270 ...

Страница 57: ...e montage sur la vis puis faites pivoter le caméscope dans le sens horaire pour le monter sur le trépied REMARQUE N utilisez pas un trépied photographique sur des surfaces irrégulières ou inclinées Il pourrait tomber et le caméscope pourrait être sérieusement endommagé Caméscope Touche marche arrêt GZ MG680 Mini connecteur HDMI Z p 25 Touche DISPLAY Z p 15 Haut parleur Commande de zoom Z p 21 Cont...

Страница 58: ...té Indicateur du contrôle de la zone de photométrie 2 Vitesse d obturation Pendant l enregistrement vidéo uniquement Indicateur de mode Indicateur du mode EXPORT Z p 35 Compteur Indicateur du mode de téléchargement Z p 36 A GZ MG680 GZ MG650 Indicateur de l entrée analogique Qualité vidéo B ULTRA FIN C FIN D NORMAL E ECONOMIE Durée restante MREC Apparaît pendant l enregistrement MQ Apparaît en mod...

Страница 59: ...e Heure Z p 16 Indicateur de niveau du volume GZ MG680 Sortie avec 1080p Pendant la lecture de photos 4 55 PM NOV 1 2009 Indicateur de mode Indicateur de revue rapide Z p 20 Numéro de dossier fichier Indicateur de lecture de diaporama Indicateur de la batterie Date Heure Z p 16 GZ MG680 Sortie avec 1080p Modifications des indicateurs sur l écran LCD Les indicateurs sur l écran LCD changent chaque ...

Страница 60: ...BN VF823U 3 h 40 m Pour retirer la batterie REMARQUE Vous pouvez aussi utiliser le caméscope avec seulement l adaptateur secteur La durée d enregistrement peut être moins longue en fonction de l environnement d enregistrement par exemple lors de l enregistrement de scènes avec des déplacements rapides Évitez de tirer sur ou de plier la fiche et le cordon de l adaptateur secteur Cela pourrait endom...

Страница 61: ... 4 Z p 16 5 Sélectionnez REGLAGE ZONE 6 Sélectionnez une ville dans la région dans laquelle vous voyagez Pour retourner à l écran précédent Sélectionnez Pour quitter l écran Sélectionnez FIN Régler la langue Vous pouvez changer la langue de l affichage sur l écran 1 Ouvrez l écran LCD pour allumer le caméscope 2 Touchez MENU 3 Sélectionnez REGLAGES AFFICHAGE 4 Sélectionnez LANGUAGE 5 Sélectionnez ...

Страница 62: ...rtes MultiMediaCards ne sont pas prises en charge Insérer une carte microSD Préparation Fermez l écran LCD pour éteindre le caméscope 1 Ouvrez le volet de la carte microSD 2 Introduisez la carte fermement le bord biseauté en premier 3 Fermez le volet de la carte microSD Pour retirer une carte microSD Poussez sur la carte microSD une fois Retirez la carte lorsqu elle ressort un peu REMARQUE L alime...

Страница 63: ...cène Pour prendre une photo pendant l enregistrement vidéo Appuyez sur SNAPSHOT Déplacez le commutateur de mode pour sélectionner le mode vidéo REMARQUE Le mode d enregistrement vidéo est automatiquement sélectionné lorsque le caméscope est éteint et rallumé Si le caméscope reste inutilisé pendant 5 minutes il s éteint de lui même pour économiser l énergie Ne déplacez pas ou ne secouez pas brusque...

Страница 64: ...E La fonction DIS Digital Image Stabilizer stabilisateur d image numérique n est pas activée durant l enregistrement de photos Si le caméscope reste inutilisé pendant 5 minutes il s éteint de lui même pour économiser l énergie Enregistrer des photos Pour visualiser la dernière photo enregistrée Sélectionnez A après la prise de vue Sélectionnez durant la lecture pour supprimer cette photo Pour chan...

Страница 65: ... réglage désiré MARCHE L éclairage DEL reste allumé indépendamment des conditions environnantes AUTO L éclairage DEL s allume automatiquement en cas d enregistrement dans des environnements mal éclairés ARRET Désactive cette fonction Vérifier la charge restante de la batterie Mode Appuyez deux fois sur INFO ou appuyez sur INFO puis sélectionnez Mode Appuyez sur INFO Pour quitter l écran Sélectionn...

Страница 66: ...re noires à la lecture Certaines vidéos pourraient ne pas être lues du tout Pour supprimer une vidéo Sélectionnez lorsque la lecture est arrêtée Pour changer le nombre de miniatures 6 miniatures 20 miniatures Déplacez la commande de zoom sur W Opérations des touches sur l écran durant la lecture de vidéo N Retourne à la première scène du fichier O Passe à la première scène du fichier suivant L Ret...

Страница 67: ...ctionner le mode de lecture L écran d index apparaît Sélectionnez le fichier désiré Déplacez le commutateur de mode pour sélectionner le mode photo Lecture de photos Opérations des touches sur l écran durant la lecture de photos P Inverse l ordre de lecture d un diaporama F Inverse l ordre de lecture d un diaporama L Retourne à l écran d index N Affiche le fichier précédent F Lance le diaporama Q ...

Страница 68: ...e sujet en augmentant l exposition En mode d enregistrement manuel Sélectionnez Pour annuler la compensation de contre jour Sélectionnez de nouveau REMARQUE Si l écran LCD est à l envers n est pas affiché Modifiez le réglage lorsque l écran LCD est en position normale Réglage manuel dans menu En mode d enregistrement manuel 1 Touchez MENU 2 Sélectionnez REGLAGE MANUEL 3 Sélectionnez le menu désiré...

Страница 69: ...e seront peut être pas reproduits correctement sur le téléviseur selon le téléviseur connecté Dans ce cas effectuez les opérations suivantes 1 Déconnectez le câble HDMI et reconnectez le 2 Éteignez et rallumez le caméscope Opération de lecture Une fois la connexion au téléviseur effectuée 1 Allumez le caméscope et le téléviseur 2 Réglez le téléviseur au mode VIDÉO 3 Uniquement en connectant le cam...

Страница 70: ...ées sont stockées à une résolution de 640 x 360 si la vidéo a été enregistrée au format 16 9 ou 640 x 480 si la vidéo a été enregistrée au format 4 3 Suivant la qualité du fichier vidéo source il se peut que l image soit allongée horizontalement ou verticalement La fonction de prises de vues en rafale ne peut pas être utilisée pour capturer des photos Vous ne pouvez pas capturer des vidéos durant ...

Страница 71: ... DVD Utiliser un graveur de DVD Disques pris en charge DVD R DVD RW de 12 cm Disques DVD R seuls des disques DVD R vierges peuvent être utilisés Disques DVD RW des disques DVD RW déjà utilisés peuvent être utilisés mais ils doivent être formatés avant l enregistrement Le formatage d un disque permet d effacer tout son contenu enregistré Il n est pas possible d utiliser des disques à double couche ...

Страница 72: ...s fichiers restants sont copiés sur le deuxième disque Pour annuler la copie sélectionnez ARRETER Copier des fichiers vidéo qui n ont jamais été copiés Les fichiers qui n ont jamais été copiés sur un disque DVD sont automatiquement sélectionnés et copiés 1 Ouvrez l écran LCD pour allumer le caméscope 2 Appuyez sur DIRECT DVD 3 Sélectionnez EXECUTER La création du disque DVD commence Lorsque TERMIN...

Страница 73: ...r vérifier les spécifications de l ordinateur Cliquez avec le bouton droit de la souris sur Ordinateur ou Poste de travail dans le menu Démarrer et sélectionnez Propriétés REMARQUE Assurez vous que votre ordinateur a un graveur de DVD Si votre système ne remplit pas les conditions requises il est recommandé de copier les fichiers en utilisant le graveur de DVD Z p 27 Les utilisateurs de Macintosh ...

Страница 74: ...uivant 4 Cliquez sur Demarrer La sauvegarde démarre Pour déconnecter le caméscope de l ordinateur 1 Cliquez avec le bouton droit de la souris sur l icône Retirer le périphérique en toute sécurité sur la barre des tâches et sélectionnez Retirer Périphérique de stockage de masse USB en toute sécurité 2 Suivez les instructions sur l écran et assurez vous que le périphérique peut être retiré en toute ...

Страница 75: ...ez les fichiers sur l ordinateur 1 Cliquez deux fois sur l icône et ouvrez le calendrier 2 Sélectionnez Videos seulement 3 Cliquez sur 4 Entrez le nom de la nouvelle liste et cliquez sur OK 5 Cliquez deux fois sur la date d enregistrement Les fichiers enregistrés le jour sélectionné sont affichés 6 Déplacez le fichier sur la liste Pour ajouter d autres fichiers dans la liste répétez les étapes 5 e...

Страница 76: ... Déplacez le fichier sur la partie inférieure et cliquez sur Suivant 4 Entrez le nom du disque sélectionnez le style de menu principal et cliquez sur Suivant 5 Cliquez sur Demarrer REMARQUE Pour plus de détails sur Everio MediaBrowser cliquez sur Aide et consultez Aide MediaBrowser Adobe Reader doit être installé sur votre ordinateur pour visualiser Aide MediaBrowser Vous pouvez télécharger Adobe ...

Страница 77: ... votre ordinateur ou aux questions concernant les spécifications ou les performances du système d exploitation d autres applications ou pilotes Pixela Région Langue N de téléphone États Unis et Canada Anglais 1 800 458 4029 numéro gratuit Europe Royaume Uni Allemagne France et Espagne Anglais Allemand Français Espagnol 800 1532 4865 numéro gratuit Autres pays en Europe Anglais Allemand Français Es...

Страница 78: ...es à la première et à la dernière scène 4 Lancez l enregistrement sur le magnétoscope ou l enregistreur DVD au point de départ de la copie Consultez le guide d utilisation du magnétoscope ou de l enregistreur DVD Pour arrêter la copie Arrêtez l enregistrement sur le magnétoscope graveur de DVD Pour masquer la date ou les icônes sur l écran Modifiez les réglages dans AFFICHER SUR TV Copie de fichie...

Страница 79: ...1 Appuyez sur EXPORT 2 Sélectionnez le fichier et réglez Pour vérifier le contenu du fichier sélectionnez VERIF 3 Sélectionnez FIN Pour annuler le réglage d exportation Sélectionnez le fichier et sélectionnez de nouveau Pour quitter l écran 1 Sélectionnez FIN 2 Sélectionnez OUI Pour confirmer le réglage d exportation Appuyez sur EXPORT dans l écran d index Transférer des fichiers sur l ordinateur ...

Страница 80: ...rgement est désactivé chaque fois que l enregistrement est terminé Téléchargement de fichiers sur des sitesWeb Télécharger des fichiers Pour plus de détails sur le téléchargement de fichiers consultez le guide d opération de MediaBrowser sur le CD ROM 1 Connectez le caméscope à l ordinateur à l aide du câble USB 2 Sélectionnez TRANSFERER Si vous ne pouvez pas charger le fichier sur YouTube Un comp...

Страница 81: ... exemple directement au soleil Enregistrement Aucun enregistrement ne peut être réalisé Déplacez le commutateur de mode pour sélectionner le mode désiré ou Avant de contacter le service client veuillez consulter le tableau suivant Si les solutions proposées dans le tableau ne résolvent pas votre problème consultez votre revendeur JVC ou le centre de services JVC le plus proche pour plus d instruct...

Страница 82: ...hauds ou froids assurez vous que la batterie est chargée dans la plage de température permise Si la batterie est rechargée en dehors de la plage température permise la recharge peut s arrêter pour protéger la batterie GZ MG680 Lors d une connexion à l aide d un câble HDMI les images ou le son ne sont pas reproduits correctement sur le téléviseur Lors d une connexion à l aide d un câble HDMI les im...

Страница 83: ...et réinsérez la carte microSD Les cartes MultimediaCard ne peuvent pas être utilisées Nettoyez les bornes de la carte microSD Insérez la carte microSD avant d allumer l appareil Éteignez et rallumez le caméscope IMPOSSIBLE DE PRENDRE PLUS D IMAGES FIXES POUR LE MOMENT Arrêtez l enregistrement vidéo puis enregistrez une photo Si une carte microSD est retirée ou insérée durant l enregistrement vidéo...

Страница 84: ...udio 300 mV rms 50 kW Sortie audio 300 mV rms 1 kW GZ MG680 GZ MG650 uniquement GZ MG680 HDMI Mini connecteur HDMI USB Mini USB types A et B compatible avec USB 2 0 Adaptateur secteur Alimentation requise 110 V à 240 V CA 50 Hz 60 Hz Sortie 11 V CC 1 A Télécommande Alimentation 3 V CC Autonomie de la pile Environ 1 an selon la fréquence d utilisation Plage d opération Moins de 5 m Température d op...

Страница 85: ...mbre approximatif de photos enregistrables Le disque dur peut enregistrer jusqu à 9999 photos dans les deux modes Support d enregistrement Taille qualité d image Carte microSD 256 Mo 512 Mo 1 Go 2 Go 4 Go 8 Go 4 3 832 x 624 FIN 990 1960 3980 7600 9999 9999 832 x 624 STANDARD 1490 2940 5970 9999 9999 9999 h heure m minute Durée de recharge d enregistrement requis approx Batterie Durée de recharge D...

Страница 86: ...ourant Adaptateur de prise ATTENTION La batterie que vous vous êtes procurée est recyclable Pour des renseignements sur le recyclage de cette batterie veuillez composer le 1 800 8 BATTERY Support d enregistrement Veiller à suivre les directives ci dessous pour éviter d altérer ou d endommager les données enregistrées Ne pas déformer ou laisser tomber le support d enregistrement ou le soumettre à u...

Страница 87: ...intenir l objectif orienté vers des objets extrêmement lumineux pendant trop longtemps exposer l objectif à la lumière directe du soleil le balancer inutilement par la dragonne trop balancer l étui souple lorsque le caméscope est à l intérieur placer le caméscope dans des endroits poussiéreux ou avec du sable comme une plage Pour éviter une chute de l appareil Serrer la ceinture de la poignée ferm...

Страница 88: ...e 21 E Éclairage DEL 21 Écran LCD 14 42 Enregistrement manuel 24 Exporter au mode Library 35 F Finaliser 27 G Graveur de DVD 27 H HDMI 25 Heure d été 16 I iTunes 35 L Lecteur multimédia portable 35 Lecture de copie 34 Lecture sommaire 22 N Nombre de photos 41 R Réglages des menus 37 Régler l horloge 16 Régler la date et l heure 5 Régler la langue 17 Revue rapide 19 20 S Sauvegarder sur DVD 27 Supp...

Отзывы: