background image

Installing the Provided Software (Built-in)

You can display the recorded images in

calendar format and perform simple editing

using the provided software.

1

Open the LCD monitor.

0

Turn off the camcorder by pressing the

M

 button for about 2 seconds.

2

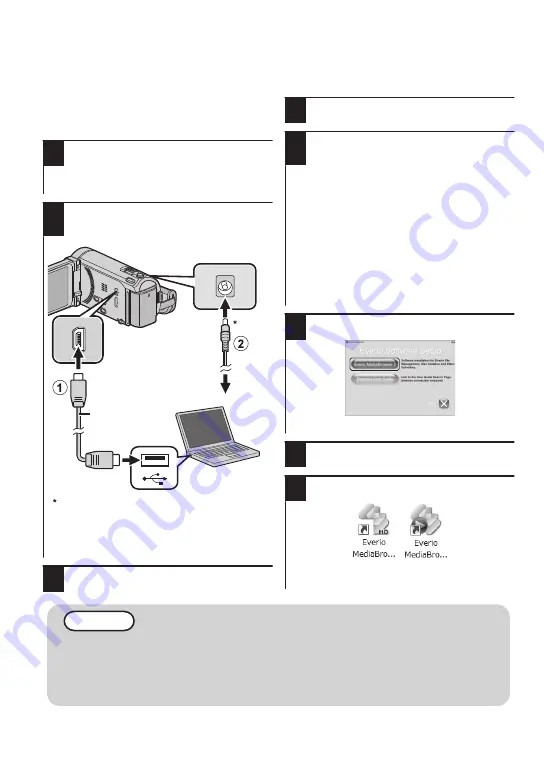
Connect the USB cable and the AC

adapter.

.

AC Adapter 

To AC Outlet

USB Cable 
(Provided)

To DC Connector

To USB 

Connector

The AC adapter shown in the illustration 
is AC-V11U (for GZ-HM860).

0

This unit turns on and the “BACK-UP”

menu appears.

3

Tap “CONNECT TO PC”.

4

Tap “PLAYBACK ON PC”.

5

Perform the following steps on the

computer.

A

Click “Run INSTALL.EXE” in the

auto play dialog box.

B

Click “Continue” on the user

account control screen.

0

“Software Setup” appears after a

while.

0

If it doesn’t appear, double-click

“JVCCAM_APP” in “My Computer”

(or “Computer”), then double-click

the “install.exe”.

6

Click “Everio MediaBrowser 3”.

.

0

Follow the on-screen instructions.

7

Click “Finish”.

8

Click “Quit”.

.

0

Installation ends and icons are created

on the desktop.

NOTE

0

To view the Detailed User Guide, connect to the internet and click “Detailed User

Guide” in step 6.

0

For the operating details of Everio MediaBrowser 3 BE, refer to “Help” -

“MediaBrowser Help” on the Everio MediaBrowser 3 BE toolbar. The instruction

manual will appear.

30

For more information, refer to the Detailed User Guide

http://manual.jvc.co.jp/index.html/

Содержание EVERIO GZ-HM860U

Страница 1: ...or this product For more details on operating this product please refer to the Detailed User Guide at the following website o http manual jvc co jp index html o You can also access the website from the built in application software of this unit p 30 For Future Reference Enter the Model No located on the bottom of the camera and Serial No located on the battery pack mount of the camera below Model ...

Страница 2: ... sufficient space on all sides to allow for ventilation 10 cm 3 15 16 or more on both sides on top and at the rear Do not block the ventilation holes If the ventilation holes are blocked by a newspaper or cloth etc the heat may not be able to get out No naked flame sources such as lighted candles should be placed on the apparatus When discarding batteries environmental problems must be considered ...

Страница 3: ...ehand Trademarks Make a backup of important recorded data AVCHD AVCHD logo AVCHD Lite and AVCHD Lite logo are trademarks of Panasonic Corporation and Sony Corporation x v Color is a trademark of Sony Corporation HDMI is a trademark of HDMI Licensing LLC Bluetooth and the Bluetooth logo are registered trademark of Bluetooth SIG Inc Manufactured under license from Dolby Laboratories Dolby and the do...

Страница 4: ...the 3D effect during 3D playback As the images that enter the left and right eyes are different fatigue may be experienced In addition depending on the content of the video an illusion of movement may be experienced and result in motion sickness 3D Display on the LCD Monitor 3D images are supported by the LCD monitor Press the 3D button to change the display on the LCD monitor between 3D and 2D 0 ...

Страница 5: ... in fatigue or discomfort o If you experience fatigue or discomfort while recording or viewing 3D images on the LCD monitor set the display to 2D 0 Continual viewing of the 3D images may result in health problems o Rest well after viewing 3D images 0 After viewing 3D images check that you do not experience fatigue or discomfort before driving etc o Take a break every 30 to 60 minutes when viewing ...

Страница 6: ...User Guide A Basic User Guide this manual and a Detailed User Guide are available for this product For more details on operating this product please refer to the Detailed User Guide at the following website o http manual jvc co jp index html o You can also access the website from the built in application software of this unit p 30 Verifying the Accessories AC Adapter AP V30U 1 for GZ HM960 AC Adap...

Страница 7: ...s up blinks during recording or playback K USB Connector p 31 L HDMI Mini Connector p 20 M USER User Button Activates preset functions N A B Video Still Image Button Switches between video and still image modes O M Power Information Button Recording Displays the remaining time for video only and battery power Playback Displays file information such as recording date Press and hold to turn the powe...

Страница 8: ...r after approximately 3 seconds Press this button to show the displays again The displays appear for approximately 3 seconds with every press Press and hold this button to fix the displays Press this button again to release the displays Playback Screen Video 00 01 23 00 12 34 6 1 2 4 5 3 A Recording Playback Mode Button Switches between recording and playback modes B Index Screen Button p 18 C Del...

Страница 9: ...Playback Screen Recording Screen NOTE 0 The touch screen of this unit is pressure sensitive When the touch screen does not respond smoothly apply slightly more force to your fingertip 0 Do not press or rub with excessive force 0 If you apply a protect sheet or a sticker the touch screen may not respond smoothly 0 Do not operate the touch screen using an object with a sharp or hard tip 0 Pressing t...

Страница 10: ...U for GZ HM860 CAUTION Be sure to use JVC battery packs 0 If you use any other battery packs besides JVC battery packs safety and performance cannot be guaranteed 0 Charging time Approx 2 h 30 m using supplied battery pack The charging time is when the unit is used at 25 C 77 F If the battery pack is charged outside the room temperature range of 10 C to 35 C 50 F to 95 F charging may take a longer...

Страница 11: ...ORY for recording By default it is set to BUILT IN MEMORY Base Terminal Side Open the cover and insert an SD card Close the LCD monitor Turn off the power of this unit before inserting or removing a card o To remove the card Push the card inward once then pull it out straight Base For more information refer to the Detailed User Guide http manual jvc co jp index html 11 Getting Started Recording Pl...

Страница 12: ...lure or data loss 0 To protect the data do not touch the terminals of the SD card 0 Eye Fi is an SD memory card with wireless LAN function For more information refer to Detailed User Guide 0 When using an SDXC card check its compatibility with the OS of your computer by referring to the Detailed User Guide 0 Both videos and still images can be recorded on one SD card It is recommended to confirm t...

Страница 13: ...its the screen o To use SD cards that have been used on other devices Format initialize the card using FORMAT SD CARD from COMMON menu All data on the card will be deleted when it is formatted Copy all files on the card to a computer before formatting A Perform steps A C from To use an SD card B Tap FORMAT SD CARD COMMON FORMAT SD CARD C Tap FILE FILE FORMAT SD CARD D Tap YES E After formatting ta...

Страница 14: ...ty name GMT SAVE CLOCK AREA SETTING To reset the clock Set the clock with CLOCK ADJUST from the COMMON menu A Open the LCD monitor 0 The unit turns on B Tap MENU C Tap Q D Tap CLOCK ADJUST COMMON CLOCK ADJUST E Tap CLOCK SETTING CLOCK SETTING CLOCK ADJUST 0 The subsequent setting operations are the same as steps 3 5 on p 14 To change the display language The language on the display can be changed ...

Страница 15: ...ecording The mode changes between Intelligent Auto and Manual with every press If the mode is H Manual press the S button to switch Check if the recording mode is P Intelligent Auto Select video mode 0 You can also tap g on the touch screen to record To stop recording tap a In addition you can also tap T W to zoom o Indications during video recording 0 00 00 10 10 AM 0 54 Image Stabilizer Video Qu...

Страница 16: ...ity levels can be registered It is recommended to register the faces that are often being recorded by this camera beforehand For details refer to Registering Human Face Personal Authentication Information in the Detailed User Guide o TOUCH PRIORITY AE AF FACE TRACKING COLOR TRACKING AREA SELECT TOUCH PRIORITY AE AF is a function that adjusts focus and brightness based on a tapped position By defau...

Страница 17: ... tap Q on the touch screen to record However focus cannot be set by pressing halfway o Indications during still image recording 10 10 AM 6630 Battery Indicator Recording Media Recording in Progress Remaining Number of Shots Focus Shutter Speed Image Size For more information refer to the Detailed User Guide http manual jvc co jp index html 17 Getting Started Recording Playback Copying Further Info...

Страница 18: ... playback Tap I J to select the media for playback Tap on the file to play back Select video or still image mode SET Tap SET Tap q again to return to the recording mode Tap q on the touch screen to select the playback mode 0 The W button on the index screen is only displayed during still image playback Still images that are recorded continuously within 2 seconds or with the continuous shooting mod...

Страница 19: ...screen g Advances to the next video Advances to the next still image h Returns to the beginning of the scene Returns to the previous still image i Forward search j Reverse search k Forwardslow motion Press andhold to start slow playback l Reverse slow motion Press and hold to start reverse slow playback U Volume adjustment R Rotates 90 degrees counterclockwise S Rotates 90 degrees clockwise T Cont...

Страница 20: ...n a 3D compatible TV for GZ HM960 If you are using a 3D compatible TV you can play back 3D images by connecting to the HDMI mini connector o Playing back in HD quality If you are using an HDTV you can play back in HD quality by connecting to the HDMI mini connector Connecting to the HDMI connector HDMI Connector Input TV HDMI Mini Cable Provided To HDMI Mini Connector Connecting to the COMPONENT c...

Страница 21: ...ecting to the AV connector AV Red White Yellow TV Audio Input R Audio Input L Video Input Video Input AV Cable Provided To AV Connector 2 Connect the AC adapter p 10 0 This unit powers on automatically when the AC adapter is connected 3 Select the TV input switch 4 Play back a file p 18 o When images look unnatural on the TV Images do not appear on the TV properly 0 Disconnect the cable and connec...

Страница 22: ...CR I p 26 External Hard Disk I p 27 Computer 2 2 2 I p 28 1 Only on AVCHD compatible devices 2 For details refer to the Detailed User Guide or the help file of Everio MediaBrowser 3 BE NOTE 0 Discs created with a DVD writer or external Blu ray drive as well as files copied to an external hard disk drive can be converted to 3D for playback for GZ HM960 0 AVCHD DVD enables you to copy record videos ...

Страница 23: ...d 2 Turn on the DVD writer or external Blu ray drive and insert a new disc o To play back the created disc Play back on an AVCHD compatible device such as Blu ray recorder o Compatible DVD writers 0 CU VD50U 0 CU VD3U o Compatible external Blu ray drive 0 You can use BE08LU20 from LG 0 To use the USB cable provided with the external Blu ray drive purchase the USB extension cable 1 The AC adapter s...

Страница 24: ... or still images in this unit are copied UNSAVED SCENES video UNSAVED IMAGES still image Videos or still images that have never been copied are automatically selected and copied 4 Tap EXECUTE Number of discs required RETURN EXECUTE PREPARE AN EMPTY DISC REQUIRED DISC SPACE ALL SCENES DVD 2 DVD DL 1 5 Tap YES or NO NO YES CREATED HEADLINE ON THE TOP MENU DO YOU WANT AN AUTOMATIC ALL SCENES YES Disp...

Страница 25: ...recording date 2011 10 10 QUIT CREATE BY DATE 0 Only files of the selected date will be copied 0 The subsequent operations are the same as steps 4 8 on the previous page B SELECT FROM SCENES SELECT FROM IMAGES A Select a file 2011 SAVE QUIT CHECK SELECT FROM SCENES 0 A check mark appears on the selected file B After selecting all the files tap SAVE 0 The subsequent operations are the same as steps...

Страница 26: ...nnector The AC adapter shown in the illustration is AC V11U for GZ HM860 0 This unit powers on automatically when the AC adapter is connected 2 Tap q to select the playback mode 3 Prepare to record Preparation on TV and VCR DVD recorder 0 Switch to a compatible external input 0 Insert a DVD R or video tape Preparation on this unit 0 Set VIDEO OUTPUT in the COMMON menu to the aspect ratio 4 3 or 16...

Страница 27: ...ce center Select video or still image mode 1 Tap BACK UP BACK UP VIDEO BACKUP 2 Tap on the media to copy SD CARD BUILT IN MEMORY SELECT THE MEDIA TO BACK UP BACK UP 3 Tap the desired method ALL SCENES BACK UP ALL SCENES video ALL IMAGES still image All videos or still images in this unit are copied UNSAVED SCENES video UNSAVED IMAGES still image Videos or still images that have never been copied a...

Страница 28: ...ed versions only Windows Vista Home Premium Pre installed versions only Windows 7 System type 32 bit 64 bit Memory At least 2 GB o Windows XP Memory At least 1 GB Processor Intel Core Duo CPU 1 66 GHz or higher Intel Core 2 Duo CPU 2 13 GHz or higher recommended Service Pack 3 Home Edition or Professional Pre installed versions only Windows XP o Other requirements Display 1024 768 pixels or above ...

Страница 29: ... still image To verify the system requirements select About This Mac from the Apple menu You can determine the operating system version processor and amount of memory 0 For the latest information on iMovie or iPhoto refer to the Apple website 0 For details on how to use iMovie or iPhoto refer to the help file of the respective software 0 There is no guarantee that the operations will work with all...

Страница 30: ...uter A Click Run INSTALL EXE in the auto play dialog box B Click Continue on the user account control screen 0 Software Setup appears after a while 0 If it doesn t appear double click JVCCAM_APP in My Computer or Computer then double click the install exe 6 Click Everio MediaBrowser 3 0 Follow the on screen instructions 7 Click Finish 8 Click Quit 0 Installation ends and icons are created on the d...

Страница 31: ...UP 0 The provided software Everio MediaBrowser 3 BE starts up on the PC The subsequent operations are to be performed on the PC 4 Select the volume 2 1 Click Click 5 Start backup Click Saving destination PC 6 After backup is complete click OK If you encounter any problems with the provided software Everio MediaBrowser 3 BE please consult the Pixela User Support Center p 32 o To disconnect this uni...

Страница 32: ...co jp english worldmap index e html about this software please have the following information ready Product Name Model Serial Number Problem Error Message Computer Manufacturer Model Desktop Laptop CPU OS Memory MB GB Available Hard Disk Space GB Please note that it may take some time to respond to your questions depending on their subject matter JVC cannot answer questions regarding basic operati...

Страница 33: ... 999 9 999 9 999 1 920 1 080 16 9 9 999 3 200 6 700 9 999 9 999 Approximate Recording Time Using Battery o 3D display on LCD monitor GZ HM960 Battery Pack Actual Recording Time Continuous Recording Time BN VG114U 35 m 1 h BN VG121U 50 m 1 h 30 m BN VG138U 1 h 30 m 2 h 45 m o 2D display on LCD monitor Battery Pack GZ HM960 GZ HM860 Actual Recording Time Continuous Recording Time Actual Recording Ti...

Страница 34: ...unit reattach them open the LCD monitor and this unit powers on automatically 5 If the above do not solve the problem consult your nearest JVC dealer or JVC service center Trouble Trouble Action Page Power POWER CHARGE lamp starts blinking when the monitor is closed 0 The battery pack is being charged 10 Recording Recording cannot be performed 0 Check the A B button 15 0 Set to the recording mode ...

Страница 35: ...ILURE 0 Turn off and on this unit again 0 If the above does not solve the problem back up your files and execute FORMAT BUILT IN MEM or FORMAT SD CARD in the COMMON menu All data will be deleted ERROR IN BUILT IN MEMORY MEMORY CARD ERROR 0 Turn off and on this unit again 0 Remove the AC adapter and battery pack then remove and re insert the SD card 0 Remove any dirt from the SD card terminals 0 If...

Страница 36: ... charge and then fully discharge the battery pack every 6 months then continue to store it at a 30 battery level X remove from charger or powered unit when not in use as some machines use current even when switched off do not drop or subject to strong impact ATTENTION The product you have purchased is powered by a rechargeable battery that is recyclable Please call 1 800 8 BATTERY for information ...

Страница 37: ...ery pack attached when the camcorder is not in use place naked flame sources such as lighted candles on the apparatus expose the apparatus to dripping or splashing leave dust or metal objects adhered to the power plug or an AC wall outlet insert any objects in the camcorder Avoid using the unit in places subject to excessive humidity or dust in places subject to soot or steam such as near a cookin...

Страница 38: ... 1 2 3 10 620 000 pixels CMOS Recording area Video 2 820 000 pixels 2 070 000 to 4 770 000 pixels dynamic zoom Recording area Still image 3 980 000 to 5 290 000 pixels 4 3 2 990 000 to 3 970 000 pixels 16 9 Lens Video F1 2 2 8 f 3 76 mm to 37 6 mm 35 mm conversion 29 5 mm to 295 mm 35 mm conversion 29 5 mm to 448 mm dynamic zoom Lens Still image F1 2 2 8 f 3 76 mm to 37 6 mm 35 mm conversion 29 7 ...

Страница 39: ...le converter plug for the country or region of visit 0 The specifications and appearance of this product are subject to changes for further improvement without prior notice Bluetooth Capabilities o Headset You can use a headset headphone that is integrated with a microphone to listen to the recorded audio sound during shooting o GPS Receiver You can use the GPS receiver to record the location info...

Страница 40: ... D Date Time Setting 14 Deleting Files 18 Dubbing Duplicate 26 F Format SD Card 13 H HDMI Connection 20 I Installation 30 L LCD Monitor 36 M Mac 29 N Number of Images 33 R Recordable Time 33 S SD Card 11 Software 28 U USB Cable 31 V Viewing Files on TV 20 W Windows 28 Z Zoom 15 0111HOH SW VM US 2011 Victor Company of Japan Limited LYT2313 001A M ...

Страница 41: ...ducto Para más detalles sobre el funcionamiento de este producto consulte el Guía detallada del usuario en el siguiente sitio web o http manual jvc co jp index html o También puede acceder al sitio web desde el software de aplicación integrado de esta unidad p 30 Para futuras consultas Introduzca el número de modelo ubicado en la parte inferior de la cámara y el número de serie ubicado en el compa...

Страница 42: ...puede requerirse una manipulación especial Visite www dtsc ca gov hazardouswaste perchlorate Cuando el equipo se encuentra instalado en un gabinete o en un estante asegúrese que tenga suficiente espacio en todos los lados para permitir la ventilación 10 cm 3 15 16 o más en cada lado en la parte superior y en la parte trasera No bloquee los orificios de ventilación Si los orificios de ventilación e...

Страница 43: ...rcial sin la autorización correspondiente Aunque grabe acontecimientos tales como espectáculos o exhibiciones para su disfrute personal se recomienda que obtenga una autorización previa AVCHD logotipo de AVCHD AVCHD Lite y el logotipo de AVCHD Lite son marcas comerciales de Panasonic Corporation y Sony Corporation x v Color es una marca comercial de Sony Corporation HDMI es una marca comercial de ...

Страница 44: ...D durante la reproducción en 3D Dado que las imágenes que ingresan a los ojos izquierdo y derecho son diferentes se puede experimentar fatiga Además dependiendo del contenido del vídeo es posible experimentar una ilusión de movimiento que resulte en mareo por movimiento Visualización en 3D en el monitor LCD Las imágenes en 3D son soportadas por el monitor LCD Presione el botón 3D para cambiar la v...

Страница 45: ...ltar en fatiga o molestia o Si usted experimenta fatiga o molestia mientras graba o visualiza imágenes en 3D en el monitor LCD ajuste la visualización en 2D 0 La visualización de imágenes en 3D en forma continua puede resultar en problemas de salud o Descanse lo necesario luego de visualizar imágenes en 3D 0 Luego de visualizar imágenes en 3D corrobore que no experimente fatiga ni molestia antes d...

Страница 46: ...llada del usuario Un Guíabásicadelusuario estemanual yun Guíadetalladadelusuario seencuentrandisponiblesparaesteproducto Paramásdetallessobreelfuncionamientodeesteproducto consulteel Guíadetalladadelusuario enelsiguientesitioweb o http manual jvc co jp index html o También puede acceder al sitio web desde el software de aplicación integrado de esta unidad p 30 Comprobación de los accesorios Adapta...

Страница 47: ...onector USB p 31 L Mini conector HDMI p 20 M Botón USER usuario Activa las funciones preprogramadas N Botón A B vídeo imagen fija Alterna entre los modos de vídeo e imagen fija O Botón M alimentación información Grabación Muestra el tiempo sólo para vídeo y carga de batería restantes Reproducción Muestra la información de los archivos como por ejemplo la fecha de grabación Mantenga presionado este...

Страница 48: ...segundos Presione este botón para mostrar las visualizaciones nuevamente Las visualizaciones aparecen durante aproximadamente 3 segundos con cada pulsación Pulse y mantenga presionado este botón para ajustar las visualizaciones Presione este botón nuevamente para que aparezcan las visualizaciones Pantalla de reproducción vídeo 00 01 23 00 12 34 6 1 2 4 5 3 A Botón de modo grabación reproducción Al...

Страница 49: ...talla de reproducción Pantalla de grabación NOTA 0 Lapantallatáctildeestaunidadessensiblealapresión Cuandolapantallatáctilnorespondaenformacorrecta aplique apenas un poco más de fuerza con la punta de los dedos 0 No presione ni friccione con demasiada fuerza 0 Sicolocaunaláminaprotectoraounaetiquetaadhesiva esposiblequelapantallatáctilnorespondaenformacorrecta 0 No opere la pantalla táctil utiliza...

Страница 50: ...r baterías JVC 0 Si utiliza alguna otra batería que no sea JVC no se pueden garantizar la seguridad ni el rendimiento del producto 0 Tiempo de carga Aprox 2 h 30 m utilizando la batería suministrada El tiempo de carga aplica cuando la unidad se utiliza a 25 C 77 F Si se carga la batería en un rango de temperatura ambiente que no se encuentre entre 10 C y 35 C 50 F y 95 F la carga puede tardar más ...

Страница 51: ... INTEGRADA para realizar la grabación En forma predeterminada el ajuste es en MEMORIA INTEGRADA base Lateral de la terminal Abra la cubierta e inserte una tarjeta SD Cierre el monitor LCD Apague la alimentación de esta unidad antes de introducir o extraer una tarjeta o Para extraer la tarjeta Presione la tarjeta hacia dentro y luego retírela hacia arriba base Para obtener más información consulte ...

Страница 52: ...roteger los datos no toque las terminales de la tarjeta SD 0 Eye Fi es una tarjeta de memoria SD con función de LAN inalámbrico Para obtener más información consulte la Guía detallada del usuario 0 Cuando utilice una tarjeta SDXC verifique su compatibilidad con el sistema operativo de su computadora consultando Guía detallada del usuario 0 Tanto los vídeos como las imágenes fijas pueden grabarse e...

Страница 53: ...utilizado en otros dispositivos Formatee inicialice la tarjeta utilizando FORMATEAR TARJETA SD del menú GENERAL Si se formatea la tarjeta todos los datos incluidos en ella se eliminarán Realice una copia de todos los archivos a una computadora antes de realizar el formateado A Siga los pasos A C desde Para utilizar una tarjeta SD B Pulsar FORMATEAR TARJETA SD GENERAL FORMATEAR TARJETA SD C Pulsar ...

Страница 54: ...ELOJ ÁREA Para restablecer el reloj Ajusteelrelojcon AJUS RELOJ desde el menú GENERAL A Abra el monitor LCD 0 Se enciende la unidad B Pulsar MENU C Pulsar Q D Pulsar AJUS RELOJ GENERAL AJUS RELOJ E Pulsar CONF RELOJ CONF RELOJ AJUS RELOJ 0 Lassiguientesoperacionesdeajustesonlasmismas que las de los pasos 3 a 5 de la p 14 Para cambiar el idioma de visualización El idioma en el que se muestra la inf...

Страница 55: ...bia entre Auto Inteligente y Manual cada vez que se presiona Si el modo es Manual H presione el botón S para cambiar de modo Compruebe que el modo de grabación sea P Auto Inteligente Seleccione el modo vídeo 0 También puede pulsar g en la pantalla táctil para realizar una grabación Para detener la grabación pulse a Además también puede pulsar T W para el zoom o Indicaciones durante la grabación de...

Страница 56: ...nombres y niveles de prioridad Se recomienda registrar con anterioridad los rostros que se graban a menudo con esta cámara Para obtener detalles consulte Registro de información de autenticación personal de rostros humanos en Guía detallada del usuario o PRIOR TOQUE AE AF RASTREO DE CARA RASTREO DE COLOR SELECCIÓN DE ÁREA PRIOR TOQUE AE AF es una función que ajusta el foco y brillo según el área s...

Страница 57: ... la pantalla táctil para realizar una grabación Sin embargo el foco no se puede ajustar presionando hasta la mitad del recorrido o Indicaciones durante la grabación de imágenes fijas 10 10 AM 6630 Indicador de batería Grabación de soportes Grabación en curso Número restante de tomas Enfoque Velocidad del obturador Tamaño de imagen Para obtener más información consulte la Guía detallada del usuario...

Страница 58: ...e e para pausar la reproducción Pulse I J para seleccionar el medio de reproducción Pulse sobre el archivo para reproducir Seleccione el modo vídeo o imagen fija AJUSTE Pulsar AJUSTE Pulse q nuevamente para regresar al modo de grabación Pulse q en la pantalla táctil para seleccionar el modo de reproducción 0 El botón W en la pantalla de índice solo aparece durante la reproducción de imágenes fijas...

Страница 59: ...za al siguiente vídeo Avanza a la siguiente imagen fija h Regresa al comienzo de la escena Regresa a la imagen fija anterior i Búsqueda hacia adelante j Búsqueda hacia atrás k Cámara lenta hacia adelante Mantenga presionadoestebotónparainiciarlareproducción en cámara lenta l Cámara lenta hacia atrás Mantenga presionado este botón para iniciar la reproducción en cámara lenta hacia atrás U Ajuste de...

Страница 60: ...mágenes en 3D en un TV apto para imágenes en 3D para GZ HM960 Si utiliza un TV apto para imágenes en 3D puede reproducir imágenes en 3D conectando la unidad al mini conector HDMI o Reproducción en calidad HD Si está utilizando un HDTV puede reproducir en calidad HD conectándose a un mini conector HDMI Conexión al conector HDMI Entrada del conector HDMI TV Mini cable HDMI Proporcionado A Mini conec...

Страница 61: ... derecha Entrada de audio L izquierda Entrada de vídeo Entrada de vídeo Cable AV proporcionado A conector AV 2 Conecte el adaptador de CA p 10 0 Esta unidad se enciende automáticamente cuando se conecta el adaptador de CA 3 Seleccione el interruptor de entrada del televisor 4 Reproduzca un archivo p 18 o Si las imágenes no se ven naturales en el televisor Las imágenes no aparecen en el televisor a...

Страница 62: ...I p 26 VCR I p 26 Disco duro externo I p 27 Computadora 2 2 2 I p 28 1 Solo para dispositivos compatibles con AVCHD 2 Para detalles consulte la Guía detallada del usuario o el archivo de ayuda de Everio MediaBrowser 3 BE NOTA 0 Los discos creados con una grabadora de DVD o unidad externa de Blu ray y los archivos copiados a una unidad de disco duro externo pueden convertirse a 3D para su reproducc...

Страница 63: ...DE SEGURIDAD 2 Encienda la grabadora de DVD o unidad externa de Blu ray e introduzca un nuevo disco o Para reproducir el disco creado Reproducción en un dispositivo compatible con AVCHD por ejemplo una grabadora de Blu ray o Grabadoras de DVD compatibles 0 CU VD50 0 CU VD3 o Unidad externa de Blu ray compatibles 0 Puede utilizar BE08LU20 de LG 0 Para utilizar el cable USB proporcionado con la unid...

Страница 64: ...ídeos o imágenes fijas en esta unidad son copiados ESCENAS SIN GUARDAR vídeo IMÁG NO GUARDADAS imagen fija Los vídeos o imágenes fijas que nunca se han copiado se seleccionan y copian automáticamente 4 Pulsar EJECUTAR Número necesario de discos VOLVER EJECUTAR PREPARAR DISCO VACÍO CANTIDAD REQUERIDA TODAS LAS ESCENAS DVD 2 DVD DL 1 5 Pulsar SÍ o NO NO SÍ SUPERIOR DEL DISCO AUTOMÁTICO EN EL MENÚ DE...

Страница 65: ...FECHA 0 Sólo se copiarán los archivos con la fecha seleccionada 0 Las siguientes operaciones son las mismas que las de los pasos 4 a 8 de la página anterior B SELECC DE ESCENAS SELECC DE IMÁGENES A Seleccione un archivo 2011 GUARDA SALIR COMPR SELECC DE ESCENAS 0 Aparecerá una marca de verificación sobre el archivo seleccionado B Después de seleccionar todos los archivos pulse GUARDA 0 Las siguien...

Страница 66: ...A conector AV El adaptador de CA mostrado en la ilustración es AC V11U para GZ HM860 0 Esta unidad se enciende automáticamente cuando se conecta el adaptador de CA 2 Pulse q para seleccionar el modo de reproducción 3 Prepárese para la grabación Preparación del televisor y de la grabadora de vídeo o DVD 0 Cambie a una entrada externa compatible 0 Introduzca un DVD R o cinta de vídeo Preparación en ...

Страница 67: ...ER COPIA DE SEGURIDAD HACER COPIA DE SEGURIDAD COPIA SEG DE VÍDEO 2 Pulse sobre el medio para copiar TARJETA SD MEMORIA INTEGRADA PARA REALIZAR COPIA SEGUR SELECCIONE LOS MEDIOS HACER COPIA DE SEGURIDAD 3 Pulse el método deseado TODAS LAS ESCENAS HACER COPIA DE SEGURIDAD TODAS LAS ESCENAS vídeo TODAS LAS IMÁGENES imagen fija Todos los vídeos o imágenes fijas en esta unidad son copiados ESCENAS SIN...

Страница 68: ...reinstaladas Windows Vista Home Premium solo versiones preinstaladas Windows 7 Tipo de sistema 32 bit 64 bit Memoria 2 GB como mínimo o Windows XP Memoria 1 GB como mínimo ProcesadorIntel Core Duo CPU 1 66 GHz o superior se recomienda Intel Core 2 Duo CPU 2 13 GHz o superior Service Pack 3 Home Edition o Professional solo versiones preinstaladas Windows XP o Otros requisitos Visualización 1024 768...

Страница 69: ...oto imagen fija de Apple Para comprobar los requisitos del sistema seleccione Acerca de este Mac del menú Apple Se puede determinar la versión del sistema operativo procesador y memoria 0 Para obtener información actualizada sobre iMovie o iPhoto consulte la página web de Apple 0 Para obtener información sobre cómo utilizar iMovie o iPhoto consulte el archivo de ayuda de los programa de software r...

Страница 70: ...álogo de reproducción automática B Hagaclicen Continuar delapantallade control de cuenta de usuario 0 Software Setup aparece después de unos momentos 0 Si no apareciera haga doble clic en JVCCAM_APP en Mi PC o Equipo y luego haga doble clic en install exe 6 Haga clic en Everio MediaBrowser 3 0 Siga las instrucciones que aparecen en pantalla 7 Haga clic en Finalizar 8 Haga clic en SALIR 0 Finaliza ...

Страница 71: ...URIDAD 0 El software proporcionado Everio MediaBrowser 3 BE se inicia en el PC Las demás operaciones se deben realizar en el PC 4 Seleccione el volumen 2 1 Haga clic Haga clic 5 Inicie la copia de seguridad Haga clic Destino de almacenamiento PC 6 Después de que se haya completado la copia de seguridad haga clic en Aceptar Si tuviera algún problema con el software proporcionado Everio MediaBrowser...

Страница 72: ...onales JVC en http www jvc victor co jp english worldmap index e html para hacer consultas sobre este software tenga a mano la siguiente información Nombre del producto modelo número de serie problema mensaje de error Computadora fabricante modelo sobremesa portátil CPU sistema operativo memoria MB GB espacio disponible en el disco duro GB Tenga en cuenta que puede tardar un poco responder a sus p...

Страница 73: ... 999 9 999 1 920 1 080 16 9 9 999 3 200 6 700 9 999 9 999 Tiempo aproximado de grabación con batería o Visualización 3D en monitor LCD GZ HM960 Batería Tiempo real de grabación Tiempo continuo de grabación BN VG114U 35 m 1 h BN VG121U 50 m 1 h 30 m BN VG138U 1 h 30 m 2 h 45 m o Visualización 2D en monitor LCD Batería GZ HM960 GZ HM860 Tiempo real de grabación Tiempo continuo de grabación Tiempo re...

Страница 74: ...erre el monitor LCD B Retire el adaptador de CA y la batería de esta unidad colóquelos nuevamente abra el monitor LCD y la unidad de encencerá automáticamente 5 Si lo mencionado anteriomente no resuelve el problema póngase en contacto con su distribuidor JVC o centro de servicios JVC más cercanos Problema Problema Acción Página Alimentación La luz POWER CHARGE empieza a parpadear cuando el monitor...

Страница 75: ...dvertencia Indicaciones de advertencia Acción Página Indicaciones de advertencia ERROR DE GRABACIÓN 0 Apague esta unidad y vuelva a encenderla 0 Si lo mencionado más arriba no soluciona el problema realice una copia de seguridad de los archivos y ejecute FORMATEAR MEM INT o FORMATEAR TARJETA SD en el menú GENERAL se eliminarán todos los datos ERROR EN MEMORIA INTEGRADA ERROR EN TARJETA DE MEMORIA ...

Страница 76: ... el periodo de vida útil mantenga un 30 del nivel de batería X si las baterías no serán utilizadas por largo tiempo Asimismo cárguelas por completo y luego descárguelas por completo cada 2 meses luego continúe guardándolas con un nivel de batería de 30 X cuando no se utilice se debe retirar del cargador o dispositivo eléctrico ya que algunas máquinas utilizan corriente incluso estando apagadas ATE...

Страница 77: ...n la correa de mano Si utiliza la cámara con un trípode fije bien la cámara en el trípode Si se le cae la cámara puede herirse usted y dañarse la cámara Si un niño utiliza la unidad un adulto deberá guiarle Los cambios o modificaciones no aprobados por JVC podrian anular la autoridad del usuario para utilizar el equipo Este equipo ha sido examinado y cumple con los límites de dispositivos digitale...

Страница 78: ... imagen 1 2 3 10 620 000 píxeles CMOS Área de grabación vídeo 2 820 000 píxeles 2 070 000 a 4 770 000 píxeles zoom dinámico Área de grabación imagen fija 3 980 000 a 5 290 000 píxeles 4 3 2 990 000 a 3 970 000 píxeles 16 9 Lente vídeo F1 2 a 2 8 f 3 76 mm a 37 6 mm Conversión de 35 mm 29 5 mm a 295 mm conversión de 35 mm 29 5 mm a 448 mm zoom dinámico Lente imagen fija F1 2 a 2 8 f 3 76 mm a 37 6 ...

Страница 79: ...ponible para el país o región en la que se encuentre 0 Las especificaciones y el aspecto de este producto están sujetos a cambios sin previo aviso Capacidades de Bluetooth o Cabezal manos libres Puede utilizar un cabezal auricular con un micrófono integrado para escuchar el sonido de audio grabado durante la filmación o Receptor de GPS Puede utilizar un receptor de GPS para grabar información sobr...

Страница 80: ...uración del reloj 14 Copia copia de seguridad 22 Copia duplicado 26 E Eliminación de archivos 18 F Formato tarjeta SD 13 I Instalación 30 M Mac 29 Monitor LCD 36 N Número de imágenes 33 S Software 28 T Tarjeta SD 11 Tiempo de grabación 33 V Visualización de archivos en un televisor 20 W Windows 28 Z Zoom 15 0111HOH SW VM US 2011 Victor Company of Japan Limited LYT2313 001A M ...

Страница 81: ...our de plus amples détails sur le fonctionnement de ce produit veuillez consulter le Manuel d utilisation sur le site Web à l adresse suivante o http manual jvc co jp index html o Vous pouvez également accéder au site web à partir du logiciel d application de cet appareil p 30 Pour consultation ultérieure Entrez le numéro de modèle situé sur la partie inférieur de la caméra et le No de série situé...

Страница 82: ...exposer la batterie le caméscope avec la batterie insérée ou la télécommande avec la batterie insérée à une chaleur excessive telle que celle des rayons directs du soleil d un feu ou autre source de chaleur Débranchez immédiatement la fi che secteur si le caméscope ne fonctionne pas normalement ATTENTION RISQUE D ÉLECTROCUTION NE PAS OUVRIR ATTENTION POUR ÉVITER TOUT RISQUE D ÉLECTROCUTION NE PAS ...

Страница 83: ... d autres appareils comprenant les amplificateurs qui produisent de la chaleur 9 Protéger le cordon d alimentation pour éviter qu il ne soit piétiné ou ne se coince tout particulièrement au niveau de la fiche de la prise de courant et du point où il sort de l appareil 10 N utiliser que des accessoires spécifiés par le fabricant 11 N utiliser qu avec le chariot le stand le trépied le support ou la ...

Страница 84: ... la lecture d images 3D Étant donné que les images qui entrent dans chaque œil sont différentes il est possible de ressentir de la fatigue En outre selon le contenu de la vidéo une illusion de mouvement peut être perçue et provoquer le mal des transports Affichage 3D sur l écran LCD Les images 3D sont supportées par un écran LCD Appuyez sur la touche 3D sur l écran LCD pour changer l affichage ent...

Страница 85: ...gue ou de l inconfort lors de l enregistrement ou la visualisation d images 3D sur l écran LCD passez l affichage du moniteur en 2D 0 Regarder continuellement des images 3D peut provoquer des problèmes de santé o Reposez vous bien après la visualisation d images 3D 0 Après la visualisation d images 3D vérifiez que vous ne ressentez pas de fatigue ou d inconfort avant de conduire etc o Reposez vous...

Страница 86: ...ur cemanuel etun Manueld utilisation sontdisponiblespourceproduit Pourdeplusamplesdétailssurlefonctionnementdeceproduit veuillezconsulterle Manueld utilisation surlesiteWebàl adressesuivante o http manual jvc co jp index html o Vous pouvez également accéder au site web à partir du logiciel d application de cet appareil p 30 Vérifier les accessoires Adaptateur secteur AP V30U 1 pour GZ HM960 Adapta...

Страница 87: ...nregistrement ou d une lecture K Connecteur USB p 31 L Mini connecteur HDMI p 20 M Touche USER Utilisateur Active les fonctions préréglées N Touche A B Vidéo Photo Bascule entre les modes vidéo et photo O Touche M Alimentation Information Enregistrement Affiche le temps pour les vidéos uniquement et la charge de batterie restants Lecture Affiche les informations relatives au fichier telles que la ...

Страница 88: ...es Appuyez sur cette touche pour afficher les écrans à nouveau Les écrans apparaissent pendant environ 3 secondes à chaque pression Appuyez sur cette touche en la maintenant enfoncée pour fixer les écrans Appuyez à nouveau sur cette touche pour faire disparaître les écrans Écran de lecture vidéo 00 01 23 00 12 34 6 1 2 4 5 3 A Touche Mode Enregistrement Lecture Bascule entre les modes d enregistre...

Страница 89: ...cture Écran d enregistrement REMARQUE 0 L écrantactiledecetappareilestsensibleàlapression Lorsquel écrantactilenerépondpassansà coups appuyezavecunpeu plusdeforcedelapointedevosdoigts 0 N appuyezpasounefrottezavecuneforceexcessive 0 Sivousappliquezunefeuilleouunautocollantdeprotection ilestpossiblequel écrantactilenerépondepassansà coups 0 N utilisezpasl écrantactileavecunobjetavecunepointeaiguisé...

Страница 90: ...U pour GZ HM860 ATTENTION Assurez vous d utiliser des batteries de JVC 0 Si vous utilisez des batteries d autres fabricants JVC les performances et la sécurité ne seront pas garanties 0 Durée de chargement Environ 2 h 30 m avec la batterie fournie Le temps de chargement est lorsque l appareil est utilisé à 25 C 77 F Si la batterie n est pas chargée à une température ambiante comprise entre 10 C et...

Страница 91: ...pport sur MEMOIRE INTERNE pour l enregistrement Par défaut il est réglé sur MEMOIRE INTERNE Basique Côté borne Ouvrez le couvercle et insérez une carte SD Fermez l écran LCD Coupez le courant de l appareil avant d insérer ou de retirer une carte o Pour retirer la carte Poussez la carte vers l intérieur puis tirez la vers vous Basique Pour plus d informations veuillez vous rapporter au Manuel d uti...

Страница 92: ...ger les données ne touchez pas aux terminaux de la carte SD 0 Eye Fi est une carte mémoire SD avec une fonction LAN sans fil Pour plus d informations veuillez vous rapporter au Manuel d utilisation 0 Lorsque vous utilisez une carte SDXC vérifiez sa compatibilité avec le SE de votre ordinateur en consultant le Manuel d utilisation 0 Les vidéos comme les photos peuvent être enregistrées sur une cart...

Страница 93: ...i ont servi pour d autres appareils Formatez initialisez la carte via FORMATER LA CARTE SD à partir le menu COMMUN Toutes les données de la carte seront supprimées lors du formatage Avant de formater la carte copiez sur un ordinateur tous les fichiers qu elle contient A Effectuez les étapes A C à partir de Pour utiliser une carte SD B Appuyez sur FORMATER LA CARTE SD COMMUN FORMATER LA CARTE SD C ...

Страница 94: ...r l horloge Réglezl horlogeavec REGLERL HEURE àpartir du menu COMMUN A Ouvrez l écran LCD 0 L unité s allume B Appuyez sur MENU C Appuyez sur Q D Appuyez sur REGLER L HEURE COMMUN REGLER L HEURE E Appuyez sur REGLAGE DE L HORLOGE REGLAGE DE L HORLOGE REGLER L HEURE 0 Les opérations de réglage suivantes sont les mêmes que celles mentionnées dans les étapes 3 à 5 sur p 14 Pour modifier la langue d a...

Страница 95: ...ode bascule entre les modes Auto Intelligent et Manuel à chaque pression Si le mode est H Manuel appuyez sur la touche S pour basculer Vérifiez si le mode d enregistrement est P Auto Intelligent Sélectionnez le mode vidéo 0 Vous pouvez aussi appuyer sur g sur l écran tactile à enregistrer Pour arrêter l enregistrement appuyez sur a Vous pouvez aussi appuyer sur T W pour zoomer o Indications appara...

Страница 96: ...t être enregistrés Il est recommandé d inscrire au préalable des visages qui sont souvent enregistrés par cette caméra Pour plus de détails consultez Enregistrer l information relative à l authentification personnelle du visage humain dans le Manuel d utilisation o TOUCHE PRIOR AE AF SUIVI DU VISAGE SUIVI DE COULEURS SELECTIONNER ZONE TOUCHE PRIOR AE AF est une fonction qui ajuste la mise au point...

Страница 97: ...tactile à enregistrer Toutefois il est impossible de régler la mise au point en appuyant à mi course o Indications apparaissant à l écran lors de l enregistrement d une photo 10 10 AM 6630 Indicateur de batterie Supports d enregistrement Enregistrement en cours Nombre de prises de vue restantes Mise au point Vitesse d obturation Taille d image Pour plus d informations veuillez vous rapporter au Ma...

Страница 98: ...yez sur e pour interrompre la lecture Appuyez sur I J pour sélectionner le support à lire Appuyez sur le fichier à lire Sélectionnez le mode vidéo ou photo REGLER Appuyez sur REGLER Appuyez à nouveau sur q pour retourner au mode d enregistrement Appuyez sur q sur l écran tactile pour sélectionner le mode de lecture 0 La touche W sur l écran d index est affichée uniquement pendant la lecture des ph...

Страница 99: ... Passe à la photo suivante h Retourne au début de la scène Retourne à la photo précédente i Recherche avant j Recherche arrière k Ralentiavant Appuyezetmaintenezenfoncée pour commencer la lecture au ralenti l Ralenti arrière Appuyez et maintenez enfoncée pour commencer la lecture arrière U Ajustement du volume R Pivote à 90 degrés dans le sens inverse des aiguilles d une montre S Pivoteà90degrésda...

Страница 100: ...des images 3D sur un téléviseur compatible 3D pour GZ HM960 Si vous utilisez un téléviseur compatible 3D vous pouvez lire des images 3D en vous connectant au mini connecteur HDMI o Lecture en qualité HD Si vous utilisez un HDTV vous pouvez lire en qualité HD en le connectant à un mini connecteur HDMI Connecter au connecteur HDMI Entrée connecteur HDMI Téléviseur Mini câble HDMI fourni Vers Mini co...

Страница 101: ...ur Entrée audio D Entrée audio G Entrée vidéo Entrée vidéo Câble AV fourni Vers connecteur AV 2 Connectez l adaptateur secteur p 10 0 Cette unité s allume automatiquement lorsque l adaptateur secteur est branché 3 Sélectionner l entrée d alimentation de la TV 4 Lire un fichier p 18 o Lorsque les photos ne rendent pas un aspect naturel sur la TV Les photos ne s affichent pas correctement sur le tél...

Страница 102: ...r externe I p 27 Ordinateur 2 2 2 I p 28 1 Seulement pour les dispositifs compatibles AVCHD 2 Pour obtenir des détails consulter le Manuel d utilisation ou le fichier d aide de Everio MediaBrowser 3 BE REMARQUE 0 Les disques créés avec un graveur de DVD ou un lecteur Blu ray externe ainsi que les fichiers copiés sur un disque dur externe peuvent être convertis en 3D pour la lecture pour GZ HM960 0...

Страница 103: ...ez le graveur de DVD ou le lecteur Blu ray externe et insérez un nouveau disque o Pour lire le disque créé Lecture sur un appareil compatible AVCHD comme enregistreur Blu ray o Graveurs de DVD compatibles 0 CU VD50 0 CU VD3 o Lecteur externes Blu ray compatibles 0 Vous pouvez utiliser BE08LU20 de LG 0 Pour utiliser le câble USB fourni avec le lecteurBlu rayexterne achetezlecâble USB de rallonge 1 ...

Страница 104: ...et appareil sont copiées SCENES NON ENREG vidéo IMAGES NON ENREG photo Les vidéos ou les photos qui n ont jamais été copiées sont automatiquement sélectionnées et copiées 4 Appuyez sur EXECUTER Nombre de disques requis RETOUR EXECUTER PREPARER UN DISQUE VIERGE ESPACE DISQUE REQUIS TOUTE LES SCENES DVD 2 DVD DL 1 5 Appuyez sur OUI ou NON NON OUI PRINCIPAL DU DISQUE AUTOMATIQUE SUR LE MENU APPLIQUER...

Страница 105: ...1 10 10 FIN CREER PAR DATE 0 Seuls les fichiers de la date sélectionnée vont être copiés 0 Les opérations suivantes sont les mêmes que celles mentionnées dans les étapes 4 à 8 de la page précédente B SELECTION VIA SCENES CHOISIR DES IMAGES A Sélectionnez un fichier 2011 ENREG FIN VERIF SELECTION VIA SCENES 0 Une marque de repère apparaît sur le fichier sélectionné B Après avoir sélectionné tous le...

Страница 106: ... fourni Vers connecteur AV L adaptateur secteur montré dans l illustration est le AC V11U pour GZ HM860 0 Cette unité s allume automatiquement lorsque l adaptateur secteur est branché 2 Appuyez sur q pour sélectionner le mode de lecture 3 Préparez l enregistrement Préparation de la TV et du magnétoscope enregistreur DVD 0 Basculez vers une entrée externe compatible 0 Insérez un DVD R ou une casset...

Страница 107: ...plus proche Sélectionnez le mode vidéo ou photo 1 Appuyez sur SAUVEGARDER SAUVEGARDER SAUVEGARDE VIDEO 2 Appuyez sur le support à copier CARTE SD MEMOIRE INTERNE A SAUVEGARDER SELECTIONNEZ LE MEDIA SAUVEGARDER 3 Appuyez sur la méthode souhaitée TOUTE LES SCENES SAUVEGARDER TOUTE LES SCENES vidéo TOUTES LES IMAGES photo Toutes les vidéos ou les photos dans cet appareil sont copiées SCENES NON ENREG...

Страница 108: ...m versions préinstallées uniquement Windows Vista Home Premium versions préinstallées uniquement Windows 7 Type de système 32 bit 64 bit Mémoire Au moins 2 Go o Windows XP Mémoire Au moins 1 Go ProcesseurIntel Core Duo CPU 1 66 GHz ou supérieur Intel Core 2 Duo CPU 2 13 GHz ou supérieur recommandé Service Pack 3 Home Edition ou Professional versions préinstallées uniquement Windows XP o Autres con...

Страница 109: ... Pour vérifier les configurations système sélectionnez À propos de ce Mac dans le menu Apple Vous pouvez déterminer la version du système d exploitation le processeur et la quantité de mémoire disponible 0 Pour plus d informations concernant iMovie ou iPhoto veuillez vous rendre sur le site d Apple 0 Pour plus d informations concernant la façon d utiliser iMovie ou iPhoto consultez fichier d aide ...

Страница 110: ...automatique B Cliquez sur Continuar sur l écran de contrôle du compte d utilisateur 0 Installation dulogiciel apparaît alors à l écran après quelques instants 0 S il n apparaît pas double cliquez sur JVCCAM_APP dans Poste de travail ou Ordinateur puis double cliquez sur install exe 6 Cliquez sur Everio MediaBrowser 3 0 Suivez les instructions qui s affichent à l écran 7 Cliquez sur Terminer 8 Cliq...

Страница 111: ...R AU PC SAUVEGARDER 0 Le logiciel fourni Everio MediaBrowser 3 BE se lance sur votre ordinateur Les opérations suivantes doivent être effectuées sur l ordinateur 4 Sélectionnez le volume 2 1 Cliquez Cliquez 5 Lancez la sauvegarde Cliquez Destination d enregistrement ordinateur 6 Une fois la sauvegarde terminée cliquez sur OK En cas de problème avec le logiciel Everio MediaBrowser 3 BE fourni veuil...

Страница 112: ...pos de ce logiciel réseau de service après vente mondial JVC http www jvc victor co jp english worldmap index e html Nom du produit modèle numéro de série problème message d erreur Ordinateur fabricant modèle bureau portable UC SE mémoire Mo Go espace disque disponible Go Veuillez noter que la réponse à vos questions peut prendre un certain temps en fonction de leur nature JVC ne peut pas répondre...

Страница 113: ...00 6 700 9 999 9 999 Durée d enregistrement approximative avec batterie o Affichage 3D sur le moniteur LCD GZ HM960 Batterie Durée d enregistrement réelle Durée d enregistrement continue BN VG114U 35 m 1 h BN VG121U 50 m 1 h 30 m BN VG138U 1 h 30 m 2 h 45 m o Affichage 2D sur le moniteur LCD Batterie GZ HM960 GZ HM860 Durée d enregistrement réelle Durée d enregistrement continue Durée d enregistre...

Страница 114: ... fermez l écran LCD B Enlevez l adaptateur secteur et la batterie de l unité replacez les ouvrez l écran LCD et cet appareil se rallume automatiquement 5 Si les points ci dessus ne peuvent résoudre le problème consultez votre revendeur JVC ou le centre de services JVC le plus proche Problèmes Problèmes Action Page Alimentation POWER CHARGE le voyant se met à clignoter lorsque l écran est fermé 0 L...

Страница 115: ... Messages d avertissement ERREUR D ENREGISTREMENT 0 Éteignez puis rallumez l appareil 0 Si malgré tout vous ne parvenez pas à résoudre le problème sauvegardez vos fichiers et exécutez FORMAT MEM INTERNE ou FORMATER LA CARTE SD dans le menu COMMUN Toutes les données seront supprimées ERREUR DANS LA MEMOIRE INTERNE ERREUR CARTE MEMOIRE 0 Éteignez puis rallumez l appareil 0 Enlevez l adaptateur secte...

Страница 116: ...age de cette batterie veuillez composer le 1 800 8 BATTERY États Unis et Canada seulement Support d enregistrement Veiller à suivre les directives ci dessous pour éviter d altérer ou d endommager les données enregistrées Ne pas déformer ou laisser tomber le support d enregistrement ou le soumettre à une forte pression des secousses ou des vibrations Ne pas éclabousser le support d enregistrement a...

Страница 117: ...rs de l utilisation du caméscope avec un trépied fixer fermement l appareil sur le trépied Si le caméscope se détache et tombe il peut causer des blessures ou être endommagé Si un enfant utilise l appareil un adulte doit être présent Des changements ou modifications non approuvés par JVC peuvent annuler le droit de l utilisateur de faire fonctionner l appareil Cet appareil a été testé et il a été ...

Страница 118: ...els CMOS Zone d enregistrement vidéo 2 820 000 pixels 2 070 000 à 4 770 000 pixels zoom dynamique Zone d enregistrement photo 3 980 000 à 5 290 000 pixels 4 3 2 990 000 à 3 970 000 pixels 16 9 Objectif Vidéo F1 2 2 8 f 3 76 mm à 37 6 mm Conversion 35 mm 29 5 mm à 295 mm Conversion 35 mm 29 5 mm à 448 mm zoom dynamique Objectif Photo F1 2 2 8 f 3 76 mm à 37 6 mm Conversion 35 mm 29 7 mm à 297 mm 4 ...

Страница 119: ... ou la région visité e 0 Les caractéristiques et l apparence de ce produit sont susceptibles d être modifiées sans préavis pour d éventuelles améliorations Capacités Bluetooth o Casque d écoute Vous pouvez utiliser un casque d écoute casque intégré avec micro pour écouter le son enregistré pendant le tournage o Récepteur GPS Vous pouvez utiliser le récepteur GPS pour enregistrer les informations s...

Страница 120: ...Dupliquer 26 Copier Sauvegarde 22 D Durée d enregistrement 33 E Écran LCD 36 F Formater la carte SD 13 I Installation 30 L Logiciel 28 M Mac 29 N Nombre d images 33 R Régler l horloge 14 Régler la date et l heure 14 S Supprimer des fichiers 18 V Visualiser des fichiers sur une TV 20 W Windows 28 Z Zoom 15 0111HOH SW VM US 2011 Victor Company of Japan Limited LYT2313 001A M ...

Отзывы: