background image

Basic Operations

10

Customize Short-cut buttons on 

HOME screen

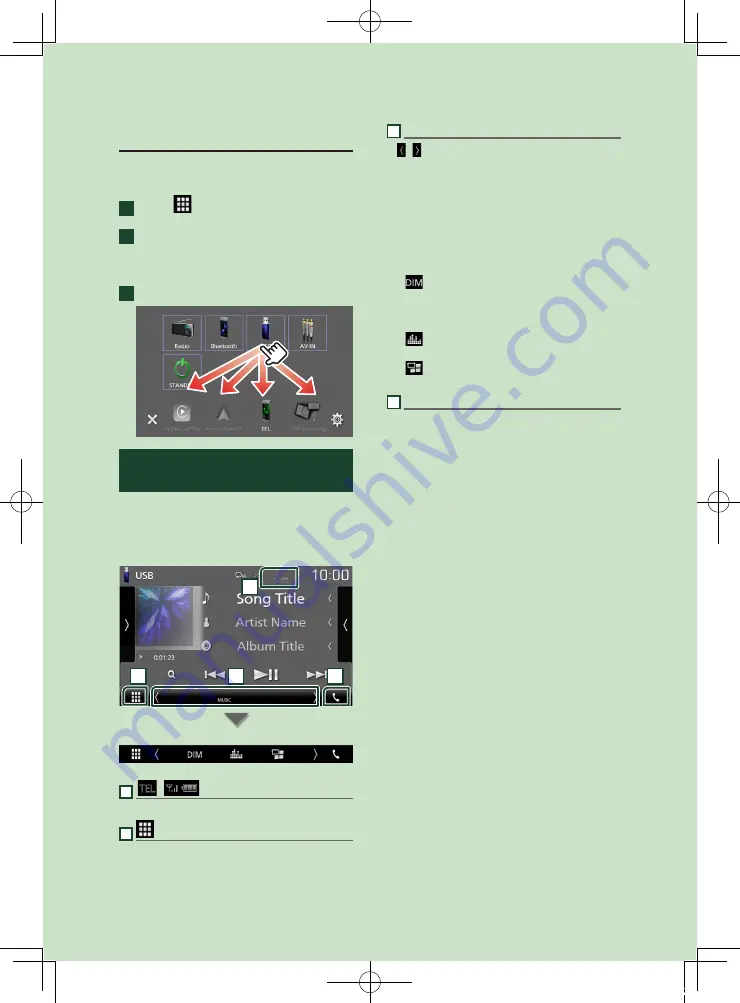
You can arrange the position of the source icons 
as you like.

1

 Touch 

[

]

 on the HOME screen.

2

  Touch and hold the icon which you want 

to move to go into the customizing 

mode.

3

  Drag it where you want to move.

Source control screen 

descriptions

There are some functions which can be 
operated from most screens.

Indicators

1

2

3

4

Sub menu

1


[

]

/

[

]

Connected Bluetooth device information.

2


 All sources icon

Displays all sources.

3

 Secondary screen

• 

[ ]

/

[ ]

 : The Secondary screen changes every 

time you touch it. You can also change the 
Secondary screen by flicking left or right on 
the screen.

• Indicators: Displays the current source 

condition and so on.


[

MUTE

]

: The mute function is active.


[

LOUD

]

: The loudness control function is on.

• Sub menu


[

]

: Operation when the icon is touched: 

The first touch darkens the screen, the second 
touch darkens the screen further, and the third 
touch restores the screen to its original brightness.


[

]

: Displays the Graphic Equalizer screen. 

(P.37)


[

]

: Displays the APP (Apple CarPlay/ Android 

Auto) screen 

(P.12)

.

4


[

Û

]

Touch to display the Hands Free screen. 

(P.25)

When connecting as Apple CarPlay or Android 
Auto, it works as a phone provided in Apple 
CarPlay or Android Auto.

!B5H-0358-25_DMX_E_En.indb   10

2020/08/26   13:21

Содержание DMX5020BTS

Страница 1: ...orporation DMX5020BTS MONITOR WITH RECEIVER INSTRUCTION MANUAL Updated information the latest Instruction Manual system updates new functions etc is available from https www kenwood com cs ce B5H 0358 25_DMX_E_En indb 1 2020 08 26 13 21 ...

Страница 2: ...ration 14 USB 15 Connecting a USB device 15 USB Basic Operation 15 Search Operation 17 Radio 18 Radio Basic Operation 18 Memory Operation 19 Selecting Operation 19 Traffic Information 20 Radio Setup 20 Bluetooth Control 21 Information for using Bluetooth devices 21 Register from the Bluetooth device 22 Bluetooth Setup 22 Playing Bluetooth Audio Device 23 Using Hands Free Unit 25 Other External Com...

Страница 3: ...stening Position DTA 39 Remote control 40 Functions of the Remote control Buttons 40 Connection Installation 41 Before Installation 41 Installing the unit 42 Troubleshooting 46 Problems and Solutions 46 Error Messages 46 Appendix 47 Playable Media and Files 47 Specifications 48 About this Unit 50 B5H 0358 25_DMX_E_En indb 3 2020 08 26 13 21 ...

Страница 4: ...n off with a cloth moistened with neutral cleaner then wipe it again with a clean soft dry cloth NOTE Applying spray cleaner directly to the unit may affect its mechanical parts Wiping the faceplate with a hard cloth or using a volatile liquid such as thinner or alcohol may scratch the surface or erase screened print Ñ Ñ How To Reset Your Unit If the unit or the connected unit fails to operate pro...

Страница 5: ...en P 8 Pressing for 1 second turns the power off When the power off turns the power on 4 MENU Displays the MENU screen Pressing for 1 second turns the screen off 5 VOICE Displays the Voice Recognition screen P 26 6 Reset If the unit or the connected unit fails to operate properly the unit returns to initial settings when this button is pressed Turning on the Unit 1 Press the HOME button h h The un...

Страница 6: ...play Set the image on the screen 1 Touch Display 2 Touch Background 3 Select the image 4 Touch For detailed operation see Display Setup P 33 Camera Set the parameters for the camera 1 Touch Camera 2 Set each item and touch For detailed operation see Camera Setup P 29 DEMO Set the demonstration mode Default is ON 1 Touch DEMO and set ON or OFF 2 Touch Finish NOTE These settings can be set from the ...

Страница 7: ...ons To perform operations on the screen you need to touch touch and hold flick or swipe to select an item display setting menu screen or to change the page etc Touch Touch the screen gently to select an item on the screen Touch and hold Touch the screen and keep your finger in place until the display changes or a message is displayed Flick Slide your finger quickly to the left or right on the scre...

Страница 8: ... When connecting as Apple CarPlay or Android Auto it works as a phone provided in Apple CarPlay or Android Auto Display the HOME screen 1 Press the HOME button h h HOME screen appears Source selection screen descriptions You can display all playback sources and options on the source selection screen 2 3 1 1 Changes the playback source For playback sources see Select the playback source P 9 2 Retur...

Страница 9: ...a phone provided in Apple CarPlay or Android Auto Switches to the USB Mirroring screen from the connected Android smartphone P 14 It is necessary to connect Android smartphone with Mirroring OA for KENWOOD application installed and to set Mode to Mirroring for Android P 14 Switches to the Radio broadcast P 18 Plays a Bluetooth audio player P 21 Plays files on a USB device P 15 Switches to an exter...

Страница 10: ...y time you touch it You can also change the Secondary screen by flicking left or right on the screen Indicators Displays the current source condition and so on MUTE The mute function is active LOUD The loudness control function is on Sub menu Operation when the icon is touched The first touch darkens the screen the second touch darkens the screen further and the third touch restores the screen to ...

Страница 11: ...1 Select on the MENU screen To turn on the screen 1 Touch the display List screen There are some common function keys in the list screens of most sources 6 1 2 3 4 5 1 Displays list type selection window 2 Displays music movie file list 3 Text scroll Scrolls the displayed text 4 etc Keys with various functions are displayed here Plays all tracks in the folder containing the current track Moves to ...

Страница 12: ...th Apple CarPlay is connected to the USB terminal the Bluetooth smartphone currently connected is disconnected 2 Unlock your iPhone Ñ Ñ Operation buttons and available Apps on the home screen of Apple CarPlay You can use the Apps of the connected iPhone The items displayed and the language used on the screen differ among the connected devices To enter Apple CarPlay mode touch Apple CarPlay icon in...

Страница 13: ...a Bluetooth automatically and the Bluetooth smartphone currently connected is disconnected 2 Unlock your Android smartphone NOTE To use the Android Auto It is necessary to set Mode to Android Auto P 14 Ñ Ñ Operation buttons and available Apps on the Android Auto screen You can perform the operations of the Apps of the connected Android smartphone The items displayed on the screen differ among the ...

Страница 14: ...evice 4 Touch Mode 5 Touch Mirroring for Android Ñ Ñ Compatible Android smartphone Android version 7 0 or later Linux Kernel version 3 5 or later Bluetooth support NOTE This unit may not work for some Android smartphone s Ñ Ñ Connecting an Android smartphone 1 Connect an Android smartphone via the USB terminal 2 Launch Mirroring App on your Android Smartphone Touch OK to start Mirroring App Touch ...

Страница 15: ...eader Take backups of the audio files used with this unit The files can be erased depending on the operating conditions of the USB device We shall have no compensation for any damage arising from any erased data USB Basic Operation Most functions can be controlled from the source control screen and playback screen Control screen 4 5 2 6 1 7 3 Open the drawer 5 4 1 Repeats the current track folder ...

Страница 16: ...lly on vertical or horizontal with no ratio change 5 Content list Touch on the right side of the screen to display the Content list Touch again to close the list Displays the playing list When you touch a track file name on the list playback will start 6 Indicator Items VIDEO Identifies the video file MUSIC Identifies the music file 7 Artwork Play mode indicator Playing time The jacket of the curr...

Страница 17: ...item in the list Repeat this step until you find the desired file Ñ Ñ Link search You can search a file of same artist album genre as the current track 1 Touch Link Search 2 Touch the desired tag type You can select from artist album and genre h h The list corresponding to your selection appears 3 Touch desired item from the content list Ñ Ñ Folder search You can search a file according to hierarc...

Страница 18: ...e Preset list Touch again to close the list Recalls the memorized station When touched for 2 seconds stores the current receiving station in memory 5 Function panel Touch on the left side of the screen to display the function panel Touch again to close the panel TI FM only Sets the traffic information mode on For details see Traffic Information P 20 SETUP FM only Displays the Radio SETUP screen Fo...

Страница 19: ...ion in memory 1 Select a station you wish to store in memory 2 Touch FM 1 24 or AM 1 12 in which you want to store the station for 2 seconds Selecting Operation Ñ Ñ Preset select You can list and select memorized station 1 Touch on the right side of the screen Select a station from the list Ñ Ñ Search by program type FM only You can tune to a station with a specific program type when listening to ...

Страница 20: ...tically Radio Setup FM only You can set tuner related parameters 1 Touch on the left side of the screen Touch SETUP h h Radio SETUP screen appears 2 Set each item as follows AF When station reception is poor automatically switches to the station that is broadcasting the same program over the same Radio Data System network Default is ON Regional Sets whether to switch to the station only in the spe...

Страница 21: ...sion of the device This unit may not work for some Bluetooth devices Connecting conditions may vary depending on your environment For some Bluetooth devices the device is disconnected when the unit is turned off Ñ Ñ About the cell phone and Bluetooth audio player This unit conforms to the following Bluetooth specifications Version Bluetooth Ver 4 1 Profile Cell phone HFP Hands Free Profile SPP Ser...

Страница 22: ... on your smartphone cell phone 2 Search the unit DMX from your smartphone cell phone 3 Operate your smartphone cell phone according to the displayed messages Confirm the request on the smartphone cell phone If a PIN code is required enter the PIN code 0000 4 Touch Yes When data transmission and connection have completed the Bluetooth connection icon appears on the screen Bluetooth Setup 1 Press th...

Страница 23: ...1 1 Device name Connected device name Repeats the current track folder Each time you touch the key repeat mode switches in the following sequence File repeat Folder repeat All songs repeat Repeat off Randomly plays all tracks in current folder Each time you touch the key random mode switches in the following sequence All random Random off Operations and display indications may differ according to ...

Страница 24: ...tion keys do not appear operate from the player Depending on your cell phone or audio player audio may be heard and controlled but text information may not appear If the volume is too low raise it on your cell phone or audio player Ñ Ñ Connect the Bluetooth audio Selects the device to connect via Bluetooth audio A2DP or APP SPP 1 Touch on the left side of the screen Touch BT DEVICE CHANGE 2 Touch ...

Страница 25: ...book up to 1000 entries Up to 20 entries including dialed calls received calls and missed calls 2 Select a dialing method Call using call records Call using the phonebook Call using the preset number Call by entering a phone number Voice Recognition P 26 Bluetooth SETUP Bluetooth SETUP 1 Touch Bluetooth SETUP screen appears NOTE The status icons such as battery and antenna displayed may differ fro...

Страница 26: ...Download Phonebook Now will start downloading the Phonebook Ñ Ñ Voice Recognition You can access the voice recognition function of the cell phone connected to this unit You can search the cell phone phonebook by voice The functionality depends on the cell phone 1 Press the VOICE button h h Voice Recognition screen appears 2 Start speaking NOTE You can use voice recognition function by touching on ...

Страница 27: ...s the S or R button Output the dial tone Touch DTMF to display the tone input screen You can send tones by touching desired keys on the screen Switching the speaking voice output Touching each time switches the speaking voice output between cell phone and speaker Call waiting When you receive a call while talking on another call you can answer the newly received call by touching The current call i...

Страница 28: ...onebook P 26 Add number direct Enter the telephone number directly and touch SET See Call by entering a phone number P 25 Delete To delete a preset number touch Delete and then touch Yes on the confirmation screen Ñ Ñ Phonebook transfer You can transfer the phonebook in your Bluetooth smartphone via PBAP 1 Touch 2 Touch h h The phonebook data transmission starts NOTE If the Phonebook contains more...

Страница 29: ...appears 3 Adjust each item as follows 1 1 Camera off Touch to exit the camera screen Ñ Ñ Camera Setup 1 Press the MENU button h h MENU screen appears 2 Touch h h SETUP Menu screen appears 3 Touch Camera h h Camera screen appears 4 Set each item as follows Parking Guidelines You can display parking guidelines to enable easier parking when you shift the gear to the reverse R position Default is ON G...

Страница 30: ... the rear view camera When adjusting the parking guidelines make sure to use the parking brake to prevent the car from moving 1 Touch ON of Parking Guidelines in the Camera screen P 29 2 Touch Guidelines SETUP in the Camera screen 3 Adjust the parking guidelines by selecting the mark 4 Adjusting the position of the selected mark A B C D Make sure that A and B are horizontally parallel and that C a...

Страница 31: ...ontrast Brightness Color Tint Adjusts each item NOTE Adjusting items are different depending on the current source System Setup 1 Press the MENU button h h MENU screen appears 2 Touch h h See the following section for each setting Set up AV P 34 Set up display P 33 Set up the user interface P 32 Set up camera P 29 Set up special P 33 Set up Bluetooth P 22 Set up Device P 14 B5H 0358 25_DMX_E_En in...

Страница 32: ...ction of steering remote This function is available only when your vehicle is equipped with the electrical steering remote controller If your steering remote controller is not compliant learning may not be completed and error message may appear 1 Touch Steering Remote Controller in the User Interface screen h h Steering Remote Controller screen appears 2 Touch the function you want to set 3 Press ...

Страница 33: ...n 2 Confirm the software version Display Setup 1 Press the MENU button h h MENU screen appears 2 Touch h h SETUP screen appears 3 Touch Display h h Display screen appears 4 Set each item as follows Dimmer Select dimmer mode OFF The display and buttons do not dim ON The display and buttons dim SYNC Default Turns the dimmer function on or off when the vehicle light control switch is turned on or off...

Страница 34: ... h h MENU screen appears 2 Touch h h SETUP screen appears 3 Touch AV h h AV screen appears 4 Set each item as follows AV OUT Specify whether to output the current source signal from the VIDEO OUT terminal ON OFF Default NOTE Images can be output only from the AV IN and USB video file source If display of the rear view camera image is selected when the AV IN source is being played no image is outpu...

Страница 35: ...appears 2 Touch h h Audio screen appears 3 Touch Speaker Xʼover 4 Select a car type You can setup the car type and speaker network etc If your car type is selected the Delay Time Alignment is set automatically for timing adjustment of sound output for each channel to have the highest surround effects 5 Touch the speaker 1 you wish to adjust and set each item 2 as follows 1 2 Speaker You can select...

Страница 36: ...e front speaker rear speaker or subwoofer level TW Tweeter Gain 2 Adjusts the tweeter level When front is selected on Speaker Select screen Phase Inversion 3 Sets the phase of subwoofer output Check Phase Inversion to shift the phase 180 degrees When subwoofer is selected on Speaker Select screen 1 Only when LPF FREQ HPF FREQ is set to a mode other than Through in Xʼover 2 Only when Tweeter is set...

Страница 37: ...e gain level by touching the each frequency bar You can select frequency bar and adjust its level by R S Preset Select Displays the screen to recall the preset equalizer curve Initialize The current EQ curve returns to flat Memory Saves the adjusted equalizer curve from User1 to User3 Bass EXT Bass Extend Settings When turned on the frequency lower than 62 5 Hz is set to the same gain level as 62 ...

Страница 38: ...ttings If you have increased the volume first then reduced the volume using the Volume Offset the sound generated if you suddenly switch to another source may be extremely loud Sound Effect You can set sound effects 1 Press the MENU button h h MENU screen appears 2 Touch h h Audio screen appears 3 Touch Sound Effect 4 Set each item as follows Bass Boost Sets the amount of bass boost among OFF 1 2 ...

Страница 39: ...osition DTA 4 Select listening position from Front R Right front Front L Left front Front All All front and All Position DTA control You can fine adjust your listening position 1 Touch Adjust 2 Touch Delay 3 Touch T or U to adjust the delay time of the selected speaker 4 Touch Level 5 Touch T or U to adjust the sound level of the selected speaker NOTE To return to the initial setting of Delay and ...

Страница 40: ...eceived by the unit 7 ATT Mutes restores the sound 8 Numeric Keypad Allows you to enter the number to search in the direct search mode For details on the direct search mode see Direct search mode P 40 9 BS DIRECT Switches to the direct search mode For details on the direct search mode see Direct search mode P 40 10 DISP Switches the screen between the current source and the App screen from the con...

Страница 41: ...gnition does not have an ACC position connect the ignition wires to a power source that can be turned on and off with the ignition key If you connect the ignition wire to a power source with a constant voltage supply such as with battery wires the battery may be drained If the console has a lid make sure to install the unit so that the front panel will not hit the lid when closing and opening If t...

Страница 42: ...for each unit 3 Connect the ISO connector to the unit 4 Install the unit in your car 5 Reconnect the terminal of the battery 6 Press the reset button Installing the unit Bend the tabs of the mounting sleeve with a screwdriver or similar utensil and attach it in place NOTE Make sure that the unit is installed securely in place If the unit is unstable it may malfunction eg the sound may skip Ñ Ñ Tri...

Страница 43: ...Removing the trim plate 1 Use the extraction key accessory 4 to lever out the four tabs two on the left part two on the right part 4 2 Pull the trim plate forward Ñ Ñ Removing the unit 1 Remove the trim plate by referring to step 1 in Removing the trim plate 2 Insert the extraction key accessory 5 deeply into the slot as shown The protrusion at the tip of the extraction key must face toward the un...

Страница 44: ...emote adapter not supplied matched to your car Connect to vehicle s reverse lamp harness when using the optional rear view camera Light Blue Yellow Steering remote control wire Fuse 15A Subwoofer Preout Cap Cap FM AM antenna Connector A Connector B USB device 2 USB terminal 1 1 0 m 1 USB maximum power supply current DC 5 V 1 5 A 2 Sold separately ISO Connector FRONT OUT REAR OUT VIDEO OUT CAM IN R...

Страница 45: ...nection B 1 B 2 Purple Purple Black Rear Right B 3 B 4 Gray Gray Black Front Right B 5 B 6 White White Black Front Left B 7 B 8 Green Green Black Rear Left 1 Max 150 mA 12V Speaker Impedance 4 8 Ω CAUTION Before you connect the commercially available ISO connectors to the unit check the following condition Make sure that the pin assignment of the connector matches with the KENWOOD unit Take extra ...

Страница 46: ...he sound skips when an audio file is being played The recording condition is bad Record the file again or use another USB memory Ñ Ñ Other The Touch Sensor Tone doesn t sound The preout jack is being used The Touch Sensor Tone cannot be output from the preout jack Error Messages When you fail to operate the unit correctly the cause of the failure appears as the message on the screen No Device USB ...

Страница 47: ...mpossible depending on the types or conditions of media or device Acceptable Video files Profile Max Picture size Max bit rate Audio format MPEG 1 mpg mpeg 352 240 352 288 1 5 Mbps MPEG Audio Layer 2 MPEG 2 mpg mpeg MP ML 720 480 720 576 8 Mbps MPEG Audio Layer 2 H 264 MPEG 4 AVC mp4 m4v avi flv Baseline Profile Main Profile 1920 1080 30 fps 8 Mbps MP3 AAC MPEG 4 mp4 avi Advanced Simple Profile 19...

Страница 48: ...y Bluetooth Ver 4 1 Frequency 2 402 2 480 GHz RF Output Power E I R P 8 dBm Avg Power Class 1 Maximum Communication range Line of sight approx 10 m 32 8 ft Audio Codec SBC AAC Profile Multi Profile support HFP Hands Free Profile SPP Serial Port Profile A2DP Advanced Audio Distribution Profile AVRCP Audio Video Remote Control Profile PBAP Phonebook Access Profile DSP section Graphics equalizer Band...

Страница 49: ...deo Output Level RCA jacks 1 Vp p 75 Ω Audio section Maximum Power Output Front Rear 45 W 4 Full Bandwidth Power at less than 1 THD 21 W 4 Output Frequency Band 20 20 000 Hz Preout Level V 2 V 10 kΩ Preout Impedance 1 4 kΩ Speaker Impedance 4 8 Ω General Operating Voltage 12V DC Car Battery Installation Dimensions W H D 182 112 75 mm Main Unit Installation size W H D 178 100 75 mm w o sleeve Weigh...

Страница 50: ...S ENCODED BY A CONSUMER ENGAGED IN A PERSONAL AND NON COMMERCIAL ACTIVITY AND OR WAS OBTAINED FROM A VIDEO PROVIDER LICENSED BY MPEG LA TO PROVIDE MPEG 4 VIDEO NO LICENSE IS GRANTED OR SHALL BE IMPLIED FOR ANY OTHER USE ADDITIONAL INFORMATION INCLUDING THAT RELATING TO PROMOTIONAL INTERNAL AND COMMERCIAL USES AND LICENSING MAY BE OBTAINED FROM MPEG LA LLC SEE HTTP WWW MPEGLA COM THIS PRODUCT IS LI...

Страница 51: ...tten permission THIS SOFTWARE IS PROVIDED BY THE COPYRIGHT HOLDERS AND CONTRIBUTORS AS IS AND ANY EXPRESS OR IMPLIED WARRANTIES INCLUDING BUT NOT LIMITED TO THE IMPLIED WARRANTIES OF MERCHANTABILITY AND FITNESS FOR A PARTICULAR PURPOSE ARE DISCLAIMED IN NO EVENT SHALL THE FOUNDATION OR CONTRIBUTORS BE LIABLE FOR ANY DIRECT INDIRECT INCIDENTAL SPECIAL EXEMPLARY OR CONSEQUENTIAL DAMAGES INCLUDING BU...

Страница 52: ...és megfelel a 2014 53 EU irányelvnek Az EU konformitási nyilatkozat teljes szövege az alábbi weboldalon érhető el Hrvatski JVCKENWOOD ovim izjavljuje da je radio oprema DMX5020BTS u skladu s Direktivom 2014 53 EU Cjeloviti tekst deklaracije Europske unije o usklađenosti dostupan je na sljedećoj internet adresi Svenska Härmed försäkrar JVCKENWOOD att radioutrustningen DMX5020BTS är i enlighet med d...

Страница 53: ...ящим заявляет что радиооборудование DMX5020BTS соответствует Директиве 2014 53 EU Полный текст декларации соответствия ЕС доступен по следующему адресу в сети Интернет Limba română Prin prezenta JVCKENWOOD declară că echipamentul radio DMX5020BTS este în conformitate cu Directiva 2014 53 UE Textul integral al declarației de conformitate UE este disponibil la urmatoarea adresă de internet Български...

Страница 54: ...his product are encouraged to read the terms of the corresponding license before use Because each individual license is prescribed by a third party other than JVCKENWOOD Corporation the original English of the license is presented EULA Ñ Ñ Software License Agreement JVCKENWOOD Corporation hereinafter called Licensor holds either the copyright to the embedded software or the right to sublicense it ...

Страница 55: ...from Licensor Article 8 Cancellation of the Agreement Licensor reserves the right to cancel this agreement forthwith and claim compensation from User for the damages caused by such cancellation when User 1 Breaches any of the provisions of this agreement or 2 Has received a petition for seizure provisional seizure provisional disposition or any other kind of compulsory execution Article 9 Destruct...

Страница 56: ... B5H 0358 25_DMX_E_En indb 56 2020 08 26 13 22 ...

Отзывы: