background image

Projecting Image

If setting for this projector is not completed, refer to “User Settings Menu”P. 34 upon turning on the power and configure

the settings accordingly.
Once the basic settings are configured, this projector can be used by simply performing the following operation

procedures.

0

Remove the lens cap.

0

Connect this projector to the computer. (P. 19, 21)

0

Connect the LAN cable. (P. 22)

1

Set this projector to the standby mode, and display the “Main” menu

0

Refer to “Turning On the Main Power”P. 24, and steps 4 to 6 of “Assigning a static IP address”P. 25.

0

The [STANDBY/ON] indicator lights up in red.

2

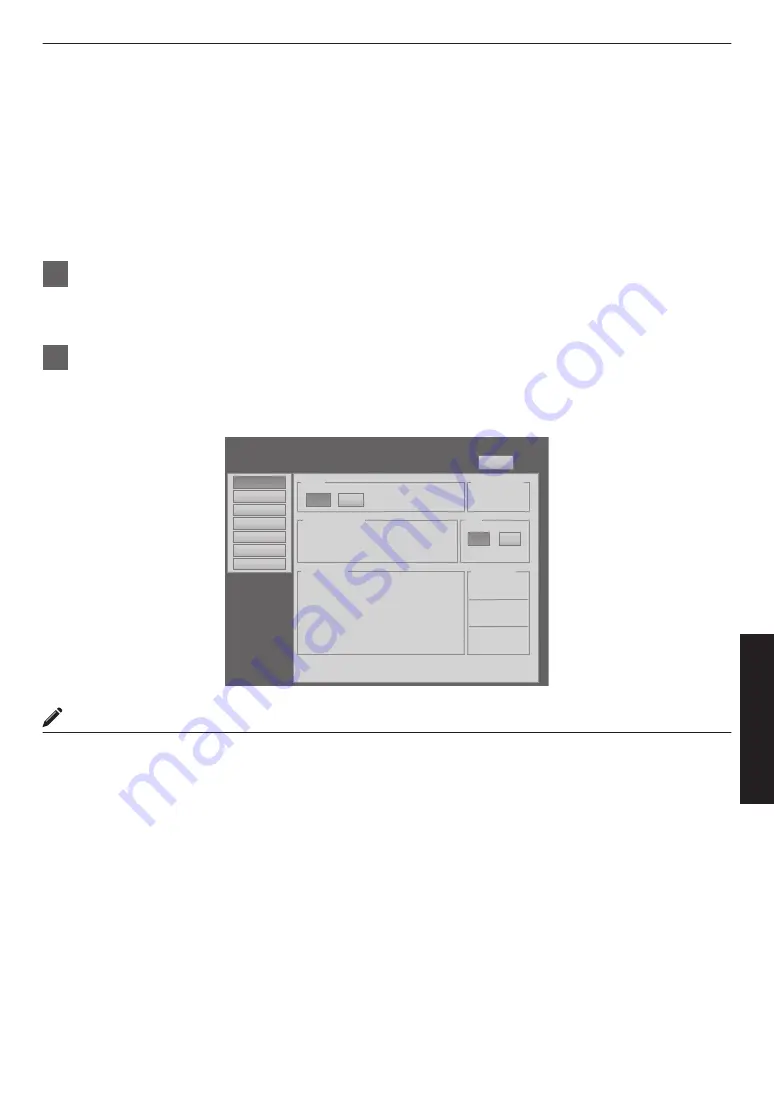
Click the “ON” button under the “Power” item of the “Main” menu to project the image

0

The power of this projector turns on, and formatting is done taking a few minutes. A gray image will be displayed

during formatting. The projected image appears once formatting ends.

0

The [STANDBY/ON] indicator lights up in green.

.

 DVI 

Rate(Hz)  Pixel H 

Pixel V 

Link

 1 

60.00 

2048 

2400 

Dual

 2 


 3 

60.00 

2048 

2400 

Dual

 4 


Power

Signal Status

Warning Status

Temperature

10h59m

Light Source Time

Hide

Exhaust

30.3 deg.C

Intake

30.3 deg.C

Inside

30.3 deg.C

ON

OFF

ON

OFF

PROJECTION

None

Main

Image

Setting

Convergence

Lens

Option

License

Logout

host PJ-1

user: root

MEMO

0

You can also turn on the power by pressing the [OPERATE


Z

] button on the projector unit for more than one second.

0

The image may flicker for a few seconds immediately after projection starts. This is not a malfunction.

0

After the LD block lights up, it takes more than 1 minute for the brightness of the video image on the screen to

stabilize.

29

Operation 

and 

Settings

Содержание DLA-VS4010

Страница 1: ...onsibility for any problems resulting from misuse of this unit by operating this equipment other than instructed in this manual INSTRUCTIONS B5A 2460 00 For Customer use Enter below the serial No which is located on the side of the cabinet Retain this information for future reference DLA VS4010 DLA VS4810 Model No Serial No Getting Started Connection and Installation Network Settings Operation and...

Страница 2: ...CAL SHOCK OR FIRE HAZARD In order not to defeat the safeguards incorporated into this product observe the following basic rules for its installation use and service Please read these Important Safeguards carefully before use All the safety and operating instructions should be read before the product is operated The safety and operating instructions should be retained for future reference All warni...

Страница 3: ...is product from the wall outlet and refer service to qualified service personnel under the following conditions When replacement parts are required be sure the service technician has used replacement parts specified by the manufacturer or with same characteristics as the original part Unauthorized substitutions may result in fire electric shock or other hazards Upon completion of any service or re...

Страница 4: ...which is colored blue must be connected to the terminal which is marked with the letter N or colored black The wire which is colored brown must be connected to the terminal which is marked with the letter L or colored red For USA and Canada only Use only the following power cord Cables Power cord DVI X4 Cable USB Cable LAN Cable RS 232C Cable Power supply cord Shielded cable Shielded cable Shielde...

Страница 5: ...ximum output is 49 2 W WARNING Beam divergence angle from lens of this unit Laser emission port Wide α 25 9 Tele α 15 4 α CAUTION Use of controls or adjustments or performance of procedures other than those specified herein may result in hazardous radiation exposure This Projector is classified as a CLASS 2 LASER PRODUCT This CLASS 2 LASER PRODUCT label and Caution label is located on the Rear Sid...

Страница 6: ...on exposure For the customers In other countries CLASS 1 LASER PRODUCT Location information of the labels Do not look into the lens while in use WARNING CAUTION LASER CAUTION LABEL IEC62471 5 RG LABEL As with any bright light source do not stare into the beam RG2 IEC 62471 5 2015 LASER CAUTION LABEL RG LABEL 6 Getting Started ...

Страница 7: ... cette pile contient du plomb Informatie voor gebruikers over het verwijderen van oude apparatuur en batterijen Alleen Europese Unie Deze symbolen geven aan dat apparatuur met dit symbool niet mag worden weggegooid als algemeen huishoudelijk afval Als u het product of de batterij wilt weggooien kunt u inzamelsystemen of faciliteiten voor een geschikte recycling gebruiken Opmerking Het teken Pb ond...

Страница 8: ...tor Settings Menu 42 Administrator Settings Menu Structure 42 7 Admin Network Menu 43 8 Admin E mail Menu 45 9 Admin Option Menu 47 10 Admin Signal Menu 48 Others Troubleshooting 50 What to do when these messages are displayed 52 Warnings Using Indicators 53 Warning Status 54 RS 232C Interface 55 Communication Specifications 55 Command Format 55 Maintenance 57 Cleaning and Replacing the Filter 57 ...

Страница 9: ...images with the lens cap attached The lens cap may be deformed due to the heat or the projector may malfunction C Projection Lens optional Zoom lens or short focal length lens is optional P 60 Remove the lens cap before projection D Lens Mounting Bracket Mount the optional projection lens E Adjustable Feet x4 Adjust the feet until the projector is level The adjustable range is 20 mm for each P 12 ...

Страница 10: ...one second or longer when the power is ON switches the projector to the standby mode P WARNING Indicator This indicator lights up in red when abnormality occurs on this projector 0 For details refer to Warnings Using Indicators P 53 Q LAMP Indicator This indicator lights up in yellow when the lifetime of the LD block exceeds 19 000 hours 0 For details refer to Warnings Using Indicators P 53 0 A me...

Страница 11: ...ync RS 232C 1 2 300 mm 600 mm 600 mm 600 mm 300 mm When using two sets of projectors side by side 300 mm 1300 mm 640 mm 600 mm 600 mm 300 mm When the projector is suspended MEMO 0 To prevent the projector from falling or toppling it is recommended that the holder be fastened to the unit using bolts 0 To mount the projector to the ceiling mount a special shelf to the ceiling followed by installing ...

Страница 12: ...VI 4 DVI 1 DVI 2 e shift Sync RS 232C 1 2 90 90 Not applicable Horizontal Angle 90 90 Not applicable CAUTION 0 Special expertise and techniques are required for mounting this unit Be sure to ask your dealer or a specialist to perform mounting 0 The projector cannot be installed upside down Adjusting the Inclination Adjust the horizontal angle of the projector Lift the projector and turn the nut of...

Страница 13: ...is 0 Install the projector such that the center of the projection screen is at the same height as the center of the lens OPERATE I B DVI 3 USB LAN RS 232C STANDBY ON LAMP WARNING DVI 4 DVI 1 DVI 2 e shift Sync RS 232C 1 2 Center Line of Lens 90 90 90 Screen When shift amount in the downward direction is 50 Install the projector such that the upper end of the projection screen is at the same height...

Страница 14: ...ted images when zoom lens is in use Projecting images by stacking projectors The lens shift feature enables you to use up to three stacked projectors at the same time Stacking the projectors enhances the brightness level and helps to project images that are sufficiently bright even when the venue is relatively big or bright OPERATE I B DVI 3 USB LAN RS 232C STANDBY ON LAMP WARNING DVI 4 DVI 1 DVI ...

Страница 15: ... by side ensure that the installation site is sufficiently strong and there is proper air cooling around the projectors For details please consult your authorized dealer When light passes through the glass of projection booth OPERATE I B DVI 3 USB LAN RS 232C STANDBY ON LAMP WARNING DVI 4 DVI 1 DVI 2 e shift Sync RS 232C 1 2 MEMO 0 When light passes through the glass the quantity of light decrease...

Страница 16: ...29 m 6 06 m 4 91 m 6 06 m 4 91 m 12 06 m 7 04 m 160 Approx 4 06 m 3 51 m 6 46 m 5 25 m 6 46 m 5 25 m 12 87 m 7 50 m 170 Approx 4 32 m 3 73 m 6 87 m 5 58 m 6 87 m 5 58 m 13 68 m 7 97 m 180 Approx 4 57 m 3 94 m 7 28 m 5 91 m 5 91 m 14 49 m 8 44 m 190 Approx 4 83 m 4 16 m 7 69 m 6 24 m 6 24 m 15 30 m 8 90 m 200 Approx 5 08 m 4 38 m 8 10 m 6 58 m 6 58 m 16 12 m 9 44 m 210 Approx 5 33 m 4 60 m 8 51 m 6...

Страница 17: ...m 140 Approx 3 56 m 3 07 m 3 42 m 150 Approx 3 81 m 3 29 m 3 67 m 160 Approx 4 06 m 3 51 m 3 92 m 170 Approx 4 32 m 3 73 m 4 17 m 180 Approx 4 57 m 3 94 m 4 42 m 190 Approx 4 83 m 4 16 m 4 67 m 200 Approx 5 08 m 4 38 m 4 92 m 210 Approx 5 33 m 4 60 m 5 17 m 220 Approx 5 59 m 4 82 m 5 43 m 230 Approx 5 84 m 5 04 m 5 68 m 240 Approx 6 10 m 5 26 m 5 93 m 250 Approx 6 35 m 5 48 m 6 18 m MEMO 0 The dis...

Страница 18: ... 1920 1200 4 Stripes 960 2400 3840 2160 2ch Dual DVI 1 DVI 3 2 Stripes 1920 2160 3840 2160 7680 4320 4ch Single DVI 1 to DVI 4 Cross 1920 1080 4 Stripes 960 2160 2048 1200 1ch Single DVI 1 Normal 2048 1200 4096 2400 2048 1080 1ch Single DVI 1 Normal 2048 1080 4096 2160 1920 1200 1ch Single DVI 1 Normal 1920 1200 3840 2400 1920 1080 1ch Single DVI 1 Normal 1920 1080 3840 2160 1600 1200 1ch Single D...

Страница 19: ...signals from the computer connect to the DVI 1 and DVI 3 terminals of this projector OPERATE I B DVI 3 USB LAN RS 232C STANDBY ON LAMP WARNING DVI 4 DVI 1 DVI 2 e shift Sync RS 232C 2 DVI D Cable Sold Separately To DVI Terminal Desktop Computer MEMO 0 Depending on your DVI D cable the signal may attenuate and the image become unstable 0 Use of DVI D cables compliant with the DDWG standard is recom...

Страница 20: ...080 1600 1200 1ch Single Normal 1600 1200 1280 1024 1ch Single Normal 1280 1024 1024 768 1ch Single Normal 1024 768 800 600 1ch Single Normal 800 600 640 480 1ch Single Normal 640 480 MEMO 0 This projector converts the frame rate to 60 Hz regardless of the synchronizing signal frequency at the computer s end 0 The respective signals are displayed at the center of the split screen 0 When in the two...

Страница 21: ...xample During Four Screen Mode OPERATE I B DVI 3 USB LAN RS 232C STANDBY ON LAMP WARNING DVI 4 DVI 1 DVI 2 e shift Sync RS 232C 2 Laptop Computer To DVI Terminal To DVI Terminal To DVI Terminal DVI D Cable Sold Separately To DVI Terminal Desktop Computer MEMO 0 Depending on your DVI D cable the signal may attenuate and the image become unstable 0 Use of DVI D cables compliant with the DDWG standar...

Страница 22: ...ING DVI 4 DVI 1 DVI 2 e shift Sync RS 232C 2 To LAN Terminal To Network Terminal Switching Hub MEMO 0 Make use of Cat 5 equivalent or higher straight 100Base TX LAN cables CAUTION 0 When connecting this projector and the controlling computer for this projector using other network be sure to consult the network administrator of the network in use or refer to technical books on networks When assigni...

Страница 23: ...gistered trademark or trademark of Microsoft Corporation in the United States and or other countries CAUTION 0 The PC specifications above are reference values for the application software to run smoothly and are not intended to guarantee their operation Note that the applications may not run smoothly depending on the condition of use of the respective users even when the system requirements are s...

Страница 24: ... address of all DLA VS4010 DLA VS4810 is 192 168 0 2 If multiple units of DLA VS4010 DLA VS4810 are used on the same network do not turn on the main power of more than one projector unit at the same time Doing so will result in duplication of the IP address and thereby preventing proper access 0 When using multiple units of DLA VS4010 DLA VS4810 turn on the main power of the second unit and config...

Страница 25: ...nd select Properties 0 Check to ensure that the Client for Microsoft Networks and Internet Protocol TCP IP check boxes are selected 4 Select Internet Protocol TCP IP and click Properties 5 Set the IP address A Select Use the following IP address B Set IP address For example use 192 168 0 100 when DLA VS4010 DLA VS4810 is in its default settings MEMO 0 Make sure that you take note of the original I...

Страница 26: ...as been selected deselect it Deselct the check 3 Check if the Active scripting of the Internet Explorer is disabled A Click Tools and select Internet Options B Click in the order of Security Trusted Sites Sites C Deselect the check Required server verification https for all sites in this zone D Enter http 192 168 0 2 under Add this web site to the zone and click Add E Click OK F Select Trusted Sit...

Страница 27: ...nce Lens Option Admin Network Admin E Mail Admin Option Admin Signal License Logout host PJ 1 user advanced Power Signal Status Warning Status Temperature 10h59m Light Source Time Hide Exhaust 30 3 deg C Intake 30 3 deg C Inside 30 3 deg C ON OFF ON OFF PROJECTION None 8 Set the IP address for this projector Main Image Setting Convergence Lens Option Admin Option Admin Signal Admin Network Admin M...

Страница 28: ... the projector will start up using the default IP address instead CAUTION 0 Configure the DHCP server such that the same IP address is assigned to the Mac Address of this projector by the DHCP server at all times Connection may fail if the above setting is not performed Connecting this projector and the computer using a USB cable You can connect this projector and the controlling computer using a ...

Страница 29: ...jector turns on and formatting is done taking a few minutes A gray image will be displayed during formatting The projected image appears once formatting ends 0 The STANDBY ON indicator lights up in green DVI Rate Hz Pixel H Pixel V Link 1 60 00 2048 2400 Dual 2 3 60 00 2048 2400 Dual 4 Power Signal Status Warning Status Temperature 10h59m Light SourceTime Hide Exhaust 30 3 deg C Intake 30 3 deg C ...

Страница 30: ...upward Press the U end of Shift To shift the image downward Press the D end of Shift To shift the image rightward Press the R end of Shift To shift the image leftward Press the L end of Shift MEMO 0 When a zoom lens is used the adjustment range for lens shift is between 0 to 50 in the vertical direction and between 0 to 25 in the horizontal direction during single screen display 0 When a short foc...

Страница 31: ...r switches to the cool down mode and the STANDBY ON indicator appears blinking in red 0 A gray image will be displayed for a maximum duration of 2 minutes during the ending process only after several hours of image projection Thereafter the LD block starts to cool down 0 After exiting the cool down mode the projector switches automatically to the standby mode and the STANDBY ON indicator lights up...

Страница 32: ...e power plug Useful Features During Projection Hiding the projected image temporarily The projected image can be hidden by clicking the ON button under the Hide item of the Main menu or Image menu 0 When the image is not displayed pressing OFF under the Hide item to display the hidden image Brightness Setting Convergence Lens Option Logout host PJ 1 user root Red 0 30 30 Green 0 30 30 Blue 0 30 30...

Страница 33: ...he proxy settings 0 If a Security Warning screen appears click OK and continue 2 Enter the login name and the password in the Login Name and Password fields respectively InputYour Login Name Password Login Name Password LOGIN MEMO 0 If you have forgotten the password please consult your authorized dealer 3 Click LOGIN 0 The Main menu for this projector appears MEMO 0 You can alter the user name an...

Страница 34: ...ector s interior temperature display Mute operation 2 Image Brightness Contrast Gamma Hide Brightness adjustment Contrast adjustment Gamma setting Mute operation 3 Setting Input Level Display Mode Input level setting Display method setting 4 Convergence Red Blue Test Pattern Pixel position adjustment Pixel position adjustment Test pattern setting 5 Lens Zoom Focus Shift Test Pattern Zoom adjustmen...

Страница 35: ...Item Setting Value Description Power ON OFF Turns on off the LD block ON Turns on the LD block OFF Turns off the LD block MEMO 0 The following operating modes of the projector are displayed to the right of the OFF button STANDBY Standby OFF PROJECTION LD block illuminated ON FAN ENABLE FAN Enable OFF ON DEVICE ENABLE Elemental Device Enable OFF ON COOLING Cooling OFF EMERGENCY ErrorOccurred Coolin...

Страница 36: ...Displays the link status of the DVI terminal MEMO 0 This item is not displayed when there is no signal input 0 The text color of Rate Hz vertical frequency turns red in the case of interlaced signal And the text turns white in the case of progressive signal Temperature Exhaust Intake Inside Displays the interior temperature of the projector Exhaust Temperature at the vent holes Intake Temperature ...

Страница 37: ...0 Default Value 0 30 to 30 Default Value 0 For adjusting the brightness of the red green and blue colors Contrast Red Green Blue 30 to 30 Default Value 0 30 to 30 Default Value 0 30 to 30 Default Value 0 For adjusting the contrast of the red green and blue colors Gamma R A B C For specifying the tone characteristics of the image A Sets gamma to 2 2 B Sets gamma to 1 8 C Sets gamma to 2 6 Hide R OF...

Страница 38: ...d 235 Display Mode R Single Double Cross For specifying the display mode of the projection screen Single Displays input signals on a single screen Double Displays two different input signals on two screens The left screen displays images of the DVI 1 terminal and the right screen displays images of the DVI 3 terminal Cross Displays four different input signals on four screens The top left screen d...

Страница 39: ...age is flipped horizontally or vertically the horizontal and vertical directions are reversed 0 Use images with a clear outline such as Color Cross Hatch patterns available in this projector for adjustment CAUTION 0 When the movement exceeds the limit the color of the button turns red Blue Test Pattern R OFF Color Bars Color Cross Hatch Cross Hatch Staircase Ramp Flat For projecting the test patte...

Страница 40: ...g the focus position MEMO 0 The zoom position changes each time the inner button is clicked The zoom position changes when the outer button is depressed CAUTION 0 Due to backlash the response may not be immediate Shift For adjusting the horizontal and vertical positions of the projection screen MEMO 0 The zoom position changes each time the inner button is clicked The zoom position changes when th...

Страница 41: ...ally OFF Do not flip image horizontally ON Flips image vertically OFF Do not flip image vertically Light Source Power R Mode1 Mode2 For switching the brightness of the LD block to Mode1 or Mode2 Mode1 Brightness high Mode2 Brightness low Back Color R Blue Black For specifying the background color during message display or when projection fails such as when there is no input signal Blue Sets the sc...

Страница 42: ... adjustment Pixel position adjustment Test pattern setting 5 Lens Zoom Focus Shift Test Pattern Zoom adjustment Focus adjustment Image position adjustment Test pattern setting 6 Option Flip Light Source Power Back Color Message Display Test Pattern Image inversion setting LD block power setting Background color setting Message display setting Test pattern setting 7 Admin Network Host Name Setting ...

Страница 43: ...etting SET Host Name PJ IP Address Setting SET DHCP Client DHCP IP Address 192 168 1 100 User Login Name Password Change SET Initialize User Name root New Password Confirm New Password Admin Login Password Change SET User Name advanced New Password Confirm New Password Subnet Mask 255 255 255 0 Default Gateway 192 168 1 1 Mac Address 01 23 45 67 89 AB STATIC IP License 43 Operation and Settings ...

Страница 44: ...cified User Login Name Password Change User Name New Password Confirm New Password Initialize root For changing the login name and password User Name For changing the login name New Password For changing the login password Confirm New Password Re enter the new password For confirmation Initialize For resetting the username password MEMO 0 You can change it to a random name You can input up to 8 ch...

Страница 45: ... user localhost 1 1 1 1 ON OFF ON OFF LOGIN CRAM MD5 PLAN 465 587 25 Main Image Setting Convergence Lens Option Admin Network Admin Option Admin Signal Admin E Mail License Error message sent from this projector Example When error occurs at the DD RB board Sender setting value for E Mail Sender Mail title 4KPJU2 report mail Message Error Code 32 Trouble with DD RB circuit board System Time 106 h 5...

Страница 46: ...cation feature OFF Disable the e mail authentication feature Auth Type R PLAIN LOGIN CRAM MD5 For configuring the e mail authentication type PLAIN Set e mail authentication to PLAIN LOGIN Set e mail authentication to LOGIN CRAM MD5 Set e mail authentication to CRAM MD5 Auth User Account For configuring the account name during e mail authentication MEMO 0 Specify an address up to a maximum of 31 ch...

Страница 47: ... Admin Signal Admin E Mail License R indicates the factory default Item Setting Value Description Color Depth R 8bit 12bit For configuring the color balance Frame Lock R ON OFF For configuring the frame synchronization of each DVI input Mech Shutter ON R OFF For configuring to ON OFF the Mech Shutter model number PK VS4MS optional sold separately Click ON to operate the Mecha Shutter High Altitude...

Страница 48: ...Stripe Dual 1024 2400 4Stripe Single For forcibly configuring the output signal Make use of this setting when there is no display due to configuration changes at the input source MEMO 0 Some portions of the image may not be displayed and the image may become noisy OFF Turns off the display by force 4096 2400 None Dual Displays a normal screen using dual link 4096 2400 None Single Displays a normal...

Страница 49: ...e DVI 3 terminal Cross Displays four different input signals on four screens The top left screen displays images of the DVI 1 terminal the top right screen displays images of the DVI 2 terminal the bottom left screen displays images of the DVI 3 terminal while the bottom right screen displays images of the DVI 4 terminal MEMO 0 Please refer to Connecting Video Signals of the Computer for details P...

Страница 50: ...d 0 Insert the power cord plug properly P 24 0 Is the main power supply switched turned on 0 Turn on the main power supply switch of the projector unit P 24 0 Is the LD block in the cool down mode 0 Turn on the power again after the cool down mode ends P 31 0 Is the LD block protection function triggered This function is triggered when the power shuts down such as during power failures 0 Wait unti...

Страница 51: ... of the connected devices possible input signals 0 Check to ensure that they are possible input signals and input compatible signals accordingly P 18 20 0 Is the input cable correctly connected 0 Connect the input cable correctly P 19 21 Projection position on the screen has shifted 0 Has the setup position of the projector been shifted 0 Check the setup position of the projector Image disappears ...

Страница 52: ...yed for 3 minutes during each projection For details please consult your authorized dealer Out of Range 0 When there is input of video signals that cannot be used with this unit Input video signals that can be used No Input 0 When no device is connected to the input terminal 0 When the input terminal is connected but there is no signal Input the video signals MEMO 0 The messages will not be displa...

Страница 53: ...en in the standby mode and in green when in the operating mode 2 The indicator lights up in red when in the warning mode and blinks in red when in the cool down mode Measures when the warning mode appears When the projector switches to the warning mode Nos 3 to 9 projection stops automatically and the cooling fan runs for about 10 seconds After the cooling fan stops running turn off the main power...

Страница 54: ...lly high temperature around the intake vent A Abnormally high ambient temperature around the lamp 15 The safety switch is activated 30 Trouble with CPU circuit board 31 Trouble with MAIN circuit board 32 Trouble with DD RB circuit board 33 Trouble with DD G circuit board 34 Trouble with SUB CPU circuit board 41 Cooling fan for the illumination system PCS has stopped 42 Cooling fan for the circuit ...

Страница 55: ...Command 3Fh Query to the projector Asking command ID 1 Identification number of the projector Factory setting is 1 SP Designates the delimiter between ID and command command and parameter as well as parameter and parameter 20h CR Designates the terminal of the data 0Dh is not necessary for Asking command Response Data Format Projector PC Upon executing a control command this unit sends back respon...

Страница 56: ...ng state 3 33 Emergency cooling state 4 34 Emergency state DHCP client parameters Character Hex Meaning 0 30 DHCP 1 31 STATIC IP IP address parameters Display the IP address using the dot 2HE delimiter Example 192 168 0 10 External control command table Function Command Setting Asking Data Type Power On ELSE Power On ELSE ON OFF Special Parameter Power U0F X OFF X ON X Hide U00 X X X Operation Mod...

Страница 57: ...t thoroughly or if it is damaged Failure to do so may cause dust to enter the projector and shadows to appear on the projected image If dirt has entered this product or if you need to purchase the filter please consult the authorized dealer from which this product is purchased or any nearby JVC servicing center A A B A B C CAUTION 0 Remove the four screws on the inner side for fastening the filter...

Страница 58: ...onge and filter Remove any dirt or dust using a vacuum cleaner CAUTION 0 Do not clean using a flammable air duster This may cause fire 4 Mount the sponge and filter Mount the filter and sponge to the projector using the reverse removed procedure Finally check to ensure that the filter cover is firmly mounted MEMO 0 Mount the filter correctly Failure to do so may cause the projector to malfunction ...

Страница 59: ...ene 0 Do not spray volatile chemicals like insecticide 0 Do not allow prolonged contact with rubber or plastic products Remove dirt that is attached to the vent holes Do this using a vacuum cleaner Wipe using a cloth if a vacuum cleaner cannot be used Leaving dust attached may prevent adjustment of the internal temperature and result in malfunction of the projector Clean dirt on the lens Do this u...

Страница 60: ...0 73 5 kg Excluding lens DLA VS4810 74 5 kg Excluding lens Optical System Projection method D ILA analog drive system 3 D ILA element 1 2 1 27 4096 2400 pixels 3 pcs total no of pixels 29 491 200 pixels Projection Lens optional GL MS4015SZ 1 50 1 to 1 84 1 zoom lens GL MS4016SZ 1 50 1 to 1 84 1 zoom lens GL MS4021SZ 2 15 1 to 3 65 1 zoom lens GL MS4011S 1 1 1 Short focal length lens Light source L...

Страница 61: ...ecision technology with a pixel effectiveness of 99 99 Only 0 01 or less of the pixels are either missing or would remain permanently lit 3 HDCP is the abbreviation for High bandwidth Digital Content Protection system Images from the DVI input terminal may not be displayed due to HDCP specification changes 0 The open source software is embedded in this product For more information please go to htt...

Страница 62: ...l Pin No Signal 1 TMDS Data 2 13 TMDS Data 3 2 TMDS Data 2 14 TMDS 5 V Power Supply 3 TMDS Data 2 4 Shield 15 Earth 5 V 4 TMDS Data 4 16 Hot Plug Detection 5 TMDS Data 4 17 TMDS Data 0 6 DDC Clock 18 TMDS Data 0 7 DDC Data 19 TMDS Data 0 5 Shield 8 NC 20 TMDS Data 5 9 TMDS Data 1 21 TMDS Data 5 10 TMDS Data 1 22 TMDS Clock Shield 11 TMDS Data 1 3 Shield 23 TMDS Clock 12 TMDS Data 3 24 TMDS Clock T...

Страница 63: ...I B DVI 3 USB LAN RS 232C STANDBY ON LAMP WARNING DVI 4 DVI 1 DVI 2 e shift Sync RS 232C 1 2 934 688 187 127 Tightening depth 10 to 20 M10 hole x 12 Intake air Intake air Rear Surface Exhaust air CAUTION 0 Using screws with dimensions other than those specified in the above diagram may cause the projector to drop or malfunction 63 Others ...

Страница 64: ...EU Via G Sirtori 7 9 20129 Milano ITALIA Importador Solamente EU Ctra Rubi 88 Edificio Can Castanyer 08174 Sant Cugat del Valles Barcelona ESPAÑA Importeur Alleen EU Leuvensesteenweg 248J 1800 Vilvoorde BELGIQUE Importeur Alleen EU Amsterdamseweg 37 1422 AC Uithoorn NEDERLAND Manufacturer 3 12 Moriya cho Kanagawa ku Yokohama shi Kanagawa 221 0022 JAPAN 2017 JVCKENWOOD Corporation 1217KSY SW X ...

Отзывы: