background image


ENGLISH


3

Getting Started

Preparation

Basic Operation

Troubleshooting

Settings

Others

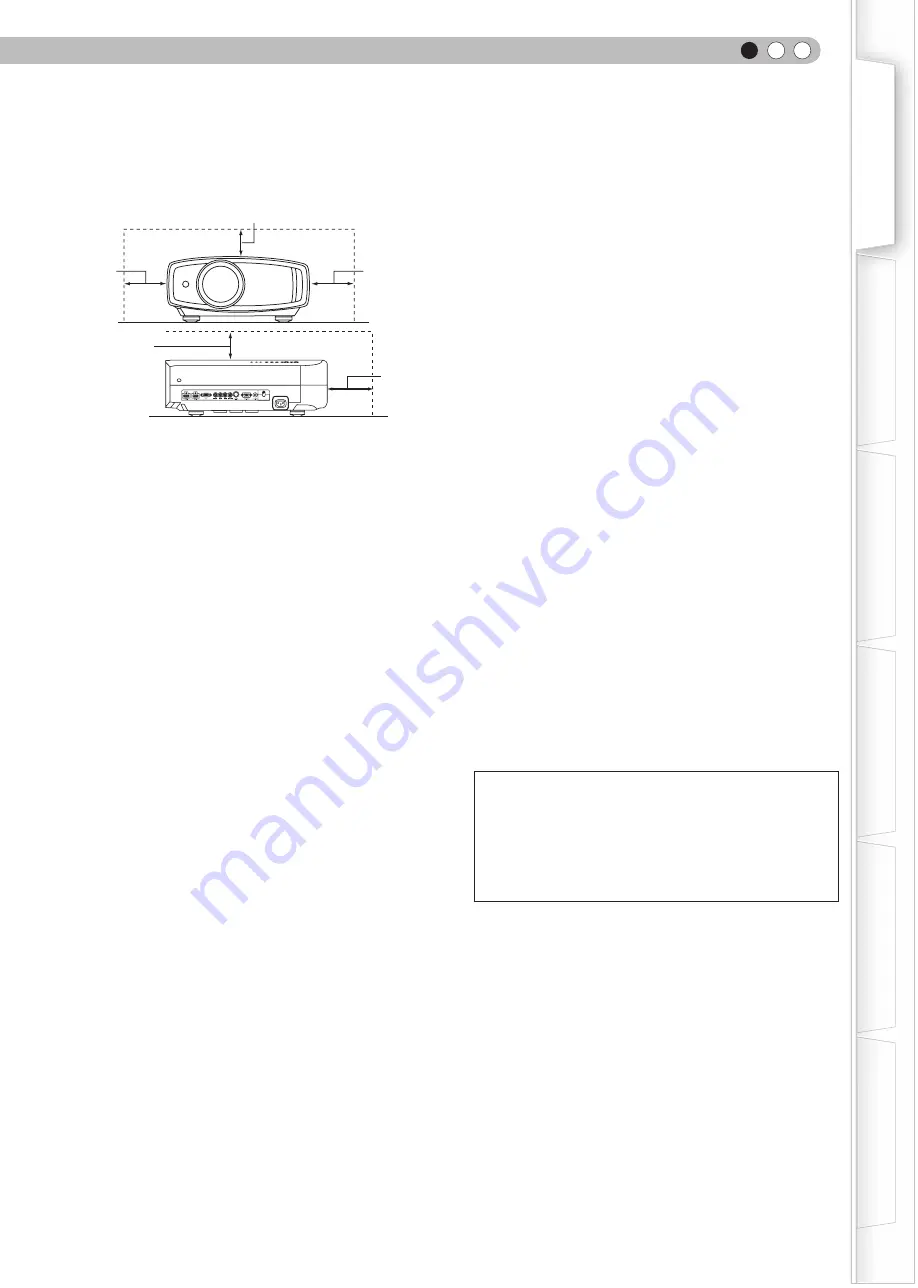
-  To allow better heat dissipation, keep a clearance between  

this unit and its surrounding as shown below. When this  

unit is enclosed in a space of dimensions as shown below,  

use an air-conditioner so that the internal and external  

temperatures are the same. Overheating can cause 

damage.

-

the type of power supply to your home, consult your 

product dealer or local power company.

- This product is equipped with a three-wire plug. This plug 

will fit only into a grounded power outlet. If you are unable 

to insert the plug into the outlet, contact your electrician to 

install the proper outlet. Do not defeat the safety purpose 

of the grounded plug.

- Power-supply cords should be routed so that they are not 

likely to be walked on or pinched by items placed upon or 

against them. Pay particular attention to cords at doors, 

plugs, receptacles, and the point where they exit from the 

product.

- For added protection of this product during a lightning 

storm, or when it is left unattended and unused for long 

periods of time, unplug it from the wall outlet and 

disconnect the cable system. This will prevent damage to

the product due to lightning and power line surges.

- Do not overload wall outlets, extension cords, or 

convenience receptacles on other equipment as this can 

result in a risk of fire or electric shock.

- Never push objects of any kind into this product through 

openings as they may touch dangerous voltage points or 

short out parts that could result in a fire or electric shock. 

Never spill liquid of any kind on the product.

- Do not attempt to service this product yourself as opening 

or removing covers may expose you to dangerous 

voltages and other hazards. Refer all service to qualified 

service personnel.

- Unplug this product from the wall outlet and refer service to 

qualified service personnel under the following conditions:

a) When the power supply cord or plug is damaged.

b) If liquid has been spilled, or objects have fallen on the product.

c) If the product has been exposed to rain or water.

d) If the product does not operate normally by following the 

operating instructions. Adjust only those controls that are 

covered by the Operation Manual, as an improper adjustment 

of controls may result in damage and will often require 

extensive work by a qualified technician to restore the product

to normal operation.

e) If the product has been dropped or damaged in any way.

f) When the product exhibits a distinct change in performance -

this indicates a need for service.

- When replacement parts are required, be sure the service 

technician has used replacement parts specified by the

manufacturer or with same characteristics as the original

part. Unauthorized substitutions may result in fire, electric 

shock, or other hazards.

-  Upon completion of any service or repairs to this product,  

ask the service technician to perform safety checks to  

determine that the product is in proper operating condition. 

-  The product should be placed more than one foot away  

from heat sources such as radiators, heat registers,  

stoves, and other products (including amplifiers) that  

produce heat. 

-  When connecting other products such as VCR’s, and DVD  

players, you should turn off the power of this product for  

protection against electric shock. 

-  Do not place combustibles behind the cooling fan. For  

example, cloth, paper, matches, aerosol cans or gas  

lighters that present special hazards when over heated. 

-  Do not look into the projection lens while the illumination  

lamp is turned on. Exposure of your eyes to the strong  

light can result in impaired eyesight. 

-  Do not look into the inside of this unit through vents  

(ventilation holes), etc. Do not look at the illumination lamp  

directly by opening the cabinet while the illumination lamp  

is turned on. The illumination lamp also contains ultraviolet  

rays and the light is so powerful that your eyesight can be  

impaired. 

-  Do not drop, hit, or damage the light-source lamp (lamp  

unit) in any way. It may cause the light-source lamp to  

break and lead to injuries. Do not use a damaged light  

source lamp. If the light-source lamp is broken, ask your  

dealer to repair it. Fragments from a broken light-source 

lamp may cause injuries. 

-  The light-source lamp used in this projector is a high  

pressure mercury lamp. Be careful when disposing of the  

light-source lamp. If anything is unclear, please consult  

your dealer. 

-  Do not ceiling-mount the projector to a place which tends  

to vibrate; otherwise, the attaching fixture of the projector  

could be broken by the vibration, possibly causing it to fall  

or overturn, which could lead to personal injury. 

-  Use only the accessory cord designed for this product to  

prevent shock. 

*

DO NOT allow any unqualified person to install the  

unit. 

Be sure to ask your dealer to install the unit (e.g.  

attaching it to the ceiling) since special technical  

knowledge and skills are required for installation. If  

installation is performed by an unqualified person, it  

may cause personal injury or electrical shock. 

power source indicated on the label. If you are not sure of 

150 mm

and above

150 mm and above

300 mm 

and above

200 mm 

and above

300 mm 

and above

SYNC

Содержание D-ILA DLA-HD950

Страница 1: ...LA PROJECTOR INSTRUCTIONS PC007182399 1 ENGLISH FRANÇAIS ESPAÑOL CASTELLANO PROJECTEUR D ILA MANUEL D INSTRUCTIONS PROYECTOR D ILA MANUAL DE INSTRUCCIONES 0809TTH AO AO 2009 Victor Company of Japan Limited DLA HD950 DLA HD990 D ILA PROJECTOR PROYECTOR D ILA PROJECTEUR D ILA FOR SERVICING Only in U S A TO OUR VALUED CUSTOMER THANK YOU FOR PURCHASING THIS JVC PRODUCT WE WANT TO HELP YOU ACHINEVE A P...

Страница 2: ... never be blocked by placing the product on bed sofa rug or similar surface It should not be placed in a built in installation such as a bookcase or rack unless proper ventilation is provided and the manufacturer s instructions have been adhered to This product has a High Intensity Discharge HID lamp that contains mercury Disposal of these materials may be regulated in your community due to enviro...

Страница 3: ...bits a distinct change in performance this indicates a need for service When replacement parts are required be sure the service technician has used replacement parts specified by the manufacturer or with same characteristics as the original part Unauthorized substitutions may result in fire electric shock or other hazards Upon completion of any service or repairs to this product ask the service te...

Страница 4: ...on this product are colored in accordance with the following cord Green and yellow Earth Blue Neutral Brown Live As these colors may not correspond with the colored making identifying the terminals in your plug proceed as follows The wire which is colored green and yellow must be connected to the terminal which is marked M with the letter E or the safety earth or colored green or green and yellow ...

Страница 5: ...t Hinweis Das Zeichen Pb unterhalb des Batteriesymbols gibt an dass diese Batterie Blei enthält FRANÇAIS Informations relatives à l élimination des appareils et des piles usagés à l intention des utilisateurs Union européenne seulement Si ces symboles figurent sur les produits cela signifie qu ils ne doivent pas être jetés comme déchets ménagers Si vous voulez jeter ce produit ou cette pile veuill...

Страница 6: ... Nota Il simbolo Pb sotto il simbolo delle batterie indica che questa batteria contiene piombo PORTUGUÊS Informação para os utilizadores acerca da eliminação de equipamento usado e pilhas Apenas União Europeia Estes símbolos indicam que o equipamento com estes símbolos não deve ser eliminado juntamente com o restante lixo doméstico Se pretende eliminar o produto ou a pilha utilize os sistemas de r...

Страница 7: ...kkoja Huomautus Akkusymbolin alapuolella oleva Pb merkintä tarkoittaa että akku sisältää lyijyä SVENSKA Information för användare gällande bortskaffning av gammal utrustning och batterier Endast den Europeiska unionen Dessa symboler indikerar att utrustning med dessa symboler inte ska hanteras som vanligt hushållsavfall Om du vill bortskaffa produkten eller batteriet ska du använda uppsamlingssyst...

Страница 8: ...sahuje olovo POLSKI Informacje dla użytkowników dotyczące poz bywania się zużytego sprzętu i baterii Tylko kraje Unii Europejskiej Te symbole oznaczają że sprzętu nie należy wyrzucać razem z odpadami gospodarczymi Jeśli trzeba po zbyć się tego produktu lub ba terii proszę skorzystać z systemu odbioru lub urządzeń do zbiórki odpadów elektronicznych w celu odpowiedniego ponowne go ich przetworzenia ...

Страница 9: ...or and luminance levels In addition THX has created a battery of signal processing tests that challenge the projector s scaling motion conversion and de interlacing capabilities This type of in depth analysis predicts how the projector will present a variety of high definition and standard definition content The JVC projector also features THX Movie Mode a pre calibrated video setting for watching...

Страница 10: ...reen Size and Projection Distance 22 Basic Operation Projecting Image 24 Convenient Features during Projection 26 Setting the Screen Size 26 Masking the Surrounding Area of an Image 26 Settings The structure of the Settings menu 28 Setting Menu 30 Procedures for Menu Operation 30 Setting Menu 31 Customizing Projected Images 42 Changing the Initial Setting of Picture Mode 42 Registering User define...

Страница 11: ...ries Please check with your authorized dealer for details Replacement Lamp BHL5010 S Lamp Unit Replacement Filter black in appearance PB006560999 Inner Filter About this Manual Describes the limitations of the functions or usage Indicates good to know information Describes operational precautions P11 Indicates relevant pages for reference BACK TEST LIGHT ASPECT HIDE PC HDMI 1 VIDEO HDMI 2 S VIDEO ...

Страница 12: ...t Remote Sensor P15 Air Inlet Lens Cover opened P24 Lens Cover closed CAUTION Do not place your fingers in the gap at the lens during lens shift adjustment This may cause injuries if your fingers are caught in between the gap P25 Do not let your fingers or other objects get caught in between the lens cover while closing the cover This can cause injuries or malfunction ...

Страница 13: ...nge Lamp warning P47 Light on Red Standby mode Light on Green During projection Blinking Green Image is temporarily hidden P25 Blinking Red Cool Down mode P25 To turn on off the power To switch input P24 To hide the image temporarily P25 Right button Left button Down button To display the menu P30 To return to the previous menu Up button WARNING LAMP STANDBY ON INPUT HIDE MENU BACK OK Manual butto...

Страница 14: ... HIDE PC HDMI 1 VIDEO HDMI 2 S VIDEO COMP LENS STAND BY MENU CINEMA 3 GAMMA C TEMP USER2 THX LENS AP PIC ADJ PICTURE MODE INPUT CINEMA 1 CINEMA 2 NATURAL STAGE DYNAMIC USER1 ON To select input mode P24 To adjust color temperature P42 To hide the image temporarily P25 To switch picture mode P42 Lens Aperture P42 To select or confirm To illuminate buttons on the remote control for 7 seconds To switc...

Страница 15: ... Range of Remote Control Unit When directing the remote control toward this unit When aiming the remote control towards the remote sensor on this unit ensure that the distance to the sensor in front or at the rear of this unit is within 7 m If the remote control fails to work properly move closer to this unit When reflecting off a screen Ensure that the total of distance A between this unit and sc...

Страница 16: ... images may not be displayed depending on the devices and cables to be connected For HDMI cable sold separately only use one that is HDMI approved It may not be possible to connect to this unit depending on the dimension of the connector cover of the cables to be connected To connect via HDMI terminal P18 To connect RS 232C terminal external control P52 To connect via component video terminals P17...

Страница 17: ...36 12 Connecting via Video Cable and S Video Cable SYNC This unit To component video input terminals Component video cable sold separately BD DVD player CR PR red CB PB blue Y green Component video output terminals SYNC This unit To video input terminal To S video input terminal S video cable sold separately video cable sold separately Video output S video output VCR and camcorder ...

Страница 18: ...ut terminal HDMI DVI conversion cable sold separately DVI output terminal Connecting Continued Notebook PC If noise is produced take PCs desktop computer away from this unit Reducing the length of the cable is recommended if there is no picture If noise is produced take PCs Notebook PC away from this unit Use only HDMI approved equipment Reducing the length of the cable is recommended if there is ...

Страница 19: ... the setting menu to RGB P36 12 For information on compatible input signals see Specifications P58 This unit To RGB video input terminals RGB video cable sold separately R Red B Blue G Green Includes sync signals RGB video output terminals Device equipped with RGB output RS 232C This unit BD DVD player for European market SCART terminal SCART RCA cable sold separately To RGB video and sync signal ...

Страница 20: ...value will cause malfunction Exercise adequate caution to prevent short circuit as the trigger terminal outputs a voltage of 12V Screen Connecting via Trigger Cable CAUTION Trigger cable sold separately To Trigger output terminal This unit Trigger input terminal Φ3 5 To PC input terminal PC cable sold separately VGA output terminal Notebook PC Connecting via PC Cable This unit For information on s...

Страница 21: ... position center Up Down position Shifting range of projected image 0 left right position center Lens shift correlation chart Left Right Shift 0 5 10 15 20 25 30 34 Up Down Shift 80 74 66 57 47 34 18 0 Approximately 34 maximum of the projected image Approximately 34 maximum of the projected image Approximately 80 maximum of the projected image 1 0 1 0 1 0 1 0 Approximately 80 maximum of the projec...

Страница 22: ...to Approx 8 60m 70 Approx 1 78m Approx 2 09m to Approx 4 28m 150 Approx 3 81m Approx 4 53m to Approx 9 22m 80 Approx 2 03m Approx 2 40m to Approx 4 89m 160 Approx 4 06m Approx 4 84m to Approx 9 84m 90 Approx 2 29m Approx 2 70m to Approx 5 51m 170 Approx 4 32m Approx 5 14m to Approx 10 45m 100 Approx 2 54m Approx 3 01m to Approx 6 13m 180 Approx 4 57m Approx 5 45m to Approx 11 07m 110 Approx 2 79m ...

Страница 23: ...ENGLISH 23 Getting Started Preparation Basic Operation Troubleshooting Settings Others MEMO ...

Страница 24: ...sts image focus size zoom and position shift 1 Adjust the focus Adjust the image size zoom 1 Connect to this unit 2 Connect to the power outlet Light on Green Power Cord Supplied Light on Red ON BACK TEST LIGHT ASPECT HIDE PC HDMI 1 VIDEO HDMI 2 S VIDEO COMP LENS STAND BY MENU CINEMA 3 GAMMA C TEMP USER2 THX LENS AP PIC ADJ PICTURE MODE INPUT CINEMA 1 CINEMA 2 NATURAL STAGE DYNAMIC USER1 ON 1 2 ST...

Страница 25: ... button again to display image The power cannot be turned off when the image is temporarily hidden About Cool Down mode The Cool Down mode is a function to cool down the lamp for approximately 60 seconds after projection is complete This function prevents the internal parts of the unit from deformation or damage due to overheating of the lamp It also prevents lamp blowout and premature shortening ...

Страница 26: ... the Surrounding Area of an Image Images for which quality at the outer area has deteriorated can be projected by masking hiding the surrounding area of the projected image 1 Project the image ASPECT 4 3 16 9 zoom Image for which quality at the outer area has deteriorated BACK TEST LIGHT ASPECT HIDE PC HDMI 1 VIDEO HDMI 2 S VIDEO COMP LENS STAND BY MENU CINEMA 3 GAMMA C TEMP USER2 THX LENS AP PIC ...

Страница 27: ...r Temp Gamma Advanced Lens Aperture Picture Adjust Natural Reset 0 Video S Video COMP Picture Position Exit MENU BACK Back Select Operate HDMI Film Mode Auto Over scan Off Aspect Video Aspect Computer V stretch 16 9 Auto Off Mask Off 5 Off 2 5 Input Signal PC Exit MENU BACK Back Select Operate Video S Video COMP Off 16 9 Aspect Video Aspect Computer V stretch Picture Position HDMI Auto 自动 Input Si...

Страница 28: ...erture Sets the lens aperture Setting 15 to 0 10 Reset Reset the setting Input Signal 11 HDMI Configures HDMI input signal Setting Input Color Space Control with HDMI 12 COMP Configures the input signal for the component video input terminals Setting Y Pb Cb Pr Cr RGB SCART 13 Video S Video Configures the Video S Video input signals Setting NTSC Setup Level Color System 14 PC Configures PC input S...

Страница 29: ...ssible positions for displaying the menu are at the four corners or at center of the screen 29 Menu Display Sets the duration for displaying the menu Setting 15sec On 30 Line Display Sets whether to display the input setting when switching the input Setting 5 sec Off 31 Source Display Sets whether to display the source of input signals when changing the input Setting On Off 32 Logo Sets whether to...

Страница 30: ...tural Reset 0 Zoom Exit MENU BACK Back Select Operate Video S Video COMP Picture Position HDMI Off 5 Over scan Film Mode Auto Mask Input Signal 4 3 4 3 16 9 Off Aspect Computer Aspect Video V stretch Auto PC 4 3 16 9 16 9 Zoom Exit MENU BACK Back Select Operate Off Off 5 Video S Video COMP Aspect Computer Aspect Video V stretch Picture Position Over scan Film Mode HDMI Auto Auto Mask Input Signal ...

Страница 31: ...cture setting best suited for viewing animated movies Natural This is the picture setting for natural hues and tones It is best suited for viewing dramas and video Stage This is the picture setting best suited for watching live concerts and stage performances Dynamic This is the picture setting best suited for viewing the picture in a room that cannot be made completely dark THX This is the pictur...

Страница 32: ...Green Less green 50 to 50 More green Blue Less blue 50 to 50 More blue Custom 2 Correction Value Based on this selection of Correction Value 5800K 6500K 7500K 9300K H B adjusts the following Gains and Offsets Gain Bright part Red Less red 50 to 50 More red Green Less green 50 to 50 More green Blue Less blue 50 to 50 More blue Offset Dark part Red Less red 50 to 50 More red Green Less green 50 to 5...

Страница 33: ...ngs can be selected according to your preferences This setting can also be configured from the remote control P14 Gamma Adjustment 1 Select the reference gamma curve coefficient 1 8 2 6 in Correction Value 2 Select the color to be adjusted in the gamma adjustment screen 3 Adjust the gamma curve in the gamma curve adjustment screen 4 To end If gamma curve is adjusted repeatedly calculation errors w...

Страница 34: ...n BNR Block Noise Reduction CTI Color Transient Improvement Color Management Off The image color cannot be adjusted Custom 1 Custom 2 Custom 3 Pause Off Video mode On Still mode Color Management Adjustment Values of each color can be adjusted Red Yellow Green Cyan Blue and Magenta All Reset Return to the factory settings Clear Motion Drive Off Improves fast moving pictures to a clear image with li...

Страница 35: ...is when the dynamic range of the input images is 0 255 Color Space Auto Automatically configures the input signals YCbCr 4 4 4 Select this when the Y Cb Cr 4 4 4 video signals are input YCbCr 4 2 2 Select this when the Y Cb Cr 4 2 2 video signals are input RGB Select this when the RGB video signals are input Control with HDMI On Enables CEC communications Off Disables CEC communications The settin...

Страница 36: ...he color system is NTSC4 43 PAL Select this when the color system is PAL PAL M Select this when the color system is PAL M PAL N Select this when the color system is PAL N SECAM Select this when the color system is SECAM The setting is available only when the Video or S Video input image is projected Input Signal PC 14 PC Configures PC input Auto Alignment Automatically adjusts Tracking Phase and P...

Страница 37: ...C signal corresponding to the panel at one dot per pixel ratio The PC screen can be shown in the original size Full Enlarges the PC signal horizontally vertically This setting can also be configured from the remote control P14 This setting cannot be set in the case of SD or HD signals Input Signal V Stretch when HD or SD video signals are input 18 V Stretch When set to On the projected 2 35 1 imag...

Страница 38: ...ift Function for adjusting lens shift Press the up down left right button to shift the screen Image Pattern On Displays the image pattern in conjunction with the above setting items Display Display for Focus for Zoom and Shift Picture of big green grids Picture of small green grids Off Without displaying the image pattern displays the external input signal Lock On Disables lens adjustment A warnin...

Страница 39: ...ensated P21 Installation Screen Adjust 26 Screen Adjust Corrects skewed white balance derived from the reflective characteristics of the screen Off Makes no correction Normally set to off A Corrects to slightly reddish B Corrects to slightly greenish C Corrects to slightly bluish Display Setup Back Color 27 Back Color Configures the screen color displayed when there is no input signal Blue Sets sc...

Страница 40: ...nds Off Do not display Display Setup Language 33 Language Sets the language of the menu display Japanese English English Deutsch German Español Spanish Italiano Italian Français French Português Portuguese Nederlands Dutch Svenska Swedish Norsk Norwegian Русский Russian Chinese Function Lamp Power 34 Lamp Power Configures the output of the light source lamp Normal For normal circumstances select t...

Страница 41: ...to power off after 2 hours 3 hours Auto power off after 3 hours 4 hours Auto power off after 4 hours Function High Altitude Mode 38 High Altitude Mode Selects this when using the projector in a location of low atmospheric pressure higher than 900 meters above sea level On Enable Off Disable Information Input Displays the currently selected video input Source Displays the type of the current video ...

Страница 42: ...uality Example To adjust Contrast 1 Display the setting menu 2 Select Picture Adjust Contrast 3 Adjust the setting 4 To end the adjustments 3 Other items can also be adjusted To end CINEMA 3 CINEMA 1 NATURAL STAGE DYNAMIC CINEMA 2 Contrast 0 Exit MENU BACK Back Select Operate 6500K 0 0 0 0 Picture Mode Contrast Brightness Color Tint Color Temp Gamma Advanced Lens Aperture Picture Adjust Reset Natu...

Страница 43: ...he Initial Setting of Picture Mode for procedures on adjusting the picture quality P42 2 Display the setting menu 3 Select Picture Adjust Picture Mode Natural Register the setting Exit MENU BACK Back Select Operate 6500K Normal 0 0 0 0 Picture Mode Contrast Brightness Color Tint Color Temp Gamma Advanced Lens Aperture Picture Adjust Natural Reset Cinemaˎ Cinemaˍ Stage Dynamic Userˍ Userˎ THX Cinem...

Страница 44: ...filter P51 Video image does not appear Is the correct external input selected Select the correct external input P24 Is the AV device properly connected Connect the AV device properly P16 to 20 Is the power of the AV device turned on Turn on the power of the AV device and play the video P24 Are the correct signals being output from the AV device Set the AV device properly P16 to 20 Is the setting o...

Страница 45: ...rrect distance from the screen P21 to 22 Video images are missing Has setting been performed for screen mask Set Mask in the setting menu to Off P27 38 20 Is the display out of position Alter the Picture Position value in the setting menu to ensure that images are not missing P36 15 Remote control does not work Are batteries installed correctly Match the polarities or correctly when inserting the ...

Страница 46: ... cannot be used in this unit has been input Input video signals that can be used The names of input terminals such as COMP will be displayed in yellow This message is displayed when the accumulated lamp time has exceeded 2900 hours To clear the message press the Back button Get ready a new lamp unit and replace as soon as possible Reset the lamp time after replacing the lamp P48 to 50 COMP No Inpu...

Страница 47: ...second 3 times 0 75 second Internal temperature is too high abnormal internal temperature 13 0 25 second 4 times 0 75 second External temperature is too high abnormal external temperature 14 0 25 second 1 time 0 75 second Abnormal electrical circuit abnormal startup of drive circuit Blinking orange 15 0 25 second 2 times 0 75 second Abnormal electrical circuit abnormal communication of the drive c...

Страница 48: ... rapidly If the picture becomes dark the tint becomes strange or the image flickers promptly the lamp unit for a new one Purchasing the Lamp Unit Loosen the screws on the lamp unit Loosen the screws with a screwdriver Please consult your authorized dealer Lamp Unit Part No BHL5010 S Pull out the lamp unit Grasp the handle and pull out the lamp unit Procedure for Lamp Replacement MEMO CAUTION Pull ...

Страница 49: ...touch the surface of a new lamp This may shorten the lamp life and cause lamp blowout Tighten the screws of the new lamp unit Tighten the screws with a screwdriver Do not place the removed lamp unit at locations that is reachable by children or near combustible items Dispose used lamp units in the same way as fluorescent lamps Follow your local community rules for disposal Attach the lamp cover In...

Страница 50: ...blink alternately for 3 seconds After that the unit switches to standby mode BACK TEST LIGHT ASPECT HIDE PC HDMI 1 VIDEO HDMI 2 S VIDEO COMP LENS STAND BY MENU CINEMA 3 GAMMA C TEMP USER2 THX LENS AP PIC ADJ PICTURE MODE INPUT CINEMA 1 CINEMA 2 NATURAL STAGE DYNAMIC USER1 ON Resetting Lamp Time WARNING LAMP STANDBY ON Reset the lamp time only when you have replaced the lamp Never reset the service...

Страница 51: ...utral detergent After washing the filter with water make sure that it is completely dry before reinstalling Otherwise electric shock or malfunctions may occur Do not clean the filter with a vacuum cleaner or air duster The filter is soft and may be damaged Replace with a new filter A dirty filter will dirty the internal parts of the unit and cause shadows on the video image To purchase a new filte...

Страница 52: ...start of communication Binary code Type Description 21 Operating command PC This unit 3F Reference command PC This unit 40 Response command This unit PC 06 ACK This unit PC When the command is accepted without error it returns to PC Unit ID This code specifies the unit The binary code is fixed at 8901 RS 232C Specifications Pin No Signal Function Signal Direction 2 RxD Receive data PC This unit 3 ...

Страница 53: ...0 Turn off the power Standby mode 4950 Input During power on 30 S VIDEO 31 VIDEO 32 COMP 33 VGA 36 HDMI 1 37 HDMI 2 5243 Remote Control Sends the same code as the supplied remote control Remote control code P54 Reference command and data Binary code Command Type Data description 5057 Power supply During standby or power on 30 Standby mode 31 Power on mode 32 During Cool Down mode 34 Warning mode 4...

Страница 54: ...3 30 35 CINEMA 2 37 33 36 38 STAND BY 37 33 30 36 CINEMA 1 37 33 36 39 HIDE 37 33 31 44 NATURAL 37 33 36 41 LENS AP 37 33 32 30 DYNAMIC 37 33 36 42 MENU 37 33 32 45 USER 1 37 33 36 43 OK 37 33 32 46 USER 2 37 33 36 44 LENS 37 33 33 30 THX 37 33 36 46 37 33 33 34 HDMI 1 37 33 37 30 37 33 33 36 HDMI 2 37 33 37 31 MENU POSITION 37 33 34 32 PIC ADJ 37 33 37 32 PC 37 33 34 36 GAMMA 37 33 37 35 VIDEO 37...

Страница 55: ...57 0A When power is turned off standby mode from power on mode Input COMP PC This unit 21 89 01 49 50 32 0A This unit PC 06 89 01 49 50 0A When video input is set to component Remote Control MENU PC This unit 21 89 01 52 43 37 33 32 45 0A This unit PC 06 89 01 52 43 0A When the same operation as pressing the MENU button on the remote control is made Reference command Type Command Description Power...

Страница 56: ... to suck up the dirt Otherwise use a cloth to wipe off the dirt If dirt is allowed to accumulate in the air inlets the internal temperature cannot be adjusted and this may cause a malfunction Dirt on the lens Clean the dirt using commercial blowers or lens cleaning papers for cleaning glasses and cameras Do not use fluid type cleaning agents This may lead to peeling of the surface coating film P13...

Страница 57: ...rew length is 23 mm Use screws shorter than 23 mm but longer than 13 mm Using other screws will result in malfunctioning or cause the unit to drop When mounting to a pedestal ensure sufficient space foot height of 10 mm or higher around the unit so that the air inlets are not blocked Do not tilt this unit more than 5 degrees from side to side when using Regardless whether the unit is still under g...

Страница 58: ... COMPONENT 1 line RCA pin jack x 3 Y 1 0V p p 75Ω CB PB CR PR 0 7V p p 75Ω HDMI Input HDMI 1 HDMI 2 2 line HDMI 19 pin x 2 HDCP compliant 3 Compatible with the HDMIv1 3a standard PC Input 1 line D Sub 15 pin VGA Trigger Output 12V 100mA Power Requirements AC 110V 240V 50 60 Hz Power Consumption 310W Standby mode 0 7W Operation Environment Temperature 5 to 35 Humidity 20 to 80 No condensation Stora...

Страница 59: ... 525 640 480 2 VGA 72 640 X 480 37 900 72 000 31 500 832 520 640 480 3 VGA 75 640 X 480 37 500 75 000 31 500 840 500 640 480 4 VGA 85 640 X 480 43 300 85 000 36 000 832 509 640 480 5 SVGA 56 800 X 600 35 200 56 000 36 000 1024 625 800 600 6 SVGA 60 800 X 600 37 900 60 000 40 000 1056 628 800 600 7 SVGA 72 800 X 600 48 100 72 000 50 000 1040 666 800 600 8 SVGA 75 800 X 600 46 900 75 000 49 500 1056...

Страница 60: ...6 Others 60 Specifications Continued 365 236 64 5 225 4 Φ42 12 95 167 297 477 5 90 6 42 5 105 198 Lens center Lamp cover Unit mm Top Surface Bottom Surface Front Dimensions Back Surface ...

Страница 61: ...Page 24 Installation Angle Page 21 Settings Page 28 Caution Page 2 Ceiling Mount Page 2 57 Settings Menu Structure Page 28 Projection Distance Distance Chart Page 22 Input Signal PC Compatibility Page 59 Video Compatibility Page 58 Filter Air Intake Filter Page 13 Replacement Filter Number Page 11 51 Cleaning and Replacement Page 51 Focus Adjustment Page 24 Message Meaning Page 46 Lamp Replacement...

Страница 62: ...6 Others 62 MEMO ...

Страница 63: ...Pour commencer Préparation Fonctionnement Dépannage Réglages Autres FRANÇAIS DLA HD950 DLA HD990 PROJECTEUR D ILA MANUEL D INSTRUCTIONS ...

Страница 64: ...r beaucoup de fonctions utiles Cet appareil a été conçu et fabriqué pour assurer votre propre sécurité Mais UNE UTILISATION INCORRECTE PEUT ENTRAÎNER UN RISQUE POTENTIEL D ÉLECTROCUTION OU D INCENDIE Afin de ne pas annuler les dispositifs de sécurité incorporés dans cet appareil observez les règles fondamentales suivantes pour son installation son utilisation et sa réparation Veuillez lire attenti...

Страница 65: ...ique qu il doit être réparé Quand le remplacement des pièces est nécessaire assurezvous que le réparateur a utilisé les pièces de rechange spécifiées par le fabricant ou possédant les mêmes caractéristiques que la pièce originale Un remplacement non autorisé peut entraîner in incendie une éléctrocution ou autres dangers Après que cet appareil a subi une réparation ou un entretien demandez au répar...

Страница 66: ...s données ci dessous CONNEXION ELECTRIQUE Royaume Uni seulement REMPLACEMENT DU FUSIBLE Fusibles Lors du remplacement du fusible assurez vous d utiliser seulement un fusible de valeur correcte et de type approuvé Remettez en place le couvercle du fusible EN CAS DE DOUTE CONSULTEZ UN ELEC TRICIEN QUALIFIE Ouvrez le compartiment à fusible avec la lame d un tournevis et remplacer le fusible Voir l il...

Страница 67: ...nweis Das Zeichen Pb unterhalb des Batteriesymbols gibt an dass diese Batterie Blei enthält FRANÇAIS Informations relatives à l élimination des appareils et des piles usagés à l intention des utilisateurs Union européenne seulement Si ces symboles figurent sur les produits cela signifie qu ils ne doivent pas être jetés comme déchets ménagers Si vous voulez jeter ce produit ou cette pile veuillez c...

Страница 68: ...Nota Il simbolo Pb sotto il simbolo delle batterie indica che questa batteria contiene piombo PORTUGUÊS Informação para os utilizadores acerca da eliminação de equipamento usado e pilhas Apenas União Europeia Estes símbolos indicam que o equipamento com estes símbolos não deve ser eliminado juntamente com o restante lixo doméstico Se pretende eliminar o produto ou a pilha utilize os sistemas de re...

Страница 69: ...a Huomautus Akkusymbolin alapuolella oleva Pb merkintä tarkoittaa että akku sisältää lyijyä SVENSKA Information för användare gällande bortskaffning av gammal utrustning och batterier Endast den Europeiska unionen Dessa symboler indikerar att utrustning med dessa symboler inte ska hanteras som vanligt hushållsavfall Om du vill bortskaffa produkten eller batteriet ska du använda uppsamlingssystem e...

Страница 70: ...sahuje olovo POLSKI Informacje dla użytkowników dotyczące poz bywania się zużytego sprzętu i baterii Tylko kraje Unii Europejskiej Te symbole oznaczają że sprzętu nie należy wyrzucać razem z odpadami gospodarczymi Jeśli trzeba po zbyć się tego produktu lub ba terii proszę skorzystać z systemu odbioru lub urządzeń do zbiórki odpadów elektronicznych w celu odpowiedniego ponowne go ich przetworzenia ...

Страница 71: ...nu varié en haute définition et en définition standard Le projecteur JVC propose également le mode cinéma THX un réglage vidéo prédéfini pour regarder des films sur DVD Blu ray HD ou la télévision Cette fonctionnalité de lecture est conçue pour recréer l expérience cinéma à la maison en réglant le facteur de contraste la luminance la température de couleur et d autres paramètres pour égaler ceux q...

Страница 72: ...n et distance de projection 22 Fonctionnement Projection d image 24 Fonctions utiles pendant la projection 26 Réglage de la taille de l écran 26 Masquage de la zone périphérique d une mage 26 Réglages La structure du menu Paramètres 28 Menu de configuration 30 Procédures d utilisation du menu 30 Menu de configuration 31 Personnalisation des images projetées 42 Changer le réglage initial des modes ...

Страница 73: ...agréé pour de plus amples détails Lampe de rechange BHL5010 S Module de lampe Filtre de rechange filtre noir PB006560999 Filtre intérieur À propos de ce manuel Décrit les limites des fonctions ou de son utilisation Indique une information bonne à savoir Décrit les précautions d utilisation à observer P11 Indique les pages de renvoi BACK TEST LIGHT ASPECT HIDE PC HDMI 1 VIDEO HDMI 2 S VIDEO COMP LE...

Страница 74: ...nalités Fermeture de l objectif ouvert P24 Fermeture de l objectif fermé Ne mettez pas vos doigts dans l ouverture de l ob jectif lorsque vous réglez le décalage de l objectif cela pourrait vous blesser si vos doigts se retrouvent coincés P25 Faites attention à ne pas vous faire coincer les doigts ou à laisser tout objet entraver la fermeture lorsque vous refermez l objectif car cela pourrait entr...

Страница 75: ...ée P25 Clignotant rouge Mode de refroidissement P25 Pour allumer éteindre l appareil Pour changer d entrée P24 Sélectionner le mode d entrée P25 Bouton droit Bouton gauche Bouton bas Pour afficher le menu P30 Pour retourner au menu précédent Bouton Haut WARNING LAMP STANDBY ON INPUT HIDE MENU BACK OK Ne fermez pas le cache de l objectif lors de la projection Sinon cela va provoquer un dysfonctionn...

Страница 76: ...DE PC HDMI 1 VIDEO HDMI 2 S VIDEO COMP LENS STAND BY MENU CINEMA 3 GAMMA C TEMP USER2 THX LENS AP PIC ADJ PICTURE MODE INPUT CINEMA 1 CINEMA 2 NATURAL STAGE DYNAMIC USER1 ON Pour changer d entrée P24 Pour régler la température de couleur P42 Pour masquer temporairement l image P25 Pour changer de mode P42 Ouverture de l objectif P42 Pour sélectionner ou confirmer Pour allumer les boutons de la tél...

Страница 77: ...ise en place des piles Cet appareil Écran Télécommande Télécommande Cet appareil 1 2 3 En cas de réflexion à partir de l écran S assurer que la distance totale A B entre this unit et l écran A et entre la télécommande et l écran B est de 7 m Dans la mesure où le rendement des signaux réflé chis depuis la télécommande different selon le type d écran utilisé la distance de fonctionnement peut diminu...

Страница 78: ...ecté Il est possible que les images ne s affichent pas suivant les câbles et les périphériques à brancher Pour le câble HDMI vendu séparément utilisez seulement un câble approuvé HDMI Suivant la dimension du couvercle du connecteur du câble à brancher il peut être impossible de brancher cet appareil Connexion à une borne HDMI P18 Connexion à une borne RS 232C contrôle externe P52 Connexion à des b...

Страница 79: ... aux bornes d entrée vidéo composantes à une borne d entrée S vidéo Câble vidéo composantes vendu séparément Câble S Vidéo vendu séparément Câble vidéo vendu séparément Sortie vidéo Sortie S vidéo Lecteur BD DVD CR PR rouge CB PB bleu Y vert Sortie vidéo composantes bornes Magnétoscope et caméscope Raccordement via un câble vidéo composantes Choisissez COMP dans le menu configuration à Y Pb Cb Pr ...

Страница 80: ...ordements Suite Raccordement par un câble de conversion HDMI DVI Raccordement par un câble HDMI PC portable Ordinateur de bureau Si du bruit apparaît écartez tout PC Ordinateur de bureau de ce produit Il est recommandé de raccourcir la longueur du câble s il n y pas d image Si du bruit apparaît écartez tout PC PC portable de ce produit Utiliser seulement un équipement compatible HDMI Il est recomm...

Страница 81: ...lut des signaux de syn chronisation Bornes de sortie vidéo RVB Appareil équipé d une sortie RVB Borne SCART Câble SCART RCA vendu séparément vers une vidéo RVB et sync les bornes d entrée signal Réglez COMP dans le menu configuration à RVB P35 12 Pour plus de renseignements sur les signaux d entrée consultez Caractéristiques P58 Raccordement via câble vidéo RGB Réglez COMP dans le menu configurati...

Страница 82: ...ement Faites très attention à éviter tout court circuit avec à l esprit que les sorties des bornes produisent du 12 V Écran Raccordement par un câble Trigger Câble Trigger Vendu séparément Pour commander la borne de sortie Cet appareil Entrée borne Trigger Φ3 5 AVERTISSEMENT Vers la borne d entrée PC Câble PC vendu séparément Pour plus d information sur les signaux d entrée pris en chargé veuillez...

Страница 83: ...hanger la portée de l image projetée Position dans l axe vertical Centrage horizontal 0 de décalage sur l axe horizontal Décalage Des dysfonctionnements peuvent survenir si l angle n est pas réglé dans la plage de valeurs susmentionnées L angle maximal pouvant être donné pour cet appareil est de 10 Régler l angle Position gauche droite Centrage vertical 0 de décalage sur l axe vertical Tableau de ...

Страница 84: ...de ou Grand angle à T Téléobjectif 140 Approx 3 56m D environ 4 23m à environ 8 60m 150 Approx 3 81m D environ 4 53m à environ 9 22m 160 Approx 4 06m D environ 4 84m à environ 9 84m 170 Approx 4 32m D environ 5 14m à environ 10 45m 180 Approx 4 57m D environ 5 45m à environ 11 07m 190 Approx 4 83m D environ 5 75m à environ 11 68m 200 Approx 5 08m D environ 6 06m à environ 12 30 m Les distances de ...

Страница 85: ...FRANÇAIS 23 Pour commencer Préparation Fonctionnement Dépannage Réglages Autres Mémo ...

Страница 86: ...MI 1 VIDEO HDMI 2 S VIDEO COMP LENS STAND BY MENU CINEMA 3 GAMMA C TEMP USER2 THX LENS AP PIC ADJ PICTURE MODE INPUT CINEMA 1 CINEMA 2 NATURAL STAGE DYNAMIC USER1 ON 1 2 STANDBY ON STANDBY ON HDMI 1 HDMI 2 COMP Video S Video PC Ajustez en conséquence en appuyant sur les boutons Haut Bas BACK Exit MENU Mise au point Contrôle Objectif Retour Activation Sélection LENS 2 Allumez l appareil Vous pouvez...

Страница 87: ... refroidissement Le mode de refroidissement est une fonction permettant le refroidissement de la lampe pendant les 60 secondes suivant la fin de la projection Cette fonction empêche la déformation ou l endomma gement des pièces internes de l appareil du fait de la surchauffe de la lampe Elle empêche également un éclatement ou un raccourcissement prématuré de la durée de vie de la lampe Pendant la ...

Страница 88: ...ier la taille de l écran de l image projetée ou masquer la zone entourant une image dont la qualité de la zone périphérique s est détériorée ASPECT 4 3 16 9 zoom Image dont la qualité de la bordure externe est détériorée BACK TEST LIGHT ASPECT HIDE PC HDMI 1 VIDEO HDMI 2 S VIDEO COMP LENS STAND BY MENU CINEMA 3 GAMMA C TEMP USER2 THX LENS AP PIC ADJ PICTURE MODE INPUT CINEMA 1 CINEMA 2 NATURAL STA...

Страница 89: ...d entrée Retour Activation Sélection Sortie Position image PC 自动 MENU BACK Video S Video COMP HDMI Position image 16 9 Auto Aspect Vidéo Aspect PC Etirement V Arrêt 5 Auto Surbalayage Film Arrêt Masque 5 2 5 Arrêt Signal d entrée Retour Activation Sélection Sortie PC Le masquage n est disponible que lorsque des images haute définition sont en entrée MENU 1 Sélectionner 2 Confirmer 1 Sélectionner 2...

Страница 90: ... ouverture de l objectif Paramètre 15 à 0 10 R A Z Réinitialiser le réglage Signal d entrée 11 HDMI Configure le signal d entrée HDMI Paramètre Entrée Espace color Contrôle avéc HDMI 12 COMP Configure le signal d entrée pour les terminaux d entrée de la vidéo en composantes Paramètre Y Pb Cb Pr Cr RVB SCART 13 Vidéo S Vidéo Règle les signaux d entrée Vidéo S Vidéo Paramètre Niveau NTSC Système Cou...

Страница 91: ...s pour l affichage du menu sont les quatre coins ou le centre de l écran 29 Affichage menus Définit la durée de l affichage du menu Paramètre 15 sec Marche 30 Aff ligne Affiche ou non le réglage d entrée lors du changement de source Paramètre 5 sec Arrêt 31 Aff source Affiche ou non l entrée source lors du changement d entrée Paramètre Marche Arrêt 32 Logo Détermine si Logo doit être affiché lors ...

Страница 92: ...MENU CINEMA 3 GAMMA C TEMP USER2 THX LENS AP PIC ADJ PICTURE MODE INPUT CINEMA 1 CINEMA 2 NATURAL STAGE DYNAMIC USER1 ON MENU BACK Video S Video COMP HDMI PC 4 3 4 3 16 9 Zoom Auto Aspect Vidéo Aspect PC Etirement V Arrêt Auto Surbalayage Film Arrêt Masque 5 Signal d entrée Retour Activation Sélection Sortie Position image MENU BACK Video S Video COMP HDMI Position image Auto Aspect PC Etirement V...

Страница 93: ...d image le plus adapté pour visionner des films d animation Naturel Il s agit du paramètre d image pour des teintes et des tons naturels Il est adapté au visionnage de drames et de vidéo Scène Il s agit du paramètre d image le plu adapté pour visionner des concerts en direct et des spectacles sur scène Dynamique Il s agit du paramètre d image le plus adapté pour visionner l image dans une pièce ne...

Страница 94: ...ge Moins rouge 50 à 50 Plus rouge Vert Moins vert 50 à 50 Plus vert Bleu Moins bleu 50 à 50 Plus bleu Perso 2 Réglage de Base Basé sur cette sélection de valeur de correction 5800K 6500K 7500K 9300K H B règle les gains et décalages suivants Gain Partie lumineuse Rouge Moins rouge 50 à 50 Plus rouge Vert Moins vert 50 à 50 Plus vert Bleu Moins bleu 50 à 50 Plus bleu Décalage Partie som bre Rouge Mo...

Страница 95: ...nces Ce réglage peut aussi être configuré à partir de la télécommande P14 Réglage gamma 1 Sélectionne le coefficient de courbe gamma de référence 1 8 2 6 fznd Réglage de Base 2 Sélectionnez la couleur que vous désirez ajuster dans l écran d ajustement gamma Gamma Réglage de Base Blanc Vert Bleu Copier Coller R A Z 1023 512 50 100 Normal A B C D Perso 1 Perso 2 Perso 3 0 Qualité image Retour Activa...

Страница 96: ...r Transient Improvement Amélioration des transitoires de couleurs Réglage couleur Arrêt La couleur d image ne peut pas être ajustée Perso 1 Perso 2 Perso 3 Pause Arrêt Mode vidéo Marche Mode image fixe Ajustement du réglage couleur Les valeurs de chaque couleur peuvent être réglées Rouge Jaune Vert Cyan Bleu et Magenta R A Z Retourner aux réglages d usine Clear Motion Drive Arrêt Améliore les imag...

Страница 97: ...Contrôle avéc HDMI Marche Active les communications CEC Arrêt Désactive les communications CEC Le réglage est disponible uniquement si le terminal HDMI est choisi L Entrée Auto ne fonctionne pas correctement pour certains périphériques sources Dans ce cas veuillez utiliser le Mode standard ou le Mode optimisé Abréviations CEC Consumer Electronics Control Commande des composants électroniques grand...

Страница 98: ... Position image Tracking Règle la taille horizontale et la zone d affichage de l image Cela peut varier suivant le signal mais ne nécessite normalement pas de réglage Phase Règle les images scintillantes et les images floues Cela peut varier suivant le signal mais ne nécessite pas normalement de réglage Position image Règle la position d affichage de l image Cela ne peut être réglé que lorsque l e...

Страница 99: ...n haut et en bas Ce réglage ne peut pas être défini dans le cas de signaux PC Signal d entrée Surbalayage 19 Surbalayage Choisit s il faut utiliser le surbalayge ou non pour le signal vidéo SD Marche Surbalayage le haut la gauche le bas et la droite chacun à 2 5 Arrêt Ne pas surbalayer Ce réglage n est pas disponible lorsque un signal PC ou HD est en entrée Signal d entrée Masque 20 Masque Masque ...

Страница 100: ...7 déplacer le vert vers la droite Bleu Horiz Déplacer le bleu vers la gauche 1 à 7 déplacer le bleu vers la droite Rouge Vert Déplacer le rouge vers le bas 1 à 5 déplacer le rouge vers le haut Vert Vert Déplacer le vert vers le bas 1 à 5 déplacer le vert vers le haut Bleu Vert Déplacer le bleu vers le bas 1 à 5 déplacer le bleu vers le haut Les axes horizontaux et verticaux sont inversés lorsque l...

Страница 101: ...ion menus 28 Position menus Règle la position de l affichage du menu Les positions possibles pour l affichage du menu sont les quatre coins ou le centre de l écran Cela peut également être configuré à partir de la télécommande P14 Affichage Affichage menus 29 Affichage menus Définit la durée de l affichage du menu 15 sec Affichage pendant 15 secondes Marche Affichage permanent Affichage Aff ligne ...

Страница 102: ... lampe 34 Puissance lampe Configure la puissance de la lampe source de lumière Normal Dans les cas habituels choisissez ce paramétrage 150 W Haut Sélectionnez ceci lorsqu il est difficile de voir l image dans une pièce éclairée 200 W Les réglages ne peuvent être changés pendant environ 90 secondes après que cet appareil ait été allumé Les réglages ne peuvent être changés pendant environ 60 seconde...

Страница 103: ...Haute Altitude Sélectionnez ceci lorsque le projecteur est utilisé dans un endroit à faible pression atmosphérique supérieure à 900 mètres au dessus du niveau de la mer Marche Marche Arrêt Arrêt Informations Entrée Affiche l entrée vidéo actuellement sélectionnée Source Affiche le type de signal d entrée vidéo en cours Si l entrée est le signal du PC ce point peut ne pas s afficher Résolution Dans...

Страница 104: ...le Pour régler le Contraste 1 Affichez le menu de configuration 2 Sélectionnez Qualité image Contraste 3 Ajustez le réglage 4 pour finaliser les réglages 3 D autres éléments peuvent également être réglés 4 Pour terminer 0 Contraste Régler BACK MENU Temp couleur Gamma et Ouverture objectif peuvent être aussi réglés depuis la télécommande P14 BACK TEST LIGHT ASPECT HIDE PC HDMI 1 VIDEO HDMI 2 S VIDE...

Страница 105: ...itial des modes pour la procédure de réglage de la qualité d image P42 2 Affichez le menu de configuration MENU 3 Sélectionnez Qualité image Modes Naturel 1 Sélectionner 2 Confirm MENU BACK 6500K Normal 0 0 0 0 Cinéma 2 Cinéma1 Scène Dynamique Util 1 Util 2 THX Cinéma 3 Naturel Modes Contraste Luminosité Couleur Teinte Temp Couleur Gamma Avancé Ouverture Qualité image Naturel R A Z Retour Activati...

Страница 106: ...ons Préparez une nouvelle lampe ou remplacez la dès que possible lorsqu elle approche de sa limite de durée P48 à 50 L appareil fonctionne lorsqu il est allumé puis s arrête brusquement après quelques minutes Les entrées et sorties d air sont elles bloquées Retirez la prise du câble d alimentation lorsque l appareil est en mode veille et retirez tout objet qui bloquerait la ventilation Rebranchez ...

Страница 107: ...P21 à 22 Absence d images vidéo Le réglage du masque d écran a t il été effectué Réglez Masque dans le menu configuration sur Arrêt P27 37 20 L affichage n est il pas en position normale Modifiez la valeur de Position d image dans le menu de configuration pour garantir que des images ne sont pas manquantes P36 15 La télécommande ne fonctionne pas Les piles sont elles installées correctement Assure...

Страница 108: ...par cet appareil a été entré Faites entrer des signaux vidéo pouvant être utilisés Les noms des bornes d entrée comme COMP S affichera en jaune Ce message s affiche lorsque la lampe a accumulé plus de 2900 heures de fonctionnement Afin d enlever ce message appuyez sur le bouton Back Veuillez préparer une nouvelle lampe puis remplacez la dès que possible et remettez le compteur temps de la lampe à ...

Страница 109: ...conde Le ventilateur de refroidissement est arrêté il s est bloqué 12 0 25 seconde 3 fois 0 75 seconde Température interne trop élevée température interne anormale 13 0 25 seconde 4 fois 0 75 seconde Température externe trop élevée température externe anormale 14 0 25 seconde 1 fois 0 75 seconde Circuit électrique anormal démarrage anormal du circuit d alimentation Eteint orange 15 0 25 seconde 2 ...

Страница 110: ...sombre que la teinte devient étrange ou que l image scintille remplacer sans tarder la lampe Acheter une lampe Dévissez les vis de la lampe Dévissez les vis à l aide d un tournevis Veuillez consulter votre détaillant agréé Lampe Pièce n BHL5010 S Retirez le module de la lampe Saisissez la poignée et tirez le module de la lampe Procédure pour le remplacement de la lampe NOTE Débranchez le câble d a...

Страница 111: ...de la lampe et provoquer son éclatement Serrez les vis du nouveau module de lampe Serrez les vis à l aide d un tournevis Ne placez pas la lampe que vous ve nez de retirer à la portée d enfants ou à proximité d éléments combustibles Éliminez les lampes usagées de la même façon que des lampes fluores centes Respectez votre réglementation locale pour leur élimination Fixez le couvercle de lampe Insér...

Страница 112: ...de remplacement de la lampe pourrait être inexacte et la lampe pourrait exploser Témoin allumé rouge Remettre à zéro le temps lampe Une fois la lampe changée remettez le Temps lampe à zéro 1 Branchez la prise du câble d alimentation à la prise électrique 2 Doit être effectué via la télécommande en mode veille le projecteur est alimenté mais il n est pas allumé Appuyez dans l ordre indiqué Appuyez ...

Страница 113: ...eutre Après avoir lavé le filtre avec de l eau assurez vous qu il est complètement sec avant de le réinstaller Sinon une décharge électrique ou des dysfonctionnements pourraient survenir Ne pas nettoyer le filtre avec un aspirateur ou de l air comprimé Le filtre est souple et pourrait être endommagé Le remplacer par un nouveau filtre Un filtre sale salira les pièces intenes de l appareil et causer...

Страница 114: ...octets Fin 1 octet En tête Ce code binaire indique le début de la communication Code binaire Type Description 21 Commande pour l utilisation PC cet appareil 3F Commande de référence PC cet appareil 40 Commande de réponse cet appareil PC 06 ACK cet appareil PC Lorsque la commande est acceptée sans erreur elle retourne au PC Identification d unité Ce code spécifie l unité Le code binaire est fixé à ...

Страница 115: ... Entrée Lorsque l appareil est sous tension 30 S VIDEO 31 VIDEO 32 COMP 33 VGA 36 HDMI 1 37 HDMI 2 5243 Télécommande Envoie le même code que celui de la télécommande fournie avec l appareil Code de télécommande P54 Commande de fonctionnement et données Code binaire Commande Type Description des données 5057 Alimentation électrique Pendant le mode veille ou lorsque l appareil est sous tension 30 Mo...

Страница 116: ...STAGE 37 33 36 37 ON 37 33 30 35 CINEMA 2 37 33 36 38 STAND BY 37 33 30 36 CINEMA 1 37 33 36 39 HIDE 37 33 31 44 NATURAL 37 33 36 41 LENS AP 37 33 32 30 DYNAMIC 37 33 36 42 MENU 37 33 32 45 USER 1 37 33 36 43 OK 37 33 32 46 USER 2 37 33 36 44 LENS 37 33 33 30 THX 37 33 36 46 37 33 33 34 HDMI 1 37 33 37 30 37 33 33 36 HDMI 2 37 33 37 31 MENU POSITION 37 33 34 32 PIC ADJ 37 33 37 32 PC 37 33 34 36 G...

Страница 117: ...orsque l appareil est éteint mode veille depuis l état allumé Entrée Composan tes PC Cet appareil 21 89 01 49 50 32 0A Cet appareil PC 06 89 01 49 50 0A Lorsque l entrée vidéo est réglée sur composantes Télécommande MENU PC Cet appareil 21 89 01 52 43 37 33 32 45 0A Cet appareil PC 06 89 01 52 43 0A Lorsque la même opération que d ap puyer sur le bouton MENU de la télé commande est effectuée Comma...

Страница 118: ...suyer la poussière Si la poussière s est accumulée dans les entrées d air la température interne ne peut être correctement réglée et cela pourrait entraîner un dysfonctionnement de l appareil Poussière sur l objectif Nettoyez la poussière au moyen de soufflettes commercia les ou de tampons nettoyants pour lunettes et appareils pho tos N utilisez pas de produits de nettoyage liquides Cela pour rait...

Страница 119: ... de 23 mm Utilisez des vis plus courtes que 23 mm mais plus longues que 13 mm Utiliser d autres vis résultera en des dysfonctionne ments ou en la chute de l appareil Si vous montez l appareil sur un socle assurez vous qu il y ait un espace suffisant des pieds d une hauteur de 10 mm ou supérieur tout autour de l appareil afin que les entrées d air ne soient pas bloquées N inclinez pas l appareil de...

Страница 120: ...santes 1 ligne prise jack RCA x 3 Y 1 0V crête à crête 75Ω CB PB CR PR 0 7V crête à crête 75Ω Entrée HDMI HDMI 1 HDMI 2 2 ligne HDMI 19 broches x 2 compatible HDCP 3 Compatible avec la norme HDMIv1 3a Entrée PC 1 ligne D Sub 15 broches VGA Sortie déclenchement 12V 100mA Puissance requise CA 110 V 240 V 50 60 Hz Consommation électrique 310W Mode de veille 0 7 W Conditions de fonctionnement Températ...

Страница 121: ...00 25 175 800 525 640 480 2 VGA 72 640 X 480 37 900 72 000 31 500 832 520 640 480 3 VGA 75 640 X 480 37 500 75 000 31 500 840 500 640 480 4 VGA 85 640 X 480 43 300 85 000 36 000 832 509 640 480 5 SVGA 56 800 X 600 35 200 56 000 36 000 1024 625 800 600 6 SVGA 60 800 X 600 37 900 60 000 40 000 1056 628 800 600 7 SVGA 72 800 X 600 48 100 72 000 50 000 1040 666 800 600 8 SVGA 75 800 X 600 46 900 75 00...

Страница 122: ...res 60 Caractéristiques suite 365 236 64 5 225 4 Φ42 12 95 167 297 477 5 90 6 42 5 105 198 Centre de l objectif couvercle de la lampe Appareil mm Dessus Face inférieure Proj avant Surface arrière Dimensions ...

Страница 123: ...ation Angle Page 21 Réglages Page 28 Mise en garde Page 2 Montage au plafond Page 2 57 Menu des paramètres Structure Page 28 Distance de projection Tableau des distances Page 22 Signal d entrée Compatibilité PC Page 59 Compatibilité vidéo Page 58 Filtre Filtre d entrée d air Page 13 Numéro du filtre de remplacement Page 11 51 Nettoyage et remplacement Page 51 Mise au point Ajustement Page 24 Messa...

Страница 124: ...6 Autres 62 Mémo ...

Страница 125: ...Para comenzar Preparación Funcionamiento básico Resolución de problemas Configuración Otros DLA HD950 DLA HD990 PROYECTOR D ILA MANUAL DE INSTRUCCIONES ESPAÑOL CASTELLANO ...

Страница 126: ...guardas incorporadas a este producto asegúrese de respetar las reglas básicas siguientes para su instalación uso y servicio Por favor lea atentamente estas Salvaguardas importantes ante del uso SALVAGUARDAS IMPORTANTES Las instrucciones de seguridad y de uso deben leerse sin falta antes de usar el producto Las instrucciones de seguridad y de uso deben guardarse para futuras consultas Deben respeta...

Страница 127: ...undante tal como se ilustra a continuación Cuando la unidad está encerrada en un espacio con dimensiones parecidas a las que se muestran utilice un acondicionador de aire de manera que las temperaturas interna y externa sean iguales Un exceso de temperatura podría provocar daños Fuente de alimentación indicada en la etiqueta Si no está seguro sobre el tipo de suministro eléctrico de su hogar pónga...

Страница 128: ...o con la letra L o de color rojo La tensión de la fuente de alimentación especificada para este producto es 110V 240VCA Por motivos de seguridad y de compatibilidad electromagnética utilice solamente el cable de alimentación designado por nuestro distribuidor Asegúrese de que el cable de alimentación usado para el proyector es el tipo correcto para la toma de corriente de CA de su país Consulte a ...

Страница 129: ...ng möglich ist Hinweis Das Zeichen Pb unterhalb des Batteriesymbols gibt an dass diese Batterie Blei enthält FRANÇAIS Informations relatives à l élimination des appareils et des piles usagés à l intention des utilisateurs Union européenne seulement Si ces symboles figurent sur les produits cela signifie qu ils ne doivent pas être jetés comme déchets ménagers Si vous voulez jeter ce produit ou cett...

Страница 130: ...Nota Il simbolo Pb sotto il simbolo delle batterie indica che questa batteria contiene piombo PORTUGUÊS Informação para os utilizadores acerca da eliminação de equipamento usado e pilhas Apenas União Europeia Estes símbolos indicam que o equipamento com estes símbolos não deve ser eliminado juntamente com o restante lixo doméstico Se pretende eliminar o produto ou a pilha utilize os sistemas de re...

Страница 131: ... kierrätyspaikkoja Huomautus Akkusymbolin alapuolella oleva Pb merkintä tarkoittaa että akku sisältää lyijyä SVENSKA Information för användare gällande bortskaffning av gammal utrustning och batterier Endast den Europeiska unionen Dessa symboler indikerar att utrustning med dessa symboler inte ska hanteras som vanligt hushållsavfall Om du vill bortskaffa produkten eller batteriet ska du använda up...

Страница 132: ...ahuje olovo POLSKI Informacje dla użytkowników dotyczące poz bywania się zużytego sprzętu i baterii Tylko kraje Unii Europejskiej Te symbole oznaczają że sprzętu nie należy wyrzucać razem z odpadami gospodarczymi Jeśli trzeba po zbyć się tego produktu lub ba terii proszę skorzystać z systemu odbioru lub urządzeń do zbiórki odpadów elektronicznych w celu odpowiedniego ponowne go ich przetworzenia U...

Страница 133: ...gura la manera en que el proyector presentará una amplia variedad de contenido de alta definición y de definición estándar El proyector JVC también posee el modo THX Movie una configuración de vídeo preestablecida para ver películas en DVD Blu ray HD o transmitidas por televisión Esta característica de reproducción está diseñada para emular en el hogar la sensación que se experimenta en el cine Es...

Страница 134: ...ia de proyección 22 Funcionamiento básico Proyección de imágenes 24 Funciones útiles durante la proyección 26 Ajuste del tamaño de la pantalla 26 Enmascaramiento de la zona circundante de una imagen 26 Configuración La estructura del menú de ajustes 28 Menú de ajustes 30 Procedimientos para utilizar el menú 30 Menú de ajustes 31 Personalizaciones de las imágenes proyectadas 42 Modificación del aju...

Страница 135: ... de reemplazo BHL5010 S Unidad de lámpara Filtro de reemplazo apariencia negra PB006560999 Filtro interno Describe las limitaciones de las funciones o utilización Indica información útil Describe precauciones relativas al funcionamiento P11 Indica las páginas importantes de referencia Acerca de este manual BACK TEST LIGHT ASPECT HIDE PC HDMI 1 VIDEO HDMI 2 S VIDEO COMP LENS MENU CINEMA 3 PICTURE M...

Страница 136: ...n Sensor remoto P15 Entrada de aire Tapa de la lente abierta P24 Tapa de la lente cerrada No coloque los dedos en la abertura de la lente durante el ajuste del desplazamiento Esto podría causar lesiones si los dedos quedan atrapados en la abertura P25 Al cerrar la tapa no permita que los dedos u otros objetos queden atrapados en la tapa de la lente Esto podría causar lesiones o fallas mecánicas AD...

Страница 137: ...en rojo Modo Enfriamiento P25 Para encender apagar la unidad Para cambiar la entrada P24 Para ocultar la imagen temporalmente P25 Botón hacia la derecha Botón hacia la izquierda Botón hacia abajo Para mostrar el menú P30 Para regresar al menú anterior Botón hacia arriba WARNING LAMP STANDBY ON INPUT HIDE MENU BACK OK No cierre la tapa de la lente durante la pro yección De lo contrario podría origi...

Страница 138: ...C HDMI 1 VIDEO HDMI 2 S VIDEO COMP LENS STAND BY MENU CINEMA 3 GAMMA C TEMP USER2 THX LENS AP PIC ADJ PICTURE MODE INPUT CINEMA 1 CINEMA 2 NATURAL STAGE DYNAMIC USER1 ON Para seleccionar el modo de entrada P24 Para ajustar la temperatura de color P42 Para ocultar la imagen de forma temporal P25 Para cambiar el modo de imagen P42 Apertura de la lente P42 Para seleccionar o confirmar Para encender l...

Страница 139: ...l remoto Control remoto Unidad 1 2 3 Cuando apunte el control remoto reflejándolo en la pantalla Asegúrese de que la distancia total A entre esta unidad y la pantalla y la distancia B entre el control remoto y la pantalla se encuentre den tro de los 7 metros Debido a que la eficacia de las señalas refle jadas desde la unidad de control remoto varía de acuerdo con el tipo de pantalla utilizada es p...

Страница 140: ...ue deban conectarse las imágenes no se muestren En relación con el cable HDMI a la venta por separado utilice solamente uno que disponga de homologación HDMI Puede que no sea posible conectarlos a esta unidad Esto depende de la dimensión de la tapa del conector de los cables que deban conectarse Para conectar a través del terminal HDMI P18 Para conectar a través del terminal RS 232C control extern...

Страница 141: ...ales de entrada de vídeo componente Al terminal de entrada de S Vídeo Cable de vídeo componente se vende por separado Cable de S Vídeo se vende por separado Cable de vídeo se vende por separado Salida de vídeo Salida de S Vídeo Reproductor BD DVD CR PR rojo CB PB azul Y verde Terminales de salida de vídeo componente VCR y videocámara Establezca COMP en Y Pb Cb Pr Cr dentro del menú de ajustes P36 ...

Страница 142: ...ravés del cable de conversión HDMI DVI Conexión a través del cable HDMI Ordenador portátil Equipo de sobremesa Si se producen ruidos aleje los ordenadores incluidos Equipo de sobremesa de este producto Se recomienda reducir la longitud del cable si no se muestra ninguna imagen Si se producen ruidos aleje los ordenadores incluidos Ordenador portátil de este producto Utilice únicamente equipos con h...

Страница 143: ...ncluye señales simultáneas Terminales de salida de vídeo RGB Dispositivo con salida RGB Terminal SCART Cable SCART RCA se vende por separado A los terminales de vídeo RGB y entrada de señal sincronizada Establezca COMP en RGB dentro del menú de ajustes P36 12 Para obtener información sobre las señales de entrada disponibles consulte Especificaciones P58 Conexión a través del cable de vídeo RGB Est...

Страница 144: ...o cuidado para evitar cortocircuitos debido a que el terminal del disparador posee una salida de voltaje de 12 V Pantalla Conexión a través del cable del disparador Cable de disparador se vende por separado Al terminal de salida del disparador Terminal de entrada del disparador Ø3 5 Unidad ADVERTENCIA Al terminal de entrada PC Cable de PC se vende por separado Terminal de salida VGA Ordenador port...

Страница 145: ...go de ángulo de esta unidad en 10 Establecimiento del ángulo Instalación del proyector y de la pantalla Al realizar la instalación coloque la unidad y la pantalla perpendicularmente entre sí De lo contrario esto podría aumentar la distorsión trapezoidal Consulte Corregir trapecio P39 25 Tabla de correlación de desplazamiento de la lente Desplazamiento hacia la izquierda o hacia la derecha 0 5 10 1...

Страница 146: ...x 4 23m a Aprox 8 60m 150 Aprox 3 81m Aprox 4 53m a Aprox 9 22m 160 Aprox 4 06m Aprox 4 84m a Aprox 9 84m 170 Aprox 4 32m Aprox 5 14m a Aprox 10 45m 180 Aprox 4 57m Aprox 5 45m a Aprox 11 07m 190 Aprox 4 83m Aprox 5 75m a Aprox 11 68m 200 Aprox 5 08m Aprox 6 06m a Aprox 12 30m Las distancias de proyección que aparecen en la tabla se indican únicamente como referencia Utilícelas en este sentido dur...

Страница 147: ...23 Para comenzar Preparación Funcionamiento básico Resolución de problemas Configuración Otros ESPAÑOL CASTELLANO Memorándum ...

Страница 148: ...mente presionando los botones hacia arriba abajo Cable de alimentación Suministrado Luz encendida en rojo ON BACK TEST LIGHT ASPECT HIDE PC HDMI 1 VIDEO HDMI 2 S VIDEO COMP LENS STAND BY MENU CINEMA 3 GAMMA C TEMP USER2 THX LENS AP PIC ADJ PICTURE MODE INPUT CINEMA 1 CINEMA 2 NATURAL STAGE DYNAMIC USER1 ON BACK Atrás Ejecutar Selecc Exit MENU Foco Control de lentes 1 2 STANDBY ON STANDBY ON HDMI 1...

Страница 149: ...iará entre Foco Zoom y Desplazamiento Acerca del modo de enfria miento El modo de enfriamiento es una función que permite enfriar la lámpara durante 60 segundos luego de haberse terminado la proyección Esta función evita que las partes internas de la unidad se deformen o se dañen debido al recalentamiento de la lámpara Además impide que la lámpara se rompa y que se disminuya prematuramente su vida...

Страница 150: ...ecte la imagen Funciones útiles durante la proyección Se puede cambiar el tamaño de pantalla de la imagen proyectada u ocultar la zona circundante de una ima gen cuya zona externa parece deteriorada ASPECT 4 3 16 9 zoom Imagen en la que la calidad de la zona externa se ha deteriorado BACK TEST LIGHT ASPECT HIDE PC HDMI 1 VIDEO HDMI 2 S VIDEO COMP LENS STAND BY MENU CINEMA 3 GAMMA C TEMP USER2 THX ...

Страница 151: ...ar Selecc Escaneado Modo Película Auto Apagado Apagado 5 Apagado 2 5 Máscara PC MENU BACK Video S Video COMP HDMI 16 9 Auto Aspecto vídeo Aspecto ordenador Extensión V Apagado 自动 5 Auto Escaneado Modo Película Apagado Máscara 5 2 5 Apagado Entrada señal Salir Atrás Ejecutar Selecc Posición de imagen PC El enmascaramiento es posible únicamen te cuando se vis ualizan imágenes de alta definición MENU...

Страница 152: ...configuración Entrada señal 11 HDMI Ajusta la señal de entrada HDMI Escenario Entrada Espacio de color Control con HDMI 12 COMP Ajusta las señales de entrada de los terminales de entrada de vídeo componente Escenario Y Pb Cb Pr Cr RGB SCART 13 Vídeo S Vídeo Configura las señales de entrada Vídeo S Vídeo Escenario Nivel NTSC Sistema de color 14 PC Permite configurar la entrada de PC Escenario Auto ...

Страница 153: ...ión del menú son en las cuatro esquinas o en el centro de la pantalla 29 Visualiz de menú Ajusta la duración de la visualización del menú Escenario 15 seg Encend 30 Indicador Establece si desea visualizar o no la entrada al cambiar de entrada Escenario 5 seg Apagado 31 Fuente Establece si se muestra la fuente de las señales de entrada cuando se cambia la entrada Escenario Encend Apagado 32 Logo De...

Страница 154: ...BY MENU CINEMA 3 GAMMA C TEMP USER2 THX LENS AP PIC ADJ PICTURE MODE INPUT CINEMA 1 CINEMA 2 NATURAL STAGE DYNAMIC USER1 ON MENU BACK Video S Video COMP HDMI PC 4 3 4 3 16 9 Zoom Auto Aspecto vídeo Aspecto ordenador Extensión V Apagado 5 Auto Escaneado Modo Película Apagado Máscara Entrada señal Salir Atrás Ejecutar Selecc Posición de imagen MENU BACK Video S Video COMP HDMI Posición de imagen 4 3...

Страница 155: ...uste de imagen es el que mejor se adapta a la visualización de películas de animación Natural Este ajuste de imagen permite disfrutar de matices y tonos naturales Es el modo que mejor se adapta a vídeos y grabaciones teatrales Estado Este ajuste de imagen es el que mejor se adapta a la reproducción de conciertos en directo y actuacio nes en un escenario Dinámico Este ajuste de imagen es el que mej...

Страница 156: ...rde Azul Menos azul 50 a 50 Más azul Compensar parte oscura Rojo Menos rojo 50 a 50 Más rojo Verde Menos verde 50 a 50 Más verde Azul Menos azul 50 a 50 Más azul Personal2 Valor corrección En función del valor seleccionado en la opción Valor corrección 5800K 6500K 7500K 9300K H B ajusta los siguientes Aumentos y Desplazamientos Aumento parte clara Rojo Menos rojo 50 a 50 Más rojo Verde Menos verde...

Страница 157: ...ro puede seleccionar otras opciones según lo prefiera También se puede configurar este ajuste desde el control remoto P14 Ajuste de gamma 1 Seleccione el coeficiente de la curva de gamma de referencia 1 8 2 6 en Valor corrección 2 Seleccione el color que desea ajustar en la pantalla de ajuste de gamma BACK BACK OK Sí No Guardar datos de gamma Si se ajusta la curva de gamma varias veces se acumular...

Страница 158: ...uidos de mosquito BNR Block Noise Reduction Reducción de ruidos de bloque CTI Color Transient Improvement Mejora de los transitorios de color Gestión de color Apagado No se puede ajustar el color de la imagen Personal 1 Personal 2 Personal 3 Pause Apagado Modo de vídeo Encend Modo de pausa Ajuste de la gestiónde color Es posible ajustar valores de cada color Rojo Amarillo Verde Cian Azul y Magenta...

Страница 159: ...mágenes de entrada sea 0 255 Espacio de color Auto Configura automáticamente las señales de entrada Y Cb Cr 4 4 4 Seleccione esta opción cuando se utilizan las señales de vídeo Y Cb Cr 4 4 4 Y Cb Cr 4 2 2 Seleccione esta opción cuando se utilizan las señales de vídeo Y Cb Cr 4 2 2 RGB Seleccione esta opción cuando se utilizan las señales de vídeo RGB Control con HDMI Encend Activa las comunicacion...

Страница 160: ... de color sea NTSC4 43 PAL Seleccione esta opción cuando el sistema de color sea PAL PAL M Seleccione esta opción cuando el sistema de color sea PAL M PAL N Seleccione esta opción cuando el sistema de color sea PAL N SECAM Seleccione esta opción cuando el sistema de color sea SECAM Este ajuste está sólo disponible cuando se utiliza la entrada de vídeo o S Vídeo Entrada señal PC 14 PC Permite confi...

Страница 161: ...r este ajuste desde el control remoto P14 No se puede ajustar esta configuración en el caso de las señales de definición estándar o de alta definición Entrada señal Extensión V cuando se utilizan señales de vídeo de definición estándar y alta definición 18 Extensión V Cuando está establecido en Encend la imagen 2 35 1 proyectada se estirará verticalmente hasta la resolución del panel Encend Se est...

Страница 162: ...quierda derecha para desplazar la imagen Patrón de imagen Encend Muestra el patrón de imagen junto con los ítems de configuración que aparecen anteriormente Visualización de Zoom y Desplaza miento Imagen de cuadrícu las verdes grandes Visualización de Foco Imagen de cuadrí culas verdes pe queñas Apagado Sin mostrar el patrón de imagen muestra la señal de entrada externa Bloqueo Encend Desactiva el...

Страница 163: ...lla Corrige los desequilibrios del balance de blanco derivados de las características reflectivas de la pantalla Apagado No realiza ninguna corrección Normalmente se ajusta en Apagado A Corrige la imagen aplicándole un suave tono rojizo B Corrige la imagen aplicándole un suave tono verdoso C Corrige la imagen aplicándole un suave tono azulado Config display Color negro 27 Color negro Configura el ...

Страница 164: ...ostrar Configuración display Idioma 33 Idioma Ajusta el idioma para la visualización del menú Japonés English Inglés Deutsch Alemán Español Español Italiano Italiano Français Francés Português Portugués Nederlands Holandés Svenska Sueco Norsk Noruego Русский Ruso Chino Función Potencia de lámp 34 Potencia de lámp Ajusta la salida de la lámpara de la fuente de luz Normal En circunstancias normales ...

Страница 165: ...camente la unidad luego de 2 horas 3 Horas Apaga automáticamente la unidad luego de 3 horas 4 Horas Apaga automáticamente la unidad luego de 4 horas Función Modo altitud alta 38 Modo altitud alta Seleccione esta opción cuando utilice el proyector en una ubicación con una presión atmosférica baja superior a 900 metros por sobre el nivel del mar Encend Habilitado Apagado Deshabilitado Información En...

Страница 166: ...a imagen Ejemplo Para ajustar Contraste 1 Abra el menú de ajustes 2 Seleccione Ajustes Imagen Contraste 3 Configure el ajuste 4 Para finalizar el ajuste 3 También es posible ajustar otros ítems 4 Para terminar CINEMA 3 CINEMA 1 NATURAL STAGE DYNAMIC CINEMA 2 MENU 0 Contraste MENU BACK 6500K 2 0 0 0 0 Natural Normal Salir Modo de imagen Contraste Brillo Color Tono Temperatura color Gamma Avanzado A...

Страница 167: ...ulte Modificación del ajuste inicial del modo de imagen para obtener información sobre los procedimientos de ajuste de la calidad de imagen P42 2 Abra el menú de ajustes MENU 3 Seleccione Ajustes imagen Modo de imagen Natural 4 Registre el ajuste Los parámetros de ajuste de la calidad de la imagen no se grabarán si se ha seleccionado otros perfiles de ima gen antes de intentar la grabación de dich...

Страница 168: ... lámpara Luego inserte nuevamente el enchufe P49 Está la lámpara en el modo de enfriamiento Una vez que se termine el enfriamiento encienda nuevamente la unidad P25 La imagen proyectada es oscura Está por agotarse la lámpara Compruebe el tiempo de vida útil de la lámpara en el menú de información Prepare una nueva unidad de lámpara o reemplace la actual tan pronto como le sea posible cuando la lám...

Страница 169: ...de la pantalla P21 a 22 Faltan imágenes de vídeo Se han efectuado los ajustes correspondientes al enmascaramiento de la pantalla Establezca Máscara en el menú de ajustes en Apagado P27 37 20 La pantalla no está en la posición correcta Modifique el valor Posición de imagen en el menú de ajustes para asegurarse de que no falta ninguna imagen P36 15 El control remoto no funciona Se colocó correctamen...

Страница 170: ...que no es compatible con esta unidad Señales de vídeo de entrada que pueden utilizarse Los nombres de los terminales de entrada como COMP aparecerán con letras amarillas Este mensaje aparece cuando el tiempo acumulado de la lámpara excedió las 2900 horas Para borrar el mensaje presione el botón Back Prepare una nueva unidad de lámpara y reemplace la actual tan pronto como le sea posible Luego rein...

Страница 171: ...dos El ventilador de refrigeración se detiene el ventilador de refrigeración queda obstruido 12 0 25 segundos 3 veces 0 75 segundos Temperatura interna demasiado alta temperatura interna anormal 13 0 25 segundos 4 veces 0 75 segundos Temperatura externa demasiado alta temperatura externa anormal 14 0 25 segundos 1 vez 0 75 segundos Circuito eléctrico defectuoso inicio anormal del circuito de avanc...

Страница 172: ...iado oscura parpadea o el tono presenta un aspecto extraño cambie la lámpara por una nueva sin demora Adquisición de la unidad de lámpara Afloje los tornillos de la unidad de lámpara Afloje los tornillos con un destornillador Comuníquese con su distribuidor autorizado Unidad de lámpara Número de parte BHL5010 S Retire la unidad de lámpara Agarre el asa y extraiga la unidad de lámpara Procedimiento...

Страница 173: ...lido de la lámpara Apriete los tornillos de la unidad de lámpara nueva Apriete los tornillos con un destornillador No coloque la unidad de lámpara que ha retirado en lugares que estén al al cance de los niños ni cerca de artículos inflamables Deseche las unidades de lámpara usa das de la misma manera que desecha las lámparas fluorescentes Siga las reglamentaciones de su comunidad en materia de eli...

Страница 174: ...davía en uso De lo contrario es posible que el estándar aproximado de referencia para el reem plazo sea inexacto y que la lámpara se rompa Luz encendida en rojo Después de reemplazar la lámpara reinicie el tiempo de la lámpara 1 Introduzca el enchufe en el tomacorriente 2 Utilizar el control remoto en el modo de espera el proyector posee alimentación pero no está encendido Presione en el orden que...

Страница 175: ...segúrese de que esté completamente seco antes de instalarlo De lo contrario podrían producirse descargas eléctricas o fallos de funcionamiento No limpie el filtro con una aspiradora ni con un plumero El filtro es suave y podría dañarse Reemplácelo por un filtro nuevo Un filtro sucio ensucia las partes internas de la unidad y trae como resultado la presencia de sombras en la imagen de vídeo Para ad...

Страница 176: ... y Final Encabezado 1 bit ID de la unidad 2 bits comando 2 bits datos n bits final 1 bit Encabezado Este código binario indica el comienzo de la comunicación Código binario Tipo Descripción 21 Comando de operación PC Esta unidad 3F Comando de referencia PC Esta unidad 40 Comando de respuesta Esta unidad PC 06 ACK Esta unidad PC Cuando el comando es aceptado sin que se produzcan errores regresa al ...

Страница 177: ...a unidad Modo de espera 4950 Entrada Durante el encendido 30 S VÍDEO 31 VÍDEO 32 COMP 33 VGA 36 HDMI 1 37 HDMI 2 5243 Control remoto Envía el mismo código que el suministrado por el control remoto Código del control remoto P54 Comando y datos de referencia código binario Comando Tipo Descripción de los datos 5057 Suministro de energía En modo de espera o durante el encendido 30 Modo de espera 31 M...

Страница 178: ...E 37 33 36 37 ON 37 33 30 35 CINEMA 2 37 33 36 38 STAND BY 37 33 30 36 CINEMA 1 37 33 36 39 HIDE 37 33 31 44 NATURAL 37 33 36 41 LENS AP 37 33 32 30 DYNAMIC 37 33 36 42 MENU 37 33 32 45 USER 1 37 33 36 43 OK 37 33 32 46 USER 2 37 33 36 44 LENS 37 33 33 30 THX 37 33 36 46 37 33 33 34 HDMI 1 37 33 37 30 37 33 33 36 HDMI 2 37 33 37 31 MENU POSITION 37 33 34 32 PIC ADJ 37 33 37 32 PC 37 33 34 36 GAMMA...

Страница 179: ...A Cuando se apaga la unidad modo de espera desde el modo de encendido Entrada COMP PC Esta unidad 21 89 01 49 50 32 0A Esta unidad PC 06 89 01 49 50 0A Cuando se establece la entrada de vídeo en vídeo componente Control remoto MENU PC Esta unidad 21 89 01 52 43 37 33 32 45 0A Esta unidad PC 06 89 01 52 43 0A Cuando se realiza la misma operación que al presionar el botón MENU en el control remoto C...

Страница 180: ...emperatura interna no pueda ajustarse y esto ocasionaría fallos de fun cionamiento Polvo o suciedad en la lente Utilice ventiladores o papel de limpieza de lentes disponibles en venta especiales para la limpieza de gafas y cámaras No utilice productos de limpieza líquidos Esto podría hacer que se pele la película protectora de la superficie P13 Si se deja de utilizar la unidad durante un tiempo pr...

Страница 181: ...a 13 mm La utilización de otros tornillos podría causar fallos de funcionamiento o caídas de la unidad Cuando monte la unidad en un pedestal asegúrese de que exista espacio suficiente altura de la base de 10 mm o más alrededor de la unidad para lograr que las entradas de aire no se encuentren bloqueadas No incline esta unidad más de 5 grados de un lado al otro cuando la esté utilizando Independien...

Страница 182: ...ENTE 3 conectores de clavija RCA de 1 canal Y 1 0V p p 75Ω CB PB CR PR 0 7V p p 75Ω Entrada HDMI HDMI 1 HDMI 2 2 conectores HDMI de 19 clavijas y 2 canales compatible con HDCP 3 Compatible con la norma HDMIv1 3a Entrada PC VGA D Sub de 1 línea y 15 clavijas Salida de activación 12V 100mA Requisitos de alimentación CA de 110V 240V 50 60 Hz Consumo de energía 310 W Modo de espera 0 7 W Ambiente de f...

Страница 183: ...line H V 1 VGA 60 640 X 480 31 500 60 000 25 175 800 525 640 480 2 VGA 72 640 X 480 37 900 72 000 31 500 832 520 640 480 3 VGA 75 640 X 480 37 500 75 000 31 500 840 500 640 480 4 VGA 85 640 X 480 43 300 85 000 36 000 832 509 640 480 5 SVGA 56 800 X 600 35 200 56 000 36 000 1024 625 800 600 6 SVGA 60 800 X 600 37 900 60 000 40 000 1056 628 800 600 7 SVGA 72 800 X 600 48 100 72 000 50 000 1040 666 8...

Страница 184: ...pecificaciones Continuación Dimensiones 365 236 64 5 225 4 Φ42 12 95 167 297 477 5 90 6 42 5 105 198 centro de la lente tapa de la lámpara Unidad mm Superficie superior Superficie inferior Frente Superficie trasera ...

Страница 185: ...uste Page 24 Instalación Ángulo Page 21 Ajustes Page 28 Advertencia Page 2 Techo Page 2 57 Menú de ajustes Estructura Page 28 Distancia de proyección Tabla de distancias Page 22 Entrada señal Compatibilidad con PC Page 59 Compatibilidad con vídeo Page 58 Filtro Filtro de entrada de aire Page 13 Número de filtro de reemplazo Page 11 51 Limpieza y reemplazo Page 51 Foco Ajuste Page 24 Mensaje Signif...

Отзывы: