background image

ENGLISH

   - 8 -

• Press the 

RED

 button. Use “ ” or “ ” button to select the

position and press “

“ or “

” button to select a letter.

Now, press the 

RED

 button again to store or 

BLUE

 button to

cancel 

NAME

.

To delete a channel from a programme number:

• Move to the channel you want to delete or use the digits so

that the selected programme number is in cyan color.

• Press the 

YELLOW

 button. Now the corresponding channel

will be deleted and all the other channels below this pro-

gramme number will be moved one programme number up.

Now, press the 

YELLOW

 button again to delete or 

BLUE

 but-

ton to cancel 

DELETE

.

To insert a channel into a programme number:

• Move to the channel to be inserted or use the digits so that

the selected programme number is in cyan color.

• Press the 

GREEN

 button. Now using “

“ or “

” or “ ”

or “ ” buttons, move to the programme number.

Now, press the 

GREEN

 button again to insert or 

BLUE

 button

to cancel

 INSERT

.

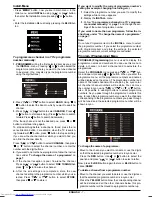
A.P.S.

If you enter the 

A.P.S.

 menu, you can automatically program-

me  the  received  channels  in  your  TV’s  programmes  with

A.P.S.

 ( Automatic programme system ).

1.

 After displaying the 

PROGRAM.

 menu, press the 

BLUE

button to enter the 

A.P.S.

 menu.

2.

 Select 

LANGUAGE

 with the “

“ or “

” button, then

press the “ ” or “ ” button to select a menu language.

3.

 Select 

COUNTRY

 with the “

“ or “

” button, then

press the “ ” or “ ” button to select the country you are

now located.

4.

 If you want to start programming, select 

START

 with the

“

“  or  “

”  button,  then  press  the  “ ”  button.  The

message “

A.P.S. IS RUNNING

” appears and 

A.P.S.

 auto-

matically programmes the received channels in your TV’s

programme numbers. Afrer 

A.P.S.

 is finalized, the 

PRO-

GRAM.

 menu appears again.

    To cancel 

A.P.S.

, press the “ ” button.

Other  Features

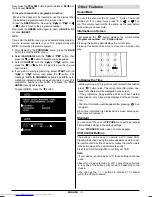
Sound Mute

To cut off the sound of the TV, press “ ” button. The sound
will be cut off. To cancel mute, press “ ” or “ ” or “ ” but-

ton. The volume level will be the same as the level before

mute when you cancel mute.

Information on Screen

First  pressing  the  “

”  button  displays  the  current  status

“

Programme number

” and “

Station name

”.

Pressing this button again displays the current time.
Pressing this button once more remove the on-screen dis-

play.

To Display the Time

• While watching a TV programme with Teletext transmission

press “

“ button twice. The current time information, cap-

tured from Teletext will be displayed on the screen.

•  If  the  programme  being  watched  does  not  have Teletext

transmission, only a box will be displayed at the same loca-

tion.

• The time information will disappear after pressing “

“ but-

ton again.

When time information is displayed on screen, entering an-

other menu will remove it.

Standard

You can re-set the current 

PICTURE

 menu settings (except

Picture Mode setting) to the default settings.
• Press “

STANDARD

” button when no menu appears.

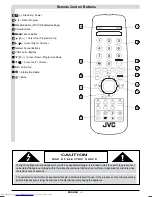
VCR Control Buttons

The  buttons  can  be  used  to  operate  a  JVC  brand  VCR.

Pressing the button having the same appearance as the origi-

nal remote control button of a device makes the function work

in the same way as the original remote control.
Press the VCR Control Button to control your VCR.

Note:

• If your device is not made by JVC, these buttons cannot be

used.

• Even if your device is made by JVC, some of these buttons

or any one of the buttons may not work, depending on the

device.

• You can use the   /   buttons to choose a TV channel

which the VCR will receive.

01-ENG&LL-AK36-AV-14RM4SP-50050685.p65

21.07.2004, 16:27

8

Содержание 50050690

Страница 1: ...K SVENSKA FARBFERNSEHGERÄT TELEVISOR A CORES BEDIENUNGSANLEITUNG INSTRUÇÕES TELEVISEUR COULEUR MANUEL D INSTRUCTIONS KLEURENTELEVISIE FARGEFJERNSYN GEBRUIKSAANWIJZING BRUKSANVISNING TELEVISOR A COLOR FÄRG TV VÄRITELEVISIO MANUAL DE INSTRUCCIONES BRUKSANVISNING KÄYTTÖOHJE FARVEFJERNSYN INSTRUKTIONSBOG ITALIANO TELEVISORE A COLORI ISTRUZIONI ...

Страница 2: ...tric shock 9 Flame sources Do not place naked flame sources on the apparatus 10 Stand By Do not leave your TV stand by or operating condition when you leave your house Warning Any intervention contrary to regulations in particular any modification of high voltage or a replacement of the picture tube may lead to an increased concentration of x rays Any television modified in this way no longer comp...

Страница 3: ...ons CAUTION RISK OF ELECTRIC SHOCK The lightning flash with arrowhead symbol within an equilateral triangle is intended to alert the user to the presence of uninsulated dangerous voltage within the product s enclosure that may be of sufficient magnitude to constitute a risk of electric shock of persons The exclamation point within an equilateral triangle is intended to alert the user to the presen...

Страница 4: ...ENGLISH 3 Control Panel Buttons Antenna Connections XGLR QSXW 7HUPLQDO 9LGHR QSXW 7HUPLQDO HDGSKRQH 21752 3 1 877216 3RZHU 3URJUDP 9ROXPH 5217 9 ...

Страница 5: ... or directly using the TV onset buttons To switch the TV on Your TV will switch on in two steps 1 Press the power button located on the front of the TV Then the TV switches itself to standby mode and the RED LED located below the TV turns on 2 To switch on the TV from stand by mode either Press a digit button on the remote control so that a program me number is selected or Press Standby Power Butt...

Страница 6: ...yed with symbol for 3 seconds To select programmes between 10 and 99 press corresponding digit buttons consecutively be fore symbol on the second digit disappears e g for pro gramme 27 first press 2 and then 7 while program number displayed as 2 Menu System Your TV has been designed with a menu system Display MENU main menu and enter one of four menus PIC TURE FEATURE INSTALL and PROGRAM 1 Press M...

Страница 7: ... Then enter the feature menu pressing or button or Enter the Feature Menu directly pressing the YELLOW button Sleep Timer As you enter the feature menu SLEEP TIMER will be the first selected option Use or button to change the value of the sleep timer between OFF 0 15 00 0 30 00 0 45 00 1 00 00 1 15 00 1 30 00 1 45 00 and 2 00 00 hours Your TV will get into standby mode when the period you selected...

Страница 8: ...ttings while no menu appears 2 Display the INSTALL menu 3 Follow To programme a channel in a TV s program me number manually on page 7 and change the set tings of the current programme number If you want to name the new programme follow the in structions under To change the name of a programme on page 7 Note Do not use Programme item in the INSTALL menu to select the programme number If you select...

Страница 9: ...The volume level will be the same as the level before mute when you cancel mute Information on Screen First pressing the button displays the current status Programme number and Station name Pressing this button again displays the current time Pressing this button once more remove the on screen dis play To Display the Time While watching a TV programme with Teletext transmission press button twice ...

Страница 10: ...umber and flash until the entered page number is found Then the page number will replace sign again Now you can display this teletext page pressing button To Select Double Height Text Press button for the top half of the information page to be displayed in double height text Press button again for the bottom half of the informa tion page to be displayed in double height text Press button once more...

Страница 11: ...V To return to the TV mode repeatedly press AV button or press or button AV 1 SCART terminal Euroconnector 21 pin SCART Video input Audio input and RGB inputs are available TV broadcast outputs Video and Audio are available AV 1 S SCART terminal Euroconnector 21 pin SCART Video input S VIDEO Y C input and Audio input are available Video and Audio outputs are available F AV Front AV terminal RCA co...

Страница 12: ...ss AV button to select the corresponding AV mode NTSC 3 58 4 43 system is detected automatically in AV mode Connecting Headphones Use the headphone socket of your TV to connect head phones Tips Care of the Screen Clean the screen with a slightly damp soft cloth Do not use abrasive solvents as they may damage the TV screen coating layer Poor Picture Have you selected the correct TV system Is your T...

Страница 13: ...E TV S01 S41 S75 S79 NUMBER OF PRESET CHANNELS 100 CHANNEL INDICATOR On Screen Display RF AERIAL INPUT 75 Ohm unbalanced OPERATING VOLTAGE 220 240V AC 50 Hz SOUND MULTIPLEX SYSTEMS Mono PICTURE TUBE For 14 AUDIOOUTPUTPOWER WRMS 10 THD 2 5 POWER CONSUMPTION W max 59 DIMENSIONS mm D 378 L 455 H 355 Weight Kg 10 ...

Страница 14: ... DEUTSCH FRANÇAIS NEDERLANDS CASTELLANO ITALIANO FARBFERNSEHGERÄT BEDIENUNGSANLEITUNG TELEVISEUR COULEUR MANUEL D INSTRUCTIONS KLEURENTELEVISIE GEBRUIKSAANWIJZING TELEVISOR A COLOR MANUAL DE INSTRUCCIONES TELEVISORE A COLORI ISTRUZIONI PORTUGUÊS TELEVISOR A CORES INSTRUÇÕES ...

Страница 15: ...tric shock 9 Flame sources Do not place naked flame sources on the apparatus 10 Stand By Do not leave your TV stand by or operating condition when you leave your house Warning Any intervention contrary to regulations in particular any modification of high voltage or a replacement of the picture tube may lead to an increased concentration of x rays Any television modified in this way no longer comp...

Страница 16: ...ons CAUTION RISK OF ELECTRIC SHOCK The lightning flash with arrowhead symbol within an equilateral triangle is intended to alert the user to the presence of uninsulated dangerous voltage within the product s enclosure that may be of sufficient magnitude to constitute a risk of electric shock of persons The exclamation point within an equilateral triangle is intended to alert the user to the presen...

Страница 17: ...ENGLISH 3 Control Panel Buttons Antenna Connections XGLR QSXW 7HUPLQDO 9LGHR QSXW 7HUPLQDO HDGSKRQH 21752 3 1 877216 3RZHU 3URJUDP 9ROXPH 5217 9 ...

Страница 18: ... or directly using the TV onset buttons To switch the TV on Your TV will switch on in two steps 1 Press the power button located on the front of the TV Then the TV switches itself to standby mode and the RED LED located below the TV turns on 2 To switch on the TV from stand by mode either Press a digit button on the remote control so that a program me number is selected or Press Standby Power Butt...

Страница 19: ...yed with symbol for 3 seconds To select programmes between 10 and 99 press corresponding digit buttons consecutively be fore symbol on the second digit disappears e g for pro gramme 27 first press 2 and then 7 while program number displayed as 2 Menu System Your TV has been designed with a menu system Display MENU main menu and enter one of four menus PIC TURE FEATURE INSTALL and PROGRAM 1 Press M...

Страница 20: ... Then enter the feature menu pressing or button or Enter the Feature Menu directly pressing the YELLOW button Sleep Timer As you enter the feature menu SLEEP TIMER will be the first selected option Use or button to change the value of the sleep timer between OFF 0 15 00 0 30 00 0 45 00 1 00 00 1 15 00 1 30 00 1 45 00 and 2 00 00 hours Your TV will get into standby mode when the period you selected...

Страница 21: ...ion is poor fine tune the channel Press or button to select FINE TUNING then press or to fine tune the channel 7 After the all settings are completed store the new channel s setting to the programme number which you se lected Press or button to select STORE then press or to store it If you want to modify the current programme number s setting for example changing fine tuning etc 1 Select the progr...

Страница 22: ...TV s programme numbers Afrer A P S is finalized the PRO GRAM menu appears again To cancel A P S press the button Other Features Sound Mute To cut off the sound of the TV press button The sound will be cut off To cancel mute press or or but ton The volume level will be the same as the level before mute when you cancel mute Information on Screen First pressing the button displays the current status ...

Страница 23: ...umber and flash until the entered page number is found Then the page number will replace sign again Now you can display this teletext page pressing button To Select Double Height Text Press button for the top half of the information page to be displayed in double height text Press button again for the bottom half of the informa tion page to be displayed in double height text Press button once more...

Страница 24: ...V To return to the TV mode repeatedly press AV button or press or button AV 1 SCART terminal Euroconnector 21 pin SCART Video input Audio input and RGB inputs are available TV broadcast outputs Video and Audio are available AV 1 S SCART terminal Euroconnector 21 pin SCART Video input S VIDEO Y C input and Audio input are available Video and Audio outputs are available F AV Front AV terminal RCA co...

Страница 25: ...ss AV button to select the corresponding AV mode NTSC 3 58 4 43 system is detected automatically in AV mode Connecting Headphones Use the headphone socket of your TV to connect head phones Tips Care of the Screen Clean the screen with a slightly damp soft cloth Do not use abrasive solvents as they may damage the TV screen coating layer Poor Picture Have you selected the correct TV system Is your T...

Страница 26: ...G S01 S41 S75 S79 L S01 S41 S75 S77 NUMBER OF PRESET CHANNELS 100 CHANNEL INDICATOR On Screen Display RF AERIAL INPUT 75 Ohm unbalanced OPERATING VOLTAGE 220 240V AC 50 Hz SOUND MULTIPLEX SYSTEMS Mono PICTURE TUBE For 14 AUDIOOUTPUTPOWER WRMS 10 THD 2 5 POWER CONSUMPTION W max 59 DIMENSIONS mm D 378 L 455 H 355 Weight Kg 10 ...

Отзывы: