background image

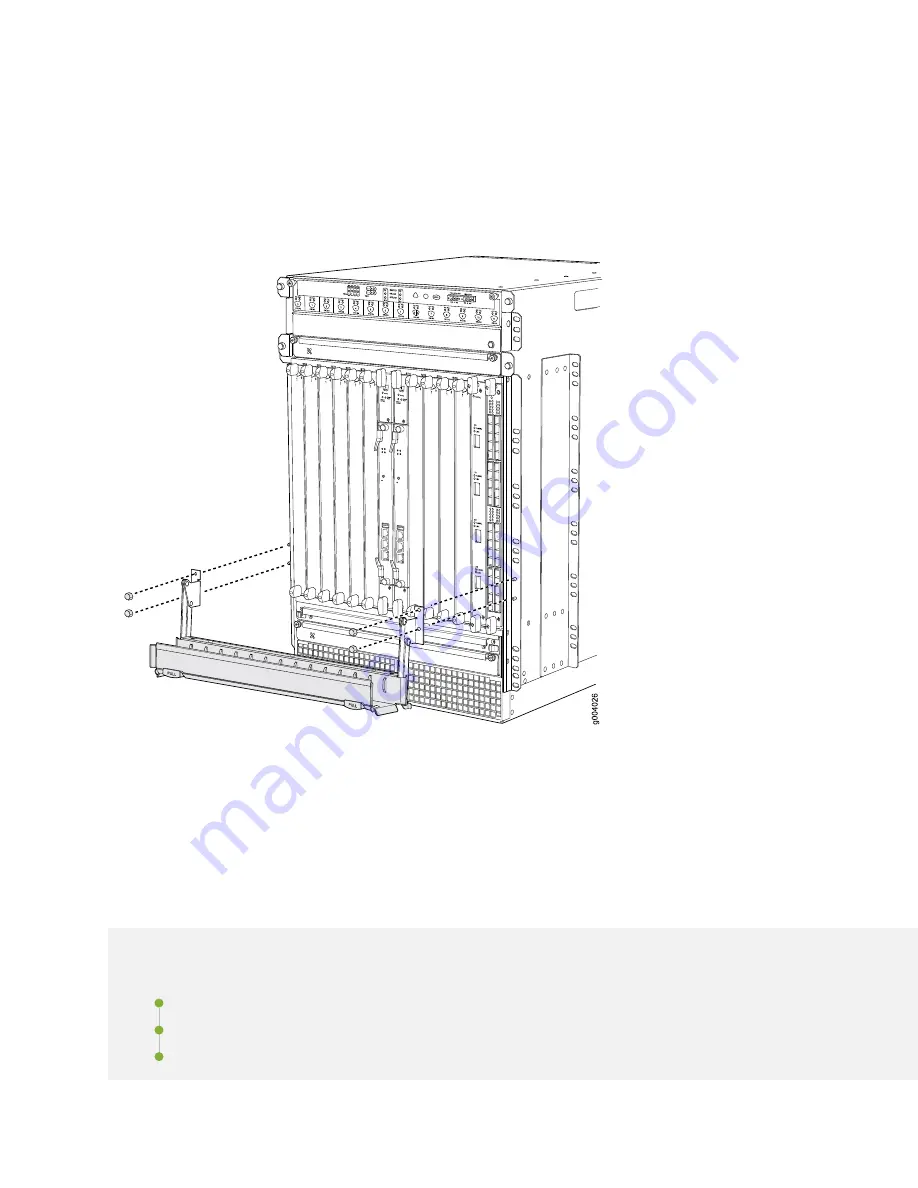
3. Insert the nuts on the corners in the standard cable manager onto the studs on the chassis.

4. Using a 7/16 in. (11 mm)nut driver, tighten the nuts securely.

Figure 155: Installing the Cable Manager

Replacing a Routing Engine in an SRX Series High-End
Chassis Cluster

IN THIS SECTION

Replacing a Routing Engine: USB Flash-Drive Method | 403

Replacing a Routing Engine: External SCP Server Method | 410

Replacing the Routing Engine: File Transfer Method | 417

402

Содержание SRX 5800

Страница 1: ...SRX5800 Services Gateway Hardware Guide Published 2020 02 10 ...

Страница 2: ...are Guide Copyright 2020 Juniper Networks Inc All rights reserved The information in this document is current as of the date on the title page YEAR 2000 NOTICE Juniper Networks hardware and software products are Year 2000 compliant Junos OS has no known time related limitations through the year 2038 However the NTP application is known to have some difficulty in the year 2036 END USER LICENSE AGRE...

Страница 3: ...ble Units 26 SRX5800 Services Gateway Component Redundancy 27 SRX5800 Chassis 28 SRX5800 Services Gateway Chassis 29 SRX5800 Services Gateway Physical Specifications 32 SRX5800 Services Gateway Midplane Description 34 SRX5800 Services Gateway Cable Manager Description 35 SRX5800 Services Gateway Craft Interface Overview 36 SRX5800 Services Gateway Craft Interface Alarm LEDs and Alarm Cutoff Lamp T...

Страница 4: ...DC Power Supply 59 SRX5800 Services Gateway High Capacity DC Power Supply LEDs 61 SRX5800 Services Gateway DC Power Supply Specifications 62 DC Power Cable Specifications for the SRX5800 Services Gateway 63 DC Power Cable Lug Specifications for the SRX5800 Services Gateway 64 DC Power Circuit Breaker Requirements for the SRX5800 Services Gateway 65 DC Power Source Cabling for the SRX5800 Services ...

Страница 5: ...ces Gateways 99 SRX5800 Services Gateway Card Cage and Slots 103 SRX5800 Services Gateway SPC Description 105 Services Processing Card SRX5K SPC 2 10 40 Specifications 105 Services Processing Card SRX5K SPC 4 15 320 Specifications 109 Services Processing Card SRX5K SPC3 Specifications 114 Modular Port Concentrator SRX5K MPC Specifications 118 MIC with 20x1GE SFP Interfaces SRX MIC 20GE SFP 120 MIC...

Страница 6: ...0 Services Gateway Cabinet Size and Clearance Requirements 170 SRX5800 Services Gateway Cabinet Airflow Requirements 170 Configuring Ambient Temperature on SRX5800 Services Gateway 171 Understanding How Configuring Ambient Temperature Helps Optimize Power Utilization 171 Monitoring the Power Consumption of SRX5800 Services Gateways Cards by Configuring the Ambient Temperature 172 Calculating Power...

Страница 7: ...eway Mounting Hardware for a Four Post Rack or Cabinet 213 Installing the SRX5800 Services Gateway Mounting Hardware in an Open Frame Rack 215 Removing Components from the SRX5800 Chassis Before Installing It in the Rack 217 Removing the Power Supplies Before Installing the SRX5800 Services Gateway Chassis 217 Removing the Cable Manager Before Installing the SRX5800 Services Gateway Chassis 218 Re...

Страница 8: ...3 Connecting Power to a DC Powered SRX5800 Services Gateway 245 Powering On a DC Powered SRX5800 Services Gateway 247 Powering Off the SRX5800 Services Gateway 249 Performing the Initial Software Configuration for the SRX5800 249 SRX5800 Services Gateway Software Configuration Overview 250 Initially Configuring the SRX5800 Services Gateway 250 Performing Initial Software Configuration Using J Web ...

Страница 9: ... Supplies 277 Replacing an SRX5800 Services Gateway AC Power Supply 278 Removing an SRX5800 Services Gateway AC Power Supply 278 Installing an SRX5800 Services Gateway AC Power Supply 281 Replacing an SRX5800 Services Gateway AC Power Supply Cord 284 Disconnecting an SRX5800 Services Gateway AC Power Supply Cord 284 Connecting an SRX5800 Services Gateway AC Power Supply Cord 285 Replacing an SRX58...

Страница 10: ...Cards and SPCs on the SRX5800 Services Gateway 340 Replacing SRX5800 Services Gateway IOCs 342 Removing an SRX5800 Services Gateway IOC 342 Installing an SRX5800 Services Gateway IOC 345 Replacing SRX5800 Services Gateway Flex IOCs 349 Removing an SRX5800 Services Gateway Flex IOC 349 Installing an SRX5800 Services Gateway Flex IOC 352 Replacing SRX5800 Services Gateway Port Modules 355 Removing a...

Страница 11: ...ng the SRX5800 Services Gateway Cable Manager 400 Installing the SRX5800 Services Gateway Cable Manager 401 Replacing a Routing Engine in an SRX Series High End Chassis Cluster 402 Replacing a Routing Engine USB Flash Drive Method 403 Replacing a Routing Engine External SCP Server Method 410 Replacing the Routing Engine File Transfer Method 417 Troubleshooting Hardware 5 Troubleshooting the SRX580...

Страница 12: ... Gateway Chassis Serial Number Label 462 Locating the SRX5800 Services Gateway Power Supply Serial Number Label 463 Locating the SRX5800 Services Gateway Craft Interface Serial Number Label 466 Information You Might Need to Supply to JTAC 467 Required Tools and Parts for Packing the SRX5800 Services Gateway 467 Packing the SRX5800 Services Gateway for Shipment 468 Packing SRX5800 Services Gateway ...

Страница 13: ...ning 501 Product Disposal Warning 503 General Electrical Safety Guidelines and Warnings 504 Prevention of Electrostatic Discharge Damage 505 AC Power Electrical Safety Guidelines 506 AC Power Disconnection Warning 508 DC Power Electrical Safety Guidelines 509 DC Power Electrical Safety Guidelines 509 DC Power Disconnection Warning 511 DC Power Grounding Requirements and Warning 513 DC Power Wiring...

Страница 14: ...ident 532 SRX5800 Services Gateway Agency Approvals 533 SRX5800 Services Gateway Compliance Statements for EMC Requirements 534 Canada 534 European Community 534 Israel 535 Japan 535 United States 535 Statements of Volatility for Juniper Network Devices 536 xiv ...

Страница 15: ...the product documentation page on the Juniper Networks website at https www juniper net documentation If the information in the latest release notes differs from the information in the documentation follow the product Release Notes Juniper Networks Books publishes books by Juniper Networks engineers and subject matter experts These books go beyond the technical documentation to explore the nuances...

Страница 16: ...1 From the HTML or PDF version of the manual copy a configuration example into a text file save the file with a name and copy the file to a directory on your routing platform For example copy the following configuration to a file and name the file ex script conf Copy the ex script conf file to the var tmp directory on your routing platform system scripts commit file ex script xsl interfaces fxp0 d...

Страница 17: ... platform commit file ex script snippet xsl 2 Move to the hierarchy level that is relevant for this snippet by issuing the following configuration mode command edit user host edit system scripts edit system scripts 3 Merge the contents of the file into your routing platform configuration by issuing the load merge relative configuration mode command edit system scripts user host load merge relative...

Страница 18: ...e text and syntax conventions used in this guide Table 2 Text and Syntax Conventions Examples Description Convention To enter configuration mode type the configure command user host configure Represents text that you type Bold text like this user host show chassis alarms No alarms currently active Represents output that appears on the terminal screen Fixed width text like this A policy term is a n...

Страница 19: ...b default metric metric Encloses optional keywords or variables angle brackets broadcast multicast string1 string2 string3 Indicates a choice between the mutually exclusive keywords or variables on either side of the symbol The set of choices is often enclosed in parentheses for clarity pipe symbol rsvp Required for dynamic MPLS only Indicates a comment specified on the same line as the configurat...

Страница 20: ...stem Click TechLibrary Feedback on the lower right of any page on the Juniper Networks TechLibrary site and do one of the following Click the thumbs up icon if the information on the page was helpful to you Click the thumbs down icon if the information on the page was not helpful to you or if you have suggestions for improvement and use the pop up form to provide feedback E mail Send your comments...

Страница 21: ...uniper net Find product documentation https www juniper net documentation Find solutions and answer questions using our Knowledge Base https kb juniper net Download the latest versions of software and review release notes https www juniper net customers csc software Search technical bulletins for relevant hardware and software notifications https kb juniper net InfoCenter Join and participate in t...

Страница 22: ...HAPTER Overview SRX5800 Services Gateway System Overview 25 SRX5800 Chassis 28 SRX5800 Services Gateway Cooling System 44 SRX5800 Power System 46 SRX5800 Host Subsystem 69 SRX5800 Line Cards and Modules 97 ...

Страница 23: ......

Страница 24: ...up to 12 additional cards of the following types Services Processing Cards SPCs provide the processing capacity to run integrated services such as firewall IPsec and IDP Modular PIC Concentrators MPCs provide Ethernet interfaces that connect the services gateway to your network I O cards IOCs provide Ethernet interfaces that connect the services gateway to your network Flex IOCs are similar to IOC...

Страница 25: ...isticated protection from Antivirus experts against malware attacks that can lead to data breaches and lost productivity Advanced persistent threats perpetrated through social networking attacks and the latest phishing scams with sophisticated e mail filtering and content blockers Lost productivity and the impact of malicious URLs and extraneous or malicious content on the network to help maintain...

Страница 26: ...ce any of these FRUs IOCs Flex IOCs Port modules of the Flex IOCs Routing Engine SCBs SPCs MPCs MICs SRX5800 Services Gateway Component Redundancy The following major hardware components are redundant Switch Control Boards SCBs The SRX5800 Services Gateway has two SCBs installed and you can install a third SCB for switch fabric redundancy The SCB of the host subsystem functions as the master and t...

Страница 27: ...to a fully configured services gateway One power supply supports approximately half of the components in the services gateway and the other power supply supports the remaining components The installation of two additional power supplies provides full power redundancy If one or two power supplies fail the remaining power supplies can provide full power to the services gateway Cooling system The coo...

Страница 28: ...inets when powered by high capacity power supplies Up to three services gateways can be installed in one standard 48 U rack if the rack can handle their combined weight which can be greater than 1 134 lb 515 kg See SRX5800 Services Gateway Physical Specifications on page 32 for physical specifications for the SRX5800 Services Gateway Mounting hardware includes front mounting flanges on the front o...

Страница 29: ...INE OK 8 FAIL ONLINE OK 9 FAIL ONLINE OK 10 FAIL ONLINE OK 11 FAIL ONLINE OK 2 6 FAIL ONLINE ACO LT YELLOW ALARM RED ALARM NC NO C NC NO C Craft interface Front mounting flange Center mounting bracket Air intake Lower fan tray Upper fan tray Air filter tray SCB0 Card slots 0 5 IOCs Card slots 7 11 Routing engine SCB1 SCB2 or Card slot 6 g030200 ESD point CHASSIS CLUSTER CONTROL 0 CHASSIS CLUSTER C...

Страница 30: ...Figure 2 Rear View of a Fully Configured AC Powered Services Gateway Chassis 31 ...

Страница 31: ...Rear View of a Fully Configured DC Powered Services Gateway Chassis SRX5800 Services Gateway Physical Specifications Table 4 on page 33 summarizes the physical specifications for the services gateway chassis 32 ...

Страница 32: ...gh capacity AC power supplies 27 8 in 70 6 cm deep from front mounting bracket to chassis rear 32 6 in 82 8 cm total depth including cable management system Depth with high capacity DC power supplies Chassis with midplane fan tray air filter and cable manager 150 lb 60 4 kg Maximum configuration 400 lb 182 kg Services gateway weight SRX5K RE 13 20 2 4 lb 1 1 kg SRX5K RE 1800X4 2 4 lb 1 1 kg Routin...

Страница 33: ...RX5800 Services Gateway Midplane Description The midplane is located toward the rear of the chassis and forms the rear of the card cage see Figure 4 on page 35 IOCs SPCs and SCBs install into the midplane from the front of the chassis and the power supplies install into the midplane from the rear of the chassis The cooling system components also connect to the midplane The midplane performs the fo...

Страница 34: ... Description The cable management system see Figure 5 on page 36 is a tray located below the card cage that has a row of fourteen dividers for securing the cables for each card Features in the cable management tray allow you to gently secure the cables with cable strips or other ties To secure the cables in place loop the tie through the cable anchor and secure the tie You can pull the cable manag...

Страница 35: ...2 FAIL ONLINE OK 3 FAIL ONLINE OK 4 FAIL ONLINE OK FAN RE 0 RE 1 ACO LT MASTER ONLINE OFFLINE PEM 1 0 0 1 2 3 5 FAIL ONLINE OK 0 FAIL ONLINE OK 1 FAIL ONLINE OK 2 6 FAIL ONLINE OK 7 FAIL YELLOW ALARM RED ALARM NC NO C NC NO C ONLINE OK 8 FAIL ONLINE OK 9 FAIL ONLINE OK 10 FAIL ONLINE OK 11 FAIL ONLINE Alarm relay contacts Yellow alarm LED Red alarm LED Alarm cutoff button IOC and SPC LEDs and onli...

Страница 36: ...7 describes the alarm LEDs and alarm cutoff button in more detail Table 5 Alarm LEDs and Alarm Cutoff Lamp Test Button Description State Color Shape Critical alarm LED Indicates a critical condition that can cause the device to stop functioning Possible causes include component removal failure or overheating On steadily Red Warning alarm LED Indicates a serious but nonfatal error condition such as...

Страница 37: ...age 38 describes the functions of the power supply LEDs on the craft interface Table 7 Power Supply LEDs on the Craft Interface Description State Color Label Power supply is functioning normally On steadily Green PEM Power supply has failed or power input has failed On steadily Red SRX5800 Services Gateway Craft Interface Card OK Fail LEDs Each slot in the card cage has a pair of LEDs on the craft...

Страница 38: ...te Color Label Fan tray is functioning normally On steadily Green OK Fan tray has failed On steadily Red FAIL SRX5800 Services Gateway Craft Interface Online Buttons The craft interface has a row of Online Offline buttons along its lower edge Each button corresponds to one slot in the card cage The Online Offline buttons are only supported for slots containing MPC interface cards You can install M...

Страница 39: ...and to check the status of installed MPCs As shown in the sample output the value Offline in the column labeled State indicates that the MPC in slot 1 is now offline user host show chassis fpc Slot State C Total Interrupt DRAM MB Heap Buffer 0 Online 35 4 0 1024 13 25 1 Online 47 3 0 1024 13 25 2 Online 37 8 0 2048 18 14 An MPC can also be taken offline via CLI command user host request chassis fp...

Страница 40: ...hassis fpc command to check the status of installed MPCs As shown in the sample output the value Online in the column labeled State indicates that the MPC in slot 1 is functioning normally Verify if the MPC is offline user host show chassis fpc node0 Temp CPU Utilization Memory Utilization Slot State C Total Interrupt DRAM MB Heap Buffer 0 Online 37 23 0 2048 19 14 1 Offline Offlined by cli comman...

Страница 41: ...e craft interface has two alarm relay contacts for connecting the device to external alarm devices see Figure 7 on page 42 Whenever a system condition triggers either the major or minor alarm on the craft interface the alarm relay contacts are also activated The alarm relay contacts are located on the upper right of the craft interface Figure 7 Alarm Relay Contacts The alarm relay contacts consist...

Страница 42: ...and NC is open Normally Open NO Table 11 on page 43 shows the electrical specifications for the alarm relay contacts Table 11 Alarm Relay Contact Electrical Specifications Current Type DC AC 30 250 Maximum Voltage 8 A Maximum Current Figure 8 on page 43 shows an example wiring diagram for a simple alarm reporting device In this case the device is a 12 volt light bulb that illuminates when the devi...

Страница 43: ...rd capacity power supplies are installed The high capacity fan tray has 12 fans that operate at 976 cubic feet per minute CFM at full speed and is required when high capacity power supplies are installed When high capacity fan trays are installed you must also install the high capacity air filter tray The fan trays are interchangeable and are hot insertable and hot removable Figure 9 Airflow Throu...

Страница 44: ...n through the upper fan tray where it combines in a common exhaust plenum and is exhausted out the upper rear of the system Figure 10 Standard Capacity Fan Tray Same Upper and Lower g004022 Figure 11 High Capacity Fan Tray Same Upper and Lower g030294 Figure 12 Air Filter g004072 Figure 13 Standard Capacity Air Filter Tray g004071 45 ...

Страница 45: ...eway 57 SRX5800 Services Gateway Standard Capacity DC Power Supply 57 SRX5800 Services Gateway Standard Capacity DC Power Supply LEDs 58 SRX5800 Services Gateway High Capacity DC Power Supply 59 SRX5800 Services Gateway High Capacity DC Power Supply LEDs 61 SRX5800 Services Gateway DC Power Supply Specifications 62 DC Power Cable Specifications for the SRX5800 Services Gateway 63 DC Power Cable Lu...

Страница 46: ...f Any Power Supply Type Shared 3 1 1700 W AC standard capacity Zoned 2 2 1700 W One AC input AC high capacity 4100 W Two AC inputs 1700 W DC standard capacity 1700 W One DC input DC high capacity 4100 W Two DC inputs NOTE The services gateway must be running Junos OS Release 10 4 or later in order to use high capacity AC power supplies The services gateway must be running Junos OS Release 12 1X44 ...

Страница 47: ...lly within a fully populated system Four power supplies provide full power redundancy If one power supply fails or is removed the remaining power supplies instantly assume the entire electrical load without interruption Three power supplies provide the maximum configuration with full power for as long as the services gateway is operational When the services gateway is powered by either standard or...

Страница 48: ... power the two zones while four power supplies provide full redundancy for both zones The power supplies in slots PEM0 and PEM2 form a redundant pair as do the power supplies in slots PEM1 and PEM3 When two power supplies are installed for a zone they share the load If a power supply fails its redundant power supply assumes the full load of that zone without interruption If you do install only two...

Страница 49: ...age 239 for instructions Figure 16 Standard Capacity AC Power Supply SRX5800 Services Gateway Standard Capacity AC Power Supply LEDs Each standard capacity AC power supply faceplate contains three LEDs that indicate the status of the power supply see Table 14 on page 51 The power supply status is also reflected in two LEDs on the craft interface In addition a power supply failure triggers the red ...

Страница 50: ...ch Two high capacity power supplies are required and you can install four high capacity power supplies for redundancy Each high capacity AC power supply has two corresponding AC appliance inlets one located in the chassis directly above the power supply and one located near the top edge of the power supply itself For each power supply you connect one power cord to the inlet on the chassis above th...

Страница 51: ...al plate The input mode switch tells the system the number of AC power feeds it should expect The input mode switch settings are described in Table 15 on page 52 The default setting is 1 Table 15 High Capacity AC Power Supply Input Mode Switch Settings Result AC Inputs Mode Switch Setting DC output of 4100 W DC OK LED lights Both AC inlets powered 1 DC output of 1700 W DC OK LED lights Only one AC...

Страница 52: ...ge 239 for instructions Figure 17 High Capacity AC Power Supply g004710 0 1 1 0 SRX5800 Services Gateway High Capacity AC Power Supply LEDs Each high capacity AC power supply faceplate contains four LEDs that indicate the status of the power supply see Table 16 on page 54 The power supply status is also reflected in two LEDs on the craft interface In addition a power supply failure triggers the re...

Страница 53: ...ower supply are not within the normal operating ranges Off Green DC OK DC power outputs generated by the power supply are within the normal operating ranges On Power supply is functioning normally Off Red PS FAIL Power supply is not functioning normally Check the AC 1 OK AC 2 OK and DC OK LEDs for more information On SRX5800 Services Gateway AC Power Supply Specifications Table 17 on page 54 lists...

Страница 54: ... 8200 W 5100 W Output power maximum per system AC Power Cord Specifications for the SRX5800 Services Gateway Each AC power supply has a single AC appliance inlet located in the chassis directly above the power supply that requires a dedicated AC power feed Most sites distribute power through a main conduit that leads to frame mounted power distribution panels one of which can be located at the top...

Страница 55: ...Country SAA 3 240 VAC 50 Hz AC CBL M PWR RA AU Australia PSB 10 220 VAC 50 Hz AC CBL M PWR RA CH China CEE 7 7 220 or 230 VAC 50 Hz AC CBL M PWR RA EU Europe except Denmark Italy Switzerland and United Kingdom CEI 23 16 VII 230 VAC 50 Hz AC CBL M PWR RA IT Italy NEMA L6 20P 220 VAC 50 or 60 Hz AC CBL M PWR RA JP Japan NEMA L6 20P 250 VAC 60 Hz AC CBL M PWR RA TWLK US North America BS89 13 240 VAC ...

Страница 56: ...CEC Section 4 010 3 The cords listed in Table 19 on page 56 are in compliance AC Power Circuit Breaker Requirements for the SRX5800 Services Gateway Each AC power supply has a single AC appliance inlet located in the chassis directly above the power supply that requires a dedicated AC power feed We recommend that you use a dedicated customer site circuit breaker rated for 15 A 250 VAC minimum for ...

Страница 57: ... DC Power Supply SRX5800 Services Gateway Standard Capacity DC Power Supply LEDs Each standard capacity DC power supply faceplate contains three LEDs that indicate the status of the power supply see Table 20 on page 59 The power supply status is also reflected in two LEDs on the craft interface In addition a power supply failure triggers the red alarm LED on the craft interface 58 ...

Страница 58: ...plies for redundancy Each high capacity DC power supply has inlets for two DC power feeds The four power connectors 48V and RTN for each of the two inlets are located behind a clear plastic cover near the bottom of the power supply Each DC power inlet you use requires a dedicated DC power feed and a dedicated 80 A circuit breaker See Figure 20 on page 61 NOTE The services gateway cannot be powered...

Страница 59: ...lt AC Inputs Mode Switch Setting DC output of 4100 W DC OK LED lights Both DC inlets powered 1 DC output of 1700 W DC OK LED lights Only one DC inlet powered DC output of 4100 W DC OK LED lights Both DC inlets powered 0 DC output disabled DC OK LED unlit Only one DC inlet powered NOTE We recommend that you set the input mode switch to 1 and connect two DC input feeds to each high capacity DC power...

Страница 60: ... LEDs Each high capacity DC power supply faceplate contains four LEDs that indicate the status of the power supply see Table 22 on page 62 The power supply status is also reflected in two LEDs on the craft interface In addition a power supply failure triggers the red alarm LED on the craft interface 61 ...

Страница 61: ...thin the normal operating ranges Off Green DC OK DC power outputs generated by the power supply are within the normal operating ranges On Power supply is functioning normally Off Red PS FAIL Power supply is not functioning normally Check the INP0 OK INP1 OK and DC OK LEDs for more information On SRX5800 Services Gateway DC Power Supply Specifications Table 23 on page 62 lists the DC power supply e...

Страница 62: ... 24 on page 63 lists the power system electrical specifications Table 24 Power System Electrical Specifications High Capacity Normal Capacity Item 2 2 2 2 Redundancy One feed mode Two feed mode 2800 W Output power maximum per supply 1700 W 4100 W 3400 W 8200 W 5600 W Output power maximum per system DC Power Cable Specifications for the SRX5800 Services Gateway Table 25 on page 63 summarizes the sp...

Страница 63: ... to the terminal studs of each power supply see Figure 21 on page 64 Figure 21 DC Power Cable Lug Crimp area 6 AWG conductor All measurements in inches 0 28 diameter each hole 2 25 0 25 0 37 0 625 g001188 0 55 End view 0 08 CAUTION Before services gateway installation begins a licensed electrician must attach a cable lug to the grounding and power cables that you supply A cable with an incorrectly...

Страница 64: ...not supplying power or not present Use a customer site circuit breaker rated according to respective National Electrical Code and customer site internal standards to maintain proper level of protection for the current specified above If you plan to operate a DC powered services gateway at less than the maximum configuration we recommend that you provision a circuit breaker according to respective ...

Страница 65: ...eway Chassis Grounding Point Specifications WARNING To meet safety and electromagnetic interference EMI requirements and to ensure proper operation you must properly ground the services gateway chassis before connecting power See Grounding the SRX5800 Services Gateway on page 239 for instructions CAUTION Before services gateway installation begins a licensed electrician must attach cable lugs to t...

Страница 66: ...ble to earth ground and then attach it to the chassis grounding point using the two screws provided NOTE Additional grounding is provided to an AC powered services gateway when you plug its power supplies into grounded AC power receptacles SRX5800 Services Gateway Grounding Cable Specifications The grounding cable that you provide must meet the specifications in Table 26 on page 67 Table 26 Ground...

Страница 67: ...ug that attaches to the grounding cable see Figure 24 on page 68 and two UNC 1 4 20 screws used to secure the grounding cable to the grounding points Figure 24 Grounding Cable Lug Crimp area 6 AWG conductor All measurements in inches 0 28 diameter each hole 2 25 0 25 0 37 0 625 g001188 0 55 End view 0 08 CAUTION Before services gateway installation begins a licensed electrician must attach a cable...

Страница 68: ... RE 13 20 Specifications 85 Routing Engine SRX5K RE 1800X4 Overview 89 Routing Engine SRX5K RE 1800X4 Specifications 90 Routing Engine SRX5K RE3 128G Specifications 93 SRX5800 Services Gateway Host Subsystem Description The host subsystem is composed of a Routing Engine installed in a Switch Control Board SCB The host subsystem provides the routing and system management functions of the services g...

Страница 69: ... or SRX5K SCB4 The host subsystem has three LEDs that display its status The host subsystem LEDs are located in the middle of the craft interface Switch Control Board SRX5K SCB Overview The Switch Control Board SCB provides the following functions Powers on and powers off IOCs and SPCs Controls clocking system resets and booting Monitors and controls system functions including fan speed board powe...

Страница 70: ...ird SCB card if SRX5K SPC 4 15 320 SPC2 is installed with SCB1 SRX5K SCB If you have installed a SPC2 on a SRX5800 Services Gateway with a redundant SCB1 card make sure to remove the redundant SCB1 card SCBs install vertically into the front of the chassis The SCB slots are located at the middle of the card cage and are labeled 0 1 and 2 6 If any slots are empty you must install a blank panel SCBs...

Страница 71: ...rocessing Cards SPCs Controls clocking system resets and booting Monitors and controls system functions including fan speed board power status PDM status and control and the system front panel Provides interconnections to all the IOCs within the chassis through the switch fabrics integrated into the SCB SRX5400 and SRX5600 Services Gateways have one SCB each installed and you can install a second ...

Страница 72: ...the IOCs Control FPGA Provides the Peripheral Component Interconnect PCI interface to the Routing Engine 1000Base T Ethernet controller Provides a 1 Gbps Ethernet link between the Routing Engines Ethernet switch Provides 1 Gbps link speeds between the Routing Engine and the IOCs Circuits for chassis management and control Power circuits for the Routing Engine and SCB SCB with slot for Routing Engi...

Страница 73: ...ating normally Red The SCB has failed and is not operating normally Off The SCB is powered down FABRIC ONLY LED Green The SCB is operating in fabric only mode Off The SCB is operating in fabric control board mode FABRIC ACTIVE LED Green The fabric is in active mode LEDs The serial number label is located as shown in Figure 27 on page 74 Figure 27 SCB Serial Number Label g004068 Serial number ID la...

Страница 74: ...f 120 Gbps per slot with redundant fabric support and improved fabric performance by using the next generation fabric XF chip A centralized clocking architecture that supports clock cleanup and distribution The Stratum 3 clock module performs clock monitoring filtering and holdover in a centralized chassis location Full performance with fabric redundancy for higher capacity line cards such as the ...

Страница 75: ...ovide a 1 Gbps Ethernet link between the Routing Engines Power circuits for the Routing Engine and the SRX5K SCBE LEDs Provides status of the SRX5K SCBE and clocking interface SRX5K SCBE with slot for Routing Engine Maximum throughput 120 Gbps per slot Description Junos OS Release 12 1X47 D15 and later Software release Slot for Routing Engine Cables and connectors None Controls SRX5400 Only bottom...

Страница 76: ...ial number location SRX5K SCBE LEDs Table 28 on page 77 describes the SRX5K SCBE LEDs and their states Table 28 SRX5K SCBE LEDs Description State Color Label Fabric is in active mode On steadily Green FABRIC ACTIVE SRX5K SCBE operates in fabric only mode On steadily Green FABRIC ONLY SRX5K SCBE operates in fabric control board mode Off None 77 ...

Страница 77: ...and fabric link speed of 8 36 Gbps supports a bandwidth of 205 Gbps per slot with redundant fabric support and 308 Gbps per slot without redundancy With the enhanced midplane and fabric link speed of 10 2 Gbps supports a bandwidth of 249 Gbps per slot with redundant fabric support and 374 Gbps per slot without redundancy with the enhanced midplane Improved fabric performance with the next generati...

Страница 78: ...rol field programmable gate array FPGA to provide the Peripheral Component Interconnect PCI interface to the Routing Engine Circuits for chassis management and control Power circuits for the Routing Engine and SCB3 LEDs to provides status of the SCB3 SCB3 with slot for Routing Engine Description Junos OS Release 15 1X49 D10 and later Software release Slot for Routing Engine Cables and connectors N...

Страница 79: ...Ds Table 29 on page 80 describes the SCB3 LEDs and their states Table 29 SRX5K SCB3 LEDs Description State Color Label Fabric is in active mode On steadily Green FABRIC ACTIVE SCB3 is online On steadily Green OK FAIL SCB3 has failed On steadily Red SCB3 is offline Off Port is enabled and link is established On steadily Green LINK Port is disabled or no link is established Off 80 ...

Страница 80: ...ces Gateways You can change the fabric mode of SCB4 from Increased Fabric Bandwidth mode to Redundant Fabric mode using the CLI If you change the fabric mode of SCB4 to Redundant Fabric mode you must install two SCB4s in SRX5600 and you can install either two or three SCB4s in SRX5800 Services Gateways If you are upgrading from SCB3 Redundant Fabric mode is the default fabric mode in SCB2 and SCB3...

Страница 81: ...ifications SRX5K SCB4 SCB4 consists of the following components LEDs to provides status of the SCB4 Circuits for chassis management and control Power circuits for the Routing Engine and SCB4 SCB4 with slot for SRX5K RE 1800X4 and SRX5K RE3 128G Routing Engines Description Junos OS Release 19 3R1 and later Software release Slot for Routing Engine Cables and connectors 82 ...

Страница 82: ...reliable power and cooling you must install SRX Series high capacity power supplies and fan trays in the SRX Series chassis Cooling requirement Weight 13 6 lb 6 2 kg Width 15 7 in 39 87 cm Depth 21 2 in 53 85 cm Height 1 2 in 3 05 cm Weight and Dimensions The serial number label is located as shown in Figure 33 on page 83 Figure 33 SRX5K SCB4 Serial Number Label g100577 Serial number ID label Seri...

Страница 83: ...ntel based PC platform that runs Junos OS Software processes that run on the Routing Engine maintain the routing tables manage the routing protocols used on the device control the device interfaces control some chassis components and provide the interface for system management and user access to the device You must install at least one Routing Engine in the services gateway You can install a secon...

Страница 84: ...a USB memory card that allows you to load Junos OS Figure 34 SRX5K RE 13 20 Routing Engine For detailed information about the Routing Engines supported by the services gateway see the SRX5400 SRX5600 and SRX5800 Services Gateway Card Reference at www juniper net documentation Routing Engine SRX5K RE 13 20 Specifications The SRX5K RE 13 20 Routing Engine Figure 35 on page 86 is an Intel based PC pl...

Страница 85: ...ntrol link feature you install it in the slot in the front panel of SCB1 The Routing Engine consists of the following components CPU Runs Junos OS to maintain the services gateway s routing tables and routing protocols It has a Pentium class processor DRAM Provides storage for the routing and forwarding tables and for other Routing Engine processes USB port Provides a removable media interface thr...

Страница 86: ... auxiliary device through a cable with an RJ 45 connector CONSOLE Connects the Routing Engine to a system console through a cable with an RJ 45 connector ETHERNET Connects the Routing Engine through an Ethernet connection to a management LAN or any other device that plugs into an Ethernet connection for out of band management Cables and connectors RESET button Reboots the Routing Engine when press...

Страница 87: ...ways be lit OK FAIL LED one bicolor Off The Routing Engine is operating normally Red The Routing Engine has failed and is not operating normally ONLINE LED Blinking green The Routing Engine is coming online Steady green The Routing Engine is functioning normally LEDs The serial number label is located on the right side of the top of the Routing Engine as shown in Figure 36 on page 88 Figure 36 SRX...

Страница 88: ...stem administrators can issue Junos OS CLI commands to manage the services gateway The ports function as follows AUX Connects the Routing Engine to a laptop modem or other auxiliary device through a serial cable with an RJ 45 connector CONSOLE Connects the Routing Engine to a system console through a serial cable with an RJ 45 connector ETHERNET Connects the Routing Engine through an Ethernet conn...

Страница 89: ...ace through which you can install the Junos OS manually Junos OS supports USB version 1 0 and 2 0 CompactFlash card Provides primary storage for software images configuration files and microcode The CompactFlash card is fixed and is inaccessible from outside the device Solid state drive SSD Provides secondary storage for log files for generating core files and for rebooting the system if the Compa...

Страница 90: ...anagement LAN or any other device that plugs into an Ethernet connection for out of band management Cables and connectors RESET button Reboots the Routing Engine when pressed Controls Front panel slot in an SCB installed in SRX5400 Bottom slot 0 SRX5600 Bottom slots 0 or 1 SRX5800 Center slots 0 or 1 NOTE The services gateway host subsystem Routing Engine must be installed in the SCB in slot 0 A R...

Страница 91: ...ed directly on the faceplate of the Routing Engine Table 31 on page 92 describes the Routing Engine LEDs and their states Table 31 SRX5K RE 1800X4 LEDs Description State Color Label Routing Engine is the master On steadily Blue MASTER Indicates activity on the SSD or CompactFlash card Blinking Green STORAGE Routing Engine is transitioning online Blinking Green ONLINE Routing Engine is functioning ...

Страница 92: ...ng Engine Figure 39 SRX5K RE3 128G Routing Engine Front View g100572 2 1 3 4 5 8 6 7 9 10 6 1 ONLINE OFFLINE button Extractor clips 7 2 SSD LEDs DISK1 and DISK2 Auxiliary port AUX 8 3 USB ports USB1 and USB2 Console port CONSOLE 9 4 RESET button Management port MGMT 10 5 SSD card slot cover Routing Engine status LEDs ONLINE OK FAIL and MASTER Routing Engine for SRX5400 SRX5600 and SRX5800 Services...

Страница 93: ...hen pressed Controls Front panel slot in an SCB installed in SRX5400 Bottom slot 0 SRX5600 Bottom slots 0 or 1 SRX5800 Center slots 0 or 1 NOTE The services gateway host subsystem Routing Engine must be installed in the SCB in slot 0 A Routing Engine installed in an SCB in slot 1 only enables dual control links in chassis cluster configurations NOTE In the SRX5600 or SRX5800 Services Gateways chas...

Страница 94: ...ing Engine DRAM Provides storage for the routing and forwarding tables and for other Routing Engine processes One 10 Gigabit Ethernet interface between the Routing Engine and Switch Control Board Extractor clips Control the locking system that secures the Routing Engine Interface ports The AUX CONSOLE and MGMT ports provide access to management devices Each Routing Engine has one 10 100 1000 Mbps ...

Страница 95: ...hen pressed SSD1 primary and SSD2 secondary Solid state drives SSD Two 200 GB each slim solid state drives that provide storage for software images configuration files microcode log files and memory dumps The Routing Engine reboots from SSD2 when boot from primary SSD1 fails Captive screws Secures the Routing Engine SRX5K RE3 128G Routing Engine LEDs Each Routing Engine has four LEDs that indicate...

Страница 96: ...5K RE3 128G Routing Engine follows this sequence the USB device SSD1 SSD2 and LAN SSD1 is the primary boot device The boot sequence is tried twice for SSD1 and SSD2 SRX5800 Line Cards and Modules IN THIS SECTION SRX5400 SRX5600 and SRX5800 Services Gateway Card Overview 98 Cards Supported on SRX5400 SRX5600 and SRX5800 Services Gateways 99 SRX5800 Services Gateway Card Cage and Slots 103 SRX5800 S...

Страница 97: ...X5800 Services Gateways I O cards IOCs provide additional physical network connections to the services gateway Their primary function is to deliver data packets arriving on the physical ports to the Services Processing Cards SPCs and to forward data packets out the physical ports after services processing Flex IOCs have two slots for port modules that add additional physical network connections to...

Страница 98: ...some chassis components and provide the interface for system management and user access to the device Port modules fit into slots in Flex IOCs and add additional physical network interface ports to the services gateway Modular Interface Cards MICs fit into slots in MPCs and add additional physical network interface ports to the services gateway MPCs and MICs are similar in form and function to Fle...

Страница 99: ...age 114 Interface Cards 15 1X49 9 2 Not supported I O Card SRX5K 40GE SFP Specifications on page 149 15 1X49 9 2 Not supported I O Card SRX5K 4XGE XFP Specifications on page 151 15 1X49 10 2 Not supported Flex I O Card SRX5K FPC IOC Specifications on page 153 12 1X46 D10 12 1X46 D10 Modular Port Concentrator SRX5K MPC Specifications on page 118 15 1X49 D10 15 1X49 D10 SRX5K MPC3 40G10G Specificati...

Страница 100: ...X5K SCBE Specifications on page 76 15 1X49 D10 15 1X49 D10 Switch Control Board SRX5K SCB3 Specifications on page 79 19 3R1 Not supported Switch Control Board SRX5K SCB4 Specifications on page 82 Other modules 10 2 Not supported Flex I O Card Port Module SRX IOC 16GE SFP Specifications on page 155 10 2 Not supported Flex I O Card Port Module SRX IOC 16GE TX Specifications on page 157 10 2 Not supp...

Страница 101: ...IC with 10x10GE SFP Interfaces SRX MIC 10XG SFPP on page 126 12 1X47 D10 12 1X47 D10 MIC with 20x1GE SFP Interfaces SRX MIC 20GE SFP on page 120 15 1X49 9 2 12 1X46 D10 Routing Engine SRX5K RE 13 20 Specifications on page 85 12 1X47 D15 12 1X47 D15 Routing Engine SRX5K RE 1800X4 Specifications on page 90 19 3R1 19 3R1 Routing Engine SRX5K RE3 128G Specifications on page 93 Figure 41 on page 103 is...

Страница 102: ...0 SRX5400 SRX5K SCB SRX5K RE 13 20 SRX5K SCB3 SRX5K RE 1800X4 SRX5K SPC 2 10 40 SRX5K SPC 4 15 320 SRX5K SPC3 SRX5K MPC3 40G10G SRX5K MPC3 100G10G SRX5K IOC4 10G SRX5K IOC4 MRAT SRX5K SCB3 SRX5K RE3 128G SRX5600 SRX5800 SRX5K SCB4 SRX5K RE3 128G SRX5600 SRX5800 SRX5K SCB4 SRX5K RE 1800X4 SRX5K 4XGE XFP SRX5K 40GE SFP SRX5K FPC IOC SRX5K MPC SRX MIC 20GE SFP SRX MIC 10XG SFPP SRX MIC 1X100G CFP SRX...

Страница 103: ...C Flex IOC or MPC SPC3 SPC X X X 0 leftmost X X X X 1 X X X X 2 X X X X 3 X X X X 4 X X X X 5 X 0 X 1 X X X X X 2 6 X X X X 7 X X X X 8 X X X X 9 X X X X 10 X X 11 rightmost NOTE For operational and cooling efficiency in SRX5800 Services Gateways we recommend that slot 0 and 11 be filled last 104 ...

Страница 104: ... reserved for Switch Control Board SCB If a slot is not occupied by a card you must install a blank panel to shield the empty slot and to allow cooling air to circulate properly through the device Figure 42 on page 105 shows a typical SPC supported on the services gateway Figure 42 Typical SPC g030302 For detailed information about SPCs supported by the services gateway see the SRX5400 SRX5600 and...

Страница 105: ... on the services gateway Figure 43 Services Processing Card SRX5K SPC 2 10 40 Each SPC consists of the following components SPC cover which functions as a ground plane and a stiffener Two small form factor pluggable SFP chassis cluster control ports for connecting multiple devices into a redundant chassis cluster See Chassis Cluster User Guide for SRX Series Devices for more information about conn...

Страница 106: ...SPC with two SPUs Description Junos OS Release 9 2 and later Software release CHASSIS CLUSTER CONTROL 0 and CHASSIS CLUSTER CONTROL 1 SFP ports for control links in chassis cluster configurations Supported SFP transceivers 1000BASE LH model numbers SRX SFP 1GE LH SRX SFP 1GE LH ET 1000BASE LX model numbers SRX SFP 1GE LX SRX SFP 1GE LX ET 1000BASE SX model numbers SRX SFP 1GE SX SRX SFP 1GE SX ET ...

Страница 107: ...eachable or the other node is no longer part of a cluster because it has been disabled by the dual membership and detection recovery process in reaction to a control link or fabric link failure Amber All cluster members are present but an error condition has compromised the performance and resiliency of the cluster The reduced bandwidth could cause packets to be dropped or could result in reduced ...

Страница 108: ...vices processing applied to it Traffic is intelligently distributed by I O cards IOCs to SPUs for services processing The services gateway must have at least one SPC installed You can install additional SPCs to increase services processing capacity You can install SPCs in any of the slots that are not reserved for Switch Control Boards SCBs If a slot is not occupied by a card you must install a bl...

Страница 109: ...per Networks device that uses a third party optic or cable the Juniper Networks Technical Assistance Center JTAC can help you diagnose the source of the problem Your JTAC engineer might recommend that you check the third party optic or cable and potentially replace it with an equivalent Juniper Networks optic or cable that is qualified for the device Fabric interfaces Two Gigabit Ethernet interfac...

Страница 110: ...s reserved for SCB RE SRX5600 Any slot except the bottom slots 0 or 1 which are reserved for SCB RE SRX5800 Any slot except the slots 0 or 1 which are reserved for SCB RE Supported Slots 475 W typical 585 W maximum NOTE In the SRX5600 and SRX5800 Services Gateways you must have high capacity power supplies either AC or DC and high capacity fan trays installed in the services gateway in order to in...

Страница 111: ...LEDs 112 ...

Страница 112: ...use it has been disabled by the dual membership and detection recovery process in reaction to a control link or fabric link failure Amber All cluster members are present but an error condition has compromised the performance and resiliency of the cluster The reduced bandwidth could cause packets to be dropped or could result in reduced resiliency because a single point of failure might exist The e...

Страница 113: ... processing power to run integrated services such as firewall IPsec and IDP see Figure 47 on page 115 All traffic traversing the services gateway is passed to an SPU to have services processing applied to it Traffic is intelligently distributed by I O cards IOCs to SPUs for services processing The services gateway must have at least one SPC installed You can install additional SPCs to increase ser...

Страница 114: ...ssis clusters CAUTION If you face a problem running a Juniper Networks device that uses a third party optic or cable the Juniper Networks Technical Assistance Center JTAC can help you diagnose the source of the problem Your JTAC engineer might recommend that you check the third party optic or cable and potentially replace it with an equivalent Juniper Networks optic or cable that is qualified for ...

Страница 115: ...lots 0 or 1 which are reserved for SCB RE Supported Slots 650 W maximum NOTE In the SRX5600 and SRX5800 Services Gateways you must have high capacity power supplies either AC or DC and high capacity fan trays installed in the services gateway in order to install and use SRX5K SPC3 SPCs If you do not have high capacity power supplies and fan trays installed the services gateway will log an alarm co...

Страница 116: ...er is missing or unreachable or the other node is no longer part of a cluster because it has been disabled by the dual membership and detection recovery process in reaction to a control link or fabric link failure Amber All cluster members are present but an error condition has compromised the performance and resiliency of the cluster The reduced bandwidth could cause packets to be dropped or coul...

Страница 117: ...must install at least one interface card in the services gateway The interface card can be of any of the available IOC Flex IOC or MPC types You can add just one MIC or you can add two MICs of the same or different types You can install MPCs in any of the slots that are not reserved for Switch Control Boards SCBs If a slot in the SRX5400 SRX5600 or SRX5800 Services Gateway card cage is not occupie...

Страница 118: ...installing an SRX5K MPC in an SRX5400 Services Gateway the session distribution mode will only function when hash based mode is configured or set as the default The normal mode is not supported A 9 drop is observed for PPS throughput when moving from session mode to hash mode for SRX5K MPC or non MPCs whereas no drop in performance is observed on CPS connection per second and session capacity numb...

Страница 119: ...at the devices have adequate power to support SRX5K MPCs Power requirement Approximately 10 lb 4 5 kg without MICs Weight OK FAIL LED one bicolor Green The MPC is operating normally Blinking green The MPC is transitioning to online or offline Red The MPC has failed and is not operating normally Off The MPC is powered down LEDs The serial number label is yellow and is located on the opposite side o...

Страница 120: ... Sockets for 20 SFP Gigabit Ethernet transceivers Supported SFP transceivers 1000BASE LX model numbers SRX SFP 1GE LX SRX SFP 1GE LX ET 1000BASE SX model numbers SRX SFP 1GE SX SRX SFP 1GE SX ET 1000BASE T model numbers SRX SFP 1GE T SRX SFP 1GE T ET Cables and connectors Approximately 1 2 lb 0 54 kg Weight OK FAIL LED one bicolor Green MIC is operating normally Red MIC has failed Off MIC is power...

Страница 121: ...Port and Interface Numbering 122 ...

Страница 122: ...SDH interface xe 10 Gigabit Ethernet interface For a complete list of media types see Interface Naming Overview fpc Slot in which the MPC is installed in an SRX5400 SRX5600 or SRX5800 Services Gateway pic Two Logical PICs on the MIC numbered 0 or 1 when installed in the first slot and 2 or 3 when installed in the second slot port Port number Figure 50 on page 123 shows the SRX MIC 20GE SFP MIC ins...

Страница 123: ... 3 user host show chassis hardware node1 Slot 1 Online SRX5k SPC II PIC 0 Online SPU Cp PIC 1 Online SPU Flow PIC 2 Online SPU Flow PIC 3 Online SPU Flow Slot 2 Online SRX5k IOC II PIC 0 Online 10x 1GE LAN SFP PIC 1 Online 10x 1GE LAN SFP PIC 2 Online 10x 1GE LAN SFP PIC 3 Online 10x 1GE LAN SFP primary node1 The show interfaces terse command output displays the Gigabit Ethernet interfaces that co...

Страница 124: ... 1 0 up down ge 2 1 1 up up ge 2 1 2 up down ge 2 1 3 up down ge 2 1 4 up up ge 2 1 5 up down ge 2 1 6 up down ge 2 1 7 up down ge 2 1 8 up up ge 2 1 9 up up ge 2 2 0 up down ge 2 2 1 up down ge 2 2 2 up down ge 2 2 3 up down ge 2 2 4 up down ge 2 2 5 up down ge 2 2 6 up down ge 2 2 7 up down ge 2 2 8 up down ge 2 2 9 up down ge 2 3 0 up down ge 2 3 1 up down ge 2 3 2 up down ge 2 3 3 up down ge 2...

Страница 125: ...s shown only for reference and is never used for any purpose Serial number location MIC with 10x10GE SFP Interfaces SRX MIC 10XG SFPP You use MICs and MPCs to add different combinations of Ethernet interfaces to your services gateway to suit the specific needs of your network The SRX MIC 10XG SFPP see Figure 52 on page 127 can be installed in an MPC to add ten 10 Gigabit Ethernet SFP ports 126 ...

Страница 126: ...Release 12 1X46 D10 Software release Sockets for ten 10 Gbps SFP transceivers See Hardware Compatibility Tool for the transceivers supported Cables and connectors Either slot in SRX5K MPC Supported slots Approximately 1 6 lb 0 7 kg Weight OK FAIL LED one bicolor Green The MIC is operating normally Red The MIC has failed and is not operating normally Off The MIC is powered down LINK LED single colo...

Страница 127: ...Port and Interface Numbering 128 ...

Страница 128: ... MIC numbered 0 when installed in the first slot or 2 when installed in the second slot port Port number Figure 53 on page 129 shows the port and interface numbering of an SRX MIC 10XG SFPP MIC when it is installed in slot 0 of an MPC in slot 2 of an SRX5400 SRX5600 or SRX5800 Services Gateway Figure 53 SRX MIC 10XG SFPP Port and Interface Numbering 0 1 2 3 4 5 6 7 8 9 g100071 xe 2 0 0 xe 2 0 1 xe...

Страница 129: ... 0 0 up up ip 0 0 0 up up lt 0 0 0 up up xe 2 0 0 up up xe 2 0 1 up up xe 2 0 2 up up xe 2 0 2 0 up up inet 131 131 131 2 24 inet6 1300 2 64 fe80 224 dcff fe20 b94c 64 multiservice xe 2 0 3 up up xe 2 0 4 up up xe 2 0 5 up up xe 2 0 6 up up xe 2 0 6 0 up up inet 141 141 141 1 24 inet6 1400 1 64 fe80 224 dcff fe20 b950 64 multiservice xe 2 0 7 up down xe 2 0 8 up down xe 2 0 9 up down xe 2 2 0 up d...

Страница 130: ...combinations of Ethernet interfaces to your services gateway to suit the specific needs of your network The SRX MIC 1X100G CFP see Figure 55 on page 131 can be installed in an MPC to add one 100 Gigabit Ethernet CFP port Figure 55 SRX MIC 1X100G CFP g030310 MIC with one CFP 100 Gigabit Ethernet port Fits into MPC Supports up to 100 Gbps of full duplex traffic Maximum configurable MTU 9192 bytes Ma...

Страница 131: ...K MPC Supported slots Approximately 1 6 lb 0 7 kg Weight OK FAIL LED one bicolor Green The MIC is operating normally Red The MIC has failed and is not operating normally Off The MIC is powered down LINK LED single color Green The link is active Off No link LEDs The serial number label is yellow and located as shown in Figure 56 on page 132 Figure 56 SRX MIC 1X100G CFP Serial Number Label g007692 S...

Страница 132: ... up to 80 Gbps of full duplex traffic Maximum configurable MTU 9192 bytes Maximum throughput 80 Gbps Description Junos OS Release 12 1X46 D10 Software release Sockets for two QSFP 40 Gigabit Ethernet fiber optic transceivers Supported QSFP transceiver 40GBASE SR4 model number SRX QSFP 40G SR4 40GBASE LR4 model number SRX QSFP 40G LR4 Cables and connectors Either slot in SRX5K MPC Supported slots A...

Страница 133: ...ace card that provides 10 Gigabit Ethernet and 40 Gigabit Ethernet interfaces with a Packet Forwarding Engine that provides a 240 Gbps line rate This interface card is supported on SRX5400 SRX5600 and SRX5800 Services Gateways See Figure 59 on page 135 NOTE These cards do not support plug in Modular Interface Cards MICs All ports on the interface card have dual color LEDs for reporting link status...

Страница 134: ...ter Software release SRX5400 Any slot except the bottom slot 0 which is reserved for SCB RE SRX5600 Any slot except the bottom slots 0 or 1 which are reserved for SCB RE SRX5800 Any slot except the middle slots 0 1 and 2 6 which are reserved for SCB RE and slots 0 left most and 11 right most NOTE You can use the 2 6 slot to install an interface card if an SCB is not already installed in it Support...

Страница 135: ... Ethernet port Intelligent oversubscription services NOTE At any one time you can have only one of the following PIC combinations powered on PIC0 PIC1 PIC0 PIC3 PIC2 PIC1 PIC2 PIC3 If you configure any of the following invalid PIC combinations the chassis will set PIC0 PIC1 combination online PIC0 PIC2 PIC1 PIC3 Software features OK FAIL LED one bicolor Solid green MPC is functioning normally Blin...

Страница 136: ... Gigabit Ethernet and 10 Gigabit Ethernet interfaces with a Packet Forwarding Engine that provides a 240 Gbps line rate This interface card is supported on SRX5400 SRX5600 and SRX5800 Services Gateways See Figure 61 on page 138 NOTE These cards do not support plug in Modular Interface Cards MICs All ports on the interface card have dual color LEDs for reporting link status The interface card also ...

Страница 137: ...Software release SRX5400 Any slot except the bottom slot 0 which is reserved for SCB RE SRX5600 Any slot except the bottom slots 0 or 1 which are reserved for SCB RE SRX5800 Any slot except the middle slots 0 1 and 2 6 which are reserved for SCB RE and slots 0 left most and 11 right most NOTE You can use the 2 6 slot to install an interface card if an SCB is not already installed in it Supported S...

Страница 138: ... 10 Gigabit Ethernet port Optical diagnostics and related alarms Intelligent oversubscription services Software features OK FAIL LED one bicolor Solid green MPC is functioning normally Blinking green MPC is transitioning online or offline Red MPC has failed 10 Gigabit Ethernet LINK LED one bicolor per port Green Link is up Amber Link is disabled Off Link is down or disabled 100 Gigabit Ethernet LI...

Страница 139: ...ecifications SRX5K IOC4 10G is a fixed configuration interface card with a Packet Forwarding Engine that provides 400 Gbps line rate This interface card provides scalability in bandwidth and services to the SRX5400 SRX5600 and SRX5800 Services Gateways See Figure 63 on page 141 NOTE SRX5K IOC4 10G cards do not support plug in Modular Interface Cards MICs 140 ...

Страница 140: ...0 which are reserved for SCB RE NOTE Slot 1 0 is a dual purpose slot You can install SRX5K IOC4 10G in slot 2 6 if an SCB is not already installed in it SRX5600 Any slot except the bottom slots 0 and 1 which are reserved for SCB RE SRX5800 Any slot except the middle slots 0 1 and 2 6 which are reserved for SCB RE and slots 0 most left and 11 most right NOTE Slot 2 6 is a dual purpose slot You can ...

Страница 141: ...G Attack detection and prevention Class of service CoS Equal cost multipath ECMP load balancing GPRS Tunneling Protocol GTP High availability chassis cluster Intrusion detection and prevention IDP IPsec VPN Layer 2 transparent mode Logical systems Network Address Translation NAT Routing protocols BFD BGP IGMP IS IS MLD Multicast OSPF PIM RIP and SCTP SSL proxy Tenant systems Unified threat managem...

Страница 142: ...AT is a fixed configuration interface card with a Packet Forwarding Engine that provides up to 480 Gbps 240 Gbps per PIC slot line rate This interface card provides scalability in bandwidth and services to the SRX5400 SRX5600 and SRX5800 Services Gateways See Figure 65 on page 143 NOTE SRX5K IOC4 MRAT cards do not support plug in Modular Interface Cards MICs Figure 65 SRX5K IOC4 MRAT g100570 SRX5K...

Страница 143: ... 1 0 which are reserved for SCB RE NOTE Slot 1 0 is a dual purpose slot You can install SRX5K IOC4 10G in slot 2 6 if an SCB is not already installed in it SRX5600 Any slot except the bottom slots 0 and 1 which are reserved for SCB RE SRX5800 Any slot except the middle slots 0 1 and 2 6 which are reserved for SCB RE and slots 0 most left and 11 most right NOTE Slot 2 6 is a dual purpose slot You c...

Страница 144: ...erent combination of port speeds as long as the aggregate capacity per group of six ports labeled 0 0 through 0 5 does not exceed 240 Gbps Similarly aggregate capacity per group of the other six ports labeled 1 0 through 1 5 should not exceed 240 Gbps Requires high capacity power supplies and high capacity fan trays The ports are labeled as see Figure 65 on page 143 10 Gigabit Ethernet or 40 Gigab...

Страница 145: ...slation NAT Routing protocols BFD BGP IGMP IS IS MLD Multicast OSPF PIM RIP and SCTP SSL proxy Tenant systems Unified threat management UTM Software features OK FAIL LED one bicolor Steady green IOC is functioning normally Yellow IOC has failed LINK LED one green per port 4 per QSFP cage Steady green Link is up Off Link is down or disabled LEDs The serial number label is located as shown in Figure...

Страница 146: ...MICs Each MIC has one or more physical interface on it An MPC with MICs installed functions in the same way as a regular I O card IOC but allows greater flexibility in adding different types of Ethernet ports to your services gateway MPCs and MICs are similar in form and function to Flex IOCs and port modules However the two use different form factors so you cannot install port modules in an MPC n...

Страница 147: ... 68 on page 148 shows a Flex IOC with two typical port modules installed Figure 68 Flex IOC with Port Modules g030286 Flex IOC 4x10GE XFP port module in slot 0 16x1GE TX port module in slot 1 Figure 69 on page 149 shows an MPC 148 ...

Страница 148: ...ing and Ethernet interfaces on a single board with four 10 Gbps Packet Forwarding Engines Each Packet Forwarding Engine consists of one I chip for Layer 3 processing and one Layer 2 network processor The IOCs interface with the power supplies and Switch Control Boards SCBs You must install at least one IOC in the services gateway The IOC can be of any of the available IOC or Flex IOC types You can...

Страница 149: ...ted SFP transceivers 1000BASE LH model numbers SRX SFP 1GE LH SRX SFP 1GE LH ET 1000BASE LX model numbers SRX SFP 1GE LX SRX SFP 1GE LX ET 1000BASE SX model numbers SRX SFP 1GE SX SRX SFP 1GE SX ET 1000BASE T model numbers SRX SFP 1GE T SRX SFP 1GE T ET Cables and connectors None Controls SRX5600 Any slot except bottom slots 0 or 1 SRX5800 Any slot except center slots 0 1 or 2 6 Supported Slots 31...

Страница 150: ...ts see Figure 72 on page 152 The IOC assembly combines packet forwarding and Ethernet interfaces on a single board with four 10 Gbps Packet Forwarding Engines Each Packet Forwarding Engine consists of one I chip for Layer 3 processing and one Layer 2 network processor The IOCs interface with the power supplies and Switch Control Boards SCBs You must install at least one IOC in the services gateway...

Страница 151: ...release Four 10 Gbps XFP ports Supported XFP transceivers 10GBASE ER model numbers SRX XFP 10GE ER and SRX XFP 10GE ER ET 10GBASE LR model numbers SRX XFP 10GE LR and SRX XFP 10GE LR ET 10GBASE SR model numbers SRX XFP 10GE SR and SRX XFP 10GE SR ET Cables and connectors None Controls SRX5600 Any slot except bottom slots 0 or 1 SRX5800 Any slot except center slots 0 1 or 2 Supported Slots 312 W ty...

Страница 152: ...s The SRX5K FPC IOC Flex I O card Flex IOC Figure 74 on page 154 is an IOC with two slots that accept port modules that add Ethernet ports to your services gateway A Flex IOC with installed port modules functions in the same way as a regular IOC but allows greater flexibility in adding different types of Ethernet ports to your services gateway Each Flex IOC has a processor subsystem which includes...

Страница 153: ...slot 1 Flex IOC with slots for two port modules Maximum throughput 10 Gbps per PFE Description Junos OS Release 9 5R1 and later Software release Slots for two port modules Cables and connectors None Controls SRX5600 Any slot except bottom slots 0 or 1 SRX5800 Any slot except center slots 0 1 or 2 6 Supported Slots 312 W typical 365 W maximum includes port modules Power Requirement Approximately 10...

Страница 154: ...x I O Cards Flex IOCs to add different combinations of small form factor pluggable transceiver SFP 10 gigabit SFP transceiver XFP and copper ports to your services gateway to suit the specific needs of your network The SRX IOC 16GE SFP port module Figure 76 on page 155 installs into a Flex IOC to add sixteen 10 100 1000 Ethernet SFP ports Figure 76 Flex IOC Port Module SRX IOC 16GE SFP g030271 Por...

Страница 155: ...NE Button The ONLINE button on the port module front panel toggles the port module online and offline Controls Either slot in SRX5K FPC IOC Flex IOC Supported Slots Approximately 1 6 lb 0 7 kg Weight OK FAIL LED one bicolor Steady green The port module is operating normally Red The port module has failed and is not operating normally Off The port module is powered down LINK LED single color one pe...

Страница 156: ...the specific needs of your network The SRX IOC 16GE TX port module Figure 78 on page 157 installs into a Flex IOC to add sixteen 10 100 1000 Ethernet RJ 45 copper ports Figure 78 Flex IOC Port Module SRX IOC 16GE TX g030285 Port module with sixteen 10 100 1000 Ethernet RJ45 ports Maximum throughput 10 Gbps Oversubscription ratio 1 6 1 Maximum configurable MTU 9192 bytes Description Junos OS Releas...

Страница 157: ...rial number label is located as shown in Figure 79 on page 158 Figure 79 Port Module SRX IOC 16GE TX Serial Number Label g030305 JX0123 Serial number ID label Serial Number Location Flex I O Card Port Module SRX IOC 4XGE XFP Specifications You use port modules and Flex I O Cards Flex IOCs to add different combinations of small form factor pluggable transceiver SFP 10 gigabit SFP transceiver XFP an...

Страница 158: ...bers SRX XFP 10GE LR and SRX XFP 10GE LR ET 10GBASE SR model numbers SRX XFP 10GE SR and SRX XFP 10GE SR ET Cables and connectors ONLINE Button The ONLINE button on the port module front panel toggles the port module online and offline Controls Either slot in SRX5K FPC IOC Flex IOC Supported Slots Approximately 1 6 lb 0 7 kg Weight OK FAIL LED one bicolor Steady green The port module is operating ...

Страница 159: ...The serial number label is located as shown in Figure 81 on page 160 Figure 81 Port Module SRX IOC 4XGE XFP Serial Number Label g030303 JX0123 Serial number ID label Serial Number Location 160 ...

Страница 160: ... Site Guidelines and Requirements 164 SRX5800 Rack and Cabinet Requirements 168 Configuring Ambient Temperature on SRX5800 Services Gateway 171 Calculating Power Requirements for the SRX5800 Services Gateway 178 SRX5800 Network Cable and Transceiver Planning 198 SRX5800 Alarm and Management Cable Specifications and Pinouts 202 ...

Страница 161: ......

Страница 162: ...space clearances SRX5800 Services Gateway Cabinet Size and Clearance Requirements on page 170 SRX5800 Services Gateway Rack Size and Strength Requirements on page 168 Select the type of rack or cabinet Connection to Building Structure for the SRX5800 Services Gateway Rack on page 169 If a rack is used secure rack to floor and building structure Acquire cables and connectors DC Power Electrical Saf...

Страница 163: ...cifications required for normal services gateway operation In addition the site should be as dust free as possible Table 36 Services Gateway Environmental Specifications Value Description No performance degradation to 10 000 ft 3048 m Altitude Normal operation ensured in relative humidity range of 5 to 90 noncondensing Relative humidity Normal operation ensured in temperature range of 32 F 0 C to ...

Страница 164: ...eneral Site Guidelines Efficient device operation requires proper site planning and maintenance and proper layout of the equipment rack or cabinet if used and wiring closet To plan and create an acceptable operating environment for your device and prevent environmentally caused equipment failures Keep the area around the chassis free from dust and conductive material such as metal flakes Follow pr...

Страница 165: ...ns To reduce or eliminate RFI from your site wiring do the following Use a twisted pair cable with a good distribution of grounding conductors If you must exceed the recommended distances use a high quality twisted pair cable with one ground conductor for each data signal when applicable Radio frequency interference If your site is susceptible to problems with electromagnetic compatibility EMC par...

Страница 166: ...fresh air from the front of the rack is supplied to the inlets and exhaust exits the rear of the rack The device must not interfere with the cooling of other systems in the rack Fillers must be used as appropriate in the rack to ensure there is no recirculation of heated exhaust air back to the front of the rack Care must also be taken around cables to ensure that there is no leakage of air in sit...

Страница 167: ... brackets attached to the center of the chassis for center mounting in an open frame rack For an open frame rack center mounting is preferable because of the more even distribution of weight SRX5800 Services Gateway Rack Size and Strength Requirements The size strength and location of the rack must accommodate the services gateway s weight and external dimensions The location of the rack must allo...

Страница 168: ...he services gateway The chassis depth from the front mounting flange to the rear of the power supply ranges from 23 0 in 58 4 cm to 27 8 in 70 6 cm depending on the type of power supply installed The rack must be strong enough to support the weight of the fully configured services gateway up to 400 lb 182 kg If you stack three fully configured services gateways it must be capable of supporting up ...

Страница 169: ...2 13 m of usable vertical space SRX5800 Services Gateway Cabinet Airflow Requirements When you mount the services gateway in a cabinet you must ensure that ventilation through the cabinet is sufficient to prevent overheating Following is a list of requirements to consider when planning for chassis cooling Ensure that the cool air supply you provide through the cabinet can adequately dissipate the ...

Страница 170: ... for a device By configuring an ambient temperature you can optimize power provisioned for the line cards When a device restarts the system adjusts the power allocation or the provisioned power for the line cards on the basis of the configured ambient temperature If enough power is not available a minor chassis alarm is raised However the chassis continues to run with the configured ambient temper...

Страница 171: ...er budget policy at that temperature 1 To configure the ambient temperature include the set chassis ambient temperature 25 40 55 statement at the edit hierarchy level in the configuration mode edit user host set chassis ambient temperature 25 40 55 2 To verify the ambient temperature of the chassis use the show chassis ambient temperature command at the edit hierarchy level in the operational mode...

Страница 172: ...the maximum operating temperature for a device By configuring an ambient temperature on SRX5800 Services Gateway you can optimize power provisioned for SPC3 IOC3 and IOC4 on SRX5800 After you set the ambient temperature of SRX5800 to 25 C SRX5800 can support eight SRX5K SPC3s with three IOC3s or three IOC4s The SRX5800 Services Gateway chassis with normal capacity AC power supplies has one overall...

Страница 173: ... IOC SPC slots 0 through 5 SCB slot 0 PEM 1 or 3 Zone 1 Figure 83 Power Distribution from DC and High Capacity AC Power Supplies in the SRX5800 Services Gateway Chassis Zone 0 Zone 1 PEM0 PEM1 PEM2 PEM3 g030291 After setting the ambient temperature of SRX5800 to 25 C you can have two different configurations 1 SRX5800 with eight SRX5K SPC3s and three IOC3s See Table 39 on page 175 174 ...

Страница 174: ...ontrol links then each power zone must have one control link You must power cycle the SRX5800 Services Gateway after the configuration Table 39 SRX5800 Services Gateway Power Requirement with 8xSPC3 and 3xIOC3 Power Budget at Ambient Temperature 25 C Power budget with 25 C config Power Budget default Part Number Chassis Component Zone 320 W 320 W 320 W SRX5800 HC FAN High capacity cooling system U...

Страница 175: ...er Fan Tray 7734 W 7828 W 8396 W Total power allocation 2 SRX5800 with eight SRX5K SPC3s and three IOC4s See Table 40 on page 177 NOTE You must install four high capacity PEMs with two inputs for each PEM You must install atleast one IOC4 and four SPC3s in each power zone You must have the third SCB in Slot 6 SCB4 is not supported You can install IOC4 in slot 11 only when the ambient temperature i...

Страница 176: ... 5 W 4 2458 W 615 W 4 2460 W 650 W 4 2600 W SPC3 SPC slots 0 through 3 440 W 2 880 W 440 W 2 880 W 545 W 2 1090 W IOC4 IOC slots 4 and 5 245 W 275 W 275 W SCB3 with RE2 SCB 0 245 W 275 W 275 W SCB3 with RE2 SCB 1 Zone 0 155 W 185 W 185 W SCB3 SCB 2 Slot 6 614 5 W 4 2458 W 615 W 4 2460 W 650 W 4 2600 W SPC3 SPC slots 7 through 10 440 W 440 W 545 W IOC4 IOC slot 11 320 W 320 W 320 W SRX5800 HC FAN H...

Страница 177: ...rward the required input current is calculated Finally you calculate the thermal output We recommend that you provision power according to the maximum input current listed in the power supply electrical specifications see SRX5800 Services Gateway AC Power Supply Specifications on page 54 and SRX5800 Services Gateway DC Power Supply Specifications on page 62 Use the following procedures to calculat...

Страница 178: ...ay chassis with normal capacity AC power supplies Table 41 SRX5800 Services Gateway Zoning Components Receiving Power Power Supply PEM Zone PEM 0 or 2 Zone 0 Lower fan tray IOC SPC slots 6 through 11 SCB slots 1 through 2 PEM 1 or 3 Zone 1 Upper fan tray IOC SPC slots 0 through 5 SCB slot 0 Figure 84 Power Distribution from DC and High Capacity AC Power Supplies in the SRX5800 Services Gateway Cha...

Страница 179: ... One SRX5K MPC IOC2 Modular Port Concentrator with two Modular Interface Cards MICs 180 ...

Страница 180: ... One SRX5K 40GE SFP I O card IOC 181 ...

Страница 181: ...ices gateway in order to install and use SPC2 If you do not have high capacity power supplies and fan trays installed the services gateway will log an alarm condition when it recognizes the SPC High capacity cooling system upper and lower fan trays NOTE The high capacity cooling system satisfies cooling requirements of SPC2 and must be used for proper cooling 182 ...

Страница 182: ...HC AC Base system 320 W 320 W 320 W 2 640 W SRX5800 HC FAN High capacity cooling system 2925 W 585W 5 2925 W SPC2 See note below SPC slots 0 through 4 570 W 570 W IOC2 with two MICs MPC slot 5 240 W 150 W 90 W SCB1 with RE1 SCB 0 slot 6 150 W 150 W SCB1 SCB 1 slot 7 570 W 570 W IOC2 with two MICs MPC slot 8 2925 W 585W 5 2925 W SPC2 See note below SPC slots 9 through 13 Zone 1 total 4080 W Zone 0 ...

Страница 183: ...aximum Output Power of Power Supply Power Supply Power exceeded non zoned 5100 W 8070 W 2970 W power exceeded 5100 W 1700 W SRX5800 AC standard capacity Power exceeded 4100 4080 20 W Power exceeded 4100 3990 110 W 3400 W one feed 8200 W two feeds 1700 W one feed 4100 W two feeds SRX5800 AC high capacity Power exceeded Power exceeded 5600 W 2800 W SRX5800 DC normal capacity Power exceeded 4100 4080...

Страница 184: ...NOTE Normal capacity AC and DC power supplies are not included in the following table because their power budget was exceeded in the sample configuration 185 ...

Страница 185: ... 1 These values are at full load and nominal voltage 4 Calculate thermal output BTUs for the system To calculate this value add the total input power requirement in watts for the two zones together and multiply the sum by 3 41 as shown in Table 45 on page 186 Table 45 Calculating Thermal Output for SRX5800 Services Gateway with SCB1 and RE1 Thermal Output BTUs per hour Power Supply 4534 4636 3 41 ...

Страница 186: ...entrator SPC2 Services Processing Card NOTE You must have high capacity power supplies either AC or DC and high capacity fan trays installed in the services gateway in order to install and use SPC2 If you do not have high capacity power supplies and fan trays installed the services gateway will log an alarm condition when it recognizes the SPC High capacity cooling system upper and lower fan trays...

Страница 187: ...2 SCB 1 slot 7 for Zone 0 570 W 570 W IOC2 with two MICs MPC slot 8 2925 W 585 W 5 2925 W SPC2 See note below SPC slots 9 through 13 Zone 1 total 4130 W Zone 0 total 4040 W SRX5800 standard capacity AC not zoned 8170 W Total power requirement For the power consumption specifications of specific SRX5800 services gateway cards see the SRX5400 SRX5600 and SRX5800 Services Gateway Card Guide at www ju...

Страница 188: ...not enough power to cover redundancy with this configuration Power exceeded 4100 4040 60 W 3400 W one feed 8200 W two feeds 1700 W one feed 4100 W two feeds SRX5800 AC high capacity Power exceeded Power exceeded 5600 W 2800 W SRX5800 DC normal capacity Power exceeded 4100 4130 30W NOTE Power is exceeded Therefore there is not enough power to cover redundancy with this configuration Power exceeded ...

Страница 189: ... Power Supply Efficiency 1 Power Supply Zone 0 4040 0 88 4590 W 88 SRX5800 AC high capacity Zone 1 4130 0 88 4693 W Zone 0 4040 0 86 4697 W 86 SRX5800 DC high capacity Zone 1 4130 0 86 4802 W 1 These values are at full load and nominal voltage 4 Calculate thermal output BTUs for the system To calculate this value add the total input power requirement in watts for the two zones together and multipl...

Страница 190: ...0G Modular Port Concentrator SPC2 Services Processing Card NOTE You must have high capacity power supplies either AC or DC and high capacity fan trays installed in the services gateway in order to install and use SPC2 If you do not have high capacity power supplies and fan trays installed the services gateway will log an alarm condition when it recognizes the SPC High capacity cooling system upper...

Страница 191: ...CB3 SCB 1 slot 7 for Zone 0 607 W 607 W IOC3 MPC slot 8 2925 W 585 W 5 2925 W SPC2 See note below SPC slots 9 through 13 Zone 1 total 4267 W Zone 0 total 4177 W SRX5800 standard capacity AC not zoned 8444 W Total power requirement For the power consumption specifications of specific SRX5800 services gateway cards see the SRX5400 SRX5600 and SRX5800 Services Gateway Card Guide at www juniper net do...

Страница 192: ...xceeded Therefore there is not enough power to cover redundancy with this configuration Power exceeded 4100 4177 77 W 3400 W one feed 8200 W two feeds 1700 W one feed 4100 W two feeds SRX5800 AC high capacity Power exceeded Power exceeded 5600 W 2800 W SRX5800 DC normal capacity Power exceeded 4100 4267 167 W NOTE Power is exceeded Therefore there is not enough power to cover redundancy with this ...

Страница 193: ... Input Power Requirement Power Supply Efficiency 1 Power Supply Zone 0 4177 0 88 4764 W 88 SRX5800 AC high capacity Zone 1 4267 0 88 4849 W Zone 0 4177 0 86 4857 W 86 SRX5800 DC high capacity Zone 1 4267 0 86 4962 W 1 These values are at full load and nominal voltage 4 Calculate thermal output BTUs for the system To calculate this value add the total input power requirement in watts for the two zo...

Страница 194: ... IOC4 MRAT Modular Port Concentrator Six SPC2s one SPC3 Services Processing Cards NOTE You must have high capacity power supplies either AC or DC and high capacity fan trays installed in the services gateway in order to install and use SPC2 and SPC3 If you do not have high capacity power supplies and fan trays installed the services gateway will log an alarm condition when it recognizes the SPC Hi...

Страница 195: ...W SCB4 with RE3 SCB 1 slot 7 for Zone 0 1000 W 500 W 2 1000 W IOC4 MPC slot 8 1820 W SPC slots 9 through 13 585 W 2 1170 SPC2 SPC3 650 W Zone 1 total 3720 W Zone 0 total 3700 W SRX5800 not zoned 7420 W Total power requirement For the power consumption specifications of specific SRX5800 services gateway cards see the SRX5400 SRX5600 and SRX5800 Services Gateway Card Guide at www juniper net documen...

Страница 196: ...total power output requirement by the efficiency of the power supply as shown in Table 56 on page 197 Table 56 Calculating Input Power for SRX5800 Services Gateway with Six SPC2s and One SPC3 Input Power Requirement Power Supply Efficiency 1 Power Supply Zone 0 3700 0 88 4204 W 88 SRX5800 AC high capacity Zone 1 3720 0 88 4227 W Zone 0 3700 0 86 4302 W 86 SRX5800 DC high capacity Zone 1 3720 0 86 ...

Страница 197: ...nt ports and the wires that connect to the alarm relay contacts Table 58 Cable and Wire Specifications for Routing Engine Management and Alarm Interfaces Routing Engine Receptacle Maximum Length Cable Wire Supplied Cable Specification Port RJ 45 female 6 ft 1 83 m One 6 ft 1 83 m length with RJ 45 DB 9 connectors RS 232 EIA 232 serial cable Routing Engine console or auxiliary interface RJ 45 autos...

Страница 198: ...er than for other media it still occurs in both multimode and single mode transmission An efficient optical data link must have enough light available to overcome attenuation Dispersion is the spreading of the signal in time The following two types of dispersion can affect an optical data link Chromatic dispersion The spreading of the signal in time resulting from the different speeds of light ray...

Страница 199: ...lating Power Margin for Fiber Optic Cable for the SRX5800 Services Gateway After calculating a link s power budget you can calculate the power margin P M which represents the amount of power available after subtracting attenuation or link loss LL from the power budget P B A worst case estimate of P M assumes maximum LL P M P B LL A P M greater than zero indicates that the power budget is sufficien...

Страница 200: ...r five connectors 0 5 dB per connector 5 0 5 dB 2 5 dB Loss for two splices 0 5 dB per splice 2 0 5 dB 1 dB Higher order loss 0 5 dB Clock recovery module 1 dB The power margin P M is calculated as follows P M P B LL P M 13 dB 2 km 1 0 dB km 5 0 5 dB 2 0 5 dB 0 5 dB HOL 1 dB CRM P M 13 dB 2 dB 2 5 dB 1 dB 0 5 dB 1 dB P M 6 dB The following sample calculation for an 8 km long single mode link with ...

Страница 201: ... Ethernet Port 203 RJ 45 Connector Pinouts for the SRX5800 Services Gateway Routing Engine Auxiliary and Console Ports 204 Alarm Relay Contact Wire Specifications for the SRX5800 Services Gateway Table 60 on page 202 lists the specifications for the wires that connect to the alarm relay contacts Table 60 Cable and Wire Specifications for Alarm Interfaces Cable Wire Supplied Cable Specification Por...

Страница 202: ... SRX5800 Services Gateway Routing Engine Ethernet Port The port on the Routing Engine labeled ETHERNET is an autosensing 10 100 Mbps Ethernet RJ 45 receptacle that accepts an Ethernet cable for connecting the Routing Engine to a management LAN or other device that supports out of band management Table 62 on page 203 describes the RJ 45 connector pinout Table 62 RJ 45 Connector Pinout for the Routi...

Страница 203: ...onnector The ports connect the Routing Engine to an auxiliary or console management device Table 63 on page 204 describes the RJ 45 connector pinout Table 63 RJ 45 Connector Pinout for the AUX and CONSOLE Ports Description Signal Pin Request to Send RTS 1 Data Terminal Ready DTR 2 Transmit Data TXD 3 Signal Ground Ground 4 Signal Ground Ground 5 Receive Data RXD 6 Data Set Ready DSR DCD 7 Clear to...

Страница 204: ...Installing the SRX5800 Services Gateway 207 Unpacking the SRX5800 208 Installing the SRX5800 Mounting Hardware 212 Connecting the SRX5800 to External Devices 232 Connecting the SRX5800 to Power 238 Performing the Initial Software Configuration for the SRX5800 249 ...

Страница 205: ......

Страница 206: ...e 215 5 Remove components from the services gateway chassis as described in Removing Components from the SRX5800 Chassis Before Installing It in the Rack on page 217 6 Lift the services gateway on to the rack as described in Installing the SRX5800 Services Gateway Chassis in the Rack on page 224 7 Reinstall components into the services gateway chassis as described in Reinstalling Components in the...

Страница 207: ...00 Services Gateway on page 247 12 Perform the initial system configuration as described in Initially Configuring the SRX5800 Services Gateway on page 250 Unpacking the SRX5800 IN THIS SECTION Tools and Parts Required to Unpack the SRX5800 Services Gateway 208 Unpacking the SRX5800 Services Gateway 209 Verifying the SRX5800 Services Gateway Parts Received 210 Tools and Parts Required to Unpack the...

Страница 208: ...to the installation site as possible where you have enough room to remove the components from the chassis While the chassis is bolted to the pallet you can use a forklift or pallet jack to move it 2 Position the shipping crate with the arrows pointing up 3 Open all the latches on the shipping crate 4 Remove the front door of the shipping crate cover and set it aside 5 Slide the remainder of the sh...

Страница 209: ... part numbers and descriptions of each part in your order If any part is missing contact a customer service representative A fully configured services gateway contains the services gateway chassis with installed components listed in Table 64 on page 210 and an accessory box which contains the parts listed in Table 65 on page 211 The parts shipped with your services gateway can vary depending on th...

Страница 210: ...out components installed Table 65 Accessory Box Parts List Quantity Part 14 Screws to mount chassis 2 Screws to connect grounding cable 1 4 20 thread 1 2 in length 2 Split washers for connecting grounding cable 8 DC power terminal Lugs 6 AWG 1 RJ 45 cable with RJ 45 Jack to Female DB 9 to connect the device through the serial port 2 Terminal block plug 3 pole 5 08 mm spacing 12A to connect the dev...

Страница 211: ...tegory 5E 15 1 ESD wrist strap with cable Installing the SRX5800 Mounting Hardware IN THIS SECTION Tools Required to Install the SRX5800 Services Gateway 213 Installing the SRX5800 Services Gateway Mounting Hardware for a Four Post Rack or Cabinet 213 Installing the SRX5800 Services Gateway Mounting Hardware in an Open Frame Rack 215 Removing Components from the SRX5800 Chassis Before Installing I...

Страница 212: ...ounting hole location The hole distances are relative to one of the standard U divisions on the rack The bottom of all mounting shelves is at 0 04 in 0 02 U above a U division Table 66 Four Post Rack or Cabinet Mounting Hole Locations Small Shelf Large Shelf Distance Above U Division Hole X 0 86 U 1 51 in 3 8 cm 3 X X 0 50 U 0 88 in 2 2 cm 2 X 0 14 U 0 25 in 0 6 cm 1 To install the mounting shelve...

Страница 213: ...Install the small shelf on the back rack rails Rest the bottom slot of each ear on a mounting screw The small shelf installs on the back of the rear rails extending toward the center of the rack The bottom of the small shelf should align with the bottom of the large shelf 9 Partially insert screws into the open holes in the ears of the small shelf 10 Tighten all the screws completely Figure 86 Ins...

Страница 214: ...tes a mounting hole location The hole distances are relative to one of the standard U divisions on the rack For reference the bottom of all mounting shelves is at 0 04 in 0 02 U above a U division Table 67 Open Frame Rack Mounting Hole Locations Large Shelf Distance Above U Division Hole X 9 86 U 17 26 in 43 8 cm 30 X 8 86 U 15 51 in 39 4 cm 27 X 7 86 U 13 76 in 34 9 cm 24 X 6 86 U 12 01 in 30 5 c...

Страница 215: ...sing the keyhole slots located near the top of the large shelf flanges 3 Partially insert screws into the open holes in the ears of the large shelf 4 Tighten all the screws completely Figure 87 Installing the Mounting Hardware for an Open Frame Rack Open frame rack Large mounting shelf g003482 After the mounting hardware is installed proceed to Installing the SRX5800 Services Gateway Chassis in th...

Страница 216: ...power supply see Figure 88 on page 218 1 Attach an ESD grounding strap to your bare wrist and connect the strap to one of the ESD points on the chassis 2 Switch off the services gateway power supplies For an AC powered services gateway move the AC input switch on the chassis above each AC power supply to the off O position If the services gateway is equipped with high capacity AC power supplies yo...

Страница 217: ...emoving the Cable Manager Before Installing the SRX5800 Services Gateway Chassis To remove the cable manager see Figure 89 on page 219 1 Attach an ESD grounding strap to your bare wrist and connect the strap to one of the ESD points on the chassis 2 Using a 7 16 in nut driver unscrew the nuts on the corners of the cable manager 3 Grasp the bottom of the cable manager and pull it straight out from ...

Страница 218: ...n ESD grounding strap to your bare wrist and connect the strap to one of the ESD points on the chassis 2 Loosen the captive screw on each side of the fan tray faceplate 3 Grasp both sides of the fan tray and pull it out approximately 1 to 3 inches 4 Press on the two latches located on the inside of the fan tray to release the fan tray from the chassis 5 Place one hand under the fan tray to support...

Страница 219: ...ER ONLINE OFFLINE RE0 FAN PEM 1 0 0 1 2 3 RE1 OK 1 FAIL ONLINE OK 7 FAIL ONLINE OK 8 FAIL ONLINE OK 9 FAIL ONLINE OK 10 FAIL ONLINE OK 11 FAIL ONLINE OK 2 6 FAIL ONLINE ACO LT YELLOW ALARM RED ALARM NC NO C NC NO C 1 0 1 0 1 0 1 0 1 0 1 0 1 0 1 0 g030222 CHASSIS CLUSTER CONTROL 0 CHASSIS CLUSTER CONTROL 1 CHASSIS CLUSTER CONTROL 0 CHASSIS CLUSTER CONTROL 1 220 ...

Страница 220: ... Removing Cards Before Installing the SRX5800 Services Gateway Chassis The services gateway holds up to twelve cards IOCs Flex IOCs MPCs SCBs and SPCs which are installed horizontally in the front of the device Each card weighs up to 18 3 lb 8 3 kg be prepared to accept its full weight To remove a card see Figure 92 on page 223 1 Have ready an antistatic mat for the card Also have ready rubber saf...

Страница 221: ... ejector handles require that all adjacent components be completely inserted so the ejector handles do not hit them which could result in damage The ejector handles have a center of rotation and need to be stored toward the center of the board Ensure the long ends of the ejectors located at both the top and the bottom of the board are vertical and pressed as far as possible toward the center of th...

Страница 222: ...istatic mat on a flat stable surface Figure 92 Removing a Card IOC Shown Other Card Types Similar OK 0 FAIL ONLINE OK 1 FAIL ONLINE OK 2 FAIL ONLINE OK 3 FAIL ONLINE OK 4 FAIL ONLINE OK 5 FAIL ONLINE OK 0 FAIL ONLINE MASTER ONLINE OFFLINE RE0 FAN PEM 1 0 0 1 2 3 RE1 OK 1 FAIL ONLINE OK 7 FAIL ONLINE OK 8 FAIL ONLINE OK 9 FAIL ONLINE OK 10 FAIL ONLINE OK 11 FAIL ONLINE OK 2 6 FAIL ONLINE ACO LT YEL...

Страница 223: ... of the mounting shelves 4 Lift the chassis approximately 0 75 in above the surface of the mounting shelves and position it as close as possible to the shelves 5 Carefully slide the services gateway onto the mounting shelves so that the bottom of the chassis and the mounting shelves overlap by approximately two inches 6 Slide the services gateway onto the mounting shelves until the center mounting...

Страница 224: ...nstalling It in the Rack After the services gateway is installed in the rack reinstall the removed components before booting and configuring the services gateway You reinstall components first in the rear of the chassis and then in the front 1 Reinstalling Power Supplies After Installing the SRX5800 Services Gateway Chassis 226 2 Reinstalling Fan Trays After Installing the SRX5800 Services Gateway...

Страница 225: ... supplies are switched off even though they are not connected to power sources 2 Ensure that the release lever below the empty power supply slot is locked in the counterclockwise position see Figure 94 on page 227 If necessary pull the spring loaded locking pin in the release lever away from the chassis and turn the release lever counterclockwise until it stops Let go of the locking pin in the rel...

Страница 226: ... Attach an ESD grounding strap to your bare wrist and connect the strap to one of the ESD points on the chassis 2 Grasp the fan tray on each side and insert it straight into the chassis Note the correct orientation by the this side up label on the top surface of the fan tray 3 Tighten the captive screws on each side of the fan tray faceplate to secure it in the chassis 4 Lower the standard cable m...

Страница 227: ...TER ONLINE OFFLINE RE0 FAN PEM 1 0 0 1 2 3 RE1 OK 1 FAIL ONLINE OK 7 FAIL ONLINE OK 8 FAIL ONLINE OK 9 FAIL ONLINE OK 10 FAIL ONLINE OK 11 FAIL ONLINE OK 2 6 FAIL ONLINE ACO LT YELLOW ALARM RED ALARM NC NO C NC NO C 1 0 1 0 1 0 1 0 1 0 1 0 1 0 1 0 g030223 CHASSIS CLUSTER CONTROL 0 CHASSIS CLUSTER CONTROL 1 CHASSIS CLUSTER CONTROL 0 CHASSIS CLUSTER CONTROL 1 228 ...

Страница 228: ...ER CONTROL 1 Reinstalling Cards After Installing the SRX5800 Services Gateway Chassis To reinstall cards IOCs Flex IOCs MPCs SPCs and SCBs see Figure 97 on page 231 1 Attach an ESD grounding strap to your bare wrist and connect the strap to one of the ESD points on the chassis 2 Take each card to be installed out of its electrostatic bag and identify the slot on the card cage where it will be conn...

Страница 229: ...d the center of the board To avoid blocking the visibility of the LEDs position the ejectors over the PARK icon To insert or remove the SCB card slide the ejector across the SCB horizontally rotate it and slide it again another quarter of a turn Turn the ejector again and repeat as necessary Use the indexing feature to maximize leverage and to avoid hitting any adjacent components 9 Grasp both eje...

Страница 230: ...L 0 0 0 5 2 0 2 5 1 0 1 5 3 0 3 5 CHASSIS CLUSTER CONTROL 0 CHASSIS CLUSTER CONTROL 1 CHASSIS CLUSTER CONTROL 0 CHASSIS CLUSTER CONTROL 1 Reinstalling the Cable Manager After Installing the SRX5800 Services Gateway Chassis To reinstall the cable manager see Figure 98 on page 232 1 Attach an ESD grounding strap to your bare wrist and connect the strap to one of the ESD points on the chassis 2 Posit...

Страница 231: ...Connections 233 Connecting the SRX5800 Services Gateway to a Management Console or an Auxiliary Device 233 Connecting the SRX5800 Services Gateway to a Network for Out of Band Management 234 Connecting an SRX5800 Services Gateway to an External Alarm Reporting Device 235 Connecting Network Cables to SRX5800 Services Gateway IOCs and Port Modules 236 232 ...

Страница 232: ...op modem or other auxiliary device connect it to the AUX port on the Routing Engine Both ports accept a cable with an RJ 45 connector One serial cable with an RJ 45 connector and a DB 9 connector is provided with the services gateway To connect a device to the CONSOLE port and another device to the AUX port you must supply an additional cable To connect a management console or auxiliary device 1 P...

Страница 233: ...ent connect an Ethernet cable with RJ 45 connectors to the ETHERNET port on the Routing Engine One Ethernet cable is provided with the services gateway To connect to the ETHERNET port on the Routing Engine 1 Plug one end of the Ethernet cable Figure 101 on page 234 shows the connector into the ETHERNET port on the Routing Engine Figure 102 on page 234 shows the port 2 Plug the other end of the cab...

Страница 234: ... mm 2 which is not provided Use the gauge of wire appropriate for the external device you are connecting To connect an external device to an alarm relay contact see Figure 103 on page 235 1 Prepare the required length of wire with gauge between 28 AWG and 14 AWG 0 08 and 2 08 mm 2 2 While the terminal block is not plugged into the relay contact use a 2 5 mm flat blade screwdriver to loosen the sma...

Страница 235: ... 105 on page 238 1 Have ready a length of the type of cable used by the component 2 Remove the rubber safety plug from the cable connector port WARNING Do not look directly into a fiber optic transceiver or into the ends of fiber optic cables Fiber optic transceivers and fiber optic cables connected to a transceiver emit laser light that can damage your eyes CAUTION Do not leave a fiber optic tran...

Страница 236: ...ing or developing stress points Secure the cable so that it is not supporting its own weight as it hangs to the floor Place excess cable out of the way in a neatly coiled loop Placing fasteners on the loop helps to maintain its shape CAUTION Avoid bending a fiber optic cable beyond its minimum bend radius An arc smaller than a few inches in diameter can damage the cable and cause problems that are...

Страница 237: ...ION Tools and Parts Required for SRX5800 Services Gateway Grounding and Power Connections 239 Grounding the SRX5800 Services Gateway 239 Connecting Power to an AC Powered SRX5800 Services Gateway 241 Powering On an AC Powered SRX5800 Services Gateway 243 Connecting Power to a DC Powered SRX5800 Services Gateway 245 Powering On a DC Powered SRX5800 Services Gateway 247 Powering Off the SRX5800 Serv...

Страница 238: ... to ensure proper operation you must properly ground the services gateway chassis before connecting power You ground the services gateway by connecting a grounding cable to earth ground and then attaching it to one of the chassis grounding points using two screws You must provide the grounding cable the cable lug is supplied with the services gateway 1 Verify that a licensed electrician has attach...

Страница 239: ...etric screws If you wish to use the metric sized grounding point you must provide appropriate screws and split washers 8 Secure the grounding cable lug to the grounding point first with the washers and then with the screws as shown in Figure 106 on page 240 Figure 106 Connecting the Grounding Cable g030295 1 4 20 Grounding Point M6 Metric Grounding Point 9 Dress the grounding cable and verify that...

Страница 240: ...ou must order them separately To connect the AC power cords to the services gateway see Figure 107 on page 242 and Figure 108 on page 243 1 Locate or obtain the power cords you will use with the services gateway The power cords must have a plug appropriate for your geographical location 2 Attach an ESD grounding strap to your bare wrist and connect the strap to one of the ESD points on the chassis...

Страница 241: ...m or as required by local code 7 Dress the power cords appropriately Verify that the power cords do not block the air exhaust and access to services gateway components or drape where people could trip on them 8 Repeat Step 3 through Step 7 for the remaining power supplies Figure 107 Connecting AC Power to the Services Gateway Standard Capacity Power Supplies 242 ...

Страница 242: ...on an AC powered services gateway 1 Verify that the power supplies are fully inserted in the chassis 2 Verify that each AC power cord is securely inserted into its appliance inlet 3 Verify that an external management device is connected to one of the Routing Engine ports AUX CONSOLE or ETHERNET 4 Turn on the power to the external management device 243 ...

Страница 243: ...upply is connected and receiving power and the AC 2 OK LED should light green steadily if the lower AC feed on the power supply itself is connected and receiving power NOTE After a power supply is powered on it can take up to 60 seconds for status indicators such as the status LEDs on the power supply and the show chassis command display to indicate that the power supply is functioning normally Ig...

Страница 244: ... external DC power sources to the terminal studs on the power supply faceplates You must provide the power cables the cable lugs are supplied with the services gateway To connect the DC source power cables to the services gateway 1 Switch off the dedicated customer site circuit breakers Ensure that the voltage across the DC power source cable leads is 0 V and that there is no chance that the cable...

Страница 245: ...r cable lug to the RTN return terminal b Secure each negative DC source power cable lug to the 48V input terminal The DC power supplies in slots PEM0 and PEM1 must be powered by dedicated power feeds derived from feed A and the DC power supplies in slots PEM2 and PEM3 must be powered by dedicated power feeds derived from feed B This configuration provides the commonly deployed A B feed redundancy ...

Страница 246: ...e power to the external management device 3 Verify that the power supplies are fully inserted in the chassis 4 Verify that the source power cables are connected to the appropriate terminal the positive source cable to the return terminal labeled RTN and the negative source cable to the input terminal labeled 48V 5 Switch on the dedicated customer site circuit breakers to provide power to the DC po...

Страница 247: ...d on it can take up to 60 seconds for status indicators such as the status LEDs on the power supply and the show chassis command display to indicate that the power supply is functioning normally Ignore error indicators that appear during the first 60 seconds If any of the status LEDs indicates that the power supply is not functioning normally repeat the installation and cabling procedures 12 On th...

Страница 248: ...net documentation 3 Attach an ESD grounding strap to your bare wrist and connect the strap to one of the ESD points on the chassis 4 Switch off the power supplies For an AC powered services gateway move the AC input switch on the chassis above each AC power supply to the off O position If the services gateway is equipped with high capacity AC power supplies you must also move the AC input switch o...

Страница 249: ... issuing Junos OS command line interface CLI commands either on a console device attached to the CONSOLE port on the Routing Engine or over a telnet connection to a network connected to the ETHERNET port on the Routing Engine Gather the following information before configuring the device Name the device will use on the network Domain name the device will use IP address and prefix length informatio...

Страница 250: ...nistrator account on the device When prompted enter the password for the administrator account edit root set system login user admin class super user authentication plain text password New password password Retype new password password 7 Commit the configuration to activate it on the device edit root commit 8 Log in as the administrative user you configured in Step 6 9 Configure the name of the de...

Страница 251: ...c route 0 0 0 0 0 next hop gateway 13 Configure basic security zones and bind them to traffic interfaces edit admin set security zones security zone trust interfaces ge 6 3 5 admin set security zones security zone untrust interfaces ge 6 2 0 14 Configure basic security policies edit admin set security policies from zone trust to zone untrust policy policy name match source address any destination ...

Страница 252: ...installation host name henbert root authentication encrypted password 1 oTVn2KY3 uQe4xzQCxpR2j7sKuV Pa0 SECRET DATA login user admin uid 928 class super user authentication encrypted password 1 cdOPmACd QvreBsJkNR1EF0uurTBkE SECRET DATA services ssh web management http interface ge 0 0 0 0 syslog user any emergency file messages any any authorization info file interactive commands 253 ...

Страница 253: ...trieval interfaces ge 0 0 0 unit 0 ge 6 2 0 unit 0 family inet address 5 1 1 1 24 ge 6 3 5 unit 0 family inet address 192 1 1 1 24 fxp0 unit 0 family inet address 192 168 10 2 24 routing options static route 0 0 0 0 0 next hop 5 1 1 2 security zones security zone trust interfaces 254 ...

Страница 254: ...ion any then permit 18 Commit the configuration to activate it on the device edit admin commit 19 Optionally configure additional properties by adding the necessary configuration statements Then commit the changes to activate them on the device edit admin commit 20 When you have finished configuring the device exit configuration mode edit admin exit admin host 255 ...

Страница 255: ...To configure root authentication and the management interface 1 Log in as root There is no password 2 Start the CLI and enter configuration mode root cli root configure root 3 Set the root authentication password by entering a cleartext password an encrypted password or an SSH public key string DSA or RSA edit root set system root authentication plain text password New password password Retype new...

Страница 256: ...ommit the configuration changes edit root commit Configuring Interfaces Zones and Policies with J Web IN THIS SECTION Configuring the Hostname 258 Configuring Interfaces 258 Configuring Zones and Assigning Interfaces 259 Configuring Security Policies 260 You can configure hostnames interfaces zones and security policies using J Web NOTE You cannot use J Web to configure SRX5400 SRX5600 and SRX5800...

Страница 257: ... See Configuring Root Authentication and the Management Interface from the CLI on page 256 4 Click Log In The J Web Dashboard page appears 5 Select Configure System Properties System Identity and then select Edit The Edit System Identity dialog box appears 6 Enter the hostname and click OK 7 Select Commit Options Commit to apply the configuration changes You have successfully configured the hostna...

Страница 258: ...Dashboard page select Configure Security Zones Screens and click Add The Add Zone dialog box appears 2 In the Main tab enter trust for zone name and enter the description 3 Set the zone type to Security 4 Select the interfaces listed under Available and move them under Selected 5 Click OK A message appears after your configuration changes are validated successfully 6 Click OK 7 Select Commit Optio...

Страница 259: ...ecting any listed under Available and moving it under Selected 4 Configure the destination IP address by selecting any listed under Available and moving it under Selected 5 Configure the application by selecting any listed under Available and moving it under Selected 6 Click OK A message appears after your configuration changes are validated successfully 7 Click OK 8 Select Commit Options Commit t...

Страница 260: ... SRX5800 Cooling System 267 Maintaining the SRX5800 Power System 276 Maintaining the SRX5800 Host Subsystem 304 Maintaining the SRX5800 Line Cards and Modules 339 Maintaining the SRX5800 Cables and Connectors 388 Replacing a Routing Engine in an SRX Series High End Chassis Cluster 402 ...

Страница 261: ......

Страница 262: ...t the bottom front of the services gateway replacing it every six months for optimum cooling system performance Do not run the device for more than a few minutes without the air filter in place Replacing the SRX5800 Services Gateway Craft Interface To replace the craft interface perform the following procedures in sequence 1 Disconnecting the Alarm Relay Wires from the SRX5800 Services Gateway Cra...

Страница 263: ...he chassis 3 Using a 2 5 mm flat blade screwdriver loosen the small screws on the face of the terminal block and remove the block from the relay contact 4 Using the 2 5 mm flat blade screwdriver loosen the small screws on the side of the terminal block Remove existing wires from the slots in the front of the block Figure 110 Alarm Relay Contacts Removing the SRX5800 Services Gateway Craft Interfac...

Страница 264: ... it toward you until it is horizontal 5 Disconnect the ribbon cable from the back of the faceplate by gently pressing on both sides of the latch with your thumb and forefinger Remove the craft interface from the chassis Figure 111 Removing the Craft Interface Installing the SRX5800 Services Gateway Craft Interface Before you begin installing the craft interface into the services gateway Ensure you...

Страница 265: ...ernal devices connected to the craft interface Figure 112 Installing the Craft Interface 1 0 1 0 1 0 1 0 1 0 1 1 0 0 1 0 1 0 1 0 g004040 OK 0 FAIL ONLIN E OK 1 FAIL ONLIN E OK 2 FAIL ONLIN E OK 3 FAIL ONLIN E OK 4 FAIL ONLIN E OK 5 FAIL ONLIN E OK 0 FAIL ONLIN E MASTER ONLINE OFFLINE RE0 FAN PEM 1 0 0 1 2 3 RE1 OK 1 FAIL ONLIN E OK 7 FAIL ONLIN E OK 8 FAIL ONLIN E OK 9 FAIL ONLIN E OK 10 FAIL ONLI...

Страница 266: ... ESD grounding strap to your bare wrist and connect the strap to one of the ESD points on the chassis 4 Plug the terminal block into the relay contact and use a 2 5 mm flat blade screwdriver to tighten the screws on the face of the block 5 Attach the other end of the wires to the external device Figure 113 Alarm Relay Contacts Maintaining the SRX5800 Cooling System IN THIS SECTION Maintaining the ...

Страница 267: ...umbers are stamped into the fan tray sheet metal next to each fan Replacing an SRX5800 Services Gateway Fan Tray The fan trays are hot insertable and hot removable To replace a fan tray perform the following procedures in sequence 1 Removing an SRX5800 Services Gateway Fan Tray 268 2 Installing an SRX5800 Services Gateway Fan Tray 271 Removing an SRX5800 Services Gateway Fan Tray NOTE To prevent o...

Страница 268: ...neously pull the two releases labeled PULL on the cable manager Lift it up and outward to lock it in place 3 Using the Phillips number 2 screwdriver loosen the captive screw on each side of the fan tray faceplate 4 Grasp both sides of the fan tray and pull it out approximately 1 to 3 inches WARNING To avoid injury keep tools and your fingers away from the fans as you slide the fan module out of th...

Страница 269: ...E OK 0 FAIL ONLINE MASTER ONLINE OFFLINE RE0 FAN PEM 1 0 0 1 2 3 RE1 OK 1 FAIL ONLINE OK 7 FAIL ONLINE OK 8 FAIL ONLINE OK 9 FAIL ONLINE OK 10 FAIL ONLINE OK 11 FAIL ONLINE OK 2 6 FAIL ONLINE ACO LT YELLOW ALARM RED ALARM NC NO C NC NO C 1 0 1 0 1 0 1 0 1 0 1 0 1 0 1 0 g030222 CHASSIS CLUSTER CONTROL 0 CHASSIS CLUSTER CONTROL 1 CHASSIS CLUSTER CONTROL 0 CHASSIS CLUSTER CONTROL 1 270 ...

Страница 270: ... 1 0 1 0 g030224 CHASSIS CLUSTER CONTROL 0 CHASSIS CLUSTER CONTROL 1 CHASSIS CLUSTER CONTROL 0 CHASSIS CLUSTER CONTROL 1 Installing an SRX5800 Services Gateway Fan Tray NOTE To prevent overheating install the replacement fan tray immediately after removing the existing fan tray Do not operate the services gateway for more than two minutes without both fan trays installed Before you begin to instal...

Страница 271: ...te to secure it in the chassis 4 Lower the cable manager back into position if necessary Figure 116 Installing an Upper Fan Tray Standard Capacity Shown High Capacity Similar OK 0 FAIL ONLINE OK 1 FAIL ONLINE OK 2 FAIL ONLINE OK 3 FAIL ONLINE OK 4 FAIL ONLINE OK 5 FAIL ONLINE OK 0 FAIL ONLINE MASTER ONLINE OFFLINE RE0 FAN PEM 1 0 0 1 2 3 RE1 OK 1 FAIL ONLINE OK 7 FAIL ONLINE OK 8 FAIL ONLINE OK 9 ...

Страница 272: ...S CLUSTER CONTROL 1 CHASSIS CLUSTER CONTROL 0 CHASSIS CLUSTER CONTROL 1 Maintaining the Air Filter on the SRX5800 Services Gateway Purpose For optimum cooling verify the condition of the air filters Action Regularly inspect the air filter A dirty air filter restricts airflow in the unit impeding the ventilation of the chassis The filter degrades over time Periodically replace the filter in use as ...

Страница 273: ...lter You should change the air filter every six months To replace the air filter perform the following procedures in sequence 1 Removing the SRX5800 Services Gateway Air Filter 274 2 Installing the SRX5800 Services Gateway Air Filter 275 Removing the SRX5800 Services Gateway Air Filter CAUTION Do not run the services gateway for more than two minutes without the air filter in place CAUTION Always ...

Страница 274: ...low the fastened loops of a cable to dangle which stresses the cable at the fastening point 3 Simultaneously pull the two releases labeled PULL on the cable manager Lift it up and outward to lock it in place to access the air filter 4 Slide the air filter tray out of the chassis 5 Lift the air filter out of the air filter tray Figure 118 Removing the Air Filter Standard Capacity Filter Tray Shown ...

Страница 275: ...k into position 6 Rearrange the cables in the cable manager Figure 119 Installing the Air Filter Standard Capacity Filter Tray Shown High Capacity Similar Maintaining the SRX5800 Power System IN THIS SECTION Maintaining SRX5800 Services Gateway Power Supplies 277 Replacing an SRX5800 Services Gateway AC Power Supply 278 Replacing an SRX5800 Services Gateway AC Power Supply Cord 284 Replacing an SR...

Страница 276: ...3 150 8 Make sure that the power and grounding cables are arranged so that they do not obstruct access to other services gateway components Routinely check the status LEDs on the power supply faceplates and the craft interface to determine if the power supplies are functioning normally Check the red and yellow alarm LEDs on the craft interface Power supply failure or removal triggers an alarm that...

Страница 277: ...teway at all times CAUTION To maintain proper cooling and prevent thermal shutdown of the operating power supply unit each power supply slot must contain either a power supply or a blank panel If you remove a power supply you must install a replacement power supply or a blank panel shortly after the removal NOTE After powering off a power supply wait at least 60 seconds before turning it back on B...

Страница 278: ...switch on the chassis above the AC power supply to the off O position If the services gateway is equipped with high capacity AC power supplies you must also move the AC input switch on the power supply itself to the off O position 4 While grasping the handle on the power supply faceplate with one hand use your other hand to pull the spring loaded locking pin in the release lever away from the chas...

Страница 279: ... Removing an AC Power Supply Standard Capacity Shown High Capacity Similar WARNING Do not touch the power connector on the top of the power supply see Figure 121 on page 281 It can contain dangerous voltages 280 ...

Страница 280: ...ou have the following available ESD grounding strap To install an AC power supply 1 Attach an ESD grounding strap to your bare wrist and connect the strap to one of the ESD points on the chassis 2 If you have not already done so move the AC input switch in the chassis above the empty power supply slot to the off O position 3 For each high capacity AC power supply move the input mode switch to posi...

Страница 281: ...n in the release lever away from the chassis and turn the release lever counterclockwise until it stops Let go of the locking pin in the release lever Ensure that the pin is seated inside the corresponding hole in the chassis 6 Using both hands slide the power supply straight into the chassis until the power supply is fully seated in the chassis slot The power supply faceplate should be flush with...

Страница 282: ...release lever clockwise until it stops 8 Let go of the locking pin in the release lever Ensure that the pin is seated inside the corresponding hole in the chassis 9 If you are installing a high capacity power supply connect a power cord to the appliance inlet at the top edge of the power supply For more information see Connecting an SRX5800 Services Gateway AC Power Supply Cord on page 285 10 Move...

Страница 283: ...can take up to 60 seconds for status indicators such as the status LEDs on the power supply and the show chassis command display to indicate that the power supply is functioning normally Ignore error indicators that appear during the first 60 seconds If any of the status LEDs indicates that the power supply is not functioning normally repeat the installation and cabling procedures Replacing an SRX...

Страница 284: ...ocated next to the appliance inlet on the power supply itself 3 Unplug the power cord from the power source receptacle 4 Unplug the power cord from the appliance inlet on the chassis or power supply Connecting an SRX5800 Services Gateway AC Power Supply Cord NOTE Power cords are not supplied with the services gateway You must order the power cords separately Before you begin to connect an AC power...

Страница 285: ... to services gateway components or drape where people could trip on it 7 Move the AC input switch nearest to the appliance inlet for the power cord you are replacing to the on position For standard capacity AC power supplies there is only one AC input switch for each power supply it is located next to the appliance inlet on the chassis above the power supply For high capacity AC power supplies the...

Страница 286: ...oard that services the DC circuit switch the circuit breaker to the off position and tape the switch handle of the circuit breaker in the off position CAUTION To maintain proper cooling and prevent thermal shutdown of the operating power supply unit each power supply slot must contain either a power supply or a blank panel If you remove a power supply you must install a replacement power supply or...

Страница 287: ...e power supply faceplate to the off O position 6 Remove the clear plastic cover protecting the terminal studs on the faceplate 7 Remove the nuts and washers from the terminal studs Use a 7 16 in nut driver or socket wrench 8 Remove the cable lugs from the terminal studs 9 Loosen the captive screw on the cable restraint on the lower edge of the power supply faceplate 10 Carefully move the power cab...

Страница 288: ...DC Power Supply from the Services Gateway Standard Capacity Shown High Capacity Similar WARNING Do not touch the power connector on the top of the power supply see Figure 125 on page 290 It can contain dangerous voltages 289 ...

Страница 289: ...NG Before performing DC power procedures ensure that power is removed from the DC circuit To ensure that all power is off locate the circuit breaker on the panel board that services the DC circuit switch the circuit breaker to the off position and tape the switch handle of the circuit breaker in the off position To install a DC power supply see Figure 126 on page 292 1 Verify that the power switch...

Страница 290: ...me active during installation 6 Ensure that the release lever below the empty power supply slot is locked in the counterclockwise position see Figure 126 on page 292 If necessary pull the spring loaded locking pin in the release lever away from the chassis and turn the release lever counterclockwise until it stops Let go of the locking pin in the release lever Ensure that the pin is seated inside ...

Страница 291: ...ver away from the chassis and turn the release lever clockwise until it stops 9 Let go of the locking pin in the release lever Ensure that the pin is seated inside the corresponding hole in the chassis 10 Remove the clear plastic cover protecting the terminal studs on the faceplate 11 Remove the nuts and washers from the terminal studs 12 Secure each power cable lug to the terminal studs first wit...

Страница 292: ...minal studs on each power supply For a standard capacity power supply a Attach the positive DC source power cable lug to the RTN return terminal b Attach the negative DC source power cable lug to the 48V input terminal c Apply between 23 lb in 2 6 Nm and 25 lb in 2 8 Nm of torque to each nut see Figure 127 on page 293 Figure 127 Connecting DC Power to a Standard Capacity DC Power Supply For a high...

Страница 293: ... surface of the terminal block as you are tightening the nuts Ensure that each nut is properly threaded onto the terminal stud The nut should be able to spin freely with your fingers when it is first placed onto the terminal stud Applying installation torque to the nut when improperly threaded may result in damage to the terminal stud CAUTION The maximum torque rating of the terminal studs on the ...

Страница 294: ...the cables are not touching and that they do not block access to services gateway components or drape where people could trip on them 16 Switch on the dedicated customer site circuit breaker 17 Verify that the input LEDs on the power supply indicate that the DC power is connected properly For a standard capacity power supply verify that the INPUT OK LED on the power supply is lit steadily For a hi...

Страница 295: ...in nut driver or socket wrench WARNING Before performing DC power procedures ensure that power is removed from the DC circuit To ensure that all power is off locate the circuit breaker on the panel board that services the DC circuit switch the circuit breaker to the off position and tape the switch handle of the circuit breaker in the off position To disconnect a power cable for a DC power supply ...

Страница 296: ...to connect a DC power supply cable Ensure you understand how to prevent electrostatic discharge ESD damage See Prevention of Electrostatic Discharge Damage on page 505 Ensure that you have the following available ESD grounding strap 7 16 in nut driver or socket wrench WARNING Before performing DC power procedures ensure that power is removed from the DC circuit To ensure that all power is off loca...

Страница 297: ...r a high capacity power supply 4 Secure the power cable lug to the terminal studs first with the split washer then with the nut Apply between 23 lb in 2 6 Nm and 25 lb in 2 8 Nm of torque to each nut see Figure 129 on page 298 and Figure 130 on page 299 Figure 129 Connecting Power Cables to a Standard Capacity DC Power Supply 298 ...

Страница 298: ... place 6 Verify that the DC power cable is connected correctly that it does not touch or block access to services gateway components and that it does not drape where people could trip on it 7 Replace the clear plastic cover over the terminal studs on the faceplate 8 Attach the power cable to the DC power source 9 Turn on the dedicated customer site circuit breaker to the power supply 10 Verify tha...

Страница 299: ... and high capacity power supplies simultaneously The one exception is during the process of replacing standard capacity power supplies with high capacity power supplies when it is permissible to have both types installed briefly CAUTION The services gateway cannot be powered from AC and DC power supplies simultaneously The first type of power supply detected by the services gateway when initially ...

Страница 300: ...Services Gateway AC Power Supply on page 278 for instructions on removing AC power supplies If there are only three standard capacity AC power supplies installed in the services gateway proceed to the next step 5 Install a high capacity AC power supply in the vacant slot in the back of the chassis See Installing an SRX5800 Services Gateway AC Power Supply on page 281 for instructions on installing...

Страница 301: ...pport high capacity DC power supplies 2 If you have not already done so replace both standard capacity fan trays with high capacity fan trays Also replace the standard capacity air filter with a high capacity air filter For more information see Replacing an SRX5800 Services Gateway Fan Tray on page 268 and Replacing the SRX5800 Services Gateway Air Filter on page 274 3 Install high capacity DC pow...

Страница 302: ...removing DC power supplies 5 Install a high capacity DC power supply in the PEM0 slot in the back of the chassis See Installing an SRX5800 Services Gateway DC Power Supply on page 290 for instructions on installing DC power supplies 6 Repeat Step 4 and Step 5 to replace the standard capacity DC power supply in the PEM1 slot with a high capacity DC power supply 7 Check the LEDs on the faceplate of ...

Страница 303: ... SRX5800 Services Gateway Host Subsystem and SCBs Purpose For optimum services gateway performance verify the condition of the host subsystem and any additional SCBs The host subsystem comprises an SCB and a Routing Engine installed into a slot in the SCB Action On a regular basis Check the LEDs on the craft interface to view information about the status of the Routing Engines Check the LEDs on th...

Страница 304: ...16 0 06 To check the status of the SCB issue the show chassis environment cb command The output is similar to the following user host show chassis environment cb CB 0 status State Online Master Temperature 40 degrees C 104 degrees F Power 1 1 2 V 1208 mV 1 5 V 1521 mV 1 8 V 1807 mV 2 5 V 2507 mV 3 3 V 3319 mV 5 0 V 5033 mV 12 0 V 12142 mV 1 25 V 1243 mV 3 3 V SM3 3312 mV 5 V RE 5059 mV 12 V RE 119...

Страница 305: ...own the Routing Engine cleanly so its state information is preserved user host request system halt 2 Wait until a message appears on the console confirming that the operating system has halted For more information about the command see Junos OS System Basics and Services Command Reference at www juniper net documentation NOTE The SCB might continue forwarding traffic for approximately 5 minutes af...

Страница 306: ...he insertion force on an SCB is too great for one ejector Replacing an SRX5800 Services Gateway SCB Before replacing an SCB read the guidelines in Operating and Positioning the SRX5800 Services Gateway SCB Ejectors on page 306 To replace an SCB perform the following procedures NOTE The procedure to replace an SCB applies to the SRX5K SCB SRX5K SCBE SRX5K SCB3 and SRX5K SCB4 1 Removing an SRX5800 S...

Страница 307: ...te interfaces fab0 user host deactivate interfaces fab1 user host commit 2 Power off the services gateway using the command request system power off user host request system power off NOTE Wait until a message appears on the console confirming that the services stopped 3 Physically turn off the power and remove the power cables from the chassis 4 Place an electrostatic bag or antistatic mat on a f...

Страница 308: ...INE OK 7 FAIL ONLINE OK 8 FAIL ONLINE OK 9 FAIL ONLINE OK 10 FAIL ONLINE OK 11 FAIL ONLINE OK 2 6 FAIL ONLINE ACO LT YELLOW ALARM RED ALARM NC NO C NC NO C 1 0 1 0 1 0 1 0 1 0 1 0 1 0 1 0 g030226 CHASSIS CLUSTER CONTROL 0 CHASSIS CLUSTER CONTROL 1 CHASSIS CLUSTER CONTROL 0 CHASSIS CLUSTER CONTROL 1 Installing an SRX5800 Services Gateway SCB Before you begin to install a SCB Ensure you understand h...

Страница 309: ...on vertically and toward the center of the board 8 Connect the power cables to the chassis and power on the services gateway 9 To verify that the SCB is functioning normally check the LEDs on its faceplate The green OK FAIL LED should light steadily a few minutes after the SCB is installed If the OK FAIL LED is red remove and install the SCB again If the OK FAIL LED still lights steadily the SCB i...

Страница 310: ...0 1 0 1 0 1 0 1 0 1 0 g030227 CHASSIS CLUSTER CONTROL 0 CHASSIS CLUSTER CONTROL 1 CHASSIS CLUSTER CONTROL 0 CHASSIS CLUSTER CONTROL 1 Replacing the SRX5800 Services Gateway Routing Engine To replace the Routing Engine perform the following procedures NOTE The procedure to replace a Routing Engine applies to SRX5K RE 13 20 SRX5K RE 1800X4 and SRX5K RE 128G 1 Removing the SRX5800 Services Gateway Ro...

Страница 311: ...ing the SRX5800 Services Gateway Host Subsystem Offline on page 306 2 Place an electrostatic bag or antistatic mat on a flat stable surface 3 Attach an ESD grounding strap to your bare wrist and connect the strap to one of the ESD points on the chassis 4 Using the Phillips number 2 screwdriver loosen the captive screws at each end of the Routing Engine faceplate 5 Flip the ejector handles outward ...

Страница 312: ...C NO C NC NO C 1 0 1 0 1 0 1 0 1 0 0 1 0 1 0 1 0 g030228 CONSOLE AUX USB RESET ONLINE OFFLINE HDD OK FAIL ONLINE MASTER ETHERNET CHASSIS CLUSTER CONTROL 0 CHASSIS CLUSTER CONTROL 1 CHASSIS CLUSTER CONTROL 0 CHASSIS CLUSTER CONTROL 1 Installing the SRX5800 Services Gateway Routing Engine Before you begin to install a routing engine Ensure you understand how to prevent electrostatic discharge ESD da...

Страница 313: ...until you feel resistance and then press the Routing Engine s faceplate until it engages the connectors 7 Press both of the ejector handles inward to seat the Routing Engine 8 Using the Phillips number 2 screwdriver tighten the captive screws on the top and bottom of the Routing Engine faceplate 9 Power on the services gateway The Routing Engine might require several minutes to boot After the Rout...

Страница 314: ...OK 0 FAIL ONLINE MASTER ONLINE OFFLINE RE0 FAN PEM 1 0 0 1 2 3 RE1 OK 1 FAIL ONLINE OK 7 FAIL ONLINE OK 8 FAIL ONLINE OK 9 FAIL ONLINE OK 10 FAIL ONLINE OK 11 FAIL ONLINE OK 2 6 FAIL ONLINE ACO LT YELLOW ALARM RED ALARM NC NO C NC NO C 1 0 1 0 1 0 1 0 1 0 0 1 0 1 0 1 0 g030229 CONSOLE AUX USB RESET ONLINE OFFLINE HDD OK FAIL ONLINE MASTER ETHERNET CHASSIS CLUSTER CONTROL 0 CHASSIS CLUSTER CONTROL ...

Страница 315: ...r db certs common key pair root SRX B ls la total 8 drwx 2 root wheel 512 Jan 22 15 09 drwx 7 root wheel 512 Mar 26 2009 rw r r 1 root wheel 0 Jan 22 15 09 test root SRX B mv test test old root SRX B ls la total 8 drwx 2 root wheel 512 Jan 22 15 10 drwx 7 root wheel 512 Mar 26 2009 rw r r 1 root wheel 0 Jan 22 15 09 test old root SRX B d Copy the files from the var db certs common key pair folder ...

Страница 316: ...primary device is depicted as node 0 and the secondary device as node 1 Follow these steps to perform the LICU 1 Ensure that the secondary node does not have an impact on network traffic by isolating it from the network when LICU is in progress For this disable the physical interfaces RETH child interfaces on the secondary node For SRX5400 Services Gateways admin cluster set interfaces xe 5 0 0 di...

Страница 317: ...ete interfaces fab1 admin cluster set interfaces fab0 fabric options member interfaces xe 4 0 5 non IOC port admin cluster set interfaces fab1 fabric options member interfaces xe 10 0 5 non IOC port 5 Commit the configuration root commit NOTE After you commit the configuration the following error message appears Connection to node1 has been broken error remote unlock configuration failed on node1 ...

Страница 318: ...he hardware upgrade on the secondary node by replacing SCB2 with SCB3 IOC2 with IOC3 and the existing midplane with the enhanced midplane Following these steps while upgrading the SCB To upgrade the Routing Engine on the secondary node a Before powering off the secondary node copy the configuration information to a USB device b Replace RE1 with RE2 and upgrade the Junos OS on RE2 c Upload the conf...

Страница 319: ...For more information about mounting the USB drive on the device refer to KB articles KB12880 and KB12022 from the Knowledge Base Perform this step when you upgrade the MPC 320 ...

Страница 320: ...b1 fabric options member interfaces xe 9 0 2 set groups global interfaces fab0 fabric options member interfaces xe 3 0 2 edit root clustert show display set grep reth0 set chassis cluster redundancy group 1 ip monitoring family inet 44 44 44 2 interface reth0 0 secondary ip address 44 44 44 3 set interfaces xe 3 0 0 gigether options redundant parent reth0 set interfaces xe 9 0 0 gigether options r...

Страница 321: ...monitoring FL Fabric Connection monitoring GR GRES monitoring HW Hardware monitoring IF Interface monitoring IP IP monitoring LB Loopback monitoring MB Mbuf monitoring NH Nexthop monitoring NP NPC monitoring SP SPU monitoring SM Schedule monitoring CF Config Sync monitoring Cluster ID 1 Node Priority Status Preempt Manual Monitor failures Redundancy group 0 Failover count 1 node0 0 lost n a n a n ...

Страница 322: ...admin cluster set interfaces xe 2 0 0 disable admin cluster set interfaces xe 2 1 0 disable admin cluster delete interfaces xe 5 0 0 disable admin cluster delete interfaces xe 5 1 0 disable For SRX5600 Services Gateways admin cluster set interfaces xe 2 0 0 disable admin cluster set interfaces xe 2 0 4 disable admin cluster delete interfaces xe 9 0 0 disable admin cluster delete interfaces xe 9 0 ...

Страница 323: ...ry node admin cluster request system reboot See Powering On an AC Powered SRX5400 Services Gateway Powering On a DC Powered SRX5400 Services Gateway Powering On an AC Powered SRX5600 Services Gateway Powering On a DC Powered SRX5600 Services Gateway Powering On an AC Powered SRX5800 Services Gateway on page 243 Powering On a DC Powered SRX5800 Services Gateway on page 247 16 Perform the hardware u...

Страница 324: ...c Upload the configuration to RE2 from the USB device 325 ...

Страница 325: ...For more information about mounting the USB drive on the device refer to KB articles KB12880 and KB12022 from the Knowledge Base Perform this step when you upgrade the MPC 326 ...

Страница 326: ...ay set grep reth0 set chassis cluster redundancy group 1 ip monitoring family inet 44 44 44 2 interface reth0 0 secondary ip address 44 44 44 3 set interfaces xe 3 0 0 gigether options redundant parent reth0 set interfaces xe 9 0 0 gigether options redundant parent reth0 set interfaces reth0 vlan tagging set interfaces reth0 redundant ether options redundancy group 1 set interfaces reth0 unit 0 vl...

Страница 327: ...ring NH Nexthop monitoring NP NPC monitoring SP SPU monitoring SM Schedule monitoring CF Config Sync monitoring Cluster ID 1 Node Priority Status Preempt Manual Monitor failures Redundancy group 0 Failover count 1 node0 0 lost n a n a n a node1 100 primary no no None Redundancy group 1 Failover count 3 node0 0 lost n a n a n a node1 150 primary no no None root cluster show chassis fpc pic status n...

Страница 328: ...ary For SRX5400 Services Gateways admin cluster set interfaces xe 5 0 0 disable admin cluster set interfaces xe 5 1 0 disable admin cluster delete interfaces xe 2 0 0 disable admin cluster delete interfaces xe 2 1 0 disable For SRX5600 Services Gateways admin cluster set interfaces xe 9 0 0 disable admin cluster set interfaces xe 9 0 4 disable admin cluster delete interfaces xe 2 0 0 disable admin...

Страница 329: ...m reboot See Powering On an AC Powered SRX5400 Services Gateway Powering On a DC Powered SRX5400 Services Gateway Powering On an AC Powered SRX5600 Services Gateway Powering On a DC Powered SRX5600 Services Gateway Powering On an AC Powered SRX5800 Services Gateway on page 243 Powering On a DC Powered SRX5800 Services Gateway on page 247 a When you power on the secondary node enable the control po...

Страница 330: ...syn check admin cluster delete security flow tcp session no sequence check 27 Commit the configuration root commit 28 Verify the Redundancy Group RG states and their priority root cluster show version node0 Hostname displays the hostname Model displays the model number Junos 15 1X49 D10 JUNOS Software Release 15 1X49 D10 node1 Hostname displays the hostname Model displays the model Junos 15 1X49 D...

Страница 331: ...Online SPU Flow PIC 2 Online SPU Flow PIC 3 Online SPU Flow Slot 5 Online SRX5k IOC II PIC 0 Online 10x 10GE SFP PIC 2 Online 10x 10GE SFP node1 Slot 1 Online SRX5k IOC II PIC 0 Online 1x 100GE CFP PIC 2 Online 2x 40GE QSFP Slot 2 Online SRX5k SPC II PIC 0 Online SPU Cp PIC 1 Online SPU Flow PIC 2 Online SPU Flow PIC 3 Online SPU Flow Slot 3 Online SRX5k IOC3 24XGE 6XLG PIC 0 Online 12x 10GE SFP P...

Страница 332: ...r ID 1 Node Priority Status Preempt Manual Monitor failures Redundancy group 0 Failover count 0 node0 250 primary no no None node1 100 secondary no no None Redundancy group 1 Failover count 0 node0 254 primary no no None node1 150 secondary no no None root cluster show security monitoring node0 Flow session Flow session CP session CP session FPC PIC CPU Mem current maximum current maximum 2 0 0 11...

Страница 333: ... interfaces terse grep reth0 xe 3 0 0 0 up up aenet reth0 0 xe 3 0 0 32767 up up aenet reth0 32767 xe 9 0 0 0 up up aenet reth0 0 xe 9 0 0 32767 up up aenet reth0 32767 reth0 up up reth0 0 up up inet 44 44 44 1 8 reth0 32767 up up multiservice root cluster show interfaces terse grep reth1 xe 3 0 4 0 up up aenet reth1 0 xe 3 0 4 32767 up up aenet reth1 32767 xe 9 0 4 0 up up aenet reth1 0 xe 9 0 4 ...

Страница 334: ...hat you perform the ISHU during a maintenance window or during the lowest possible traffic as the secondary node is not available at this time Ensure to upgrade the SCB and Routing Engine at the same time as the following configurations are only supported SRX5K RE 13 20 and SRX5K SCB SRX5K RE 1800X4 and SRX5K SCBE SRX5K RE 1800X4 and SRX5K SCB3 NOTE While performing the ISHU in the SRX5800 service...

Страница 335: ...unified in service software upgrade unified ISSU see Upgrading Both Devices in a Chassis Cluster Using an ISSU To perform an ISHU 1 Export the configuration information from the secondary node to a USB or an external storage device For more information about mounting the USB on the device refer to KB articles KB12880 and KB12022 from the Knowledge Base 2 Power off the secondary node See Powering O...

Страница 336: ...ease 12 1X47 D15 or later for SRX5K RE 1800X4 SRX5K SCBE and 15 1X49 D10 or later for SRX5K RE 1800X4 SRX5K SCB3 8 After the secondary node reboots import all the configuration settings from the USB to the node For more information about mounting the USB on the device refer to KB articles KB12880 and KB12022 from the Knowledge Base 9 Power off the secondary node See Powering Off the SRX5400 Servic...

Страница 337: ...ter failover redundancy group 0 node 1 For RG1 issue the following command admin cluster request chassis cluster failover redundancy group 1 node 1 Verify that all RGs are failed over by issuing the following command admin cluster show chassis cluster status 13 Verify the operations of the upgraded secondary node by performing the following To ensure all FPC s are online issue the following comman...

Страница 338: ...ices at www juniper net documentation Maintaining the SRX5800 Line Cards and Modules IN THIS SECTION Maintaining Interface Cards and SPCs on the SRX5800 Services Gateway 340 Replacing SRX5800 Services Gateway IOCs 342 Replacing SRX5800 Services Gateway Flex IOCs 349 Replacing SRX5800 Services Gateway Port Modules 355 Replacing SRX5800 Services Gateway SPCs 360 Replacing SPCs in an Operating SRX540...

Страница 339: ...sends an alarm message to the Routing Engine Issue the CLI show chassis fpc command to check the status of installed cards As shown in the sample output the value Online in the column labeled State indicates that the card is functioning normally user host show chassis fpc Temp CPU Utilization Memory Utilization Slot State C Total Interrupt DRAM MB Heap Buffer 0 Online 41 9 0 1024 15 57 1 Online 43...

Страница 340: ...Total CPU DRAM 1024 MB Total RLDRAM 256 MB Total DDR DRAM 4096 MB Start time 2007 07 10 12 28 42 PDT Uptime 1 hour 33 minutes 43 seconds Issue the CLI show chassis fpc pic status command The slots are numbered 0 through 5 bottom to top user host show chassis fpc pic status Slot 0 Online SRX5k DPC 40x 1GE PIC 0 Online 10x 1GE RichQ PIC 1 Online 10x 1GE RichQ PIC 2 Online 10x 1GE RichQ PIC 3 Online ...

Страница 341: ...moving an SRX5800 Services Gateway IOC 342 2 Installing an SRX5800 Services Gateway IOC 345 Removing an SRX5800 Services Gateway IOC An IOC weighs up to 13 1 lb 5 9 kg Be prepared to accept its full weight Before you begin to remove an IOC Ensure you understand how to prevent electrostatic discharge ESD damage See Prevention of Electrostatic Discharge Damage on page 505 Ensure that you have the fo...

Страница 342: ...nformation about the command see Junos OS System Basics and Services Command Reference at www juniper net documentation 4 Power off the services gateway using the command request system power off user host request system power off NOTE Wait until a message appears on the console confirming that the services stopped 5 Physically turn off the power and remove the power cables from the chassis 6 Remo...

Страница 343: ... hand under it to support it Slide the IOC completely out of the chassis and place it on the antistatic mat or in the electrostatic bag CAUTION The weight of the IOC is concentrated in the back end Be prepared to accept the full weight up to 13 1 lb 5 9 kg as you slide the IOC out of the chassis When the IOC is out of the chassis do not hold it by the ejector handles bus bars or edge connectors Th...

Страница 344: ... 0 0 1 0 1 0 g030230 OK FAIL 0 0 0 5 2 0 2 5 1 0 1 5 3 0 3 5 CHASSIS CLUSTER CONTROL 0 CHASSIS CLUSTER CONTROL 1 CHASSIS CLUSTER CONTROL 0 CHASSIS CLUSTER CONTROL 1 Installing an SRX5800 Services Gateway IOC An IOC weighs up to 13 1 lb 5 9 kg Be prepared to accept its full weight Before you begin to install an IOC Ensure you understand how to prevent electrostatic discharge ESD damage See Preventi...

Страница 345: ...ch transceiver is covered by a rubber safety cap If it is not cover the transceiver with a safety cap 7 Orient the IOC so that the faceplate faces you 8 Lift the IOC into place and carefully align the top and bottom edges of the IOC with the guides inside the card cage 9 Slide the IOC all the way into the card cage until you feel resistance 10 Grasp both ejector handles and rotate them clockwise s...

Страница 346: ... are difficult to diagnose 14 Connect the power cables to the chassis 15 Power on the services gateway 16 Use one of the following methods to bring the IOC online Press and hold the corresponding IOC online button on the craft interface until the green OK LED next to the button lights steadily in about 5 seconds Issue the following CLI command user host request chassis fpc slot slot number online ...

Страница 347: ...AN PEM 1 0 0 1 2 3 RE1 OK 1 FAIL ONLINE OK 7 FAIL ONLINE OK 8 FAIL ONLINE OK 9 FAIL ONLINE OK 10 FAIL ONLINE OK 11 FAIL ONLINE OK 2 6 FAIL ONLINE ACO LT YELLOW ALARM RED ALARM NC NO C NC NO C 1 0 1 0 1 0 1 0 1 0 0 1 0 1 0 g030231 OK FAIL 0 0 0 5 2 0 2 5 1 0 1 5 3 0 3 5 CHASSIS CLUSTER CONTROL 0 CHASSIS CLUSTER CONTROL 1 CHASSIS CLUSTER CONTROL 0 CHASSIS CLUSTER CONTROL 1 348 ...

Страница 348: ...L 0 CHASSIS CLUSTER CONTROL 1 CHASSIS CLUSTER CONTROL 0 CHASSIS CLUSTER CONTROL 1 Replacing SRX5800 Services Gateway Flex IOCs To replace a Flex IOC perform the following procedures 1 Removing an SRX5800 Services Gateway Flex IOC 349 2 Installing an SRX5800 Services Gateway Flex IOC 352 Removing an SRX5800 Services Gateway Flex IOC A Flex IOC weighs up to 13 1 lb 5 9 kg Be prepared to accept the f...

Страница 349: ...asics and Services Command Reference at www juniper net documentation 3 Power off the services gateway using the command request system power off user host request system power off NOTE Wait until a message appears on the console confirming that the services stopped 4 Physically turn off the power and remove the power cables from the chassis 5 If you have not already done so remove the port module...

Страница 350: ... not stack Flex IOCs on top of one another after removal Place each one individually in an electrostatic bag or on its own antistatic mat on a flat stable surface 9 If you are not reinstalling a replacement card into the empty slot within a short time install a blank panel over the slot to maintain proper airflow in the card cage CAUTION After removing an IOC from the chassis wait at least 30 seco...

Страница 351: ...lex IOC Before you begin to install a Flex IOC Ensure you understand how to prevent electrostatic discharge ESD damage See Prevention of Electrostatic Discharge Damage on page 505 Ensure that you have the following available ESD grounding strap Antistatic mat for the Flex IOC 352 ...

Страница 352: ...stopped 3 Physically turn off the power and remove the power cables from the chassis 4 Place the Flex IOC on an antistatic mat or remove it from its electrostatic bag 5 Identify the slot on the services gateway where you will install the Flex IOC 6 If you have not already done so remove the blank panel from the slot where you are installing the Flex IOC 7 Orient the Flex IOC so that the faceplate ...

Страница 353: ...Use one of the following methods to bring the Flex IOC online Press and hold the corresponding online button on the craft interface until the green OK LED next to the button lights steadily in about 5 seconds Issue the following CLI command user host request chassis fpc slot slot number online For more information about the command see Junos OS System Basics and Services Command Reference at www j...

Страница 354: ...eight when you remove or install a port module Before you begin to remove a port module Ensure you understand how to prevent electrostatic discharge ESD damage See Prevention of Electrostatic Discharge Damage on page 505 Ensure that you have the following available ESD grounding strap Phillips number 1 screwdriver Replacement port module or blank panel Antistatic mat for the port module Rubber saf...

Страница 355: ... cables from developing stress points WARNING Do not look directly into a fiber optic transceiver or into the ends of fiber optic cables Fiber optic transceivers and fiber optic cables connected to a transceiver emit laser light that can damage your eyes CAUTION Do not leave a fiber optic transceiver uncovered except when you are inserting or removing cable The safety cap keeps the port clean and ...

Страница 356: ...ll a blank panel over the slot to maintain proper airflow in the card cage CAUTION After removing a port module from the chassis wait at least 30 seconds before reinserting it removing a port module from a different slot or inserting a port module into a different slot Installing an SRX5800 Services Gateway Port Module Before you begin to install a port module Ensure you understand how to prevent ...

Страница 357: ...rify that each fiber optic transceiver is covered with a rubber safety cap If it is not cover the transceiver with a safety cap 5 If necessary remove the blank panel covering the slot in the Flex IOC where you are installing the port module 6 Orient the port module so that the faceplate faces you 7 Lift the port module into place and carefully align the top and bottom edges of the port module with...

Страница 358: ...nsceiver emit laser light that can damage your eyes 11 Insert the appropriate cables into the cable connector ports on each port module Secure the cables so that they are not supporting their own weight Place excess cable out of the way in a neatly coiled loop using the cable management system Placing fasteners on a loop helps to maintain its shape CAUTION Do not let fiber optic cables hang free f...

Страница 359: ...t number online For more information about the command see Junos OS System Basics and Services Command Reference at www juniper net documentation CAUTION After the OK FAIL LED turns green wait at least 30 seconds before removing the port module again removing a port module from a different slot or inserting a port module in a different slot You can also verify that the port module is functioning c...

Страница 360: ...ff the power and remove the power cables from the chassis 4 Label the cables connected to each port on the SPC so that you can later reconnect the cables to the correct ports 5 Disconnect the cables from the SPC If the SPC uses fiber optic cable immediately cover each transceiver and the end of each cable with a rubber safety cap Arrange the disconnected cables in the cable management system to pr...

Страница 361: ... and the other hand under it to support it Slide the SPC completely out of the chassis and place it on the antistatic mat or in the electrostatic bag CAUTION The weight of the SPC is concentrated in the back end Be prepared to accept the full weight up to 18 3 lb 8 3 kg as you slide the SPC out of the chassis When the SPC is out of the chassis do not hold it by the ejector handles bus bars or edge...

Страница 362: ...ASSIS CLUSTER CONTROL 0 CHASSIS CLUSTER CONTROL 1 Installing an SRX5800 Services Gateway SPC Before you begin to install a SPC Ensure you understand how to prevent electrostatic discharge ESD damage See Prevention of Electrostatic Discharge Damage on page 505 Ensure that you have the following available ESD grounding strap Antistatic mat Rubber safety caps for transceivers To install an SPC see Fi...

Страница 363: ...and then the top of the card with the guides inside the card cage 9 Slide the SPC all the way into the card cage until you feel resistance 10 Grasp both ejector handles and rotate them clockwise simultaneously until the SPC is fully seated 11 If the SPC uses fiber optic cable remove the rubber safety cap from each transceiver and cable WARNING Do not look directly into a fiber optic transceiver or...

Страница 364: ...oid bending a fiber optic cable beyond its minimum bend radius An arc smaller than a few inches in diameter can damage the cable and cause problems that are difficult to diagnose 13 Connect the power cables to the chassis 14 Power on the services gateway 15 Verify that the SPC is functioning correctly by issuing the show chassis fpc and show chassis fpc pic status commands 365 ...

Страница 365: ...Figure 143 Installing an SPC 366 ...

Страница 366: ...E OFFLINE RE0 FAN PEM 1 0 0 1 2 3 RE1 OK 1 FAIL ONLINE OK 7 FAIL ONLINE OK 8 FAIL ONLINE OK 9 FAIL ONLINE OK 10 FAIL ONLINE OK 11 FAIL ONLINE OK 2 6 FAIL ONLINE ACO LT YELLOW ALARM RED ALARM NC NO C NC NO C 1 0 1 0 1 0 1 0 1 0 1 0 1 0 1 0 g030233 Fiber optic cable CHASSIS CLUSTER CONTROL 0 CHASSIS CLUSTER CONTROL 1 CHASSIS CLUSTER CONTROL 0 CHASSIS CLUSTER CONTROL 1 367 ...

Страница 367: ...368 ...

Страница 368: ...nal SPCs in slots 0 or 1 using this procedure If you are adding second generation SRX5K SPC 4 15 320 SPCs to the chassis you must install the new SPCs so that a second generation SRX5K SPC 4 15 320 SPC is the SPC in the original lowest numbered slot For example if the chassis already has two first generation SPCs installed in slots 2 and 3 you must install SRX5K SPC 4 15 320 SPCs in slots 0 or 1 Y...

Страница 369: ...eway must have at least one SPC installed The installation may warrant additional SPCs if the number of sessions encountered is greater than the session limit of one SPC If the chassis cluster is operating in active active mode you must transition it to active passive mode before using this procedure You transition the cluster to active passive mode by making one node primary for all redundancy gr...

Страница 370: ...s Gateway from Standard Capacity to High Capacity Power Supplies or Upgrading an SRX5600 Services Gateway from Standard Capacity to High Capacity Power Supplies for more information If your installation does not meet these criteria use the procedure in Installing an SRX5400 Services Gateway SPC or Installing an SRX5600 Services Gateway SPC or Installing an SRX5800 Services Gateway SPC on page 363 ...

Страница 371: ... finish starting 10 Reestablish the CLI session with the secondary node device 11 Use the show chassis fpc pic status command to make sure that all of the cards in the secondary node chassis are back online 12 Use the show chassis cluster status command to make sure that the priority for all redundancy groups is greater than zero 13 Use the console port on the device that is the primary node to es...

Страница 372: ...or all redundancy groups is greater than zero In Service Hardware Upgrade for SRX5K SPC3 in a Chassis Cluster If your device is part of a chassis cluster you can install SRX5K SPC3 using the In Service Hardware Upgrade ISHU procedure and avoid network downtime NOTE This ISHU procedure will not replace any existing Services Processing Cards SPC it will guide you to install an additional SRX5K SPC3 ...

Страница 373: ... the chassis the CP mode is Full CP mode The services gateway must already be equipped with high capacity power supplies and fan trays and the high capacity air filters See Upgrading an SRX5600 Services Gateway from Standard Capacity to High Capacity Power Supplies or Upgrading an SRX5600 Services Gateway from Standard Capacity to High Capacity Power Supplies for more information During this insta...

Страница 374: ...ter status command to make sure that the priority for all redundancy groups is greater than zero 12 Use the console port on the device that is the primary node to establish a CLI session 13 In the CLI session for the primary node device use the request chassis cluster failover command to fail over each redundancy group that has an ID number greater than zero 14 In the CLI session for the primary n...

Страница 375: ... and MIC slots in an FPC are numbered from 0 through 1 bottom to top user host show chassis fpc pic status Slot 0 Online SRX5k SPC PIC 0 Online SPU Cp Flow PIC 1 Online SPU Flow Slot 3 Online SRX5k DPC 4X 10GE PIC 0 Online 1x 10GE LAN WAN RichQ PIC 1 Online 1x 10GE LAN WAN RichQ PIC 2 Online 1x 10GE LAN WAN RichQ PIC 3 Online 1x 10GE LAN WAN RichQ Slot 5 Online SRX5k FIOC PIC 0 Online 16x 1GE TX P...

Страница 376: ...D grounding strap around your bare wrist and connect the other end of the strap to the ESD point on the chassis 3 Power off the services gateway 4 Label the cables connected to the MIC so that you can later reconnect each cable to the correct MIC 5 Disconnect the cables from the MIC If the MIC uses fiber optic cable immediately cover each transceiver and the end of each cable with a rubber safety ...

Страница 377: ... minimum bend radius An arc smaller than a few inches in diameter can damage the cable and cause problems that are difficult to diagnose 7 On the MPC pull the ejector knob that is adjacent to the MIC you are removing away from the MPC faceplate The ejector knob is located between the MIC and the rotational knob that retains the MPC in the services gateway card cage Pulling the ejector knob unseats...

Страница 378: ... carrier Place it in the electrostatic bag or on the antistatic mat 9 If you are not reinstalling a MIC into the emptied MIC slot within a short time install a blank MIC panel over the slot to maintain proper airflow in the MPC card cage Installing an SRX5800 Services Gateway MIC Before you begin to install a MIC 379 ...

Страница 379: ...ateway Chassis Cluster for more information To install a MIC 1 Wrap and fasten one end of the ESD grounding strap around your bare wrist and connect the other end of the strap to the ESD point on the chassis 2 If you have not already done so power off the services gateway 3 If the MIC uses fiber optic cable verify that a rubber safety cap is over each transceiver on the faceplate Install a cap if ...

Страница 380: ...knob will automatically move in towards the faceplate to lock the MIC in position as it seats If the MIC does not seat properly in the slot pull the ejector knob all the way out and try again to seat the MIC The MIC will not seat properly unless the ejector knob is all the way when you start to insert the MIC CAUTION Slide the MIC straight into the slot to avoid damaging the components on the MIC ...

Страница 381: ...e cables into the cable connectors on the MIC 10 Arrange each cable to prevent the cable from dislodging or developing stress points Secure the cable so that it is not supporting its own weight as it hangs to the floor Place excess cable out of the way in a neatly coiled loop CAUTION Do not let fiber optic cables hang free from the connector Do not allow the fastened loops of a cable to dangle whi...

Страница 382: ...ge 505 Ensure that you have the following available ESD grounding strap Replacement MPC or blank panel Antistatic mat Rubber safety caps for transceivers To remove an MPC 1 Wrap and fasten one end of the ESD grounding strap around your bare wrist and connect the other end of the strap to the ESD point on the chassis 2 Power off the services gateway 3 Label the cables connected to each MIC on the M...

Страница 383: ...r can damage the cable and cause problems that are difficult to diagnose 5 If a MIC uses fiber optic cable immediately cover each transceiver and the end of each cable with a rubber safety cap 6 Arrange the disconnected cables in the cable management brackets to prevent the cables from developing stress points 7 Simultaneously turn both the ejector handles counterclockwise to unseat the MPC 8 Gras...

Страница 384: ...r it to support it Slide the MPC completely out of the chassis and place it on the antistatic mat or in the electrostatic bag CAUTION The weight of the MPC is concentrated in the back end Be prepared to accept the full weight up to 18 35 lb 8 3 kg as you slide the MPC out of the chassis When the MPC is out of the chassis do not hold it by the ejector handles bus bars or edge connectors They cannot...

Страница 385: ...0 Services Gateway Chassis Cluster for more information Before you begin to install a MPC Ensure you understand how to prevent electrostatic discharge ESD damage See Prevention of Electrostatic Discharge Damage on page 505 Ensure that you have the following available ESD grounding strap Antistatic mat Rubber safety caps for transceivers To install an MPC 1 Wrap and fasten one end of the ESD ground...

Страница 386: ... bus bars or edge connectors They cannot support its weight Figure 148 Installing an MPC g030319 OK 0 FAIL ONLINE OK 1 FAIL ONLINE OK 2 FAIL ONLINE OK 3 FAIL ONLINE OK 4 FAIL ONLINE OK 5 FAIL ONLINE OK 0 FAIL ONLINE MASTER ONLINE OFFLINE RE0 FAN PEM 1 0 0 1 2 3 RE1 OK 1 FAIL ONLINE OK 7 FAIL ONLINE OK 8 FAIL ONLINE OK 9 FAIL ONLINE OK 10 FAIL ONLINE OK 11 FAIL ONLINE OK 2 6 FAIL ONLINE ACO LT YELL...

Страница 387: ...ION Do not let fiber optic cables hang free from the connector Do not allow the fastened loops of a cable to dangle which stresses the cable at the fastening point CAUTION Avoid bending a fiber optic cable beyond its minimum bend radius An arc smaller than a few inches in diameter can damage the cable and cause problems that are difficult to diagnose 14 Power on the services gateway The OK LED on ...

Страница 388: ... see Figure 149 on page 389 Figure 149 Cable Manager Release handles Maintenance linkage Place excess cable out of the way in the cable manager Do not allow fastened loops of cable to dangle from the connector or cable manager because this stresses the cable at the fastening point Putting fasteners on the loops helps to maintain their shape Keep the cable connections clean and free of dust and oth...

Страница 389: ...d attach a short fiber extension to the optical equipment Any wear and tear due to frequent plugging and unplugging is then absorbed by the short fiber extension which is easy and inexpensive to replace Keep fiber optic cable connections clean Small microdeposits of oil and dust in the canal of the transceiver or cable connector could cause loss of light reducing signal power and possibly causing ...

Страница 390: ...nding strap To replace the cable connected to the ETHERNET port 1 Wrap and fasten one end of the ESD grounding strap around your bare wrist and connect the other end of the strap to the ESD point on the chassis 2 Press the tab on the connector and pull the connector straight out of the port Figure 150 on page 391 shows the connector 3 Disconnect the cable from the network device 4 Plug one end of ...

Страница 391: ...harge ESD damage See Prevention of Electrostatic Discharge Damage on page 505 Ensure that you have the following available ESD grounding strap To replace a cable connected to a management console or auxiliary device 1 Wrap and fasten one end of the ESD grounding strap around your bare wrist and connect the other end of the strap to the ESD point on the chassis 2 Press the tab on the connector and ...

Страница 392: ...scharge Damage on page 505 Ensure that you have the following available ESD grounding strap Rubber safety caps To remove a fiber optic cable from a network interface on an IOC port module or MIC 1 If the component connects to fiber optic cable have ready a rubber safety cap for each cable and transceiver 2 If removing all cables connected to the component use one of the following methods to take t...

Страница 393: ... optic cables connected to a transceiver emit laser light that can damage your eyes CAUTION Do not leave a fiber optic transceiver uncovered except when you are inserting or removing cable The safety cap keeps the port clean and prevents accidental exposure to laser light 4 Remove the cable from the cable manager and detach it from the destination port Installing an SRX5800 Services Gateway Networ...

Страница 394: ...f the way in a neatly coiled loop Placing fasteners on the loop helps to maintain its shape CAUTION Avoid bending a fiber optic cable beyond its minimum bend radius An arc smaller than a few inches in diameter can damage the cable and cause problems that are difficult to diagnose CAUTION Do not let fiber optic cables hang free from the connector Do not allow the fastened loops of a cable to dangle...

Страница 395: ...pc command or correct PIC functioning by issuing the show chassis fpc pic status command Replacing SRX5800 Services Gateway XFP and SFP Transceivers To replace an XFP or SFP transceiver perform the following procedures 1 Removing an SRX5800 Services Gateway SFP or XFP Transceiver 396 2 Installing an SRX5800 Services Gateway SFP or XFP Transceiver 398 Removing an SRX5800 Services Gateway SFP or XFP...

Страница 396: ...oving a cable The rubber safety cap keeps the port clean and prevents accidental exposure to laser light 3 Remove the cable connector from the transceiver Cover the transceiver and the end of each fiber optic cable connector with a rubber safety cap immediately after disconnecting the fiber optic cables 4 Carefully arrange the disconnected cable in the cable manager to prevent the cable from devel...

Страница 397: ...nsceiver into a different socket Installing an SRX5800 Services Gateway SFP or XFP Transceiver Transceivers that are installed in an MIC or SPC Transceivers are hot insertable and hot removable Removing a transceiver does not interrupt the functioning of the card but the removed transceiver no longer receives or transmits data CAUTION If you face a problem running a Juniper Networks device that us...

Страница 398: ...t cover the transceiver with a safety cap 4 Carefully align the transceiver with the slots in the component The connectors should face the component 5 Slide the transceiver until the connector is seated in the component slot If you are unable to fully insert the transceiver make sure the connector is facing the right way 6 Close the ejector handle of the transceiver 7 Remove the rubber safety cap ...

Страница 399: ...you have the following available ESD grounding strap 7 16 in 11 mm nut driver To remove the cable manager see Figure 154 on page 401 1 Attach an ESD grounding strap to your bare wrist and connect the strap to one of the ESD points on the chassis 2 Using a 7 16 in nut driver unscrew the nuts on the corners of the cable manager 3 Grasp the bottom of the cable manager and pull it straight out from th...

Страница 400: ...amage See Prevention of Electrostatic Discharge Damage on page 505 Ensure that you have the following available ESD grounding strap 7 16 in 11 mm nut driver To install the cable manager see Figure 155 on page 402 1 Attach an ESD grounding strap to your bare wrist and connect the strap to one of the ESD points on the chassis 2 Position the standard cable manager on the studs on the lower front of t...

Страница 401: ...iver tighten the nuts securely Figure 155 Installing the Cable Manager Replacing a Routing Engine in an SRX Series High End Chassis Cluster IN THIS SECTION Replacing a Routing Engine USB Flash Drive Method 403 Replacing a Routing Engine External SCP Server Method 410 Replacing the Routing Engine File Transfer Method 417 402 ...

Страница 402: ...USB flash drive and the firmware version matches the version of Junos OS currently installed on the device Use the show version command to identify the Junos OS version You can download the firmware from https support juniper net support downloads The chassis cluster has only two redundancy groups RG0 and RG1 configured This procedure includes the steps for replacing the Routing Engine on node 0 o...

Страница 403: ...tatus secondary node0 root node0 show chassis cluster status Monitor Failure codes CS Cold Sync monitoring FL Fabric Connection monitoring GR GRES monitoring HW Hardware monitoring IF Interface monitoring IP IP monitoring LB Loopback monitoring MB Mbuf monitoring NH Nexthop monitoring NP NPC monitoring SP SPU monitoring SM Schedule monitoring CF Config Sync monitoring RE Relinquish monitoring Clus...

Страница 404: ...lled License identifier xxxxxxxxxx License version 2 Features subscriber acct Per Subscriber Radius Accounting permanent subscriber auth Per Subscriber Radius Authentication permanent subscriber addr Address Pool Assignment permanent subscriber vlan Dynamic Auto sensed Vlan permanent subscriber ip Dynamic and Static IP permanent d If licenses are installed copy the output of the show system licens...

Страница 405: ...ry 5 00 Removable Direct Access SCSI 0 device da2 40 000MB s transfers da2 983MB 2013184 512 byte sectors 64H 32S T 983C d List all the directories with names starting with da in the dev folder and identify the USB drive root node0 ls dev da root node0 ls dev da dev da0 dev da0s1c dev da0s2a dev da0s3 dev da0s3e dev da0s1 dev da0s1f dev da0s2c dev da0s3c dev da2 dev da0s1a dev da0s2 dev da0s2f dev...

Страница 406: ... event options policy NAT POOL UTIL events 60s set event options policy NAT POOL UTIL then event script srx nat bucket overload slax arguments utilization threshold 90 set event options policy NAT POOL UTIL then event script srx nat bucket overload slax arguments pool GLOBAL set event options event script traceoptions file escript log size 1m files 2 set event options event script traceoptions fla...

Страница 407: ... root node1 show chassis cluster interfaces primary node1 root node1 show chassis cluster interfaces Control link status Down Control interfaces Index Interface Monitored Status Internal SA Security 0 em0 Down Disabled Disabled 1 em1 Down Disabled Disabled Fabric link status Down Control interfaces Name Child Interface Status Security Physical Monitored fab0 xe 11 0 3 Down Down Disable fab0 g Powe...

Страница 408: ...equest system license add terminal See Adding New Licenses CLI Procedure c Load and commit the configuration root node0 configure shared root node0 load override var tmp filename root node0 commit root node0 exit 6 Check the status of all the FPCs and PICs and ensure that all the FPCs and PICs are online root node0 show chassis fpc pic status 7 Halt node 0 from the console root node0 request syste...

Страница 409: ...healthy reset the cluster priorities root node1 request chassis cluster failover reset redundancy group 1 root node1 request chassis cluster failover reset redundancy group 0 Replacing a Routing Engine External SCP Server Method The following are the assumptions and prerequisites for this procedure Console access and SSH access are available The chassis cluster has only two redundancy groups RG0 a...

Страница 410: ...sis cluster status secondary node0 root node0 show chassis cluster status Monitor Failure codes CS Cold Sync monitoring FL Fabric Connection monitoring GR GRES monitoring HW Hardware monitoring IF Interface monitoring IP IP monitoring LB Loopback monitoring MB Mbuf monitoring NH Nexthop monitoring NP NPC monitoring SP SPU monitoring SM Schedule monitoring CF Config Sync monitoring RE Relinquish mo...

Страница 411: ...ent Licenses installed License identifier xxxxxxxxxx License version 2 Features subscriber acct Per Subscriber Radius Accounting permanent subscriber auth Per Subscriber Radius Authentication permanent subscriber addr Address Pool Assignment permanent subscriber vlan Dynamic Auto sensed Vlan permanent subscriber ip Dynamic and Static IP permanent d If licenses are installed copy the output of the ...

Страница 412: ...options policy NAT POOL UTIL events 60s set event options policy NAT POOL UTIL then event script srx nat bucket overload slax arguments utilization threshold 90 set event options policy NAT POOL UTIL then event script srx nat bucket overload slax arguments pool GLOBAL set event options event script traceoptions file escript log size 1m files 2 set event options event script traceoptions flag outpu...

Страница 413: ...atus Internal SA Security 0 em0 Down Disabled Disabled 1 em1 Down Disabled Disabled Fabric link status Down Control interfaces Name Child Interface Status Security Physical Monitored fab0 xe 11 0 3 Down Down Disable fab0 g Power on node 0 4 Load the configuration file and scripts on the new Routing Engine a Log in to the Routing Engine on node 0 from the console b Configure the IP address for the ...

Страница 414: ...r ip junos release domestic tgz var tmp root node0 cli root node0 request system software add var tmp junos release domestic tgz reboot The device reboots and comes up with the intended Junos OS version f Copy the configuration file from the external SCP server root node0 scp root server ip node0 config yyyy mm dd var tmp node0 config yyyy mm dd g Optional If you backed up scripts then restore the...

Страница 415: ...ng any key on the console 9 Check the chassis cluster status on node 1 root node1 show chassis cluster status Node 0 comes up and becomes the secondary node on both RG0 and RG1 Wait until the node 0 priority on RG1 changes to the configured value 10 Verify that sessions are showing up on node 0 and that the number of sessions on node 0 is nearly equal to the number of sessions on the primary node ...

Страница 416: ...request chassis cluster failover redundancy group 1 node 1 Fail over RG0 root node0 request chassis cluster failover redundancy group 0 node 1 b Verify that both RGs are active on node 1 after the failover root node0 show chassis cluster status secondary node0 root node0 show chassis cluster status Monitor Failure codes CS Cold Sync monitoring FL Fabric Connection monitoring GR GRES monitoring HW ...

Страница 417: ...er 0 1000 0 permanent scale l2tp 0 1000 0 permanent scale mobile ip 0 1000 0 permanent Licenses installed License identifier xxxxxxxxxx License version 2 Features subscriber acct Per Subscriber Radius Accounting permanent subscriber auth Per Subscriber Radius Authentication permanent subscriber addr Address Pool Assignment permanent subscriber vlan Dynamic Auto sensed Vlan permanent subscriber ip ...

Страница 418: ...s flag output set event options event script file srx monitor addbook policy count slax f If any scripts are referenced in the configuration then back up these scripts root node0 scp var db scripts commit commit script slax root node1 fxp0 ip commit script slax 4 Install the replacement Routing Engine a Power off node 0 root node0 request system power off b Wait until a message appears on the cons...

Страница 419: ... password and the IP address for the fxp0 interface Do not commit the configuration NOTE You need not configure a gateway as the assumption is that the fxp0 interfaces on both nodes are in the same subnet root node0 edit root node0 set system root authentication plain text password New password type password here Retype new password retype password here root node0 set interfaces fxp0 unit 0 family...

Страница 420: ...ware add var tmp junos release domestic tgz reboot The device reboots and comes up with the intended Junos OS version g Optional Copy the scripts that you backed up in Step 3 from node 1 root node1 scp var db scripts op op script slax root node0 fxp0 ip var db scripts op h Optional Apply the licenses that you backed up in Step 3 root node0 request system license add terminal See Adding New License...

Страница 421: ...e secondary node on both RG0 and RG1 Wait until the node 0 priority on RG1 changes to the configured value 11 Verify that sessions are showing up on node 0 and that the number of sessions on node 0 is nearly equal to the number of sessions on the primary node node 1 root node1 show security monitoring 12 If the cluster is healthy reset the cluster priorities root node1 request chassis cluster fail...

Страница 422: ...5 CHAPTER Troubleshooting Hardware Troubleshooting the SRX5800 425 ...

Страница 423: ......

Страница 424: ...Modules 447 Troubleshooting SRX5800 Services Gateway SPCs 448 Troubleshooting the SRX5800 Services Gateway Power System 449 Behavior of the SRX5400 SRX5600 and SRX5800 Services Gateways When the SRX5K SCBE and SRX5K RE 1800X4 in a Chassis Cluster Fail 455 Troubleshooting the SRX5800 Services Gateway with the Junos OS CLI The Junos OS command line interface CLI is the primary tool for controlling a...

Страница 425: ...Gateways Table 69 on page 426 lists the alarms that the chassis components can generate on SRX5400 SRX5600 and SRX5800 Services Gateways Table 69 Chassis Component Alarm Conditions on SRX5400 SRX5600 and SRX5800 Services Gateways Alarm Severity Remedy Alarm Condition Chassis Component Yellow Change air filter Change air filter Air filters Yellow Open a support case using the Case Manager link at h...

Страница 426: ...ion Chassis Component Yellow Check the card Remove and reinsert the card If this fails replace failed card An interface card is offline Interface Cards MPC IOC Flex IOC Red Replace failed card An interface card has failed Red Insert card into empty slot An interface card has been removed Red Reboot the specified card Volt Sensor Fail 427 ...

Страница 427: ...erature threshold Red Check the status of all fan trays FPC airflow temperature sensors in SRX5K SPC3 reach high or over or crosses fire temperature threshold Yellow If the alarm is present consistently then it indicates a hardware issue Open a support case using the Case Manager link at https www juniper net support or call 1 888 314 5822 toll free US Canada or 1 408 745 9500 from outside the Uni...

Страница 428: ...m Conditions on SRX5400 SRX5600 and SRX5800 Services Gateways continued Alarm Severity Remedy Alarm Condition Chassis Component SRX5K SPC3 LTC Firm Ware Version Mismatch LEDs on the front panel of the chassis indicate major alarm 429 ...

Страница 429: ...atch alarm 2 Issue the CLI show system firmware command to check the current LTC firmware version if a new verision of LTC firmware is available for the SRX5K SPC3 card and the firmware status is OK 3 If there is a new version of LTC firmware issue the CLI command request system firmware upgrade pic fpc slot x pic slot x tag x to upgrade the LTC firmware on the SRX5K SPC3 card 4 Issue the CLI comm...

Страница 430: ...ttps www juniper net support or call 1 888 314 5822 toll free US Canada or 1 408 745 9500 from outside the United States Real Time Clock battery failure Red Replace the SSD or Open a support case using the Case Manager link at https www juniper net support or call 1 888 314 5822 toll free US Canada or 1 408 745 9500 from outside the United States SSDs on the SRX5K SPC3 missing or read write to SSD...

Страница 431: ...X5600 and SRX5800 Services Gateways continued Alarm Severity Remedy Alarm Condition Chassis Component From the CLI use the command restart chassis control to reboot the services gateway If SPC still doesn t come online then remove and insert back the SPC 432 ...

Страница 432: ...n tray A higher cooling capacity fan tray is required when an MPC or high density SPCs are installed on the chassis Red Reseat the Fan Tray If problem still continues open a support case using the Case Manager link at https www juniper net support or call 1 888 314 5822 toll free US Canada or 1 408 745 9500 from outside the United States Fan tray under voltage Red Check and insert the appropriate ...

Страница 433: ...5600 and SRX5800 Services Gateways continued Alarm Severity Remedy Alarm Condition Chassis Component Yellow Insert host subsystem into empty slot A host subsystem has been removed Host subsystem Red Replace failed host subsystem A host subsystem has failed 434 ...

Страница 434: ... supply output connection A power supply output has failed Red Replace failed power supply A power supply has failed Red When two AC power supplies are installed insert one power supply into an odd numbered slot and the other power supply into an even numbered slot Invalid AC power supply configuration Red When two DC power supplies are installed insert one power supply into an odd numbered slot a...

Страница 435: ...sis Component Alarm Conditions on SRX5400 SRX5600 and SRX5800 Services Gateways continued Alarm Severity Remedy Alarm Condition Chassis Component Red Install an additional power supply Not enough power supplies 436 ...

Страница 436: ...faulty serial console port cable connected to the device Routing Engine Yellow Reformat hard disk and install bootable image If this fails replace failed Routing Engine Error in reading or writing hard disk Yellow Reformat CompactFlash card and install bootable image If this fails replace failed Routing Engine Error in reading or writing CompactFlash card Yellow Install bootable image on default m...

Страница 437: ...uting Engine Red Replace failed Routing Engine Routing Engine failed to boot Red Check the interface cable connection Reboot the system If the alarm recurs open a support case using the Case Manager link at https www juniper net support or call 1 888 314 5822 toll free US Canada or 1 408 745 9500 from outside the United States The Ethernet management interface fxp0 or em0 on the Routing Engine is ...

Страница 438: ...nsor alarm has failed Red Replace failed SCB An SCB has failed Yellow Check fabric plane summary if all 4 fabric planes are online This alarm could be raised before all fabric planes are brought up It will be cleared after at least 4 planes are up If all planes are up and still seeing alarms raise a case using the Case Manager link at https www juniper net support or call 1 888 314 5822 toll free ...

Страница 439: ... it Check airflow Check fan The chassis temperature has exceeded 65 degrees C 149 degrees F and the fans have been turned on to full speed Red Check room temperature Check air filter and replace it Check airflow Check fan The chassis temperature has exceeded 65 degrees C 149 degrees F and a fan has failed If this condition persists for more than 4 minutes the Services Gateway shuts down Red Check ...

Страница 440: ... or call 1 888 314 5822 toll free US Canada or 1 408 745 9500 from outside the United States Backup Routing Engine Alarms For Services Gateways with master and backup Routing Engines a master Routing Engine can generate alarms for events that occur on a backup Routing Engine Table 70 on page 442 lists chassis alarms generated for a backup Routing Engine NOTE Because the failure occurs on the backu...

Страница 441: ...uting Engine Boot Device Yellow Check the interface cable connection Reboot the system If the alarm recurs open a support case using the Case Manager link at https www juniper net support or call 1 888 314 5822 toll free US Canada or 1 408 745 9500 from outside the United States The Ethernet management interface fxp0 or em0 on the backup Routing Engine is down Ethernet Yellow Open a support case u...

Страница 442: ...SRX5800 Services Gateway with Alarm Relay Contacts The craft interface has two alarm relay contacts for connecting the services gateway to external alarm devices Whenever a system condition triggers either the major or minor alarm on the craft interface the alarm relay contacts are also activated The alarm relay contacts are located on the upper right of the craft interface Troubleshooting the SRX...

Страница 443: ...Green indicates OK and red indicates a failure The card OK Fail LEDs are located along the bottom of the craft interface and are labeled 0 through 5 2 6 and 7 through 11 SCB LEDs Two LEDs OK and FAIL indicate the status of each SCB Green indicates OK and red indicates a failure The SCB LEDs are located in the center of the craft interface along the bottom and are labeled 0 and 1 Fan LEDs Two LEDs ...

Страница 444: ...ace the fan tray Place your hand near the exhaust vents at the side of the chassis to determine whether the fans are pushing air out of the chassis If the fan tray is removed a minor alarm and a major alarm occur The following conditions automatically cause the fans to run at full speed and also trigger the indicated alarm A fan fails major alarm The services gateway temperature exceeds the temper...

Страница 445: ...r the slot on the craft interface When the interface card is online and functioning normally the OK LED lights green steadily Issue the CLI show chassis fpc command to check the status of installed interface cards As shown in the sample output the value Online in the column labeled State indicates that the interface card is functioning normally user host show chassis fpc Temp CPU Utilization Memor...

Страница 446: ...6 MB Total DDR DRAM 4096 MB Start time 2007 07 10 12 28 42 PDT Uptime 1 hour 33 minutes 43 seconds For further description of the output from the command see Junos OS System Basics and Services Command Reference at www juniper net documentation Troubleshooting SRX5800 Services Gateway MICs and Port Modules Problem Description The MICs or port modules are not functioning normally Solution Check the...

Страница 447: ...Services Processing Card SPC is not functioning normally Solution Make sure the SPC is properly seated in the midplane Check that each ejector handle has been turned clockwise and is tight Issue the CLI show chassis fpc command to check the status of installed SPCs As shown in the sample output the value Online in the column labeled State indicates that the SPC is functioning normally user host sh...

Страница 448: ...DRAM 6656 MB Start time 2013 12 10 02 58 07 PST Uptime 1 day 11 hours 59 minutes 24 seconds Max Power Consumption 570 Watts For further description of the output from the command see Junos OS System Basics and Services Command Reference at www juniper net documentation Troubleshooting the SRX5800 Services Gateway Power System Problem Description The power system is not functioning normally Solutio...

Страница 449: ...o determine the source of the problem Check that the AC input switch or DC circuit breaker is in the on position and that the power supply is receiving power Verify that the source circuit breaker has the proper current rating Each power supply must be connected to a separate source circuit breaker Verify that the AC power cord or DC power cables from the power source to the services gateway are n...

Страница 450: ...pt to power on the power supply if the LED is still lit and the fan is still running If you do the services gateway will not reboot 4 Turn on power to where the AC line goes into the power distribution module PDM area 5 Move the power switch on the power supply to the on position 6 Verify that the LEDs on the power supply faceplate are properly lit 7 Issue the CLI show chassis environment pem comm...

Страница 451: ...eeds that are present for the power supply Figure 156 AC Power Input Mode Switch g006057 0 1 1 0 Position 0 indicates that only one AC or DC feed is provided Position 1 indicates that two AC or DC feeds are provided The following example shows what should be the DIP switch position based on the number of AC or DC input feeds expected and connected to the PEM 1 Issue the CLI show chassis power comm...

Страница 452: ...and shows that on PEM 0 two AC input feeds are expected and two AC input feeds are connected and on PEM 1 one AC input feed is expected and two AC input feeds are connected 2 Issue the show chassis alarms command to see if there are any active alarms and the position of the PEM DIP switch show chassis alarms 1 alarms currently active Alarm time Class Description 2017 01 23 05 05 17 PST Minor PEM 1...

Страница 453: ... 2 feed expected 2 feed connected Capacity 4100 W maximum 4100 W DC output 741 W zone 0 13 A at 57 V 18 of capacity PEM 1 State Online AC input OK 2 feed expected 2 feed connected Capacity 4100 W maximum 4100 W DC output 741 W zone 1 13 A at 57 V 18 of capacity PEM 2 State Empty Input Absent PEM 3 State Empty Input Absent System Zone 0 Capacity 4100 W maximum 4100 W Allocated power 1255 W 2845 W r...

Страница 454: ...nd SRX5800 Services Gateways when the Switch Control Board SRX5K SCBE and Routing Engine SRX5K RE 1800X4 in the chassis cluster fail NOTE This procedure is also applicable for SCB3 except that SCB3 redundancy is supported NOTE We strongly recommend that you perform the ISHU during a maintenance window or during the lowest possible traffic as the secondary node is not available at this time NOTE Th...

Страница 455: ...ll fail over to the secondary node as the primary node powers off 4 virtual 4 virtual 2 SRX5600 This device supports one SCB for two fabric planes providing a redundancy of three SCBs If the active SCB fails the device behavior does not change as the remaining two SCBs fulfill the requirement to have four fabric planes If the second SCB also fails no spare planes are available in the chassis trigg...

Страница 456: ...6 CHAPTER Contacting Customer Support and Returning the Chassis or Components Returning the SRX5800 Chassis or Components 459 ...

Страница 457: ......

Страница 458: ...teway for Shipment 468 Packing SRX5800 Services Gateway Components for Shipment 469 Contacting Customer Support Once you have located the serial numbers of the services gateway or component you can return the services gateway or component for repair or replacement For this you need to contact Juniper Networks Technical Assistance Center JTAC You can contact JTAC 24 hours a day 7 days a week using ...

Страница 459: ...erial number of the services gateway or component For the serial number locations of cards and modules such as MPCs SPCs port modules and Routing Engines see the SRX5400 SRX5600 and SRX5800 Services Gateway Card Reference at www juniper net documentation 2 Obtain a Return Materials Authorization RMA number from JTAC NOTE Do not return the services gateway or any component to Juniper Networks unles...

Страница 460: ...S 1 7kW 200 240VAC in Routing Engine 0 REV 06 740 015113 1000697051 RE S 1300 CB 0 REV 07 710 013385 KC0433 SRX5k SCB CB 1 REV 07 710 013385 KC0259 SRX5k SCB FPC 6 REV 03 750 020235 JS4722 SRX5k DPC 40x 1GE CPU REV 06 710 013713 JZ4019 DPC PMB PIC 0 BUILTIN BUILTIN 10x 1GE RichQ Xcvr 0 REV 01 740 011782 PAQ2K01 SFP SX Xcvr 1 REV 01 740 014132 61531018 SFP T Xcvr 2 REV 01 740 013111 7303709 SFP T X...

Страница 461: ...KA7426 DPC PMB PIC 0 BUILTIN BUILTIN SPU Cp PIC 1 BUILTIN BUILTIN SPU Flow Fan Tray 0 REV 04 740 014971 TP1433 Fan Tray Fan Tray 1 REV 04 740 014971 TP1636 Fan Tray Most components also have a small rectangular serial number ID label see Figure 157 on page 462 attached to the component body Figure 157 Serial Number ID Label Locating the SRX5800 Services Gateway Chassis Serial Number Label The chas...

Страница 462: ...mponent You must provide the serial number to the Juniper Networks Technical Assistance Center JTAC when you contact them to obtain Return Materials Authorization RMA The location of the serial number labels on Standard Capacity and High Capacity AC or DC power supplies is explained below AC Power Supplies Standard Capacity AC Power Supply The serial number label is on the AC power supply faceplat...

Страница 463: ...label is on the top of the AC power supply See Figure 160 on page 464 Figure 160 High Capacity AC Power Supply Serial Number Label g022053 DC power Supplies Standard Capacity DC Power Supply The serial number label is on the DC power supply faceplate under the circuit breaker switch See Figure 161 on page 465 464 ...

Страница 464: ...Figure 161 Standard Capacity DC Power Supply Serial Number Label High Capacity DC Power Supply The serial number label is on the top of the DC power supply See Figure 162 on page 466 465 ...

Страница 465: ...age 466 Figure 163 Craft Interface Serial Number Label g004094 OK 0 FAIL ONLINE OK 1 FAIL ONLINE OK 2 FAIL ONLINE OK 3 FAIL ONLINE OK 4 FAIL ONLINE OK 5 FAIL ONLINE OK 0 FAIL ONLINE MASTER ONLINE OFFLINE RE0 FAN PEM 1 0 0 1 2 3 RE1 OK 1 FAIL ONLINE OK 7 FAIL ONLINE OK 8 FAIL ONLINE OK 9 FAIL ONLINE OK 10 FAIL ONLINE OK 11 FAIL ONLINE OK 2 6 FAIL ONLINE ACO LT YELLOW ALARM RED ALARM NC NO C NC NO C...

Страница 466: ...umber and shipping address Required Tools and Parts for Packing the SRX5800 Services Gateway To remove components from the services gateway or the services gateway from a rack you need the following tools and parts 2 5 mm flat blade screwdriver for detaching alarm relay terminal block 7 16 in 11 mm nut driver Blank panels to cover empty slots Electrostatic bag or antistatic mat for each component ...

Страница 467: ...witch or DC circuit breaker for all power supplies to the off O position 5 Disconnect power from the services gateway 6 Remove the cables that connect to all external devices 7 Remove all field replaceable units FRUs from the services gateway 8 Remove the services gateway chassis from the rack If you are using a mechanical lift place the lift platform under the chassis unscrew and remove the mount...

Страница 468: ...or Shipment Follow these guidelines for packing and shipping individual components of the services gateway When you return a component make sure that it is adequately protected with packing materials and packed so that the pieces are prevented from moving around inside the carton Use the original shipping materials if they are available Place the individual component in an electrostatic bag Write ...

Страница 469: ...ng Statement for Norway and Sweden 482 Installation Instructions Warning 483 Chassis and Component Lifting Guidelines 483 Ramp Warning 484 Rack Mounting and Cabinet Mounting Warnings 484 Grounded Equipment Warning 490 Laser and LED Safety Guidelines and Warnings 490 Radiation from Open Port Apertures Warning 495 Maintenance and Operational Safety Guidelines and Warnings 496 General Electrical Safe...

Страница 470: ...r Grounding Requirements and Warning 523 DC Power Wiring Sequence Warning 525 DC Power Wiring Terminations Warning 528 Multiple Power Supplies Disconnection Warning 531 TN Power Warning 532 Action to Take After an Electrical Accident 532 SRX5800 Services Gateway Agency Approvals 533 SRX5800 Services Gateway Compliance Statements for EMC Requirements 534 Statements of Volatility for Juniper Network...

Страница 471: ...l or manipulate wiring during electrical storms Never install electrical jacks in wet locations unless the jacks are specifically designed for wet environments Operate the device only when it is properly grounded Ensure that the separate protective earthing terminal provided on this device is permanently connected to earth Replace fuses only with fuses of the same type and rating Do not open or re...

Страница 472: ...ls of safety warnings there are two Warning formats NOTE You might find this information helpful in a particular situation or you might overlook this important information if it was not highlighted in a Note CAUTION You need to observe the specified guidelines to prevent minor injury or discomfort to you or severe damage to the device WARNING This symbol alerts you to the risk of personal injury f...

Страница 473: ...475 ...

Страница 474: ...e befinden sich in einer Situation die zu einer Körperverletzung führen könnte Bevor Sie mit der Arbeit an irgendeinem Gerät beginnen seien Sie sich der mit elektrischen Stromkreisen verbundenen Gefahren und der Standardpraktiken zur Vermeidung von Unfällen bewußt Avvertenza Questo simbolo di avvertenza indica un pericolo La situazione potrebbe causare infortuni alle persone Prima di lavorare su q...

Страница 475: ... signalerar fara Du befinner dig i en situation som kan leda till personskada Innan du utför arbete på någon utrustning måste du vara medveten om farorna med elkretsar och känna till vanligt förfarande för att förebygga skador 477 ...

Страница 476: ...Restricted Access Area Warning 478 ...

Страница 477: ...un mécanisme de verrouillage et une clé ou tout autre moyen de sécurité L accès aux zones de sécurité est sous le contrôle de l autorité responsable de l emplacement Warnung Diese Einheit ist zur Installation in Bereichen mit beschränktem Zutritt vorgesehen Ein Bereich mit beschränktem Zutritt ist ein Bereich zu dem nur Wartungspersonal mit einem Spezialwerkzeugs Schloß und Schlüssel oder anderer ...

Страница 478: ... Electrostatic Discharge Damage 505 Fire Safety Requirements In the event of a fire emergency the safety of people is the primary concern You should establish procedures for protecting people in the event of a fire emergency provide safety training and properly provision fire control equipment and fire extinguishers In addition you should establish procedures to protect your equipment in the event...

Страница 479: ...ary ingredient in these fire extinguishers is monoammonium phosphate which is very sticky and difficult to clean In addition in the presence of minute amounts of moisture monoammonium phosphate can become highly corrosive and corrodes most metals Any equipment in a room in which a chemical fire extinguisher has been discharged is subject to premature failure and unreliable operation The equipment ...

Страница 480: ...to e qualificato deve essere autorizzato ad installare o sostituire questo apparecchio Advarsel Kun kvalifisert personell med riktig opplæring bør montere eller bytte ut dette utstyret Aviso Este equipamento deverá ser instalado ou substituído apenas por pessoal devidamente treinado e qualificado Atención Estos equipos deben ser instalados y reemplazados exclusivamente por personal técnico adecuad...

Страница 481: ...s til strømkilden Aviso Leia as instruções de instalação antes de ligar o sistema à sua fonte de energia Atención Ver las instrucciones de instalación antes de conectar el sistema a la red de alimentación Varning Läs installationsanvisningarna innan du kopplar systemet till dess strömförsörjningsenhet Chassis and Component Lifting Guidelines Before moving the device to a site ensure that the site ...

Страница 482: ...ä sellaista kaltevaa pintaa jonka kaltevuus ylittää 10 astetta Attention Ne pas utiliser une rampe dont l inclinaison est supérieure à 10 degrés Warnung Keine Rampen mit einer Neigung von mehr als 10 Grad verwenden Avvertenza Non usare una rampa con pendenza superiore a 10 gradi Advarsel Bruk aldri en rampe som heller mer enn 10 grader Aviso Não utilize uma rampa com uma inclinação superior a 10 g...

Страница 483: ...485 ...

Страница 484: ...Networks switch moet in een stellage worden geïnstalleerd die aan een bouwsel is verankerd Dit toestel dient onderaan in het rek gemonteerd te worden als het toestel het enige in het rek is Wanneer u dit toestel in een gedeeltelijk gevuld rek monteert dient u het rek van onderen naar boven te laden met het zwaarste onderdeel onderaan in het rek Als het rek voorzien is van stabiliseringshulpmiddele...

Страница 485: ...oder Warten dieser Einheit in einem Gestell müssen Sie besondere Vorkehrungen treffen um sicherzustellen daß das System stabil bleibt Die folgenden Richtlinien sollen zur Gewährleistung Ihrer Sicherheit dienen Der Juniper Networks switch muß in einem Gestell installiert werden das in der Gebäudestruktur verankert ist Wenn diese Einheit die einzige im Gestell ist sollte sie unten im Gestell angebra...

Страница 486: ...lt skal kabinettet lastes fra bunnen og opp med den tyngste komponenten nederst i kabinettet Hvis kabinettet er utstyrt med stabiliseringsutstyr skal stabilisatorene installeres før montering eller utføring av reparasjonsarbeid på enheten i kabinettet Aviso Para se prevenir contra danos corporais ao montar ou reparar esta unidade numa estante deverá tomar precauções especiais para se certificar de...

Страница 487: ...g För att undvika kroppsskada när du installerar eller utför underhållsarbete på denna enhet på en ställning måste du vidta särskilda försiktighetsåtgärder för att försäkra dig om att systemet står stadigt Följande riktlinjer ges för att trygga din säkerhet Juniper Networks switch måste installeras i en ställning som är förankrad i byggnadens struktur Om denna enhet är den enda enheten på ställnin...

Страница 488: ...rät während des normalen Betriebs an Erde gelegt ist Avvertenza Questa apparecchiatura deve essere collegata a massa Accertarsi che il dispositivo host sia collegato alla massa di terra durante il normale utilizzo Advarsel Dette utstyret skal jordes Forviss deg om vertsterminalen er jordet ved normalt bruk Aviso Este equipamento deverá estar ligado à terra Certifique se que o host se encontra liga...

Страница 489: ... When working around ports that support optical transceivers observe the following safety guidelines to prevent eye injury Do not look into unterminated ports or at fibers that connect to unknown sources Do not examine unterminated optical ports with optical instruments Avoid direct exposure to the beam WARNING Unterminated optical connectors can emit invisible laser radiation The lens in the huma...

Страница 490: ...laser produkt Varoitus Luokan 1 lasertuote Attention Produit laser de classe I Warnung Laserprodukt der Klasse 1 Avvertenza Prodotto laser di Classe 1 Advarsel Laserprodukt av klasse 1 Aviso Produto laser de classe 1 Atención Producto láser Clase I Varning Laserprodukt av klass 1 492 ...

Страница 491: ...us Luokan 1 valodiodituote Attention Alarme de produit LED Class I Warnung Class 1 LED Produktwarnung Avvertenza Avvertenza prodotto LED di Classe 1 Advarsel LED produkt i klasse 1 Aviso Produto de classe 1 com LED Atención Aviso sobre producto LED de Clase 1 Varning Lysdiodprodukt av klass 1 493 ...

Страница 492: ...nstruments optiques Warnung Nicht direkt in den Strahl blicken und ihn nicht direkt mit optischen Geräten prüfen Avvertenza Non fissare il raggio con gli occhi né usare strumenti ottici per osservarlo direttamente Advarsel Stirr eller se ikke direkte p strlen med optiske instrumenter Aviso Não olhe fixamente para o raio nem olhe para ele directamente com instrumentos ópticos Atención No mirar fija...

Страница 493: ... Vermeiden Sie es sich den Strahlungen auszusetzen und starren Sie nicht in die Öffnungen Avvertenza Quando i cavi in fibra non sono inseriti radiazioni invisibili possono essere emesse attraverso l apertura della porta Evitate di esporvi alle radiazioni e non guardate direttamente nelle aperture Advarsel Unngå utsettelse for stråling og stirr ikke inn i åpninger som er åpne fordi usynlig stråling...

Страница 494: ...S SECTION Battery Handling Warning 497 Jewelry Removal Warning 498 Lightning Activity Warning 500 Operating Temperature Warning 501 Product Disposal Warning 503 While performing the maintenance activities for devices observe the following guidelines and warnings 496 ...

Страница 495: ...leichen oder vom Hersteller empfohlenen Batterietyp Entsorgen Sie die benutzten Batterien nach den Anweisungen des Herstellers Advarsel Det kan være fare for eksplosjon hvis batteriet skiftes på feil måte Skift kun med samme eller tilsvarende type som er anbefalt av produsenten Kasser brukte batterier i henhold til produsentens instruksjoner Avvertenza Pericolo di esplosione se la batteria non è i...

Страница 496: ...Jewelry Removal Warning 498 ...

Страница 497: ... Vor der Arbeit an Geräten die an das Netz angeschlossen sind jeglichen Schmuck einschließlich Ringe Ketten und Uhren abnehmen Metallgegenstände erhitzen sich wenn sie an das Netz und die Erde angeschlossen werden und können schwere Verbrennungen verursachen oder an die Anschlußklemmen angeschweißt werden Avvertenza Prima di intervenire su apparecchiature collegate alle linee di alimentazione togl...

Страница 498: ... te sluiten of te ontkoppelen Varoitus Älä työskentele järjestelmän parissa äläkä yhdistä tai irrota kaapeleita ukkosilmalla Attention Ne pas travailler sur le système ni brancher ou débrancher les câbles pendant un orage Warnung Arbeiten Sie nicht am System und schließen Sie keine Kabel an bzw trennen Sie keine ab wenn es gewittert Avvertenza Non lavorare sul sistema o collegare oppure scollegare...

Страница 499: ...Operating Temperature Warning 501 ...

Страница 500: ...iner Gegend betrieben werden in der die Umgebungstemperatur das empfohlene Maximum von 40 C überschreitet Um Lüftungsverschluß zu verhindern achten Sie darauf daß mindestens 15 2 cm lichter Raum um die Lüftungsöffnungen herum frei bleibt Avvertenza Per evitare il surriscaldamento dei switch non adoperateli in un locale che ecceda la temperatura ambientale massima di 40 C Per evitare che la circola...

Страница 501: ...sia lakeja ja säännöksiä noudattaen Attention La mise au rebut définitive de ce produit doit être effectuée conformément à toutes les lois et réglementations en vigueur Warnung Dieses Produkt muß den geltenden Gesetzen und Vorschriften entsprechend entsorgt werden Avvertenza L eliminazione finale di questo prodotto deve essere eseguita osservando le normative italiane vigenti in materia Advarsel E...

Страница 502: ... other end of the strap around your bare wrist Failure to use an ESD grounding strap could result in damage to the device Install the device in compliance with the following local national and international electrical codes United States National Fire Protection Association NFPA 70 United States National Electrical Code Other countries International Electromechanical Commission IEC 60364 Part 1 th...

Страница 503: ...st strap when you are handling components that are subject to ESD damage and make sure that it is in direct contact with your skin If a grounding strap is not available hold the component in its antistatic bag see Figure 164 on page 506 in one hand and touch the exposed bare metal of the device with the other hand immediately before inserting the component into the device WARNING For safety period...

Страница 504: ...ce SPD must be used at the AC power source The following electrical safety guidelines apply to AC powered devices Note the following warnings printed on the device CAUTION THIS UNIT HAS MORE THAN ONE POWER SUPPLY CORD DISCONNECT ALL POWER SUPPLY CORDS BEFORE SERVICING TO AVOID ELECTRIC SHOCK ATTENTION CET APPAREIL COMPORTE PLUS D UN CORDON D ALIMENTATION AFIN DE PRÉVENIR LES CHOCS ÉLECTRIQUES DÉBR...

Страница 505: ...utlet must be near the AC powered device and be easily accessible For devices that have more than one power supply connection you must ensure that all power connections are fully disconnected so that power to the device is completely removed to prevent electric shock To disconnect power unplug all power cords one for each power supply Power Cable Warning Japanese WARNING The attached power cable i...

Страница 506: ...der in der Nähe von Netzgeräten arbeiten ziehen Sie bei Wechselstromeinheiten das Netzkabel ab bzw Avvertenza Prima di lavorare su un telaio o intorno ad alimentatori scollegare il cavo di alimentazione sulle unità CA Advarsel Før det utføres arbeid på kabinettet eller det arbeides i nærheten av strømforsyningsenheter skal strømledningen trekkes ut på vekselstrømsenheter Aviso Antes de trabalhar n...

Страница 507: ...de in Canada Be sure to connect the ground wire or conduit to a solid office earth ground A closed loop ring is recommended for terminating the ground conductor at the ground stud Run two wires from the circuit breaker box to a source of 48 VDC Use appropriate gauge wire to handle up to 40 A A DC powered services gateway that is equipped with a DC terminal block is intended only for installation i...

Страница 508: ...cuit and any higher voltages are only to be associated with float voltages for the charging function Because the services gateway is a positive ground system you must connect the positive lead to the terminal labeled RETURN the negative lead to the terminal labeled 48V and the earth ground to the chassis grounding points 510 ...

Страница 509: ...DC Power Disconnection Warning 511 ...

Страница 510: ...n être sûr localiser le disjoncteur situé sur le panneau de service du circuit en courant continu placer le disjoncteur en position fermée OFF et à l aide d un ruban adhésif bloquer la poignée du disjoncteur en position OFF Warnung Vor Ausführung der folgenden Vorgänge ist sicherzustellen daß die Gleichstromschaltung keinen Strom erhält Um sicherzustellen daß sämtlicher Strom abgestellt ist machen...

Страница 511: ...FF y sujetar con cinta la palanca del interruptor automático en posición de Apagado OFF Varning Innan du utför någon av följande procedurer måste du kontrollera att strömförsörjningen till likströmskretsen är bruten Kontrollera att all strömförsörjning är BRUTEN genom att slå AV det överspänningsskydd som skyddar likströmskretsen och tejpa fast överspänningsskyddets omkopplare i FRÅN läget DC Powe...

Страница 512: ...premier et déconnectée en dernier Warnung Der Erdanschluß muß bei der Installation der Einheit immer zuerst hergestellt und zuletzt abgetrennt werden Avvertenza In fase di installazione dell unità eseguire sempre per primo il collegamento a massa e disconnetterlo per ultimo Advarsel Når enheten installeres må jordledningen alltid tilkobles først og frakobles sist Aviso Ao instalar a unidade a liga...

Страница 513: ...DC Power Wiring Sequence Warning 515 ...

Страница 514: ...ez que le fil de masse devrait toujours être relié d abord et débranché pour la dernière fois Warnung Die Stromzufuhr ist nur mit geeigneten Ringösen an das DC Netzteil anzuschliessen Die richtige Anschlusssequenz ist Erdanschluss zu Erdanschluss RTN zu RTN und dann 48V zu 48V Die richtige Sequenz zum Abtrennen der Stromversorgung ist 48V zu 48V RTN zu RTN und dann Erdanschluss zu Erdanschluss Es ...

Страница 515: ...ncia apropriada da fiação é moída para moer RTN a RTN então 48 V a 48 V Ao desconectar a potência a seqüência apropriada da fiação é 48 V a 48 V RTN a RTN moeu então para moer Anote que o fio à terra deve sempre ser conectado primeiramente e desconectado por último Anote que o fio à terra deve sempre ser conectado primeiramente e desconectado por último Varning Korrekt kopplingssekvens ar jord til...

Страница 516: ...DC Power Wiring Terminations Warning 518 ...

Страница 517: ...ugelassene Verdrahtungsanschlüsse z B Ringoesen oder gabelförmige Kabelschuhe mit nach oben gerichteten Enden zu verwenden Diese Abschlüsse sollten die angemessene Größe für die Drähte haben und sowohl die Isolierung als auch den Leiter festklemmen Avvertenza Quando occorre usare trecce usare connettori omologati come quelli a occhiello o a forcella con linguette rivolte verso l alto I connettori ...

Страница 518: ...typ med uppåtvänd tapp Storleken på dessa kontakter måste vara avpassad till ledningarna och måste kunna hålla både isoleringen och ledaren fastklämda RELATED DOCUMENTATION Action to Take After an Electrical Accident 532 General Electrical Safety Guidelines and Warnings 504 AC Power Electrical Safety Guidelines 506 520 ...

Страница 519: ...DC Power Disconnection Warning 521 ...

Страница 520: ... être sûr localiser le disjoncteur situé sur le panneau de service du circuit en courant continu placer le disjoncteur en position fermée OFF et à l aide d un ruban adhésif bloquer la poignée du disjoncteur en position OFF Warnung Vor Ausführung der folgenden Vorgänge ist sicherzustellen daß die Gleichstromschaltung keinen Strom erhält Um sicherzustellen daß sämtlicher Strom abgestellt ist machen ...

Страница 521: ...F y sujetar con cinta la palanca del interruptor automático en posición de Apagado OFF Varning Innan du utför någon av följande procedurer måste du kontrollera att strömförsörjningen till likströmskretsen är bruten Kontrollera att all strömförsörjning är BRUTEN genom att slå AV det överspänningsskydd som skyddar likströmskretsen och tejpa fast överspänningsskyddets omkopplare i FRÅN läget DC Power...

Страница 522: ...ier et déconnectée en dernier Warnung Der Erdanschluß muß bei der Installation der Einheit immer zuerst hergestellt und zuletzt abgetrennt werden Avvertenza In fase di installazione dell unità eseguire sempre per primo il collegamento a massa e disconnetterlo per ultimo Advarsel Når enheten installeres må jordledningen alltid tilkobles først og frakobles sist Aviso Ao instalar a unidade a ligação ...

Страница 523: ...DC Power Wiring Sequence Warning 525 ...

Страница 524: ...tez que le fil de masse devrait toujours être relié d abord et débranché pour la dernière fois Warnung Die Stromzufuhr ist nur mit geeigneten Ringösen an das DC Netzteil anzuschliessen Die richtige Anschlusssequenz ist Erdanschluss zu Erdanschluss RTN zu RTN und dann 48V zu 48V Die richtige Sequenz zum Abtrennen der Stromversorgung ist 48V zu 48V RTN zu RTN und dann Erdanschluss zu Erdanschluss Es...

Страница 525: ...üência apropriada da fiação é moída para moer RTN a RTN então 48 V a 48 V Ao desconectar a potência a seqüência apropriada da fiação é 48 V a 48 V RTN a RTN moeu então para moer Anote que o fio à terra deve sempre ser conectado primeiramente e desconectado por último Anote que o fio à terra deve sempre ser conectado primeiramente e desconectado por último Varning Korrekt kopplingssekvens ar jord t...

Страница 526: ...DC Power Wiring Terminations Warning 528 ...

Страница 527: ... sur le conducteur Warnung Wenn Litzenverdrahtung erforderlich ist sind zugelassene Verdrahtungsabschlüsse z B für einen geschlossenen Regelkreis oder gabelförmig mit nach oben gerichteten Kabelschuhen zu verwenden Diese Abschlüsse sollten die angemessene Größe für die Drähte haben und sowohl die Isolierung als auch den Leiter festklemmen Avvertenza Quando occorre usare trecce usare connettori omo...

Страница 528: ...n que sujetar tanto el aislante como el conductor Varning När flertrådiga ledningar krävs måste godkända ledningskontakter användas t ex kabelsko av sluten eller öppen typ med uppåtvänd tapp Storleken på dessa kontakter måste vara avpassad till ledningarna och måste kunna hålla både isoleringen och ledaren fastklämda 530 ...

Страница 529: ...inen Stromanschluß um Strom gänzlich von der Einheit fernzuhalten müssen alle Stromzufuhren abgetrennt sein Avvertenza Questa unità ha più di una connessione per alimentatore elettrico tutte le connessioni devono essere completamente rimosse per togliere l elettricità dall unità Advarsel Denne enheten har mer enn én strømtilkobling Alle tilkoblinger må kobles helt fra for å eliminere strøm fra enh...

Страница 530: ... TN Advarsel Utstyret er utfomet til bruk med TN strømsystemer Aviso O dispositivo foi criado para operar com sistemas de corrente TN Atención El equipo está diseñado para trabajar con sistemas de alimentación tipo TN Varning Enheten är konstruerad för användning tillsammans med elkraftssystem av TN typ Action to Take After an Electrical Accident If an electrical accident results in an injury take...

Страница 531: ...22 Class A European Radiated Emissions VCCI Class A Japanese Radiated Emissions ETSI EN 300386 V1 3 3 Telecom Network Equipment Electromagnetic Compatibility Requirements Immunity EN 55024 A1 A2 Information Technology Equipment Immunity Characteristics EN 61000 3 2 Power Line Harmonics EN 61000 3 3 A1 A2 A3 Power Line Voltage Fluctuations and Flicker EN 61000 4 2 A1 A2 Electrostatic Discharge EN 6...

Страница 532: ...s IN THIS SECTION Canada 534 European Community 534 Israel 535 Japan 535 United States 535 Canada This Class A digital apparatus complies with Canadian ICES 003 Cet appareil numérique de la classe A est conforme à la norme NMB 003 du Canada European Community This is a Class A product In a domestic environment this product may cause radio interference in which case the user may be required to take...

Страница 533: ...services gateway has been tested and found to comply with the limits for a Class A digital device of the FCC Rules These limits are designed to provide reasonable protection against harmful interference when the equipment is operated in a commercial environment This equipment generates uses and can radiate radio frequency energy and if not installed and used in accordance with the instruction manu...

Страница 534: ...ove non volatile storage components from the device NOTE Statements of volatility are not available for all Juniper Networks devices CTP Series CTP150 CTP2000 EX Series EX2200 and EX2200 C EX2300 24P EX2300 24T and EX2300 24T DC EX2300 48P and EX2300 48T EX2300 C EX3300 EX3400 24P EX3400 24T EX3400 24T DC EX3400 48P EX3400 48T EX3400 48T AFI EX4200 EX4300 EX4300 48MP EX4500 EX4550 EX4600 EX8200 XR...

Страница 535: ...MX10 MX40 and MX80 MX240 MX480 and MX960 RE A 2000 Route Engine RE S X6 64G Routing Engine QFX Series QFX3008 I QFX3100 QFX3500 QFX3600 QFX5100 24Q QFX5100 48S QFX5100 48T QFX5110 32Q QFX5110 48S QFX5200 QFX5200 32C QFX10008 and QFX10016 SRX Series SRX100 SRX110 SRX210B SRX210H POE SRX210H P MGW 537 ...

Страница 536: ... SRX220 SRX240H SRX240H POE SRX300 SRX320 SRX340 and SRX345 SRX550 SRX650 SRX1400 SRX1500 SRX3400 and SRX3600 SRX5400 SRX5600 and SRX5800 SRX MP 1SERIAL SSG 520M T Series RE A 2000 Route Engine 538 ...

Отзывы: