background image


Little Rider 

Child Safety Car Seat 

Groups 0+/1 (0~ 18kg) 


User Manual 


             EN      RO      BG      HU      PL  
 

Содержание Little Rider

Страница 1: ...Little Rider Child Safety Car Seat Groups 0 1 0 18kg User Manual EN RO BG HU PL...

Страница 2: ...re Never use the child seat without them 2 Car interiors can become very hot when left standing in direct sunlight Metal fittings on the seat and harness may become hot and should be covered up 3 Seat...

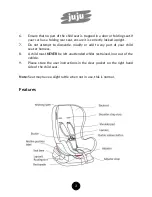
Страница 3: ...right 7 Do not attempt to dismantle modify or add to any part of your child seat or harness 8 A child must NEVER be left unattended whilst restrained in or out of the vehicle 9 Please store the user i...

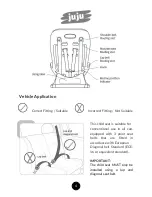
Страница 4: ...e This child seat is suitable for conventional use in all cars equipped with 3 point seat belts that are fitted in accordance with European Diagonal belt Standard ECE 16 or equivalent standard IMPORTA...

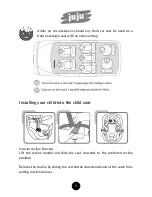
Страница 5: ...seat with an active airbag Installing your child into the child seat How to recline the seat Lift the recline handle and slide the seat forwards to the preferred recline position Release the buckle b...

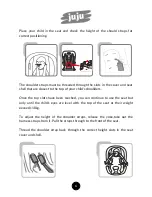
Страница 6: ...ld s shouliders Once the top slots have been reached you can continue to use the seat but only until the child s eyes are level with the top of the seat or their weight exceeds 18kg To adjust the heig...

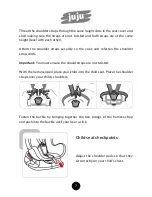
Страница 7: ...e and refasten the shoulder strap cords Important You must ensure the should straps are not twisted With the harness open place your child into the child seat Place the shoulder straps over your child...

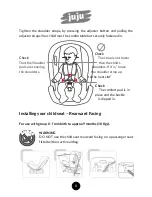
Страница 8: ...the Shoulder than the child s pads are covering shoulders If it is move the shoulders the shoulder strap up to the next slot Check The comfort pad is in place and the buckle is clipped in Installing...

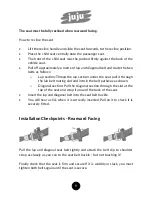
Страница 9: ...ab belt routing slot and into in the belt pathway as shown o Diagonal section Pull the diagonal section through the slot at the top of the seat and wrap it around the back of the seat Insert the lap a...

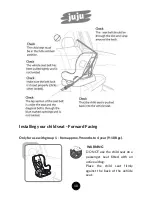
Страница 10: ...Forward Facing Only for use with group 1 from approx 9 months to 4 year 9 18 Kgs WARNING DO NOT use the child seat on a passenger seat fitted with an active airbag Place the child seat firmly against...

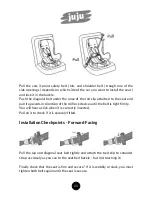
Страница 11: ...ction of the roll lock device until the belt is tight firmly You will hear a click when it is correctly inserted Pull on it to check if it is securely fitted Installation Checkpoints Forward Facing Pu...

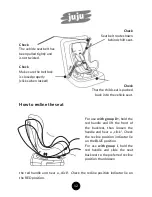
Страница 12: ...nto the vehicle seat How to recline the seat For use with group 0 hold the red handle and lift the front of the backrest than loosen the handle and hear a click Check the recline position indicator li...

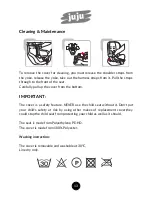
Страница 13: ...ll up the cover from the bottom IMPORTANT The cover is a safety feature NEVER use the child seat without it Don t put your child s safety at risk by using other makes of replacement cover they could s...

Страница 14: ...A ESTE DOTATA PENTRU ACEST SPATIU CU SISTEM DE PROTECTIE AIRBAG 1 Husa si centurile pentru piept sunt accesorii de siguranta Nu folositi niciodata scaunul fara ele 2 Interiorul masinii se poate incing...

Страница 15: ...din spate asigurativa ca este montata corespunzator 7 Nu incercati sa demontati modificati sau sa adaugati alte parti la scaunul auto sau la ham 8 Copilul nu trebuie NICIDATA lasat nesupravegheat cat...

Страница 16: ...caun auto este potrivit pentru utilizare in masini dotate cu centuri de siguranta in 3 puncte in concordanta cu Standardul European ECE 16 sau un standard echivalent IMPORTANT ESTE NECESAR ca scaunul...

Страница 17: ...ebuie montat pe locul din fata daca masina este dotata cu sistem de siguranta airbag Instalarea copilului in scaunul de masina Inclinarea scaunului Ridicati manerul de inclinare si trageti scaunul in...

Страница 18: ...i scaunului ce se gasesc pe spatar Verificati sa fie cat mai aproape de umerii copilului In momentul in care orificiile de sus nu mai sunt suficiente puteti sa continuati utilizarea scaunului insa doa...

Страница 19: ...entura este trecuta prin orificiile de pe scaun Asezati copilul in scaun dupa ce ati desfacut hamul in prealabil Asezati centurile de umar peste copil Inchideti hamul aducand cele doua capete catre si...

Страница 20: ...ageti de cureaua de ajustare si apasati clapeta de ajustare in acelasi timp Instalarea scaunului copilului cu spatele la directia de mers Pentru utilizare in grupa 0 de la nastere pana la aproximativ...

Страница 21: ...itionati centura prin orificiul aflat in partea superioara a scaunului si asezati o astfel incat sa cuprinda spatele scaunului Prindeti centura in sistemul de inchidere Veti auzi un click atunci cand...

Страница 22: ...ste inclinat la maxim Verificati ca centura autoturismului sa nu fie rasucita Verificati daca sistemul de inchidere al centurii este functional Verificati daca centura orizontala se afla sub scaun si...

Страница 23: ...pate a scaunului Trageti centura in 3 puncte a masinii mediana si diagonala printr unul din orificiile de pe scaun in functie de locul unde il pozitionati si prindeti o in sistemul de inchidere Imping...

Страница 24: ...este bine prins si securizat Daca este instabil trebuie sa strangeti ambele segmente ale centurii pana cand este fixat Centura este trecuta prin ghidajul indicat Verificati daca centura de siguranta a...

Страница 25: ...e afla in pozitia ALBASTRA Pentru Grupa 1 apasati clapeta rosie situata in partea de jos a scaunului si culisati scaunul pana in pozitia dorita apoi eliberati clapeta rosie pana auziti un click Verifi...

Страница 26: ...supuneti copilul la risc prin utilizarea altor marci sau inlocuind husa ar putea sa nu protejeze copilul asa cum ar trebui Scaunul este confectionat din polietilena PE HD Husa este confectionata din 1...

Страница 27: ...27 BG 0 13 13 0 9 18 1 1 2 3 4 5...

Страница 28: ...28 6 7 8 9...

Страница 29: ...29 3 ECE 16...

Страница 30: ...30...

Страница 31: ...31 18...

Страница 32: ...32...

Страница 33: ...33 0 9 10...

Страница 34: ...34 o o...

Страница 35: ...35...

Страница 36: ...36 1 9 4 9 18kg 3...

Страница 37: ...37...

Страница 38: ...38 0 1...

Страница 39: ...39 PE HD 100 30...

Страница 40: ...biztons gi vek biztons gi kell kek Ne haszn lja soha az l st ezek hi ny ban 2 A g pkocsi belseje felforr sodhat abban az esetben ha ez napon van hagyva Az l s s a h m f m r szei felmelegedhetnek s ez...

Страница 41: ...sen legyen beszerelve 7 Ne pr b ljon az aut l shez vagy a h mhoz m s kell keket hozz adni ezeket m dos tani vagy leszerelni 8 A gyereket ne hagyja fel gyelet n lk l soha se a g pkocsiban se a g pkocsi...

Страница 42: ...szerel s Jelen aut l st olyan g pkocsikban megfelel beszerelni melyek 3 pontos biztons gi vekkel vannak ell tva az Eur pai Szabv nyok szerint ECE 16 vagy egy azonos szabv ny FONTOS FONTOS hogy az aut...

Страница 43: ...K VAN SZERELVE Ne haszn lja ezt a helyet abban az esetben ha a l gzs k aktiv lva van Haszn lja az l st csak abban az esetben ha az els l s k z ps s tl s biztons gi vvel van ell tva A gyerek elhelyez...

Страница 44: ...szon tal lhat k Figyeljen arra hogy minn l k zelebb helyezkedjenek el a gyezek h llaihoz Abban az esetben ha a fenti lyukak m r nem legend k m g haszn lhatja az l st de csak abban az esetben ha a gyer...

Страница 45: ...meg hogy az v legyen th zva az l s lyukain Vizsg lja meg hogy a gyerek l se j l az aut l s h tt masz hoz legyen nyomva Vizsg lja meg hogy az v legyen th zva az l s lyukain Z rja be a h mot gy hogy a...

Страница 46: ...eg hogy az v a gyerek v llaival egyir nyban legyen Abban az esetben ha alattuk van helyezze az vet a k vetkez vez rl be Vizsg lja meg hogy a v llp rn k helyesen legyenek elhelyezve Vizsg lja meg a kap...

Страница 47: ...l egy m tert a g pkocsi biztons gi v b l s helyezze a k vetkez k ppen o A k z ps r szt Helyezze az vet az l s al s h zza t az v tmenet nek egyik vez rl lyuk n o Az tl s r szt Helyezze az vet az l s f...

Страница 48: ...l j l meg kell szor tsa az v mindk t r sz t am g ezek r gz dnek Vizsg lja meg hogy a biztons gi v a fels vez rl sen kereszt l legyen h zva s az l s h tt masz ra legyen helyezve Vizsg lja meg hogy az l...

Страница 49: ...tve az l st az g pkocsi h ts l s re H zza t a g pkocsi 3 pontos biztons gi v t k z ps s tl s az l s egyik lyuk n kereszt l att l f gg en hogy hov helyezi s kapcsolja a r gz t si berendez shez Nyomja...

Страница 50: ...z l s j l r gz ve s biztos tva legyen Abban az esetben ha nem stabil az v mindk t r sz t meg kell szor tsa am g ez r gz dik Vizsg lja meg azt hogy a biztons gi v teljesen ki legyen ny jva s ne legyen...

Страница 51: ...lyzetben legyen Az 1 csoport eset ben nyomja meg az l s alatt tal lhat piros billenty t s h zza meg az l st am g ez a megfelel helyzetbe ker l ut na engedje a billenty t am g egy kattan st hall N zze...

Страница 52: ...t haszn lata ltal vagy a h zat kicser l se ltal Ne vesz lyeztesse gyerek t m s huzat haszn lata ltal vagy a h zat kicser l se ltal ez lehet nem v di a gyereket mint az eredeti Az l s PE HD polietil n...

Страница 53: ...FORMIE DZIECI CY FOTELIK SAMOCHODOWY NIE MO E BY U YTKOWANY NA PRZEDNIM MIEJSCU SIEDZ CYM JE ELI SAMOCH D JEST WYPOSA ONY W SYSTEM OCHRONY AIRBAG DLA TEGO MIEJSCA 1 Pokrowiec i pasy piersiowe s akceso...

Страница 54: ...a w drzwiach Je eli wasz samoch d ma siedzenia w tylnej cz ci upewnijcie si e jest on prawid owo zamontowany 7 Nie wolno pr bowa demonta u zmiany lub dodawania innych cz ci do fotelika samochodowego l...

Страница 55: ...ie Niniejszy fotelik samochodowy mo e by u ytkowany w samochodach wyposa onych w 3 punktowe pasy bezpiecze stwa zgodnie z Europejskim Standardem ECE 16 lub ekwiwalentnym standardem WA NE KONIECZNYM JE...

Страница 56: ...amontowa na przednim siedzeniu je eli samoch d jest wyposa ony w system bezpiecze stwa z airbagiem Umieszczenie dziecka w foteliku samochodowym Nachylenie fotelika Poci gnij za uchwyt nachylenia i pop...

Страница 57: ...ry pokrowca i fotelika kt re znajduj si na oparciu Sprawd czy s jak najbli ej ramion dziecka W chwili w kt rej g rne otwory nie s wystarczaj ce mo esz kontynuowa u ytkowanie fotelika tylko je eli oczy...

Страница 58: ...siedzenia Sprawd czy pas przeszed przez otwoty fotelika W dziecko na fotelik po uprzednim otwarciu uprz y Za dziecku pasy naramienne Zamknij uprz z czaj c oba ko ce w kierunku systemu zamykania oraz p...

Страница 59: ...awd czy poduszki naramienne s w prawid owej pozycji Sprawd czy pas jest zamocowany na prawej cz ci ramion dziecka Je eli jest pod nimi przesu pas do nast pnego otworu Sprawd zamek i jego ochron Monta...

Страница 60: ...pod fotelikiem i prze go przez zacisk prowadz cy w otworze przez kt ry przechodzi pas o Cz przek tna Prze pas przez otw r znajduj cy si w g rnej cz ci fotelika oraz po go tak by obejmowa tyln cz fote...

Страница 61: ...chodzi przez g rny otw r oraz jest zamocowany na oparciu fotelika Sprawd czy fotelik jest maksymalnie pochylony Sprawd czy pas samochodowy nie jest skr cony Sprawd czy system zamykania pasa dzia a Spr...

Страница 62: ...z ty u Poci gnij pas w 3 punktach samochodu rodkowym i przek tnym przez jeden z otwor w w foteliku w zale no ci od miejsca w kt rym go umie cisz oraz chwy go w systemie zamykania Popchnij pas przek tn...

Страница 63: ...uchwycony i zabezpieczony Je eli jest niestabilny nale y zacisn obie cz ci pasa a nie b dzie dobrze zamocowany Sprawd czy pas bezpiecze stwa jest maksymalnie rozci gni ty oraz e nie jest skr cony Pas...

Страница 64: ...a Sprawd czy wska nik nachylenia fotelika znajduje si w pozycji NIEBIESKIEJ Dla Grupy 1 naci nij na czerwon klapk w dolnej cz ci fotelika oraz przesu fotelik do danej pozycji a nast pnie zwolnij czerw...

Страница 65: ...NIGDY nie u ywaj fotelika bez niego Nie poddawaj dziecka ryzyku poprzez u ytkowanie innych marek lub nie wymieniaj pokrowca co mog oby nie chroni dziecka tak jak powinno Fotelik sk ada si z polietyle...

Страница 66: ...66...

Страница 67: ...67...

Страница 68: ...uding clause 4 2 5 6 7 EN 716 2 2008 A1 2013 The Technical Construction File required by this Directive is maintained at the corporate headquarters of Dot Com Investment S R L Date of issue 01 02 2015...

Отзывы: