47
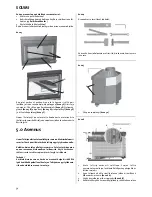
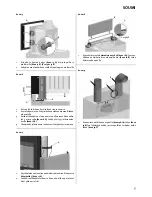
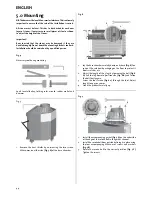
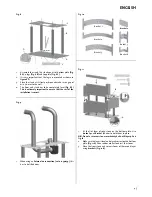
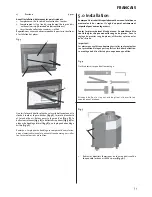
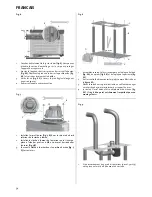
Fig. 16
1.
A
B
5mm
Adjust the position of the burn chamber in relation to the
surround.
2.
The front of the burn chamber must be flush with the front
of the layer.
3.
The gap below the decorative frame must be
5 mm
parallel
to the second layer on the top
(Fig. 16 A)
This can be adjusted
with the foot screws
(Fig. 16 B)
.
4.
Level the burn chamber.
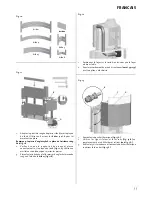
Fig. 17
A
1. Use
bracket 5
(Fig. 17 A)
on layer 3 and 4.
2.
Adjust the brackets with bare hands if necessary to make
them hold the stones together.
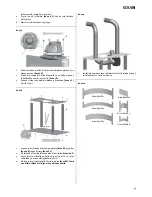
Fig. 18
A
B
223628
1.
Place the attachment bracket on the special corner stone
223628
(Fig. 18 A)
. The front stone
(Fig. 18 B)
of layer 5 shall
rest on the attachment bracket.
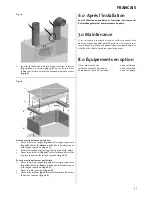
Fig. 19
B
C
A
1.
Install the flue pipe. Top smoke outlet
(Fig. 19 A)
or rear
smoke outlet
(Fig. 19 B)
.
If a rear smoke outlet:
Remove the
knockout in the rear plate
(Fig. 19 C)
.
ENGLISH
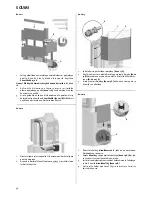
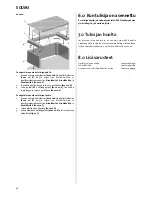
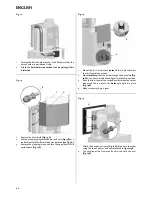
Fig. 20
A
B
E
D
C
F
If top smoke outlet:
1.
Place the last layer
(Fig. 20 A)
and the top layer
(Fig. 20 B)
.
Use
bracket 2, bracket 4 and bracket 6
between the last layer
and the top layer
(Fig. 20 C)
.
2.
Remove the knockout and place the top grid
(Fig. 20 D)
.
3.
Place the distance pieces
(Fig. 20 E)
, remove the knockout
and place top heat shield
(Fig. 20 F)
.
If rear smoke outlet:
1.
Place the last layer
(Fig. 20 A)
and the top layer
(Fig. 20 B)
.
Use
bracket 2
,
bracket 4
and
bracket 6
between the last layer
and the top layer
(Fig. 20 C)
.
2.
Place the top grid
(Fig. 20 D)
.
3.
Place the distance pieces
(Fig. 20 E)
and place top heat shield
(Fig. 20 F)
.
Содержание FS 165 - I 400 FL
Страница 4: ...4 3 0 Omrammingens deler Fig 2 NORSK ...
Страница 14: ...14 3 0 Omramningens dele Fig 2 DANSK ...
Страница 23: ...23 3 0 Omramningens delar Bild 2 SVENSK ...
Страница 32: ...32 3 0 Elementtitakan osat Kuva 2 SOUMI ...
Страница 41: ...41 3 0 Parts of the surround Fig 2 ENGLISH ...
Страница 51: ...51 3 0 Vue éclatée de l habillage Fig 2 FRANCAIS ...
Страница 60: ...60 3 0 Partes del revestimiento Fig 2 ESPAÑOL ...
Страница 70: ...70 3 0 Componenti per il rivestimento Fig 2 ITALIANO ...
Страница 80: ...80 3 0 Teile der Ummantelung Abb 2 DEUTSCH ...
Страница 89: ...89 NEDERLANDS ...
Страница 90: ...90 3 0 Onderdelen voor de mantel Fig 2 NEDERLANDS ...
Страница 98: ...98 ...
Страница 99: ...99 ...

