Docking and charging the Illustra body worn camera
(continued)
Note:
To remove the camera from the docking station, hold the camera
on both sides and lift it upwards. The camera is held firmly in place by a
retaining clip, so a small amount of force is required.
Note:
When checking-out the body worn camera from the camera
application, ensure that the white light is flashing on the front of the
camera before removing it from the docking station / disconnecting the
USB cable.
Replacing the Illustra body worn camera battery
1. Press the power button (See Figure 2) to power off the Illustra body
worn camera.
2. Place the camera on a flat surface so that the LCD screen is visible.
3. Remove all of the eight rubber inserts covering the eight screws.
4. Use a T5 Torx screwdriver and remove the eight screws.
5. Carefully remove the front case panel.
Note:
Take care not to damage the front case panel when removing
it as some force may be required.
Note:
The battery is now visible.
6. Remove the old battery from the camera.
7. Align the new battery terminals with the terminals in the camera and
insert the new battery until it clicks into place.
8. Place the front case panel onto the camera body (like it was before
the front case was removed) and carefully push downward on each
of the four corners until the front case panel securely clicks into
place.
Security
Q
uick
S
tart
G
uide (8200-2077-01_
D
0)
Illustra Body Worn Camera
This guide describes the configuration and general usage
of the Illustra body worn camera.
In the Box
1 x Illustra body worn camera
1 x Quick Start Guide
1 x Crocodile clip (for attaching the camera to clothing)
1 x Klick fast adaptor (for attaching the camera to clothing)
1 x USB cable
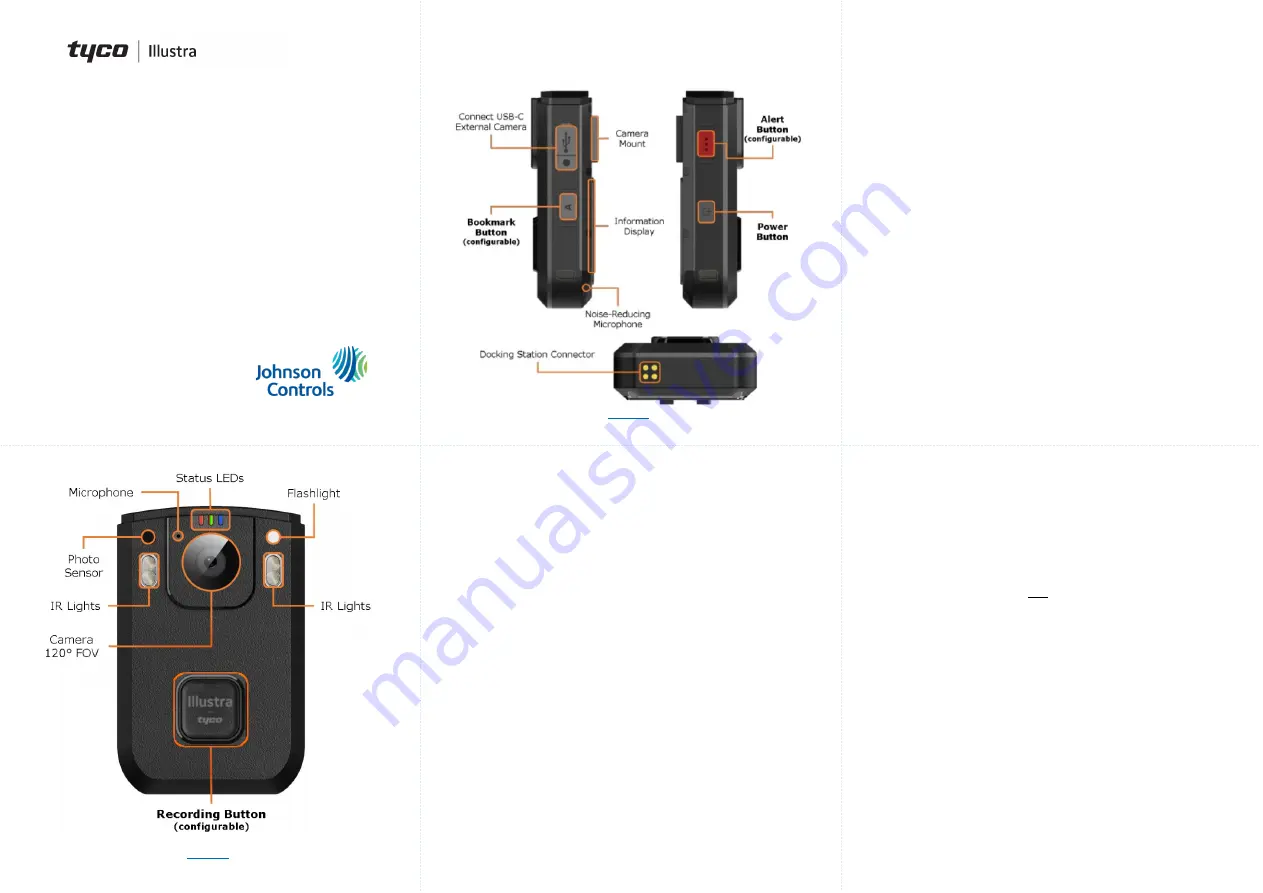
Illustra body worn camera overview
Figure 1
Illustra body worn camera overview (continued)
Figure 2
Setting up the Illustra body worn camera
1. Set up the Illustra docking station as per instructions in the docking
station Quick Start Guide.
2.
Optional:
Insert a SIM card into the SIM card slot on the body
worn camera. (See the ‘
Inserting a SIM card’
section).
3. Insert the Illustra body worn camera into one of the camera slots
on the Illustra docking station.
Note:
Up to 8 cameras can charge at one time.
4. Complete the set up within the Illustra body worn camera
application.
Docking and charging the Illustra body worn camera
1. Set up the Illustra Docking Station as per instructions in the
docking station Quick Start Guide.
2. Insert the Illustra body worn camera into one of the eight camera
charging slots on the Illustra docking station.
Note:
Ensure that the docking station connector (See Figure 2) on
the camera inserts into the four pins in the charging slot. The
camera only fits into the slot in the correct orientation.
3. Press down on top of the camera until it clicks into place. The
camera is now securely attached.
Note:
A red charging light on the camera is now visible and a
green light indicates that the camera has successfully connected
and is fully charged.
Replacing the Illustra body worn camera battery
(continued)
9.
Use a T5 Torx screwdriver to insert and securely attach alleight
screws.
10. Insert all eight rubber inserts into each of the screw holes.
Mounting the camera
The Illustra body worn camera comes with two mounting options in the
box:
(i)
a crocodile clip or
(ii)
a klick fast adaptor (for connection to
standard klick fast mounts). Select
one
of these options.
Mounting the camera with the crocodile clip
1. Place the camera on a flat surface so that the LCD screen is visible.
Note:
The ‘U’ shaped mounting slot (‘A’ in Figure 3) is located above
the LCD screen.
2. Align the metal clip on the crocodile clip with the ‘U’ shaped
mounting slot and then slide the metal clip downward into the ‘U’
shaped mounting slot until the metal clip clicks into place.
3. Securely attach the crocodile clip to a piece of clothing.
Mounting the camera with the klick fast adaptor
1. Insert part B in Figure 3 into the ‘U’ shaped mounting slot (A) (Figure
3).
2. Place part C in Figure 3 on top of Part B and align the holes in both
parts.
3. Place part D in Figure 3 on top of Part C and align the holes in both
parts.
4. Insert the screw (E) (Figure 3) into the hole and use a screwdriver to
securely attach the screw all parts to the camera.


