Programming the ACT2 Controller Using the Maestro Software Interface
59
Unit #3 HVAC
Setup
Status
Setpoints
Night setpoints
Zone #1
Prev
Next
Undo
06:00
Ends at
Night Set Back
22:00
Starts at
15
Warmup Setup
30
T outside
T outs
time
60
30
Delay [Min]
4
10
Differential:
Delay[Min]:
Cooling Setpoints
Available during night set back
78
Setpoint:
4
10
Differential:
Delay[Min]:
Reclaim Setpoints
55
Setpoint:
4
4
Differential:
Delay[Min]:
Auxiliary Setpoints
50
Setpoint:
0
0
Deadband:
Delay[Min]:
Dehum. Setpoints
0
Setpoint:
Auxiliary heat
Dehum.
Night Setback:
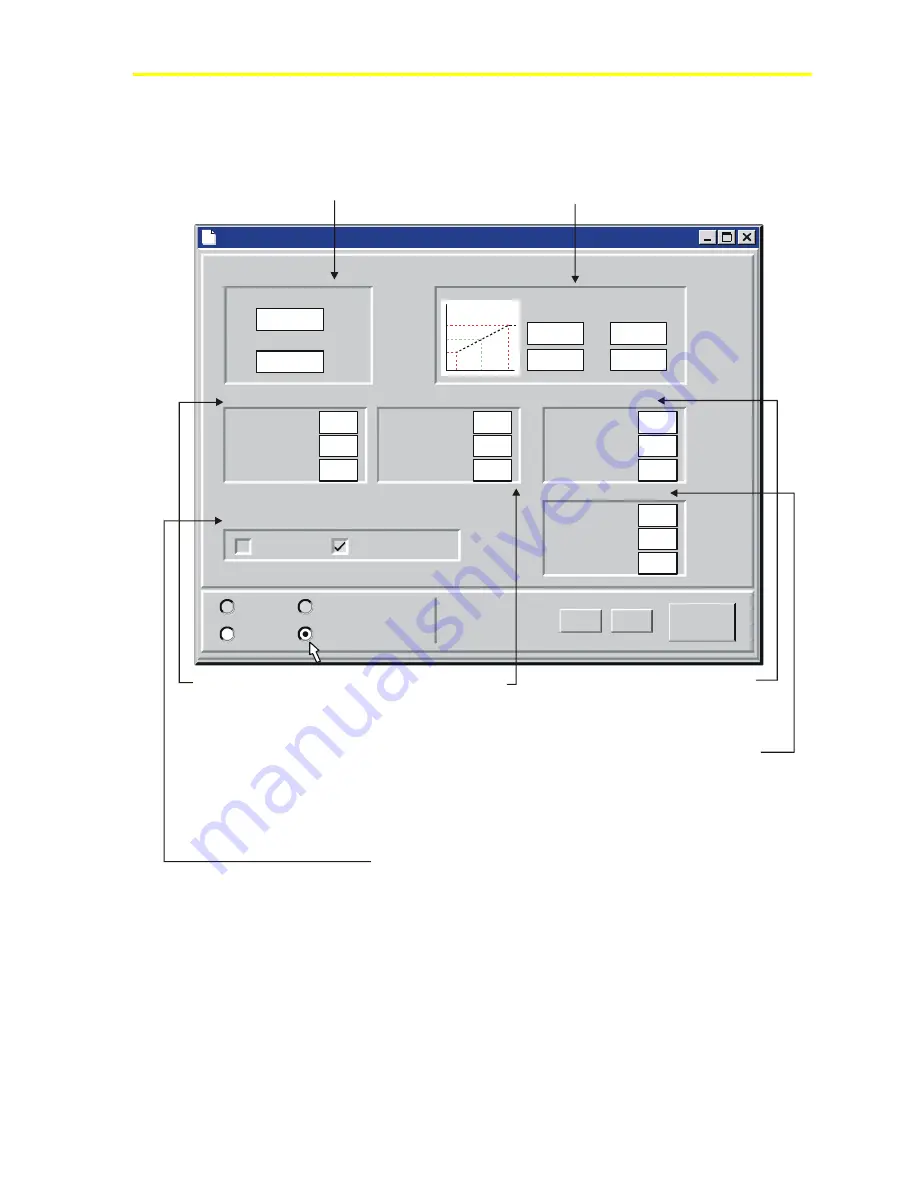
This defines the
start and end times when the
setback parameters are active.
These times must be given in
24-hour format (e.g., 6:00 p.m. is
written as 18:00.)
Warmup Setup:
This defines how warmup is
performed to ready the space for daytime
temperatures. If the temperature outside is below
either temperature in the T outside boxes, warmup
will take place. Warmup will begin at the number of
minutes before the end of night setback given in the
Delay box. See example below.
Cooling Setpoints:
This
area defines when cooling is
activated during night
setback.
Setpoint
Differential
Delay
defines
the temperature at which
cooling begins.
is
the total differential between
stages.
is
the
minimum time (in minutes)
between successive stages.
Reclaim Setpoints:
This
area defines when heating is
activated during night setback.
defines the
temperature at which heating
begins.
and
are defined for heating in the
same manner as for cooling.
Setpoint
Differential
Delay
Auxiliary Setpoints:
This defines
when auxiliary heat is activated during
night setback.
Dehum. Setpoints:
This defines when
dehumidification is used during night
setback.
Available during night set back:
Placing a check in the
box will make the dehumidification and auxiliary heat
outputs available during night setback. Removing the
check will prevent dehumidification or auxiliary heat
during night setback times.
T outs
time
Figure 55: HVAC Night Setback Parameters
Содержание PENN ACT2
Страница 16: ...Maestro Software 16 ...
Страница 30: ...Maestro Software 30 ...
Страница 38: ...Maestro Software 38 3 Click the unit you wish to view Figure 32 Select Unit Dialog 4 Click the OK button ...
Страница 90: ...Maestro Software 90 ...
Страница 102: ...Maestro Software 102 ...
Страница 104: ...Maestro Software 104 ...


