SECTION 3 - CHASSIS & TURNTABLE
3-196
3121160
Engine Control Module Replacement
REMOVAL
1.
Disconnect Negative battery cable.
2.
Remove controller from mounting bracket.
3.
Push connector lock back to unlock connector.
4.
Unplug controller and remove.
INSTALLATION
THE CONTROLLER IS CALIBRATED FOR EACH ENGINE VERIFY YOU HAVE THE
CORRECT CONTROLLER
1.
Plug connector into controller.
2.
Push lock into place.
3.
Mount controller into mounting bracket.
4.
Reconnect the battery cable.
5.
Start engine.
6.
Check for any DTC codes and clear.
7.
Verify engine is in closed loop and no warning lights are
illuminated.
Heated Exhaust Gas Oxygen Sensor Replacement
REMOVAL
1.
Disconnect Negative battery cable.
2.
Disconnect the O2 sensor electrical connector.
3.
Using an O2 Sensor socket, remove the O2 Sensor and
discard.
INSTALLATION
BEFORE INSTALL THE O2 SENSOR LUBRICATE THREADS WITH ANTI-SEIZE
COMPOUND GM P/N 5613695 OR EQUIVALENT. AVOID GETTING COMPOUND
ON THE SENSOR TIP.
1.
Install O2 sensor. Tighten to 30 lb-ft (41 Nm).
2.
Start engine.
3.
Check for any DTC codes and clear.
4.
Verify engine is in closed loop and no warning lights are
illuminated.
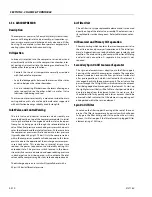
3.35 GM ENGINE LPG FUEL SYSTEM DIAGNOSIS
Fuel System Description
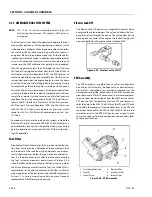
To maintain fuel and emission control on the LPG fuel system
the Engine Control Units (ECM) relies on numerous engine
sensor and output data from the Electronic Pressure Regulator
(EPR). The ECM will then determine the target fuel calibration
and command the EPR to reposition the voice coil to the
proper position which, subsequently reposition the secondary
lever in the pressure regulator to maintain proper control. The
EPR and ECM will continue to communicate back and forth
during normal operation.
In the event that the EPR fails to communicate or the Commu-
nications Area Network (CAN) cable fails to transmit data the
regulator will operate in an open loop configuration. As the air
valve vacuum in the mixer venturi is communicated to the sec-
ondary chamber of the regulator the secondary diaphragm
will be drawn in a downwards motion. This downward motion
will cause the secondary lever to open thus allowing more fuel
to enter the mixer.
In the (LPR) the fuel is vaporized and the pressure reduced in
two stages. The first stage reduces the pressure to approxi-
mately 1.0 to 3.0 psi (6.8 to 20.6 kPa). The second stage
reduces the pressure to approximately negative 1.5 in. of
water column.
The fuel is then drawn from the secondary chamber of the LPR
by the vacuum generated by air flowing through the mixer.
This vacuum signal is also used to generate lift for the mixer air
valve. This vacuum signal is most commonly referred to as air
valve vacuum. In the mixer, the fuel mixes with the air entering
the engine. This air/ fuel mixture is then drawn into the engine
for combustion.
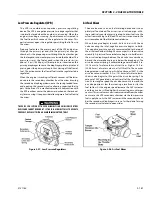
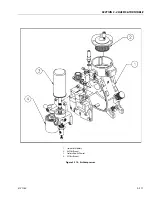
Figure 3-109. EPR Assembly
Содержание 740AJ
Страница 1: ...Service and Maintenance Manual Model 740AJ Prior to S N 0300185827 P N 3121160 October 24 2017 AS NZS...
Страница 2: ......
Страница 51: ...SECTION 2 GENERAL 3121160 2 11 Figure 2 2 Engine Operating Temperature Specifications Ford 4150548 E...
Страница 55: ...SECTION 3 CHASSIS TURNTABLE 3121160 3 3 This page left blank intentionally...
Страница 56: ...SECTION 3 CHASSIS TURNTABLE 3 4 3121160 1 Figure 3 2 Axle and Steering Installation Sheet 1 of 2 0258286 C...
Страница 100: ...SECTION 3 CHASSIS TURNTABLE 3 48 3121160 Figure 3 37 Swing Bearing Tolerance Boom Placement Sheet 1 of 2...
Страница 101: ...SECTION 3 CHASSIS TURNTABLE 3121160 3 49 Figure 3 38 Swing Bearing Tolerance Boom Placement Sheet 2 of 2...
Страница 116: ...SECTION 3 CHASSIS TURNTABLE 3 64 3121160 Figure 3 44 Swing Hub Prior to SN 0300074383...
Страница 124: ...SECTION 3 CHASSIS TURNTABLE 3 72 3121160 Figure 3 45 Swing Drive Hub Fairfield SN 0300074383 through 0300134352...
Страница 180: ...SECTION 3 CHASSIS TURNTABLE 3 128 3121160 1 Figure 3 66 Auxiliary Pump Location 1 AuxiliaryPump 2 HydraulicTank...
Страница 203: ...SECTION 3 CHASSIS TURNTABLE 3121160 3 151 Figure 3 77 EFI Component Location...
Страница 206: ...SECTION 3 CHASSIS TURNTABLE 3 154 3121160 Figure 3 78 ECM EPM Identification ECM EPM...
Страница 213: ...SECTION 3 CHASSIS TURNTABLE 3121160 3 161 Megajector Regulator LockoffSolenoid Figure 3 80 LPG System Components Mixer...
Страница 219: ...SECTION 3 CHASSIS TURNTABLE 3121160 3 167 Figure 3 81 Check Out and Initial Start Up Procedures...
Страница 224: ...SECTION 3 CHASSIS TURNTABLE 3 172 3121160 Figure 3 83 Deutz EMR 2 Troubleshooting Flow Chart...
Страница 225: ...SECTION 3 CHASSIS TURNTABLE 3121160 3 173 Figure 3 84 Deutz EMR 2 Vehicle Side Connection Diagram...
Страница 226: ...SECTION 3 CHASSIS TURNTABLE 3 174 3121160 Figure 3 85 Deutz EMR 2 Engine Side Connection Diagram Sheet 1 of 2...
Страница 227: ...SECTION 3 CHASSIS TURNTABLE 3121160 3 175 Figure 3 86 Deutz EMR 2 Engine Side Connection Diagram Sheet 2 of 2...
Страница 228: ...SECTION 3 CHASSIS TURNTABLE 3 176 3121160 Figure 3 87 EMR 2 Engine Plug Pin Identification...
Страница 229: ...SECTION 3 CHASSIS TURNTABLE 3121160 3 177 Figure 3 88 EMR 2 Vehicle Plug Pin Identification...
Страница 230: ...SECTION 3 CHASSIS TURNTABLE 3 178 3121160 Figure 3 89 EMR2 Fault Codes Sheet 1 of 5...
Страница 231: ...SECTION 3 CHASSIS TURNTABLE 3121160 3 179 Figure 3 90 EMR2 Fault Codes Sheet 2 of 5...
Страница 232: ...SECTION 3 CHASSIS TURNTABLE 3 180 3121160 Figure 3 91 EMR2 Fault Codes Sheet 3 of 5...
Страница 233: ...SECTION 3 CHASSIS TURNTABLE 3121160 3 181 Figure 3 92 EMR2 Fault Codes Sheet 4 of 5...
Страница 234: ...SECTION 3 CHASSIS TURNTABLE 3 182 3121160 Figure 3 93 EMR2 Fault Codes Sheet 5 of 5...
Страница 303: ...SECTION 4 BOOM PLATFORM 3121160 4 31 Figure 4 20 Rotator Assembly HELAC...
Страница 335: ...SECTION 4 BOOM PLATFORM 3121160 4 63 THIS SENSOR ON NON ADE MACHINES ONLY Figure 4 27 UMS Sensor Location...
Страница 336: ...SECTION 4 BOOM PLATFORM 4 64 3121160 Figure 4 28 UMS Module Location ADE MACHINES NON ADE MACHINES...
Страница 425: ...SECTION 5 BASIC HYDRAULIC INFORMATION AND SCHEMATICS 3121160 5 81 Figure 5 131 Variable Displacement Pump Rexroth...
Страница 443: ...SECTION 5 BASIC HYDRAULIC INFORMATION AND SCHEMATICS 3121160 5 99 Figure 5 146 Fault Logic Troubleshooting...
Страница 444: ...SECTION 5 BASIC HYDRAULIC INFORMATION AND SCHEMATICS 5 100 3121160 Figure 5 147 Fault Logic Troubleshooting...
Страница 445: ...SECTION 5 BASIC HYDRAULIC INFORMATION AND SCHEMATICS 3121160 5 101 Figure 5 148 Fault Logic Troubleshooting...
Страница 460: ...SECTION 5 BASIC HYDRAULIC INFORMATION AND SCHEMATICS 5 116 3121160 NOTES...
Страница 467: ...SECTION 6 JLG CONTROL SYSTEM 3121160 6 7 Figure 6 2 ADE Block Diagram...
Страница 471: ...SECTION 6 JLG CONTROL SYSTEM 3121160 6 11 Figure 6 6 Analyzer Flow Chart Prior to Version 5 X Software Sheet 4 of 4...
Страница 473: ...SECTION 6 JLG CONTROL SYSTEM 3121160 6 13 Figure 6 8 Analyzer Flow Chart Version 5 X Software Sheet 2 of 4...
Страница 534: ...SECTION 6 JLG CONTROL SYSTEM 6 74 3121160 NOTES...
Страница 545: ...SECTION 7 BASIC ELECTRICAL INFORMATION SCHEMATICS 3121160 7 11 Figure 7 15 Connector Installation...
Страница 580: ...SECTION 7 BASIC ELECTRICAL INFORMATION SCHEMATICS 7 46 3121160 NOTES...
Страница 581: ......

