SECTION 5 - BASIC HYDRAULICS INFORMATION & SCHEMATICS
31215031
5-29
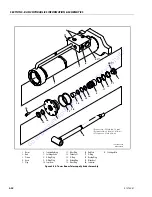
Assembly
IMPROPER SEAL INSTALLATION CAN CAUSE CYLINDER LEAKS AND IMPROPER
CYLINDER OPERATION.
NOTE:
Use proper cylinder seal kit for cylinder assembly. See your
JLG Parts Manual.
NOTE:
Apply a light film of hydraulic oil to all components before
assembly.
1.
Support rod in holding fixture
2.
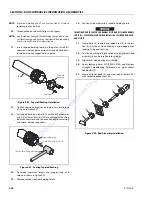
Install wear ring (16), rod seal (13), and wiper seal (12) in
cylinder head (3).
3.
Install new backup ring (14) and O-ring (15) in outside
diameter groove of cylinder head (3).
Figure 5-48. Head Seal Kit Installation
Figure 5-49. Cylinder Head Seals
4.
Install wear pad assembly (7) on rod (2). Carefully install
cylinder head assembly (4) on rod. Do not damage or
dislodge wiper and rod seals. Push head along rod to
rod end.
5.
Install O-ring (15) in spacer (5). Carefully slide spacer
with O-ring end facing cylinder head, on rod.
6.
Install backup ring (21), O-ring (14) and backup ring (21)
in piston (3).
7.
Install seal (13) and two lock rings (12) in outside diame-
ter piston grooves.
Figure 5-50. Piston Seal Kit Installation
Figure 5-51. Piston Seals
8.
Using suitable protection, clamp cylinder rod in a vise or
similar holding fixture as close to piston as possible.
9.
Carefully thread piston on cylinder rod hand tight. Do
not damaged or dislodge O-ring and backup rings.
20
4
16
19
17
16
20
19
18
17
4
21
21
14
3
12
13
12
15
5
MAF06650
3
12
12
13
21
14
21
Tapered
Bushing
End
Go
to
Discount-Equipment.com
to
order
your
parts


