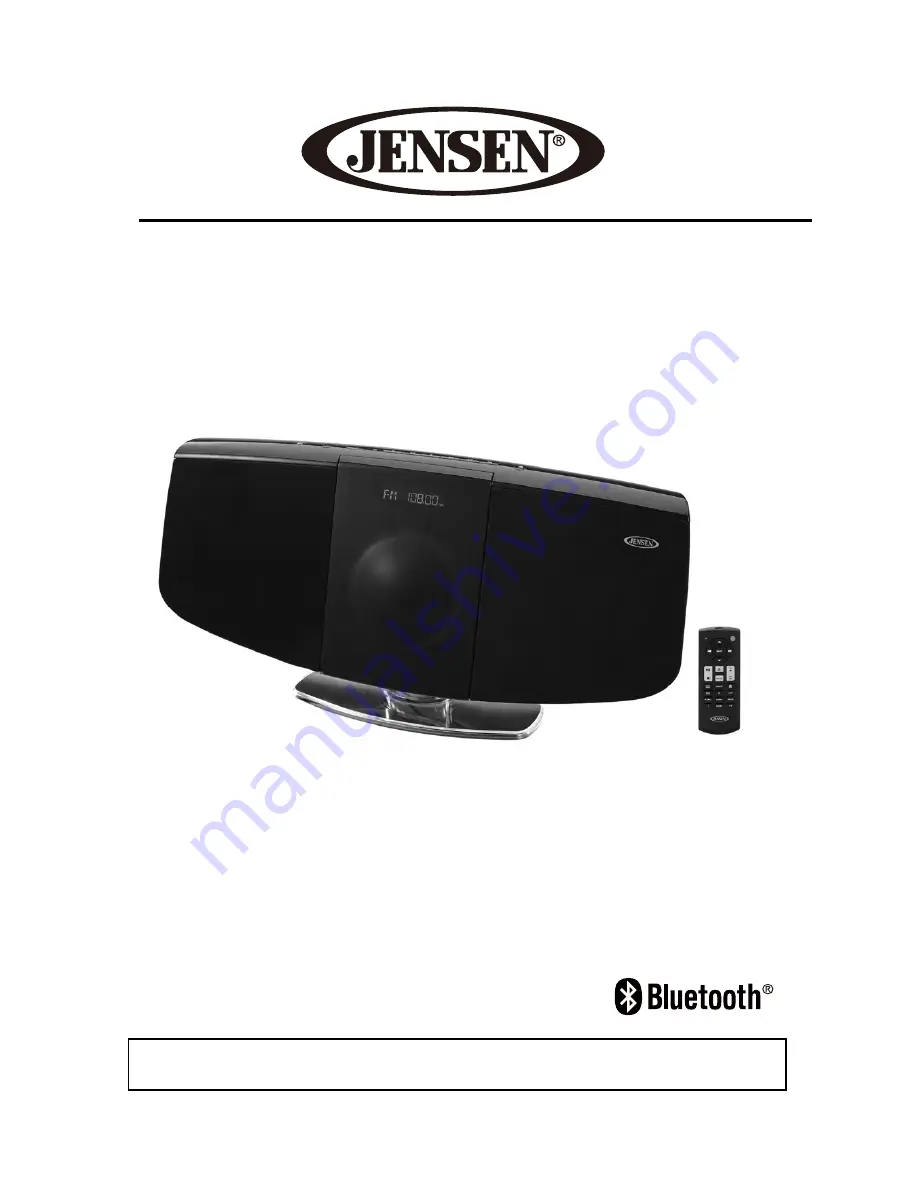
Wall Mountable Bluetooth Music System
with CD
USER MANUAL JBS-350
PLEASE READ THIS USER MANUAL COMPLETELY BEFORE OPERATING THIS
UNIT AND RETAIN THIS BOOKLET FOR FUTURE REFERENCE.
Страница 1: ...Wall Mountable Bluetooth Music System with CD USER MANUAL JBS 350 PLEASE READ THIS USER MANUAL COMPLETELY BEFORE OPERATING THIS UNIT AND RETAIN THIS BOOKLET FOR FUTURE REFERENCE ...
Страница 2: ...tting Slowly increase the sound until you can hear it comfortably and clearly and without distortion Once you have established a comfortable sound level Set the dial and leave it there Taking a minute to do this now will help to prevent hearing damage or loss in the future After all we want you listening for a lifetime We Want You Listening For a Lifetime Used wisely your new sound equipment will ...
Страница 3: ...or similar surface that may block the ventilation openings or placed in a built in installation such as a bookcase or cabinet that may impede the flow of air through the ventilation openings 8 Do not install near any heat sources such as radiators heat registers stoves or other apparatus including amplifiers that produce heat 9 AC adaptor is used as disconnect device and it should remain readily o...
Страница 4: ...harmful interference and 2 this device must accept any interference received including interference that may cause undesired operation NOTE This equipment has been tested and found to comply with the limits for a Class B digital device pursuant to Part 15 of the FCC Rules These limits are designed to provide reasonable protection against harmful interference in a residential installation This equi...
Страница 5: ...k that the rated voltage of your unit matches your local voltage ON CONDENSATION When left in a heated room where it is warm and damp water droplets or condensation may form inside the CD player When there is condensation inside the unit the unit may not function normally Let it stand for 1 to 2 hours before turning the power on or gradually heat the room up and dry the unit before use Should any ...
Страница 6: ...r water lines located behind the wall where you are attaching the unit We recommend having this speaker professionally installed Use the included wall mounting accessories and template to attach the sound bar to the wall 1 Use the supplied wall mounting instruction sheet to make marks on the wall for the plastic anchors Make sure the marks are level before drilling 2 Drill holes on the marks 3 Ins...
Страница 7: ...6 142 mm 4 Screw Spacer Sleeves Wall plugs plastic ...
Страница 8: ...7 LOCATION OF CONTROLS MAIN UNIT 2 1 3 3 4 7 5 6 19 19 FRONT VIEW BACK VIEW ...
Страница 9: ...12 In CD mode Stop CD playing 13 In CD BLUETOOTH mode Skip to the previous or next track In CD mode Press hold to fast backward forward In FM mode Tuning Down Up 14 In CD BLUETOOTH mode Play Pause 15 In CD mode Open Close the CD Door 16 Headphone Jack 17 AUX IN 3 5 mm AUX IN Jack 18 USB CHARGING USB Charging Port 19 Passive Radiator 20 NFC linking Point 8 9 16 10 11 12 13 14 13 15 17 18 20 AUX IN ...
Страница 10: ...OTH mode Skip to the previous or next track In CD mode Press hold to fast backward forward In FM mode Tuning Down Up 4 SELECT Confirm the selection during setup 5 In CD mode Open Close the CD Door 6 In CD BLUETOOTH mode Play Pause 7 In CD mode Stop CD playing REMOTE CONTROL VOL VOL 21 5 6 7 1 4 3 14 17 3 19 20 16 2 8 9 11 2 10 12 13 15 18 ...
Страница 11: ...tereo Mono In C D mode Select CD Repea t Random Play 12 EQ Select Preset Equalizer 13 ALARM 1 ALARM 2 Alarm 1 2 S etting Alarm ON OFF Button 14 Bluetooth Mode But ton 15 FOL DER In MP3 CD mode Skip to next MP3 folder currently playing 16 10 In MP3 CD Skip to music track of 10 17 SNOO ZE Alarm Snooze Bu tton 18 SLEEP Sleep Timer Button 19 Mute Button 20 VOL Volume Up Down But ton 21 Power On Standb...
Страница 12: ... operates on an external AC adaptor rated at 12V mA included and requires one 3V type CR2025 Lithium battery included for remote control Do not attempt to operate the unit from any other power source You could cause damage to the unit and void your warranty AC DC Adaptor Connection An AC DC Adaptor with the output 12V mA Included is required for operating the main unit To connect the AC DC Adaptor...
Страница 13: ...alent type battery 3 Insert the battery holder back into the battery slot NOTE Only use a well known brand of battery to ensure the longest life and best performance Battery Precautions Replacement of batteries must be done by an adult The supply terminals are not to be short circuited Non rechargeable batteries are not to be recharged Exhausted batteries are to be removed Only batteries of the eq...
Страница 14: ...r fast advance reverse setting 6 Press the SELECT Button on the remote control again to complete the setting NOTE The clock and radio station presets will need to be reset if the power is interrupted or in the event of a power outage 12 00 will appear and start blinking on the LCD display to notify you that the power was interrupted and the clock will need to be reset Please follow steps 1 5 above...
Страница 15: ...ote control or Power Button on main unit once It resets itself for the following day Note If you press the Button on main unit or FUNCTION Button on remote control when alarm sounding unit will stop the alarm and switch to function mode immediately To cancel the following day alarm tap the ALARM 1 or 2 Button repeatedly until corresponding ALARM indicator goes off SNOOZE FUNCTION Press the SNOOZE ...
Страница 16: ...requency so you may need to manually tune for the best reception PRESET RADIO STATIONS 1 Press the POWER Button on main unit or remote control to turn on the unit 2 Tap the FUNCTION Button on main unit or remote control to select Radio mode 3 Tune to the desired radio station either by manually or automatically tuning method 4 Press the PROG PRESET Button on remote control the next available prese...
Страница 17: ...l track and starting counter of 00 00 5 Press the PLAY PAUSE on main unit or remote control the CD will start playing from first track 6 Press the volume control on main unit or VOL on remote control to adjust to the desired volume level 7 To pause playback press the PLAY PAUSE on main unit or remote control The track time and icon will flash To resume playing press the CD PLAY PAUSE again 8 You c...
Страница 18: ...mber will advance one i e P 02 in LCD display while track number will reset to 00 for next programming track 4 Repeat steps 2 to 3 to store more tracks in the memory You can store up to 20 tracks 5 Press the PLAY PAUSE on main unit or remote control to start playing the CD or MP3 CD in the programmed sequence 6 Press the FM ST MODE Button on remote control to select Repeat 1 All or Random play if ...
Страница 19: ...ve for connecting but find that you are still having problems connecting using NFC we recommend checking to be sure your Bluetooth device is only using factory authorized parts and batteries PAIRING Linking a BLUETOOTH ENABLED cell phone OR OTHER BLUETOOTH ENABLED DEVICE to the JBS 350 If the JBS 350 has never been paired with a Bluetooth device before You need to follow the pairing instructions b...
Страница 20: ...Line out Jack or Headphone Jack of your external audio device 3 Turn on the unit and external audio device 4 Tap the FUNCTION Button on main or remote control to select AUX mode display will show AUX IN 5 The volume level can now be controlled through the main unit Operate all other functions on the auxiliary device as usual Note If you connect this unit to the Line Out Jack of your external devic...
Страница 21: ...th units and void the warranty Note 1 Some smart phones and portable devices use proprietary USB connections and circuitry so they may not charge when plugged into the USB port Please refer to your device user manual before you attempt to charge them 2 It is normal if the unit gets warm while the USB port is in use and charging your smart phone or portable device 3 Do not charge your smart phone o...
Страница 22: ...cabinet If the front panel becomes dirty or smudged with fingerprints it may be cleaned with a soft cloth slightly dampened with a mild soap and water solution Never use abrasive cloths or polishes as these will damage the finish of your unit CAUTION Never allow any water or other liquids to get inside the unit while cleaning TROUBLESHOOTING GUIDE If you experience difficulties in the use of this ...
Страница 23: ... reducing the output volume on the device itself Also try turning bass boost OFF or change the EQ setting Unit gets warm after extended play at high volume This is normal Turn the unit off for a period of time or lower volume SPECIFICATIONS Power requirement AC adaptor for main unit AC input 120V 60Hz DC output 12V 1500 mA Remote control 1 x 3V CR2025 Lithium Battery Frequency Range Radio Band FM ...
Страница 24: ...ure to provide reasonable care and necessary maintenance as outlined in the user manual 3 Warranty of all SPECTRA products applies to residential use only and is void when products are used in a nonresidential environment or installed outside the united States This warranty gives you specific legal rights and you may also have other rights which vary from state to state TO OBTAIN SERVICE please re...