INSTALLATION &
OWNER’S MANUAL
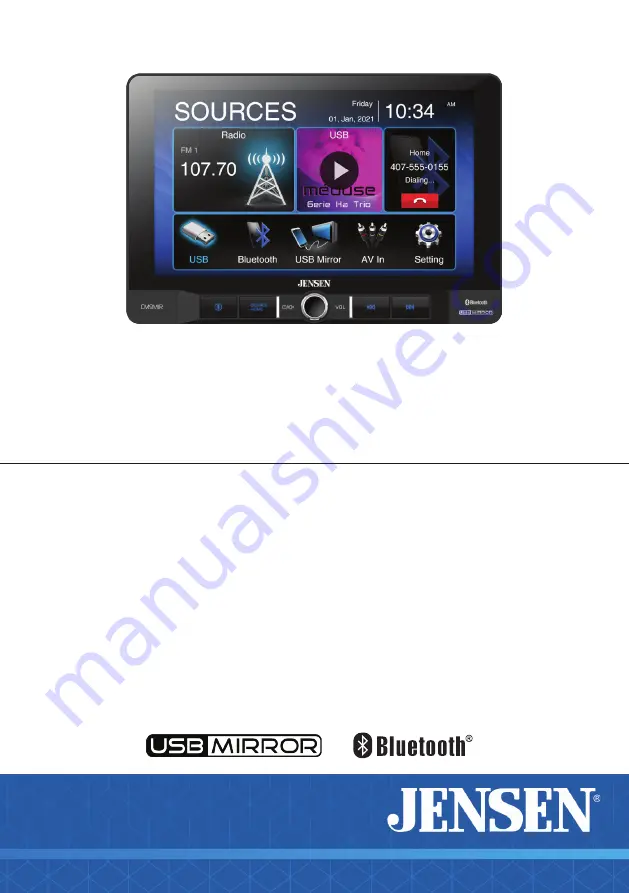
CM9MIR
Multimedia Receiver with USB Mirror
featuring a 9" Digital TFT Display
AM-FM
USB Media Player
Rear Camera Input
Страница 1: ...INSTALLATION OWNER S MANUAL CM9MIR Multimedia Receiver with USB Mirror featuring a 9 Digital TFT Display AM FM USB Media Player Rear Camera Input ...
Страница 2: ...xcessive shock When replacing a fuse only use a new one with the correct rating Using a fuse wit the wrong rating may cause the unit to malfunction To prevent short circuits when replacing a fuse disconnect the wiring harness first Use only the provided hardware and wire harness If you experience problems during installation consult your nearest JENSEN deale If the unit malfunctions reset the unit...
Страница 3: ...cations General Operation Audio Operation AM FM Tuner Operation USB Operation Media Compatibility Bluetooth Operation USB Mirror Operation Auxiliary Inputs Rear Camera Operation SWC Input Operation Troubleshooting Specifications Warranty Table of Contents 3 4 5 6 7 8 9 10 11 12 13 14 15 16 17 18 19 20 21 22 23 ...
Страница 4: ...the vehicle is not in Park and or the parking brake is not fully engaged When installing this unit the installer must connect the parking brake detect wire to the parking brake mechanism in order to make the parking brake lock out feature operable DO NOT simply ground the parking brake detect wire to a metal portion of the vehicle Failure to properly install the parking brake lock out feature coul...
Страница 5: ...d found to comply with the limits for a Class B digital device pursuant to Part 15 of the FCC Rules These limits are designed to provide reasonable protection against harmful interference in a residential installation This equipment generates uses and can radiate radio frequency energy and if not installed and used in accordance with the instructions may cause harmful interference to radio communi...
Страница 6: ...t would be subject to high temperatures such as from direct sunlight or where it would be subject to dust dirt or excessive vibration Preparation 3 A 1 2 3 4 90 90 2 C 8 2 7 1inch 0inch A C 1inch 0inch 4 8 B 0 5 inch B 0 5 inch 5 1 25mm 2 1 2 12mm Flush M5 0X8 0MM 4 PCS M5 0X6 0MM 4 PCS 6 6 1 See the enclosed installation guide for more details ...
Страница 7: ...6 CM9MIR Screen Rotation Screen angle can pivot side to side Screen depth can be adjusted from 0 to 0 5 to 1 forward Screen height adjusts up to 1 5 down Screen tilts forward and back ...
Страница 8: ... BLUE RED WHITE RED WHITE YELLOW RED YELLOW WHITE GND CAMERA 12V AV IN R AV IN L VIDEO IN CAMERA IN LINE OUT FRONT L LINE OUT FRONT R LINE OUT REAR L LINE OUT REAR R SUB WOOFER 1 SUB WOOFER 2 BLACK BLACK BLACK BLACK BLACK BLACK BLACK BLACK GRAY RED WHITE BLACK GRAY BLACK GREEN GREEN BLACK VIOLET VIOLET BLACK RED BLACK YELLOW ORANGE VIOLET WHITE BLUE PINK BLUE WHITE WHITE GRAY LEFT FRONT RIGHT FRON...
Страница 9: ...MIR Control Locations VOICE ACTIVATION BUTTON SOURCE HOME POWER VOLUME MUTE PREVIOUS BUTTON NEXT BUTTON RESET USB PORT 1 2 3 4 5 6 The radio display features the following functions and displays 1 2 3 4 5 6 ...
Страница 10: ...operation can also be accessed by selecting the corresponding icon from the main menu Operation Mode Selection Press the icon at the top left corner of the screen to display the OSD main menu Press the Radio USB Bluetooth USB Mirror AV In Settings in the Main meu pate to select the desired source Connect external audio video devices to the rear RCA Type A V Input Insert a USB flash drive to play M...
Страница 11: ...lectric Pop Soft allows user to enter custom EQ settings Time Alignment To adjust time correction settings select PRESET 1 PRESET 2 or PRESET 3 Loudness Touch screen button to turn the Loudness function on off Subwoofer Control Touch the button to turn the Subwoofer Control On Off Subwoofer Gain Select subwoofer 6 to 6 0 is default Display Brightness Press or to adjust to desired level O Minimum 2...
Страница 12: ...Setting Speaker Positions Reset to Default Settings 1 2 3 4 Adjustments To properly set the time alignment you will need measure the distance from each speaker in ft to where you want the center stage to be for example if you want the position to be at the divers seat then meausre each speaker side front rear to where your head is located and set the distance accordingly Each vehicle will vary in ...
Страница 13: ...egin playback of that station Hold this button down for a few seconds and it will switch between AS and PS Press the icon to adjust the brightness Press DX LOC text to turn on the local or distance Auto Store Presets Press and hold AS PS to automatically program the FM 18 AM 12 available into the presets in the current Band Preset Scan Press AS PS to scan through all tunable presets in the current...
Страница 14: ...hat folder and press to return to the file list Use the up and down arrows to navigate the file list Press the arrow to return to the previous screen Press icon to repeat current track and adjust to repeat all tracks in the current folder Touch RPT again to exit repeat mode Press icon to shuffle all tacks in the current folder and again to shuffle all tracks Touch icon again to exit Repeat mode Pr...
Страница 15: ... 2 12 16 22 05 24kHz MPEG 2 5 8 11 025 12kHz Bitrate MPEG 1 32 320kbps MPEG 2 8 160kbps MPEG 2 5 8 160kbps Other Information Directory Depth Unlimited File Name Length 32 bytes Total File Number 2000 files Total Folder Number 200 folders File Number via Folder 2000 files MP3 ID3 TAG ver 1 x ver 2 x Title Artist Album Notes Due to ongoing technological advancement some USB flash drives may be incom...
Страница 16: ...numbers 0 9 and _ underscore Some characters may not be displayed correctly depending on the character type This device can play back files in Joliet and other standards that conform to ISO9660 MP3 written in the formats other than the above may not play and or their file names or folder names may not be displayed properly Some files may not play or be displayed correctly depending on sampling rat...
Страница 17: ...hen the connect feature is set to Auto connect On If the connect feature is set to Auto Connect Off the head unit will not automatically connect to any device From the main menu touch the Bluetooth on the screen Bluetooth icon will appear anytime a Bluetooth device is connected Press icon to return to Main Menu screen Displays current mode of operation When Bluetooth is On and a Bluetooth device i...
Страница 18: ...eturn to the beginning of the current track Press icon to pause or resume playback Touch icon to skip ahead to the next song Press the icon to adjust Equalizer setting Press MUSIC to transfer audio between the unit and mobile phone Press SETUP to access Bluetooth settings Dial a number and touch the Phone icon to call Use the keypad to dial a phone number Press the DEVICES to show the pairing devi...
Страница 19: ...3 Rotation icon Press rotation icon to Rotate the Mirrored screen from horizontal to vertical Tip Manually rotate the monitor to the left or right until locked in the vertical horizontal position 4 Audio Mix On Off icon When turned on the previous source in Radio mode will be played in the background 5 Reconnect Icon Reconnects USB Mirroring if the connection is not working properly Main Menu Curr...
Страница 20: ...ernal audio source as needed if connected to the headphone output of the device Connect an optional rear camera to the Camera Input Black RCA connector Refer to the camera s wiring diagram for installation details The unit will automatically select camera mode when connected to the reverse lamp circuitry A V Input Rear Camera Input Auto Selection ...
Страница 21: ...t supported or not desired then the function MUST be skipped as per the PAC SWI RC instructions 4 The SWC function MUST be programmed in the correct order per the PAC SWI RC radio function mapping order instructions Note Not all OE steering wheel functions may be supported by the CM9MIR 3 5mm SWC port located on the rear of the unit on the MAIN POWER I O Harness AXXESS Installation Hints The ASWC ...
Страница 22: ...blows fuse s Yellow or red wire touching chassis ground Check for pinched wire Speaker wires touching chassis ground Check for pinched wire Incorrect fuse rating Use fuses with correct rating Unit has audio but no video Parking brake safety circuit not connected Parking brake not applied Check connections at parking brake Apply parking brake as described on page 26 Please keep your original sales ...
Страница 23: ...class Panel size 9 diagonal measurement View angle up down left right 50 70 70 70 Resolution 1024 H x 600 V Brightness cd m2 500 NITS Contrast ratio 500 1 Pixels 1 152 000 Speaker output impedance 4 ohms Line output voltage 4 volt RMS Line output impedance 200 ohms Chassis dimensions 7 x 7 x 2 W x D x H Design and specifications subject to change without notice CEA 2006 Power Standard Specificatio...
Страница 24: ...hipment of the product Specific license conditions and copyright notices for the software can be found via www jensenmobile com What to do 1 Before you call for service check the troubleshooting guide in your owner s manual A slight adjustment of any custom controls may save you a service call 2 If you require service during the warranty period you must carefully pack the product preferably in the...
Страница 25: ...821 V01 Namsung America Inc 2021 Namsung America Inc All rights reserved All rights reserved No part of this publication may be reproduced distributed or transmitted in any form or by any means including photocopying recording or other electronic or mechanical methods without the prior written permission of NAMSUNG AMERICA INC ...