FIELD SERVICE
REPLACEMENT OF THE TRIAC (PN 15475)
26
1 . . Remove .the .lower .rear .panel .(Figure .2) .
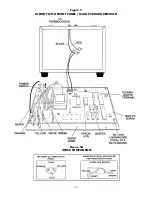
2 . . Note .and .record .the .color .and .location .of .each .of .the .three .wires .on .the .triac .terminals
.
(Figure .5A) . .Remove .each .of .the .three .wires .by .pulling .straight .up .on .the .connector . .DO .NOT . . . . .
.
PULL .ON .THE .WIRES .
3 . . Remove .the .two .nuts .and .screws .that .hold .triac .in .place . .Lift .triac .off .the .rear .panel .(Figure .5A) .
4 . . There .is .an .insulating .pad .located .between .triac .and .panel . .If .it .did .not .come .off .with .the .triac, . . .
.
remove .it .from .the .rear .panel . .Do .not .reuse . .Wipe .the .rear .panel .to .remove .any .grease-like .
.
materials .
5 . . Put .the .new .insulating .pad .and .then .the .new .triac .in .place .on .the .rear .panel . .Locate .the .triac
.
so .that .the .center .terminal .will .face .downward .when .the .rear .panel .is .in .place .
6 . . Replace .the .three .wires .on .the .triac .terminals .(Figure .5A) .observing .the .following .color .coding:
.
Yellow .wire .to .upper .right .terminal .
.
Blue .wire .to .center .(lower) .terminal .
.
Orange .wire .to .upper .left .terminal .
7 . . Replace .the .lower .rear .panel .(Figure .2) .


