JBM Electronics
Gateway C102/C112
Reference Guide
Страница 1: ...JBM Electronics Gateway C102 C112 Reference Guide...
Страница 2: ...r IP Interface Configuration Page 30 8 Using Zmodem to Transfer Files to the Unit Page 31 9 Starting the GWLNX Application Page 35 10 Configuring the Auto Start Feature Page 37 11 Troubleshooting Test...
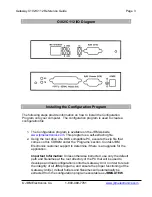
Страница 3: ...ile 2 Using the root drive of a DOS compatible PC execute the zip file that comes on this CDROM under the Programs section Contact JBM Electronics customer support to determine if there is an upgrade...
Страница 4: ...ou can find additional information and support on our website www jbmelectronics com Gathering Information Determine what protocols will be used in this config Select the corresponding worksheet locat...
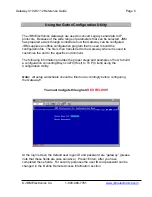
Страница 5: ...nsferred to the Gateway where it is used to customize the unit to the specific environment The following information provides the proper steps and examples of how to build a configuration converting B...
Страница 6: ...jbmelectronics com You are now at the Main Menu screen Tab the cursor down and select Unit Configuration by pressing Enter When the selection box appears select New by pressing Enter on the field This...
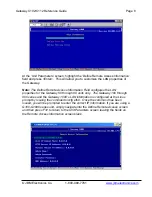
Страница 7: ...to describe your configuration Once you have entered a name press Enter to advance to the next screen At this screen select the unit model you will be configuring by tabbing the cursor to the appropri...
Страница 8: ...gures the LAN properties for the Gateway 50 through 80 units only The Gateway 100 through 900 series and the Gateway 1000 s LAN information is configured at the Linux prompt by issuing the command nic...
Страница 9: ...t Parameters screen tab down to the Define Port IDs field and press Enter This allows you to customize the characteristics performed by the port controllers of the Gateway Assign an identity to each p...
Страница 10: ...st of protocols that are supported by the Gateway Use the arrow keys to navigate to the appropriate protocol and press Enter For this example select the Bisync 3270 Host protocol by highlighting its n...
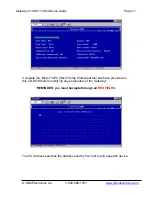
Страница 11: ...jbmelectronics com Complete the Bisync 3270 Host Setup Worksheet that has been provided on this CD ROM before modifying any parameters of the Gateway REMINDER you must navigate through all RED FIELDS...
Страница 12: ...Co 1 800 489 7781 www jbmelectronics com The Device Address is assigned to a specific device that is to be polled by the host After modifying all the parameters to fit your environment press F12 to sa...
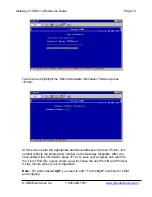
Страница 13: ...opriate hardware address and press Enter this number reflects the labeled port number on the Gateway faceplate After you have entered this information press F12 to save your progress and return to the...
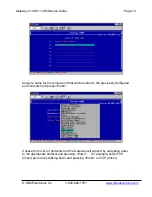
Страница 14: ...r the remote port that will be routed to the previously configured port controller and press Enter Choose from a list of protocols that the Gateway will support by navigating down to the appropriate p...
Страница 15: ...800 489 7781 www jbmelectronics com Tab the cursor down to Edit Current Port Configuration and press Enter Complete the TCP Client Setup Worksheet from our website before modifying any parameters of...
Страница 16: ...jbmelectronics com After you have modified all the parameters to fit your environment press F12 to save your progress and return to the Port Parameters screen Tab the cursor down to Define Routing Tab...
Страница 17: ...s that you have assigned for the Gateway In this example we will be routing the Bisync 3270 Host port to the TCP Client port The ports must be routed back to back Start by highlighting a Port ID and p...
Страница 18: ...ecific Port ID Highlight TCP Client and press Enter This step is an example of the Bisync port receiving data from the TCP Client port This screen will verify the source that the Bisync 3270 Host port...
Страница 19: ...Electronics Co 1 800 489 7781 www jbmelectronics com Select the remote Port ID you are routing and repeat the same steps you just performed for the Bisync 3270 Host Port ID Confirm the sub address by...
Страница 20: ...s back to back For example route the TCP Client port with the Bisync 3270 Host port Verify the destination that the TCP Client port will receive data from If configuring numerous port IDs and sub addr...
Страница 21: ...ressing Enter Highlight Save Exit from the selection box and press Enter Your configuration is now successfully saved Once the configuration is saved you will be brought back to the Main Menu screen T...
Страница 22: ...he File field and press Enter from the selection box Note If you are using an application prior to version 334 you need to select old cfg from the transfer mode menu A list of configurations that you...
Страница 23: ...in the format that the Gateway unit can read It should match the above filename Confirm this information and press Enter Verify by pressing Y to confirm that the pathway is correct The configuration f...
Страница 24: ...gged into the 9 pin port on the back of the unit labeled ttyS0 Console DCE and to an available COM port on your PC Also make sure unit is plugged in and receiving power Step 1 From the Windows Desktop...
Страница 25: ...Connect To Look for the setting called Connect Using and select COM1 Then click OK Step 4 Use the following parameters to configure the port settings Click OK when you have input the settings Bits per...
Страница 26: ...JBM Electronics Co 1 800 489 7781 www jbmelectronics com Step 5 Click on File Properties Settings Tab Set emulation to VT100 Step 6 Click on File Save This will store the connection settings under the...
Страница 27: ...accounts The first is root which has full control and the second is jbmgatew which has partial control 1 Log into the Gateway through the console using root for the user name and gateway for the passw...
Страница 28: ...the current directory rmdir rd Deletes or removes an existing directory File Functions cat type Displays the contents of a file cp copy Copies a file or a group of files mv ren Renames a file rm del...
Страница 29: ...sing the niccfg stand alone script 1 Connect to the Gateway using a terminal emulation program such as HyperTerminal The login screen appears 2 Login to the Gateway as root user 3 Type niccfg eth0 at...
Страница 30: ...nsferred using an error checking async file transfer program such as ZModem The following are the instructions for using the Hyperterminal with the console connection to transfer the configuration pro...
Страница 31: ...nce Guide Page 31 JBM Electronics Co 1 800 489 7781 www jbmelectronics com 1 Change to the jbmgatew directory by typing cd home jbmgatew 2 Click Transfer on the top task bar of the Hyperterminal sessi...
Страница 32: ...ename should be Z Modem with Crash Recovery Click Send to transfer the file 4 At the jbmgatew prompt type ll LL in lowercase This will show you the contents of the jbmgatew directory You should now se...
Страница 33: ...Gateway C102 C112 Reference Guide Page 33 JBM Electronics Co 1 800 489 7781 www jbmelectronics com...
Страница 34: ...defined your IP interface parameters using the NICCFG script you are ready to test the application 1 Log into the gateway as root 2 Change directories to home jbmgatew using the following command cd h...
Страница 35: ...Co 1 800 489 7781 www jbmelectronics com 4 Issue the ps ax command This will return a list of the running processes on the unit Look for your command line from step 3 If it is present you are ready t...
Страница 36: ...Start the GWLNX Application Our units are pre configured to use the jbmcontrol application to auto start gwlnx on boot and to restart should the application stop running for any reason To enable this...
Страница 37: ...d a single line below All of these lines start with a sign Move the cursor under the in front of the gwlnx line Type dd this will remove that line of text Then with the cursor in the same position typ...
Страница 38: ...eference Guide Page 38 JBM Electronics Co 1 800 489 7781 www jbmelectronics com 4 When the line is complete and looks correct hit the esc key This will take the editor out of insert mode Now type wq a...
Страница 39: ...onf modifications were successful and that the application will auto start 1 Type sync reboot This will reboot the Gateway A typical reboot takes about 30 seconds 2 When the Gateway is finished reboot...
Страница 40: ...nd resets the Gateway Reset Task ID Resets an individual task The Task ID is displayed through the Show Task command Logout Terminates the Telnet session with the Gateway Ena Enables the logging mecha...
Страница 41: ...Gateway C102 C112 Reference Guide Page 41 JBM Electronics Co 1 800 489 7781 www jbmelectronics com Viewing Show Stat s BiSync Contention to TCP Example RS232 TCP...
Страница 42: ...Gateway C102 C112 Reference Guide Page 42 JBM Electronics Co 1 800 489 7781 www jbmelectronics com SNA to TCP Example RS232 TCP...
Страница 43: ...Gateway C102 C112 Reference Guide Page 43 JBM Electronics Co 1 800 489 7781 www jbmelectronics com TC500 Example RS232 Note This configuration does not have TCP Modifying your Config File...
Страница 44: ...elds are case sensitive Press Enter after you have completed these fields For security purposes the user ID and password can be changed in the Define Remote Access Information section You are now at t...
Страница 45: ...y C102 C112 Reference Guide Page 45 JBM Electronics Co 1 800 489 7781 www jbmelectronics com Select the file that you want to edit and press Enter Select the Parameter that you want to edit and press...
Страница 46: ...o 1 800 489 7781 www jbmelectronics com Select the port ID that need to be changed Press Enter once to change the name of the ID Press Enter twice to enter that port and make parameter changes Select...
Страница 47: ...00 489 7781 www jbmelectronics com Select the Configuration Parameter that needs to be changed and press Enter to bring up the parameter options The options you can select will appear in a small gray...
Страница 48: ...48 JBM Electronics Co 1 800 489 7781 www jbmelectronics com Once you have made all of the needed changes press the F12 key till you reach this screen Press Enter and select Save As in the gray option...
Страница 49: ...1 www jbmelectronics com You will now have the option to change the Description of the configuration file Press enter after you have made your changes After you have saved your changes it will reopen...
Страница 50: ...com At the main menu select Transfer Mode This will bring up a small gray box with your transfer options Select File and press Enter You will now see a large gray box with a list of at least one confi...
Страница 51: ...that will make it easy for you to recognize Just be sure to remember that the file is limited to the DOS naming standard 8 3 Example 12345678 cfg Press Enter after you have named the file At this poin...