background image

27

MO200

5200QDC

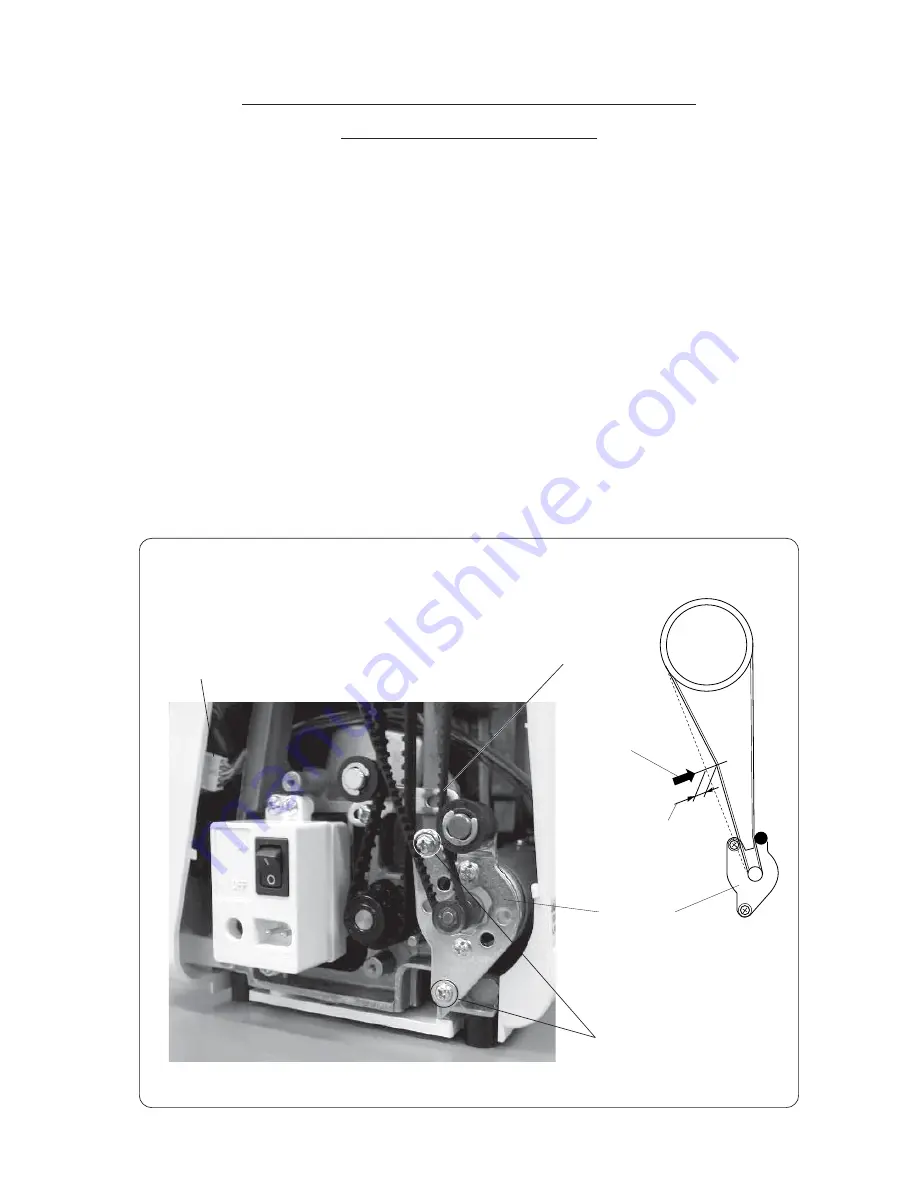
REPLACING DC MOTOR AND ADJUSTING

MOTOR BELT TENSION

TO REMOVE:

1. Remove the belt cover (see page 4).

2. Unplug the DC motor connector.

3. Remove the two setscrews, then remove the DC motor and belt.

TO INSTALL:

4. Lightly tighten the two screws.

5. Put the motor belt on the pulley and adjust the belt deflection to about 7 to 9 mm by pressing the middle

of the motor belt with your finger (with approximately 300 grams of pressure). Then, tighten the screws

firmly.

6. Install the belt cover.

Pressure 300g

Belt deflection:

7~9 mm

DC motor

Setscrews (2)

Belt

DC motor connector

Содержание MO200

Страница 1: ...SERVICE MANUAL MO200 MODEL MO200 5200QDC...

Страница 2: ...TION 14 NEEDLE THREAD TENSION 15 STRETCH STITCH FEED BALANCE 16 REPLACEMENT AND ADJUSTMENT OF THE NEEDLE THREADER PLATE 17 ADJUSTING BUTTONHOLE LEVER POSITION 18 CONNECTOR DIAGRAM 19 SELF DIAGNOSTIC T...

Страница 3: ...ws A and setscrew B and remove the top cover TO INSTALL 2 Follow the above procedure in reverse FACE COVER TO REMOVE 1 Remove the 2 setscrews C and remove the face cover TO INSTALL 2 Follow the above...

Страница 4: ...tween the base and the arm boss Install the base with the 4 setscrews A and the 2 setscrews B BED COVER TO REMOVE 1 Set the drop lever to the left and remove the 2 setscrews D remove the bed cover TO...

Страница 5: ...4 MO200 5200QDC SERVICE ACCESS 3 BELT COVER TO REMOVE 1 Remove the setscrew A B and remove the belt cover TO INSTALL 2 Install the belt cover with the setscrew A and B Setscrew A Setscrew B Belt cover...

Страница 6: ...w F Remove setscrews for the lump fixing plate when the setscrew A is hard to access 3 Disconnect the connector and flexible cable from the board A then remove the front cover disengage part G TO INST...

Страница 7: ...Loosen the setscrews A B C and D then remove the setscrew E To remove the cover detach the presser foot lifter section first with the presser foot lifter in the down position TO INSTALL 3 Follow the a...

Страница 8: ...nd the feed dog window on the needle plate should be parallel 1 Remove the face cover and raise the presser foot Loosen the setscrew to adjust the presser foot height 6 0 mm and the presser foot align...

Страница 9: ...p position is not in the center of the needle plate hole when the straight stitch is selected or if the clearance between the needle and edge of the needle plate hole on both side is less than 0 2 mm...

Страница 10: ...ern left needle position 3 Remove the bed cover see page 3 4 Turn the handwheel toward you and set the needle bar at the lowest position 5 Loosen the 2 setscrews on the lower shaft gear 6 Raise the ne...

Страница 11: ...right side of the needle in ascending travel of needle from its left and lowest position 1 Remove the needle plate and bobbin holder 2 Turn on the power switch 3 Select the pattern left needle positio...

Страница 12: ...Loosen the screws A B C then slightly tighten the hinge screw C 2 Turn the handwheel toward you and adjust the clearance between test pin and the point of the hook in the left and right needle positi...

Страница 13: ...e setscrew 3 Turn the lower shaft bushing eccentric bushing clockwise B if there is too much play in the hook Turn the lower shaft bushing eccentric bushing counterclockwise A if there is too little p...

Страница 14: ...ssure adjusting lever at 3 and lower the presser foot 2 Turn on the power switch 3 Remove the bed cover see page 3 4 Turn the handwheel toward you to set the feed dog at the highest position 5 Loosen...

Страница 15: ...toward you slowly with your hand until the needle start to sewing Loosen the setscrew and turn the upper shaft shield plate in the direction of A If the swing point is higher than 8 2 mm B If the swin...

Страница 16: ...the standard range adjust as follows ADJUSTMENT 1 Set the thread tension dial to A and check the thread tension 2 Remove the face cover see page 4 3 If the tension is outside the standard range turn...

Страница 17: ...6 3 mm as shown ADJUSTMENT PROCEDURE 1 Turn the power switch on while pressing the reverse button auto lock button Press the 8 button The standard mode shows up if you do not press the 8 button within...

Страница 18: ...n the needle threader knob and pull the threader plate supporter A down to remove it see FIG 1 2 To install the needle threader plate line the groove up with the pin B and push it up to snap fit TO AD...

Страница 19: ...r and loosen setscrew A 3 Lower the buttonhole lever Position the buttonhole lever guide so the screen displays L Tighten setscrew A TO ADJUST THE BUTTONHOLE SENSOR POSITION 4 Attach the buttonhole fo...

Страница 20: ...ransformer primary circuit BLK H Power transformer secondary circuit RED I Printed circuit board F BLK J Bobbin winder switch BLU K Presser foot lifter switch BLK L Thread tension switch BLU M Arm lam...

Страница 21: ...ms has been resolved Turn on the power switch If any of following problems occur take the recommended actions in the order they are shown THE MACHINE DOES NOT RESPOND WHEN THE POWER SWITCH IS TURNED O...

Страница 22: ...utton auto lock button Then press the 01 button within 3 seconds to enter the self diagnostic mode Press the keys in order as described below 1 Reverse stitch button 2 Auto lock button 3 Up down needl...

Страница 23: ...ight the screen displays 255 to 250 Press CLR button to proceed to the next step TESTS Lower the buttonhole lever Pull and push the buttonhole lever then check the display Twin needle button is pushed...

Страница 24: ...is pressed with the needle bar at UP position the needle bar vibrates and the needle drop is set at center position 2 When the memory key is pressed with the needle bar at middle position the needle...

Страница 25: ...ove printed circuit board A TO INSTALL 4 To install follow the above procedure in reverse REPLACING THE FUSES TO REMOVE 5 Remove the printed circuit board A 6 Remove the 4 setscrews and remove the pri...

Страница 26: ...board K follow the above procedure in reverse REPLACING THE SLIDE VOLUME TO REMOVE 5 Unplug the slide volume connector from printed circuit board K 6 Remove the 2 CS 3 rings and remove the side volum...

Страница 27: ...eedle up down button start stop button reverse button should Click when pressed REPLACING PRINTED CIRCUIT BOARD L TO REMOVE 5 Unplug the printed circuit board L connector from printed circuit board F...

Страница 28: ...he DC motor and belt TO INSTALL 4 Lightly tighten the two screws 5 Put the motor belt on the pulley and adjust the belt deflection to about 7 to 9 mm by pressing the middle of the motor belt with your...

Страница 29: ...Remove the two screws and remove the machine socket TO INSTALL 3 To install the machine socket follow the above procedure in reverse NOTE Pull out the cord in front of the arm to prevent it from cont...

Страница 30: ...sformer follow the above procedure in reverse NOTE Place the rear end of the transformer on the transformer support Slide the two transformer wire tubes to the side of transformer and secure them to t...

Страница 31: ...LL 4 To install the zigzag width motor follow the above procedure in reverse NOTE 1 The setscrew of zigzag rod should be tightened to 5 7 kg of torque 2 Check to ensure that the upper shaft sensor mou...

Страница 32: ...e connector from the board A 4 Remove the snap ring E 3 5 Remove the two setscrews A B and remove the feed motor TO INSTALL 6 To install the feed motor follow the above procedure in reverse NOTE Adjus...

Страница 33: ...he two setscrews A and remove the needle plate motor TO INSTALL 5 To install the needle plate motor follow the above procedure in reverse NOTE Check if the sub needle plate is closed when pattern 1 is...

Отзывы: