background image

www.toews.com

Janome 5812 

Instruction Manual 

Janome 5812 Instruction Manual

www.toews.com

5812 Owners Manual/ User Guide

Содержание 5812

Страница 1: ...w w w t o e w s c o m Janome 5812 Instruction Manual Janome 5812 Instruction Manual www toews com 5812 Owners Manual User Guide...

Страница 2: ...ne to the nearest authorized dealer or service center for examination repair electrical or mechanical adjustment 4 Never operate the appliance with any air opening blocked Keep ventilation openings of...

Страница 3: ...Stitch Length Control Dial 14 Adjusting Stretch Stitch Balance 14 Reverse Stitch Control 14 To Drop or Raise the Feed Dogs 14 SECTION III STRAIGHT STITCH SEWING Straight Stitch 15 Starting to sew 15 F...

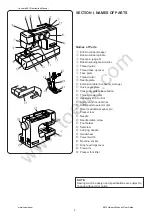
Страница 4: ...titch control 5 Stitch length control dial 6 Stitch pattern selector dial 7 Hole for additional spool pin 8 Presser foot 9 Needle 0 Needle clamp screw 1 Foot holder 2 Setscrew 3 Carrying handle 4 Hand...

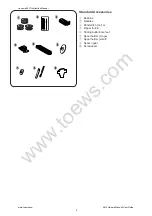
Страница 5: ...r t t t t t y y y y y u u u u u i i i i i o o o o o q Bobbins w Needles e Blind stitch foot G r Zipper foot E t Sliding buttonhole foot y Spool holder Lrage u Spool holder small i Seam ripper o Screw...

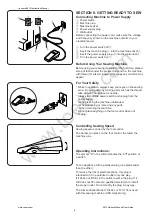
Страница 6: ...cting Machine to Power Supply q Power switch w Machine plug e Machine socket r Power supply plug t Wall outlet Before connecting the power cord make sure the voltage and frequency shown on the machine...

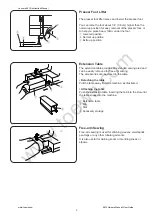
Страница 7: ...Slot r Accessory storage Free arm Sewing Free arm sewing is used for stitching sleeves waistbands pant legs or any other tubular garments It is also useful for darning socks or mending knees or elbow...

Страница 8: ...can cause permanent snags or runs in knits fine silks and silk like fabrics Changing the Presser Foot CAUTION When attaching or removing presser foot turn OFF the power switch and remove the needle f...

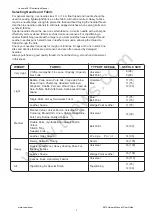
Страница 9: ...It should be strong smooth and consistent in thickness Heavy Denim Sailcloth Ticking Denim 16 100 Double Faced Wool Heavy Coating Fake Fur Drapery Fabrics Universal 16 100 Leather Suede Wedge Point Le...

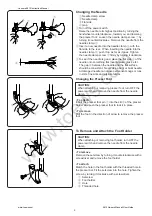
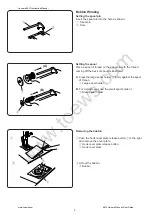
Страница 10: ...Press the large spool holder q firmly against the spool of thread q Large spool holder B For a small spool use the small spool holder w w Small spool holder Removing the bobbin z Push the hook cover...

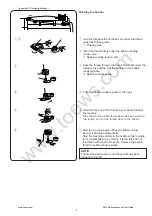
Страница 11: ...t the thread firmly under the bobbin winding tension disc w Bobbin winding tension disc c Pass the thread through the hole in the bobbin from the inside to the outside Put the bobbin on the bobbin win...

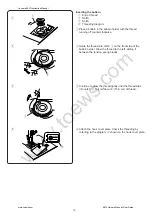
Страница 12: ...lips into notch e Pull out about 6 15 0 cm of thread v Attach the hook cover plate Check the threading by referring to the diagram r shown on the hook cover plate Inserting the bobbin q End of thread...

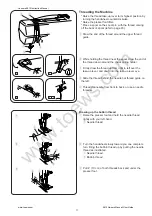
Страница 13: ...right to left over the take up lever and down into the take up lever eye v Slide the thread behind the needle bar thread guide on the left b Thread the needle from front to back or use a needle threa...

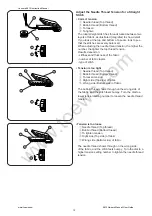
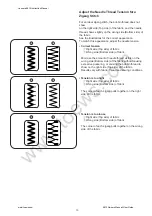
Страница 14: ...oo tight q Needle thread Top thread w Bobbin thread Bottom thread e To loosen tension r Right side Top side of fabric t Wrong side Bottom side of fabric The bobbin thread shows through on the wrong si...

Страница 15: ...amount of needle thread visible on the wrong side Bottom side of the fabric without causing excessive puckering or causing the bobbin thread to show on the right side Top side of the fabric Results v...

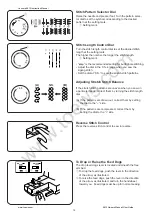
Страница 16: ...lance If the stretch stitch patterns are uneven when you sew on a particular fabric correct them by turning the stitch length dial A If the patterns are drawn out correct them by setting the dial to t...

Страница 17: ...apart and are engraved at 10 mm 15 mm 30 mm and 40 mm Turn a Square Corner q Cornering guide When sewing with fabric edge at 5 8 seam guide to turn a square so that sewing continues at same distance f...

Страница 18: ...hand side of pin q w e r w e q Fabric preparation q Right top side of fabric w Wrong bottom side of fabric e Bottom seam r Zipper bottom stop position t Basting stitch Place the right top sides of the...

Страница 19: ...ches to clear a path for the stitch Remove fabric and close zipper Raise and release foot and re attach it on left hand side of pin Take the upper fabric layer and lay it flat over the zipper Starting...

Страница 20: ...elector C w Stitch length 0 5 3 e Needle thread tension 2 5 r Presser foot Zigzag foot A w e r q This stitch is useful in garment construction and in finishing raw edges of any sewing project Start ov...

Страница 21: ...you determine the zigzag width 3 Thread the needle Turn the handwheel so that the needle is in its leftmost position and then drop the needle through the left buttonhole 4 Press the foot control and s...

Страница 22: ...e along the guide u in the foot Use the same color thread as the fabric On heavy weight fabrics that ravel the raw edge should be overcast first Fold the hem as illustrated q Wrong side Bottom side of...

Страница 23: ...ot Remove the fabric from the machine and cut the sewing thread Insert a pin inside the bartack Then cut the opening with a seam ripper Take care not to cut the stitches t Pin y Seam ripper 4 Step But...

Страница 24: ...needle and bobbin thread to the left Move the slider toward you so that the top mark r on the slider meets the start mark e e Start mark r Top mark t Needle thread y Bobbin thread Lower the needle int...

Страница 25: ...h test stitch on the fabric being used for best results A tight satin stitch may pucker some lightweight fabrics Attach a piece of stabilizer on the wrong side Bottom side of the fabric Draw letters o...

Страница 26: ...Machine setting q Stitch selector A w Stitch length 1 5 3 e Needle thread tension 2 6 r Presser foot Blind hem stitch foot G Fold the fabric wrong sides together and lower the needle into the fabric...

Страница 27: ...zag foot A Shell Stitch Machine setting q Stitch selector G w Stitch length 2 3 e Needle thread tension 6 8 r Presser foot Zigzag foot A Use a lightweight fabric tricot for example Fold the fabric in...

Страница 28: ...items requir ing extra strength such as backpacks This strong durable stitch is recommended where both elasticity and strength are necessary in order to insure comfort and durability Straight Stretch...

Страница 29: ...ng q Stitch selector E or F w Stitch length S S e Needle thread tension 2 6 r Presser foot Zigzag foot A This stitch is for sewing a seam with an overcast finish It is used when making swim wear ski p...

Страница 30: ...three times wider than the projected width Set stitch length at 4 and sew rows of straight stitches 3 8 1 0 cm apart across the area to be smocked Knot the threads along one edge w From the other edg...

Страница 31: ...se to replace it e Light bulb CAUTION As the light bulb could be HOT protect your fingers when you handle it Cleaning the Hook Race and Feed Dogs z Remove the presser foot and needle Remove screw on t...

Страница 32: ...the needle plate Tighten the screw firmly with the screwdriver e Screw CAUTION Do not pull the fabric or turn the handwheel when threads or fabric are tangled in the hook area Remove the needle plate...

Страница 33: ...abric being sewn 4 The needle thread is not threaded properly 5 A poor quality needle is used 1 The needle thread tension is too tight 2 The needle thread is not threaded properly 3 The needle is too...

Страница 34: ...w w w t o e w s c o m Janome 5812 Instruction Manual www toews com 5812 Owners Manual User Guide...

Страница 35: ...w w w t o e w s c o m Janome 5812 Instruction Manual www toews com 5812 Owners Manual User Guide...

Страница 36: ...w w w t o e w s c o m 508 800 122 EN Janome 5812 Instruction Manual www toews com 5812 Owners Manual User Guide...

Отзывы: