background image

C

M

Y

CM

MY

CY CMY

K

Содержание Montecarlo R1

Страница 1: ...C M Y CM MY CY CMY K...

Страница 2: ...C M Y CM MY CY CMY K 2...

Страница 3: ...C M Y CM MY CY CMY K 3 espa ol english fran ais deutsch italiano portugu s nederlands cesky polski 4 14 24 34 44 54 64 74 84 94...

Страница 4: ...dependiente Asiento reclinable dispone de 2 posiciones Apoyabrazos del elevador regulables en altura Con el fin de proteger adecuadamente al ni o y asegurar su confort y sujeci n dentro del autom vil...

Страница 5: ...segunda mano ya que JAN S A s lo puede garantizar la total seguridad en art culos usados por su primer comprador JAN S A recomienda sustituir su asiento MONTECARLO R1 por uno nuevo cuando haya sido s...

Страница 6: ...espaldo en posici n horizontal y encaje las dos patas del respaldo en los agujeros del coj n elevador 1a Gire el respaldo hasta su posici n vertical 1b Ponga la pieza de bloqueo en la parte trasera de...

Страница 7: ...l ni o crezca Ponga el ni o en el asiento aseg rese que est bien sentado El cintur n debe quedar ligeramente por encima del hombro del ni o 2a Para regular la altura presione el bot n situado detr s d...

Страница 8: ...rtencias que le hacemos en las INSTRUCCIONES GENERALES Antes de proceder a instalar inspeccione el asiento de su veh culo para localizar los dos anclajes ISOfix Una vez localizados posicione su MONTE...

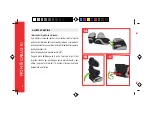
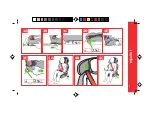
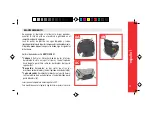
Страница 9: ...C M Y CM MY CY CMY K espa ol 9 CLICK 3A 3B 3C 3D 3E 3F 4A 4C 4B...

Страница 10: ...l parado Para reclinar el asiento levante la palanca delante del Coj n elevador y desl celo hasta la posici n deseada 5a Dispone de 2 posiciones 6 Regulaci n laterales del respaldo y del cabezal en an...

Страница 11: ...CY CMY K 7 Regulaci n de los apoyabrazos en altura Para regular la altura de los apoyabrazos del Coj n elevador presione en el centro y g relo hasta la posici n deseada 7a Dispone de tres posiciones e...

Страница 12: ...urones indicados en las instrucciones puede ser altamente contraproducente Guarde este libro de instrucciones para futuras consultas Ll velo siempre en el compartimento situado debajo del coj n elevad...

Страница 13: ...do de su silla MONTECARLO R1 espa ol 13 Cabezal Retire los 2 broches debajo de los laterales desabroche la cinta en la parte trasera y tire del tapizado hacia delante por ltimo retire los dos broches...

Страница 14: ...seat has the following options The width of the backrest and headrest can be regulated independently In order to protect your child adequately and make sure that they are comfortable and secure insid...

Страница 15: ...roducts as JAN S A can only guarantee the complete safety for items used by the initial buyer JAN S A recommends that you replace your MONTECARLO R1 seat with a new one when it has been subjected to v...

Страница 16: ...ckrestinahorizontalpositionandslot the two legs of the backrest into the booster cushion holes 1a Turn the backrest to its vertical position 1b Place the blocking part in the rear part of the legs of...

Страница 17: ...he child in the seat make sure that they are seated correctly The belt must lie gently on the child s shoulder 2a To regulate the height press the button situated behind the headrest and slide the hea...

Страница 18: ...eetheredsignalontheanchoringsbutton 3c Position your MONTECARLO R1 on the car seat following the advice and warningswegaveintheGENERALINSTRUCTIONS Before continuing with the installation inspect the y...

Страница 19: ...C M Y CM MY CY CMY K english 19 CLICK 3A 3B 3C 3D 3E 3F 4A 4C 4B...

Страница 20: ...car stopped To recline the seat raise the lever in front of the booster cushion and slide it to the desired position 5a It has 2 positions 6 Regulation of the width of the sides of the backrest and he...

Страница 21: ...Y K 7 Regulation of the height of the armrests To regulate the height of the armrests of the booster cushion press in the centre and turn until you reached the desired position 7a It has three positio...

Страница 22: ...car stopped Not threading the belts as shown in the instructions may be extremely counterproductive and dangerous Keepthisinstructionbookforfutureconsultations Always keep it in the compartment under...

Страница 23: ...ve the cover of your MONTECARLO R1 seat Headrest Remove the 2 clasps under the sides unfasten the strap on the rear part and pull the cover forwards Finally remove the two clasps from the upper part 8...

Страница 24: ...linable sur 2 positions Les accoudoirs du rehausseur peuvent tre r gl s en hauteur Pour prot ger l enfant de fa on ad quate pour assurer son confort et pour qu il soit correctement maintenu dans la vo...

Страница 25: ...duits d occasion JAN S A ne pouvant garantir la totale s curit que pour des articles utilis s par leur premier propri taire JAN S A recommande de remplac votre si ge MONTECARLO R1 pour un neuf s il a...

Страница 26: ...ernier mettezledossierenpositionhorizontale et embo tez les deux pattes du dossier dans les orifices du coussin rehausseur 1a Tournez le dossier jusqu sa position verticale 1b Mettez la pi ce de bloca...

Страница 27: ...grandit Mettez l enfant dans le si ge et assurez vous qu il est correctement assis La ceinture doit passer l g rement au dessus de l paule de l enfant 2a Pour r gler la hauteur appuyez sur le bouton s...

Страница 28: ...s et mises en garde indiqu s dans les INSTRUCTIONS G N RALES Avant d effectuer l installation inspectez le si ge de votre voiture pour localiser les deux attaches ISOfix Quand vous les aurez localis s...

Страница 29: ...C M Y CM MY CY CMY K fran ais 29 CLICK 3A 3B 3C 3D 3E 3F 4A 4C 4B...

Страница 30: ...tant l arr t Pour incliner le si ge levez le levier avant du Coussin rehausseur et faites le glisser jusqu la position d sir e 5a 2 positions disponibles 6 R glage de la largeur des c t s du dossier e...

Страница 31: ...CMY K fran ais 31 7 R glage de la hauteur des accoudoirs Pour r gler la hauteur des accoudoirs du Coussin rehausseur appuyez sur le centre et tournez le jusqu la position d sir e 7a Trois positions d...

Страница 32: ...res indiqu es sur les instructions peut tre hautement pr judiciable et dangereux Gardez ce manuel d instructions pour de futures consultations Rangez letoujoursdanslecompartimentsitu souslecoussinreha...

Страница 33: ...t Lavage la main une temp rature de 30 C maximum Pour remonter le rev tement suivez ces instructions l inverse fran ais 33 Pourretirerlerev tementdevotresi geMONTECARLOR1 Appui t te Retirez les 2 agra...

Страница 34: ...w hrend der Fahrt den bestm glichen Schutz und Komfort zu bieten sollten Sie folgende Anweisungen beherzigen Der MONTECARLO R1 entspricht den strengen Sicherheits Anforderungen der europ ischen Pr fno...

Страница 35: ...en Kindersitz auf einem anderen Sitzplatz Wenden Sie sich bitte im Zweifel an JAN 0a Da nicht alle Sicherheitssysteme exakt aufeinander abgestimmt sind sollten Sie unbedingt testen ob der MONTECARLO R...

Страница 36: ...ie R ckenlehne flach horizontal auf den Bodenundf hrendiebeidenHakenanderR ckenlehneindie ffnungen an der Sitzerh hung 1a Bringen Sie die R ckenlehne in die aufrechte Position 1b Bringen Sie die Sperr...

Страница 37: ...gewissern Sie sich dass R cken undPogutanliegen DerGurtmuss berdieSchulterlaufenundgutanliegen 2a Dr cken Sie zur H henverstellung auf den Knopf an der R ckseite der Kopfst tze und schieben Sie die Ko...

Страница 38: ...n ISOFIX Befestigungen 4 SicherungIhresKindesimSitz Setzen Sie das Kind in den MONTECARLO R1 Sitz und vergewissern Sie sich dass es auch richtig im hinteren Teil des Sitzes anliegt legen Sie den Gurt...

Страница 39: ...C M Y CM MY CY CMY K deutsch 39 CLICK 3A 3B 3C 3D 3E 3F 4A 4C 4B...

Страница 40: ...verstellen dr cken Sie den Hebel vor der Sitzerh hung hoch und schieben Sie die Lehne in die gew nschte Position 5a Die R ckenlehne ist in 2 Positionen verstellbar 6 Verstellung der Sitzbreite 5 Verst...

Страница 41: ...tellung der Armlehnen Um die Armlehnen der Sitzerh hung in der H he zu verstellen dr cken SieaufdenKnopfinderMitteundbringenSiedieLehneindiegew nschte Position 7a Die Armlehnen sind in drei Positionen...

Страница 42: ...m Nachlesen auf Bewahren Sie die Gebrauchsanweisung immer in der integrierten Ablagefl cheunterderSitzerh hungauf Vergewissern Sie sich vor jeder Fahrt dass sich jegliche im Fahrzeug befindlichen Gep...

Страница 43: ...opfst tze L sen Sie den Bezug von den zwei H kchen unter den Seitenst tzen l sen Sie das Band an der R ckseite und ziehen Sie den Bezug nach vorne Zum Schluss l sen Sie den Bezug von den zwei H kchen...

Страница 44: ...t al bambino il seggiolino MONTECARLO R1 presenta le seguenti caratteristiche Lo schienale e il poggiatesta possono essere regolati in larghezza separatamente Il seggiolino si pu regolare in 2 posizio...

Страница 45: ...u garantire la sicurezza assoluta unicamente nel caso di articoli acquistati per la prima volta JAN S A raccomanda la sostituzione del seggiolino MONTECARLO R1 con uno nuovo nel caso in cui si stato s...

Страница 46: ...ntodelmedesimo mettereloschienaleinposizioneorizzontale e incastrare i supporti negli orifizi corrispondenti 1a Portare lo schienale alla posizione verticale 1b Collocare il dispositivo di blocco nell...

Страница 47: ...e il bambino nel seggiolino assicurandosi che sia seduto bene La cinghia dovr passare un po al di sopra della sua spalla 2a Per regolare l altezza premere il pulsante situato dietro il poggiatesta e f...

Страница 48: ...a di procedere all installazione verificare che il sedile del veicolo sia provvisto dei due attacchi ISOfix Una volta trovati posizionare il MONTE 4 Allacciare la cintura di sicurezza con il bambino s...

Страница 49: ...C M Y CM MY CY CMY K italiano 49 CLICK 3A 3B 3C 3D 3E 3F 4A 4C 4B...

Страница 50: ...nso antiorarioperstringere 5A 6A ATTENZIONE Non reclinare il seggiolino mentre si sta usando Per reclinare oraddrizzareilseggiolinoMONTECARLOR1 sidovr regolarelalunghezza della cintura di sicurezza Re...

Страница 51: ...Y CY CMY K 7Regolazionealtezzadegliappoggiabraccia Per regolare l altezza degli appoggiabraccia del rialzo premere al centro e portarlo alla posizione voluta 7a Le posizioni disponibili sono tre 7A it...

Страница 52: ...e di istruzioni per eventuali dubbi Tenerlo sempre nello scomparto che si trova sotto il rialzo Assicurarsi che all interno dell auto sia l equipaggio che i restanti oggetti che possono causare danni...

Страница 53: ...ne Il rivestimento pu essere smontato e lavato Seguire le istruzioni specificatesotto TogliereilrivestimentodalseggiolinoMONTECARLOR1 Poggiatesta Aprire i due automatici che si trovano nella parte inf...

Страница 54: ...regulados em largura de maneira independente Pode inclinar o assento h 2 posi es Os descansa bra os do elevador podem regular se em altura MONTECARLO R1 superou as exigentes provas de seguran a da di...

Страница 55: ...produtos em segunda m o pois JAN S A s pode garantir a total seguran a em artigos usados pelo seu primeiro comprador JAN S A recomenda substituir o seu assento MONTECARLO R1 por um novo quando tenha...

Страница 56: ...oqueoespaldaremposi o horizontal e encaixe os dois p s do espaldar nos orif cios do almofad o elevador 1a Gire o espaldar at sua posi o vertical 1b Ponha a pe a de bloqueio na parte traseira dos p s d...

Страница 57: ...que a crian a cres a Ponhaacrian anoassentoeassegure sedequeest bemsentada Ocinto deveficarligeiramenteporcimadoombrodacrian a 2a Para regular a altura aperte o bot o situado atr s da cabe a e desliz...

Страница 58: ...to Quando quiser retirar o assento MONTECARLO R1 puxe pelos bot es ao mesmo tempo que extrai o elevador 3f INSTALANDO O SEU MONTECARLO R1 NO AUTOM VEL As ancoragens ISOfix foram desenvolvidas para con...

Страница 59: ...C M Y CM MY CY CMY K portugu s 59 CLICK 3A 3B 3C 3D 3E 3F 4A 4C 4B...

Страница 60: ...os gire em sentido anti hor rio para fech los 5A 6A ATEN O N o incline o assento quando est em uso Para inclinar ou endireitar o seu assento MONTECARLO R1 dever ajustar o comprimento do cinto Realize...

Страница 61: ...C M Y CM MY CY CMY K 7Regula odosdescansa bra osemaltura Pararegularaalturadosdescansa bra osdoAlmofad oelevador aperteno centroegire oat posi odesejada 7a Temtr sposi es 7A portugu s 61...

Страница 62: ...nstru esparafuturasconsultas Leve o sempre no compartimento situado debaixo do almofad o elevador Assegure se de que dentro do autom vel tanto a equipagem como qualquer outro objecto suscept vel de ca...

Страница 63: ...cadeirinha MONTECARLO R1 Cabe a Retire os 2 colchetes debaixo dos lados desaperte a correia na parte traseira e puxe pelo forro para a frente Finalmente retire os dois colchetes da parte superior 8a E...

Страница 64: ...afhankelijk hoog en breedverstelbar De rugleuning is verstelbar in 2 posities De armsteunen zijn hoogverstelbar MONTECARLO R1 werd met goed gevolg aan de volgende veiligheidstesten volgens de Europese...

Страница 65: ...dat U geen tweedehands produkten gebruiken JAN S A kan de hoogste veijligheid alleen voor de eerste eigenaar garanderen JAN S A adviseert dat U het autostoeltje MONTECARLO R1 vervangen als het betrok...

Страница 66: ...e rugleuning op horizontale positie en zet beide potsen van de rugleuning in de gaten van de onderste deel 1a Draai de rugleuning tot ze loodrecht staat 1b Plaatsdevergrendelingsdeelaandeachterkanteva...

Страница 67: ...ld als het kind grooit Plaatshetkindinhetstoeltje zorgervoordathijgoedzit Degordelmoet een beetje boven zijn schouder zijn 2a Om de hoogte te verstellen druk op de knop achter de hoofdsteun en verstel...

Страница 68: ...voor dat beide vergrendelingsstukken zijn open het rode symbool opdeknoppenmoetzichtbaarzijn 3c PlaatsUw MONTECARLOR1opdebank vanhetautovolgensdeALGEMENE AANWIJZINGEN Alvorens de instalatie uit te voe...

Страница 69: ...C M Y CM MY CY CMY K nederlands 69 CLICK 3A 3B 3C 3D 3E 3F 4A 4C 4B...

Страница 70: ...tje te doen leunen verhef de hendel voor de onderste deel van het autostoeltje en verstel het tot de gewenste positie 5a Er zijn 2 posities 6 Breedverstelling van de zijkanten en hoofdsteun 5 Verstell...

Страница 71: ...Y CM MY CY CMY K 7 Hoogverstelling van de armsteunen Omdehoogtevandearmsteunenteverstellen drukophetmiddelpunkt en draai tot de gewenste positie 7a Er zijn drie posities ter beschikking 7A nederlands...

Страница 72: ...il staat Een andere positionering van de riemen dan aangegeven in de instructieskanhetbeveiligingseffecttenietdoenenheelgevaarlijkzijn Bewaardezeaanwijzingenvoortoekomstigeraadpleging Bewaar ze altijd...

Страница 73: ...w MONTECARLO R1 af te nemen Hoofdsteun Neem de 2 sluitingen onder de zijkanten af maak de band aan de achterkant open en trek de bekkleding naar voren Tenslotte maak de twee sluitingen aan de bovenkan...

Страница 74: ...zpusoben na d te vase sedacka MONTECARLO R1 m nasleduj ci mozn nastaven Je mozn nez visle nastavit s rku zadn operky a operky hlavy Je mozn sklopit sedacku do 2 pozic Operky ruk na spodn c sti sedacky...

Страница 75: ...e nejasnost se obr tte na JAN 0a N vsechny bezpecnostn syst my jsou presne stejn proto v m doporucujeme vyzkouset MONTECARLO R1 v aumobilu do kter ho bude namontov n Je velmi dulezit nepouz vat produk...

Страница 76: ...c sti sedacky dejte zadn operku dovodorovn polohy a vyrovnejte obe dv chytky zadn operky s otvory ve spodn c stisedacky 1a Otoctezadn operkudovertik ln polohy 1b Um stneted lprozablokov nidozadn c sti...

Страница 77: ...Vlozte d te do sedacky a ubezpecte se ze je dobre posazeno Bezpecnostn p s mus prechazet m rne nad ramenem d tete 2a Pro nastaven vysky stlacte tlac tko kter se nach zi za operkou hlavy a posunte oper...

Страница 78: ...Pred instalaci sedacky najdete kde jsou um stneny oba poutac body ISOfix vevasemautomobilu 3 Upevnen MONTECARLO R1 pomoc poutac ch bodu ISOfix vaseho automobilu Um stnete sedacku MONTECARLO R1 tak ab...

Страница 79: ...C M Y CM MY CY CMY K 79 cesky CLICK 3A 3B 3C 3D 3E 3F 4A 4C 4B...

Страница 80: ...ek pro otevren a proti smeru hodinovych rucicek pro uzavren Neskl pet sedacku kdyz v n sed d te Pro sklopen nebo zdvizen sedacky MONTECARLO R1 je zapotreby nastavit dlouzku bezpecnostn ho p su Realizu...

Страница 81: ...C M Y CM MY CY CMY K 7 Nastaven vysky operek ramen Pro nastaven vysky operek ramen spodn c sti sedacky stlacte ve strede a tocte do pozadovan polohy 7a Jsou mozn tri polohy 7A 81 cesky...

Страница 82: ...lu Ujistete se ze sedacka MONTECARLO R1 nez stala prichycena mezi sklopnymisedadlynebodvermiautomobilu Nenechte nikdy d te samo Jak koliv modifikace nebo prid ni soucast sedacce bez autorizace JANE S...

Страница 83: ...dle nasleduj c ch instrukc Odmontov n calounen sedacky MONTECARLO R1 Operka hlavy Odstrante dve chytky na stran ch dolu rozepnete p sek vzadu a t hnete calounen smerem dopredu nakonec odstrante dve ch...

Страница 84: ...C M Y CM MY CY CMY K MONTECARLO R1 MONTECARLO R1 15 12 36 MONTECARLO R1 ECE 44 4 2 3 0 MONTECARLO R1 9 ISOFIX 6 0 MONTECARLO R1 MONTECARLO R1 84 2 0 0 ECE 16 A B D 0 2...

Страница 85: ...C M Y CM MY CY CMY K 85 0a MONTECARLO R1 MONTECARLO R1 MONTECARLOR1 0 MONTECARLO R1 www jane es 0A...

Страница 86: ...C M Y CM MY CY CMY K MONTECARLO R1 4 5 7 8 7 4 8 5 9 1 0 1a 1b 4 1c 86 1B 1A 1C...

Страница 87: ...C M Y CM MY CY CMY K 28 0 D 2a 0 2b J 87 2B 2A...

Страница 88: ...CARLO R1 ISOfix D MONTECARLO R1 D 5 ISOfix J www jane es ISOfix MONTECARLO R1 0 3a MONTECARLO R1 ISOfix 3b 3c MONTECARLO R1 B K D L K ISOfix MONTECARLO R1 ISOfix 3d 3e MONTECARLOR1 3f 4 MONTECARLO R1...

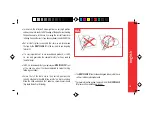
Страница 89: ...C M Y CM MY CY CMY K 89 CLICK 3A 3B 3C 3D 3E 3F 4A 4C 4B...

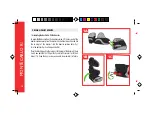
Страница 90: ...C M Y CM MY CY CMY K MONTECARLO R1 5 6 A 0 MONTECARLO R1 0 5a 0 2 0 6a 5A 6A 90...

Страница 91: ...C M Y CM MY CY CMY K 0 7a A 7 91 7A...

Страница 92: ...C M Y CM MY CY CMY K MONTECARLO R1 0 A A 0 MONTECARLO R1 K MONTECARLO R1 MONTECARLO R1 MONTECARLO R1 7 0 92...

Страница 93: ...C M Y CM MY CY CMY K 0 MONTECARLO R1 0 30 C 0 8 2 8 a 8 b 8 8 c 8A 8B 8C 93...

Страница 94: ...zmocnionymprzeciwkosi omskr tnym OG LNE INSTRUKCJE MONTECARLO R1 zda wymagaj ce testy bezpiecze stwa europejskiej normy ECE 44 04 dla grup 2 i 3 Regulowanymi pod okietnikami siedziska Obudowami z syst...

Страница 95: ...estosowanie produkt w z drugiej r ki poniewa JAN S A mo e jedynie zagwarantowa stuprocentowe bezpiecze stwo dla artyku w u ywanych przez pierwszego nabywc JAN S A zaleca zast pienie fotelika MONTECARL...

Страница 96: ...na zatrzask obydwa zaczepy oparcia do otwor w siedziska 1a Umie ci oparcie w pozycji pionowej 1b Umie ci blokad w tylniej cz ci zaczep w oparcia istnieje tylko jedna pozycja w kt rej blokada zostanie...

Страница 97: ...adowi dziecko w foteliku i upewni si czy siedzi prawid owo Pas powinien znajdowa si nieco ponad ramieniem dziecka 2a Celem regulacji wysoko ci zag wka nacisn przycisk znajduj cy si za zag wkiem i wysu...

Страница 98: ...ci fotelik MONTECARLO R1 na siedzeniu samochodu zgodnie z zaleceniami i ostrze eniami podanymi w OG LNYCH INSTRUKACJACH Przed instalacj dokona przegl du siedzenia pojazdu celem ustalenia miejsca zacz...

Страница 99: ...C M Y CM MY CY CMY K polski 99 CLICK 3A 3B 3C 3D 3E 3F 4A 4C 4B...

Страница 100: ...ynno nale y wykona podczas postoju samochodu W celu regulacji pochylenia fotelika podnie dr ek znajduj cy si z przodu siedziska i wysun go do jednej z 2 po danych pozycji 5a 5 Regulacja pochylenia fot...

Страница 101: ...C M Y CM MY CY CMY K polski 101 7 Regulacja wysoko ci pod okietnik w Aby regulowa wysoko pod okietnik w siedziska nale y nacisn boczne pokr t o i przekr ci je do jednej z trzech pozycji 7a 7A...

Страница 102: ...centem lub sprzedawca pojazdu Upewnic sie ze fotelik MONTECARLO R1 nie moze zostac przytrzasniety przez skladane siedzenia lub drzwi samochodu Nie nalezy nigdy pozostawiac dziecka samego Wszelkie mody...

Страница 103: ...z fotelika MONTECARLO R1 Zag wek Wyj 2 zapinki mieszcz ce si na bokach zag wka odpi pasek w tylniej cz ci i poci gn za pokrowiec do siebie na koniec odpi zapinki znajduj ce si w g rnej cz ci 8a Oparci...

Страница 104: ...MY CY CMY K JAN S A Pol Industrial Riera de Caldes C Mercaders 34 08184 Palau Solit i Plegamans BARCELONA Telf 93 703 18 00 Fax 93 703 18 04 www jane es IM 01388 ECE R44 04 SEMI UNIVERSAL 15 36 kg 00...

Отзывы: