5
DE
- Montage
GB
- Assembly
FR
- Montage
IT
- Montaggio
ES
- Montaje
CZ
-
Montáž
PL
-
Montaż
NL
- Installeren
SK
-
Montáž
DE
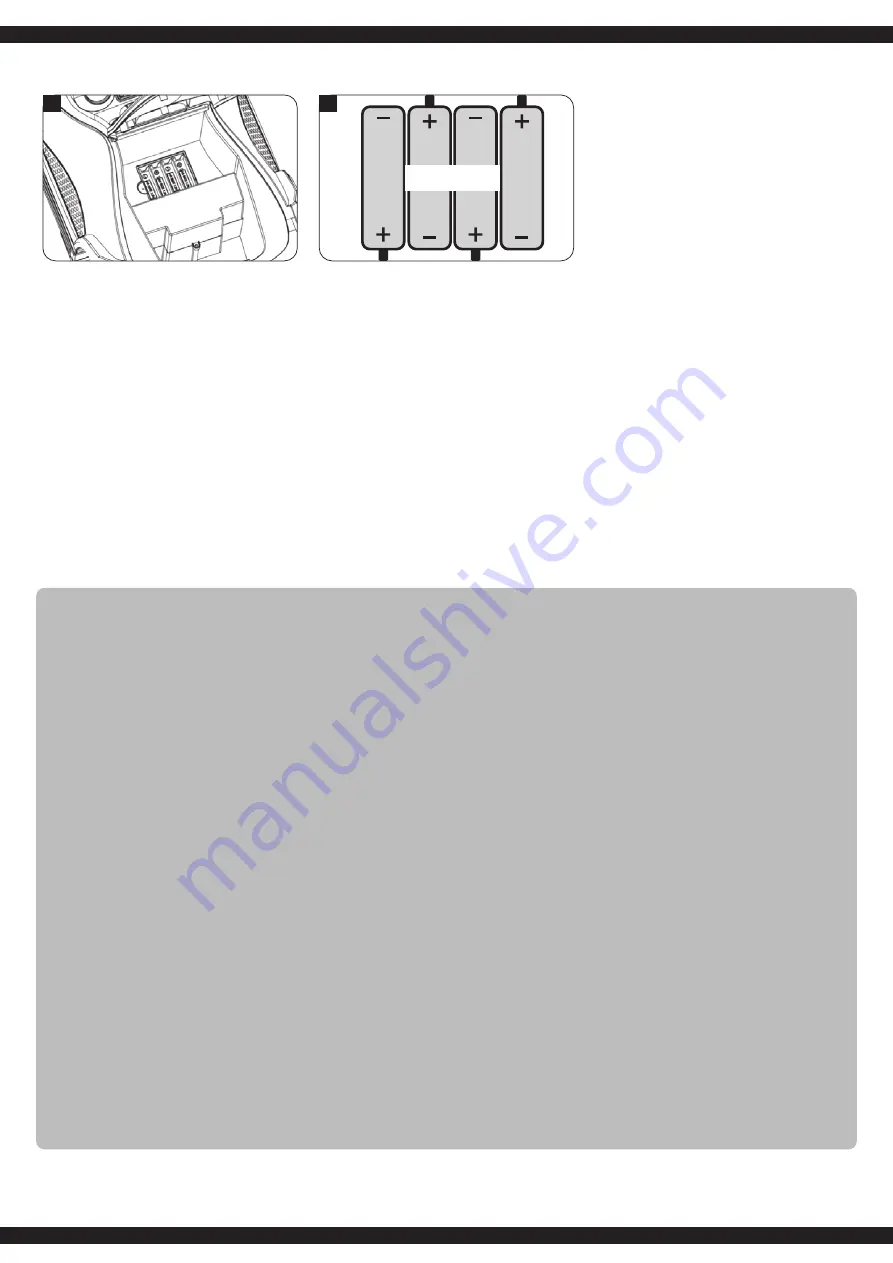
3. Einlegen der Batterien
Heben Sie den Sitz wie im Bild an und öffnen Sie das Batteriefach im Stauraum. Legen Sie
4 AA Batterien ein, achten Sie auf die richtige Polung
(3.1)
. Platzieren Sie die Batterie-
abdeckung und schrauben Sie diese fest.
GB
3. Placing the battery
Please lift the seat as shown and open the battery cover in the storage area. Put the 4 AA
batteries making sure that it is corectly put in
(3.1)
. Replace the battery cover and secure with
the screw provided.
FR
3. Mettre des piles
Soulevez le siège comme indiqué sur la photo et ouvrir le compartiment. Mettez-y 4 piles AA.
Prendre soin à ce que les bornes soient correctement posées
(3.1)
. Poser le cache-pile et
visser:
IT
3. Inserimento della batteria
Sollevare il sedile, come nella foto e aprire il coperchio del vano batteria ed inserire
4 batterie AA. Fare attenzione alla corretta polarità
(3.1)
. Posizionare il coperchio della batteria
e avvitare.
ES
3. Inserir la batería
Levante el asiento como en la imagen y abrir la tapa del compartimiento de la batería. Inserir
4 baterías AA. Prestar atención a la polaridad correcta
(3.1)
. Posicionar la tapa de la batería y
atornillar.
CZ
3. Vkládání baterií
Zvedněte sedadlo (viz obrázek) a otevřete prostor pro baterie, který se nachází v přihrádce.
Vložte 4 baterie AAA. Zkontrolujte, zda jsou baterie vloženy se správnou polaritou
(3.1)
. Vložte
kryt baterie ve správné poloze a pevně jej zašroubujte.
PL
3. Wkładanie baterii
Podnieś fotelik w sposób przedstawiony na zdjęciu i otwórz schowek na baterie w schowku.
Włóż 4 baterie AA, upewniając się, że biegunowość jest prawidłowa
(3.1).
Umieść pokrywę
baterii i przykręć ją mocno.
NL
3. Batterij zetten
Breng de zetel hoog (zie afbeelding) en open het batterijvakje in het dashboardkastje. Plaats 4
AAA batterijen. Zorg ervoor dat de batterijen met de juiste polariteit worden geplaatst.
(3.1)
.
Plaats De batterijdekker op de juiste plaats en schroef het goed vast.
SK
3. Vkladanie batérií
Zdvihnite sedadlo (viď. obrázok) a otvorte priehradku na batérie umiestnenú v priehradke v
palubnej doske. Vložte 4 AAA batérie. Uistite sa, že sú batérie vložené v zhode so správnou
polaritou
(3.1)
. Umiestnite kryt batérie do príslušnej polohy a pevne zaskrutkujte.
4x AA
3
3.1
DE
-
Batteriehinweis:
Nicht wiederaufladbare Batterien dürfen nicht aufgeladen werden!
Nicht öffnen!
Nicht ins Feuer werfen!
Alte und neue Batterien nicht mischen!
Keine alkalischen, Standard-(Kohlenstoff-Zink) oder wiederaufladbare Batterien mischen!
Aufladbare Batterien sind aus dem Spielzeug herauszunehmen, bevor sie geladen werden!
Aufladbare Batterien dürfen nur unter Aufsicht Erwachsener geladen werden!
Die Anschlussklemmen dürfen nicht kurzgeschlossen werden!
GB
-
Battery warning:
Non-rechargeable batteries are not to be recharged!
Do not open!
Do not dispose of in fire!
Do not mix old and new batteries!
Do not mix alkaline batteries, standard (carbon-zinc) or rechargeable batteries!
Rechargeable batteries are to be removed from the toy before being charged!
Rechargeable batteries are only to be charged under adult supervision!
The supply terminals are not to be short-circuited!
FR
-
Informations concernant l‘accumulateur:
Les batteries non rechargeables ne doivent pas être rechargées!
Ne pas ouvrir!
Ne pas jeter au feu!
Ne pas utiliser des piles neuves et usées à la fois!
Ne pas utiliser en même temps des piles alcalines, standard (zinc-charbon) et des
accumulateurs!
Les piles rechargeables doivent être retirées du jouet!
Les batteries rechargeables ne peuvent être rechargées que sous la surveillance d‘un adulte!
Les connexions ne doivent pas être court-circuitées!
IT
-
Informazioni relative alle pile:
Le batterie non ricaricabili non devono essere caricate!
Non aprire!
Non gettare nel fuoco!
Non usare contemporaneamente pile nuove e pile usate!
Non usare contemporaneamente pile alcaline, standard (zinco-carbone) e ricaricabili!
Le batterie ricaricabili devono essere rimosse dal giocattolo!
Le batterie ricaricabili possono essere ricaricate solo sotto la supervisione di un adulto!
I morsetti di collegamento don devono essere cortocircuitati!
ES
-
Advertencia sobre las baterías:
Las baterías no recargables no se pueden cargar!
No abrir!
No arrojar al fuego!
No mezcle baterías nueva y viejas!
No mezcle baterías alcalinas, estándar (carbono-zinc) o baterías recargables!
Las baterías recargables deben retirarse del juguete!
Las baterías recargables sólo pueden cargarse bajo la supervisión de un adulto!
Los conectores de conexión no deben estar en cortocircuito!
CZ -
Informace ohledně akumulátoru:
Nenabíjejte jednorázové baterie!
Neotvírejte!
Nevhazujte do ohně!
Nedávejte dohromady staré a nové baterie.
Nedávejte dohromady alkalické a standardní (carbon-zinc) nebo nabíjecí baterie.
Před nabíjením vyjměte nabíjecí baterie z hračky!
Nabíjecí baterie lze nabíjet pouze pod dohledem dospělé osoby!
Nezkratujte připojovací svorky!
PL
- Informacja dotycząca akumulatora:
Nie ładować baterii jednorazowego użytku!
Nie otwierać!
Nie wrzucać do ognia!
Nie mieszać starych i nowych baterii.
Nie mieszać baterii alkalicznych, zwykłych (węglowo-cynkowych) lub akumulatorowych/
ładowalnych – używać baterii jednego rodzaju.
Przed rozpoczęciem ładowania należy wyjąć akumulatorki z zabawki!
Akumulatorki można ładować tylko pod nadzorem osoby dorosłej!
Nie wolno zwierać zacisków przyłączeniowych!
NL
-
Informatie over de batterij:
Laad geen wegwerpbatterij op!
Niet openen!
Gooi niet op het vuur!
Gebruik geen oude en nieuwe batterijen tegelijk!
Gebruik geen alkaline, standaard (zink-koolstof) batterijen tegelijk!
Verwijder de batterijen uit het speelgoed voordat het wordt opgeladen!
Laad de batterijen op enkel onder toezicht van een volwassene!
Voorkom kortsluiting van de aansluitingsklemmen!
SK
-
Informácia ohľadom akumulátora:
Nenabíjajte jednorazové batérie!
Neotvárajte!
Nehádžte do ohňa!
Nepoužívajte staré a nové batérie súčasne!
Nepoužívajte alkalické, štandardné (zinkovo-uhlíkové) batérie a akumulátory súčasne!
Pred začatím nabíjania vyberte batérie z hračky!
Batérie je možné nabíjať len pod dohľadom dospelej osoby!


