IrrigationCaddy IC-W1 Скачать руководство пользователя страница 1


Quick Start Guide 

IrrigationCaddy IC-W1 Installation Steps 
 

NOTE:

 The IC is an indoor device. Make sure the device is 

placed indoors in a dry protected area. Exposure to rain and 
extreme weather conditions will damage the device. 


Steps: 

1. 

Find an appropriate location for the IC, and hold the enclosure in place. 

2. 

Using a pen make marks through the screw mounting holes (A) on the 
plastic ears protruding from the enclosure. 

3. 

NOTE: 

If installing on Drywall make sure you use screw anchors 

4. 

Put the device aside, and drill a hole on each one of the marks you made. 

5. 

Put the IC back in place and insert the screws through the mounting holes. 


Mounting on the Wall 


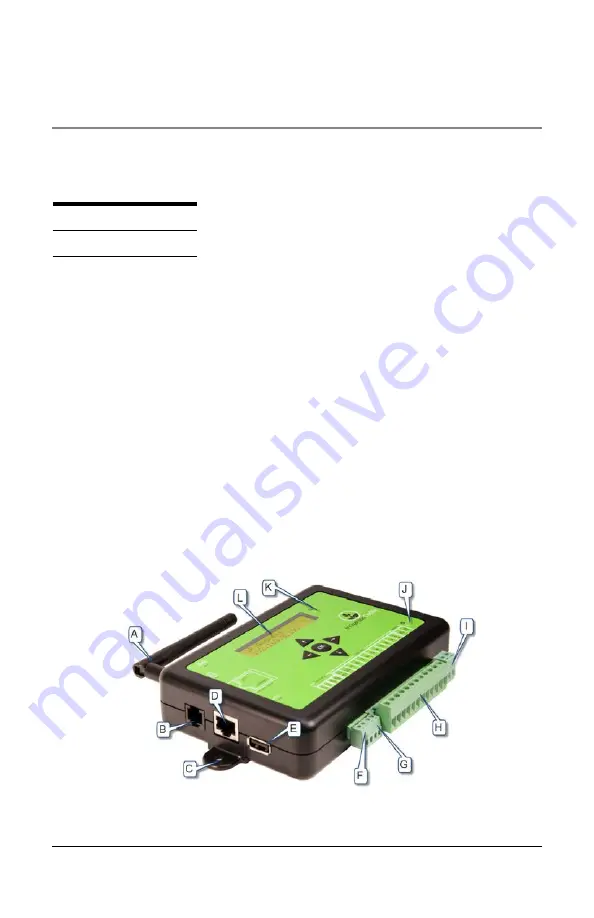
Figure 1 Caddy Parts 

W A R N I N G  


info 

Содержание IC-W1

Страница 1: ...ropriate location for the IC and hold the enclosure in place 2 Using a pen make marks through the screw mounting holes A on the plastic ears protruding from the enclosure 3 NOTE If installing on Drywa...

Страница 2: ...r Control System and attach the IC to the wall Make sure the valve cables can reach the IC 2 Identify the common cable and connect it to the com output 3 Connect valves 1 through 10 to the correspondi...

Страница 3: ...r own WiFi network Router To access the unit execute the following steps Steps 1 Make sure the unit is plugged in 2 Connect your computer to the newly created IrrigationCaddyAP AdHoc network On Window...

Страница 4: ...1 1 You might have to wait up to 30 seconds before you are able to access the page after connecting to IrrigationCaddyAP Refresh the page until it connects On MAC OS X a Click on the Wireless Signal...

Страница 5: ...ss the page after connecting to IrrigationCaddyAP Refresh the page until it connects 3 Now you are connected to the IrrigationCaddy AdHoc network however the objective should be to connect the IC to y...

Страница 6: ...ks button 6 When the scan finishes it will display a list of available networks Click on your preferred network to connect to it 7 If the network is protected you will be prompted to enter a passphras...

Страница 7: ...nnect to the new network just selected Now you need to connect your laptop PC portable device to reconnect to the new network so that you can access the IC in the new network 9 To go back to the origi...

Страница 8: ...8 On MAC OS X...

Страница 9: ...IC W1 zone capacity can be expanded to up to 43 zones by adding expansion modules EXP 800 The expansion modules connect into the Expansion Port for the IC W1 Up to 4 expansion modules can be used by a...

Страница 10: ...e left button at the same time and keep them pressed for 4 seconds The unit will then reset to factory defaults and restart The display will say Resetting and Rebooting at this point you can let the b...

Страница 11: ...11...

Страница 12: ......

Отзывы: