


6
NOTE: DIAGRAMS & ILLUSTRATIONS ARE NOT TO SCALE.
HOMEOWNER’S INSTRUCTIONS -
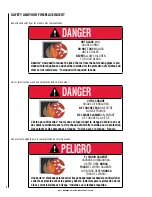
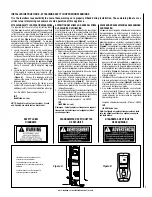
ATTACHING SAFETY IN OPERATION WARNINGS
SAFETY LABEL
DIAGRAMS
DIAGRAMAS DE ETIQUETAS
DE SEGURIDAD
DIAGRAMMES DES ÉTIQUETTES
DE SÉCURITÉ
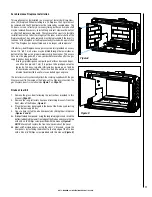
ATTACHING SAFETY IN OPERATION WARNINGS
Your appliance has been furnished with safety instruc-
tion labels that are to be affixed to the operation and
control points of the appliance. A safety instruction
label should be affixed next to the burner control
switch where the appliance is turned on and off
(See
Figure A)
and the remote control handheld transmitter
(See Figure B)
. The warnings should already have
been put in place when the appliance initial set-up
was completed. If they are not affixed at these spots,
locate the multi-lingual adhesive labels provided with
these instructions and proceed as follows:
1. Locate the control switch on the control panel
of your appliance (verify the switch operates the
appliance by turning it on and off). Clean the
surface on the control panel thoroughly to remove
any dust and oils. Affix the label next to the burner
control switch that controls the appliance
(Figure
A)
. Choose the language primarily spoken in the
home.
2. Locate the remote control transmitter and clean
it thoroughly to remove any dust and oils. Affix
the label to the surface of handheld transmitter
(Figure B)
. Choose the language primarily spoken
in the home.
3. If you are unable to locate the labels, please
contact IHP or your nearest IHP dealer to receive
additional safety instruction labels free of charge.
Cat. No. H8024 Replacement Label Kit
IHP
IronStrike.us.com
Note: English is red text on clear label. French and
Spanish are white text on black label.
COLOCACIóN DE ADVERTENCIAS DE SEGURIDAD
EN OPERACIóN
Su artefacto incluye etiquetas de instrucciones de
seguridad que deben colocarse en los puntos de
operación y control del artefacto. Se debe colocar una
etiqueta de instrucciones de seguridad adyacente al
interruptor de control del quemador donde se enciende y
se apaga el artefacto
(ver la Figura A)
y en el transmisor
de control remoto
(Figura B)
. Las advertencias ya deben
haberse colocado cuando se completó la instalación
inicial del artefacto. Si no están colocadas en estos
lugares, encuentre las etiquetas adhesivas multilingües
proporcionadas con estas instrucciones y prosiga de
la siguiente manera:
1. Identifique el interruptor de control en el panel de
control del artefacto (verifique que el interruptor
opera el artefacto encendiéndolo y apagándolo).
Limpie bien la superficie del panel de control para
quitar el polvo y aceite. Pegue la etiqueta adyacente
al interruptor de control del quemador que controla
el artefacto
(Figura A)
. Seleccione el idioma que más
se habla en la casa.
2. Identifique el transmisor de control remoto y
límpielo bien para quitar el polvo y aceite. Pegue la
etiqueta en la superficie del transmisor
(Figura B)
.
Seleccione el idioma que más se habla en la casa.
3. Si no puede encontrar las etiquetas, sírvase llamar
a Innovative Hearth Products o al distribuidor
de Innovative Hearth Products más cercano para
recibir etiquetas de instrucciones de seguridad
adicionales gratuitas.
Juego de etiquetas de repuesto - Nº de cat. H8024
IHP
IronStrike.us.com
Nota: La etiqueta en inglés es transparente con texto
rojo. Las etiquetas en francés y español son negras
con texto blanco.
APPOSITION DES MISES EN GARDE RELATIVES
à LA SéCURITé D’UTILISATION
Votre appareil a été livré avec des étiquettes de sécurité
qui doivent être collées à côté des dispositifs de contrôle
du brûleur. Une étiquette de sécurité devrait être collée sur
la plaque du récepteur contrôlant l’allumage de l’appareil
(voir Figure A)
et sur le boîtier de la télécommande
(Figure B)
. Les mises en garde auraient dû être collées au
moment de l’installation initiale de l’appareil. Si ce n’est
pas le cas, prenez les étiquettes adhésives multilingues
fournies avec ces instructions et procédez comme suit :
1. Repérez le contrôleur sur le panneau de contrôle de
votre appareil (vérifiez que l’interrupteur contrôle
le fonctionnement de l’appareil en le faisant
basculer de Marche à Arrêt, et vice-versa). Nettoyez
soigneusement la surface sur le panneau de contrôle
pour éliminer la poussière et les traces de graisse
ou d’huile. Collez l’étiquette à côté du bouton de
contrôle du brûleur qui contrôle l’appareil
(Figure
A)
. Choisissez la langue qui est principalement parlée
dans la résidence du propriétaire.
2. Repérez la télécommande et nettoyez-la soigneuse-
ment pour éliminer la poussière et les traces de
graisse ou d’huile. Collez l’étiquette sur le boîtier de
la télécommande
(Figure B)
. Choisissez la langue
qui est principalement parlée dans la résidence du
propriétaire.
3. Si vous ne parvenez pas à localiser les étiquettes, s’il
vous plaît contactez IHP ou votre revendeur le plus
proche pour recevoir IHP étiquettes d’instructions
de sécurité supplémentaires gratuitement.
Étiquettes de remplacement, n° cat. H8024
IHP
IronStrike.us.com
Remarque : Le texte anglais est rouge sur un support
transparent. Le texte français et espagnol est blanc
sur un support noir.
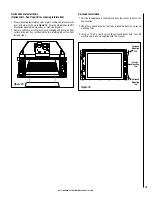
Figure A
Figure B
Illustrations are for example only. Your
accessories may be different.
Les illustrations sont par exemple
uniquement. Vos accessoires peuvent être
différents.
Las ilustraciones son sólo ejemplos. Tu
accesorios pueden ser diferentes.